使用CSS3 制作一个material-design 风格登录界面
心血来潮,想学学 material design 的设计风格,就尝试完成了一个登录页面制作.
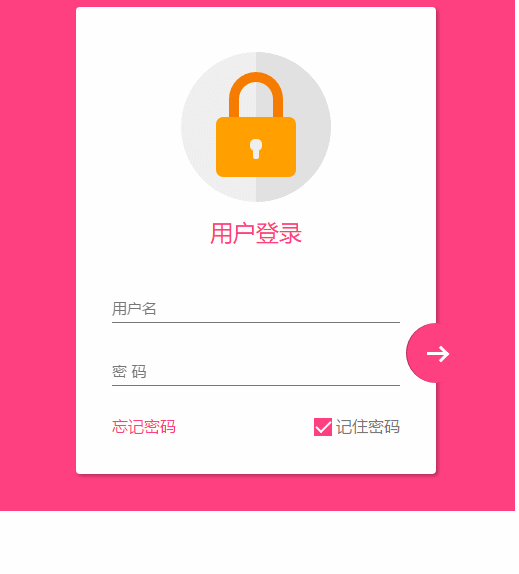
这是整体效果.
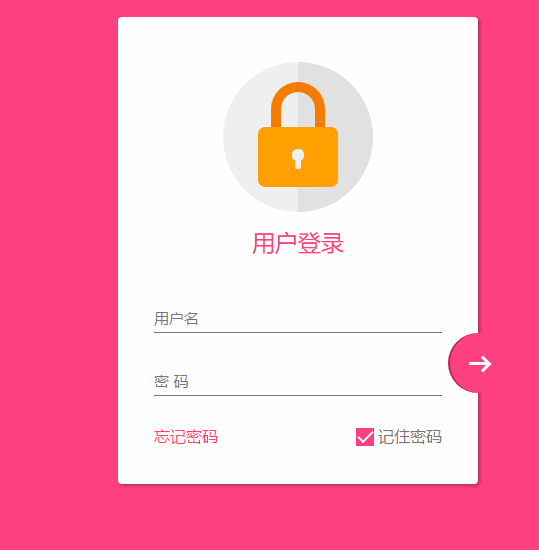
感觉还不错吧,结尾会附上代码
在编写的过程中,没有使用任何图片或者字体图标,全部使用css3完成,还是遇到一些难点和bug,所以想笔记下来,以后方便查阅.
响应式设计
在这个页面中,使用下面3点来完成响应式设计
- 最大宽度 .设定了一个 max-width 的最大宽度,以便在大屏幕时兼容.
- margin : 20px auto; 使其保持时刻居中
- 组件使用像素
关于响应式的设计要点还有很多。
整体页面布局
<!DOCTYPE html>

<html lang="en">

<head>

    <meta charset="UTF-8">

    <title>Document</title>

    <meta http-equiv="X-UA-Compatible" content="IE=edge,chrome=1">

    <meta name="viewport" content="width=device-width, initial-scale=1.0">

    <link rel="stylesheet" href="styles/style.css">

</head>

<body>

    <div class="container">

        <div class="logo">

            <div class="logo-block-top">

            </div>

            <div class="logo-block-bottom">

            </div>

        </div>

        <h4 class="login-header">用户登录</h4>

        <div class="content">

            <div class="form-group">

                <input type="text" required class="form-control">

                <label class="form-label">用户名</label>

            </div>

            <div class="form-group">

                <input type="text" required class="form-control">

                <label class="form-label">密 码</label>

            </div>

            <div class="option">

                <div class="option-left"><a href="">忘记密码</a></div>

                <div class="option-right">

                    <span class="md-checkbox" checked="checked"></span>

                    <label class="form-label">记住密码</label>

                </div>

            </div>

        </div>

        <button class="login-button">

            <span class="icon-login"></span>

        </button>

    </div>

</body>

<script src="./app.js type=" text/javascript "></script>

</html>
CSS 开始
给 body 添加样式
html {

    font-family: "Microsoft YaHei", 宋体, "Segoe UI", "Lucida Grande", Helvetica, Arial, sans-serif, FreeSans, Arimo;

    background-color: #FF4081;

    color: #777;

}
版心
.container{

    position: relative;

    max-width: 360px;

    margin: 0 auto;

    margin-top: 30px;

    padding: 45px 20px;

    border-radius: 4px;

    box-shadow: 2px 2px 5px rgba(0, 0, 0, 0.3);

    background-color: #fff;

    box-sizing: border-box;

}
注意,这里调整内部边距使用了padding 而不是对子元素使用margin,因为如果要使用margin,为了BFC 的效果,就需要加上 overflow: hidden. 这样就会对尾部按钮溢出产生影响.
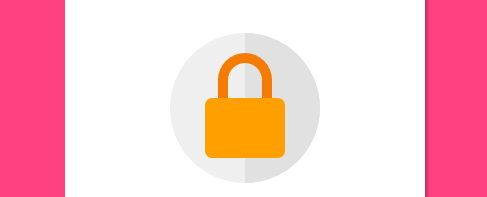
头部logo
.container>.logo {

    height: 150px;

    width: 150px;

    position: relative;

    background-color: #EFEFEF;

    border-radius: 75px;

    margin: 0 auto;

}
设置 border-radius 为 width和height的一般,就会使其成为一个圆

下面需要一个颜色更深的半圆
如何绘制一个半圆?
.container>.logo::after {

    content: ' ';

    height: 150px;

    width: 75px;

    position: absolute;

    background-color: #E1E1E1;

    border-radius: 0 75px 75px 0;

    left: 75px;

    top: 0;

}
设置宽度为高度的一般,然后设置左上角和左下角圆角为0,右边为75px

制作锁,分为两部分,lock-top 和 lock -bottom
.container>.logo>.logo-block-top {

    box-sizing: border-box;

    height: 45px;

    width: 54px;

    border: 10px solid #F57C00;

    border-bottom: 0;

    position: absolute;

    border-radius: 27px 27px 0 0;

    left: 48px;

    z-index: 1001;

    top: 20px;

}
同样是设置圆角
.container>.logo>.logo-block-bottom {

    position: absolute;

    height: 60px;

    width: 80px;

    box-sizing: border-box;

    background-color: #FFA000;

    z-index: 1001;

    top: 65px;

    left: 35px;

    border-radius: 7px;

}
!
设置钥匙心,这个也分为两部分,上面的圆孔和和下面的椭圆
刚好可以设置在 lock-bottom 的 before和after伪元素上面
.container>.logo>.logo-block-bottom::before {

    content: " ";

    position: absolute;

    height: 12px;

    width: 12px;

    background-color: #EFEFEF;

    border-radius: 5px;

    top: 22px;

    left: 34px;

    box-sizing: border-box;

}

.container>.logo>.logo-block-bottom::after {

    content: " ";

    position: absolute;

    height: 12px;

    width: 6px;

    background-color: #EFEFEF;

    border-radius: 2px;

    top: 30px;

    left: 37px;

    box-sizing: border-box;

}
到这里 logo 就完成了
下面是 ' 用户登录 ' 标题.
注意,这里最好使用margin 而不是padding,不要破坏原有h4 标签.
.container>.login-header {

    text-align: center;

    font-size: 23px;

    color: #FF4081;

    font-weight: 400;

    margin: 15px 0 18px 0;

}
为内容添加一个容器
.container>.content {

    width: 90%;

    margin: 0 auto;

}
添加一个 form-group,包含 label和input 标签,设置相对布局
.container>.content>.form-group {

    position: relative;

}
下面就是核心部分,为input 设置样式(这里会产生一个bug,在结尾会介绍)
.container>.content>.form-group>.form-control {

    z-index: 3;

    position: relative;

    height: 58px;

    width: 100%;

    border: 0px;

    border-bottom: 1px solid #777;

    padding-top: 22px;

    color: #FF4081;

    font-size: 12px;

    background: none;

    box-sizing: border-box;

    outline: none;

    display: inline-block;

    -webkit-transition: 0.3s;

    transition: 0.3s;

}
labe 标签,使用绝对定位,将其放置到Input的上面.
.container>.content>.form-group>.form-label {

    z-index: 1;

    position: absolute;

    bottom: 10px;

    left: 0;

    font-size: 15px;

    -webkit-transition: 0.3s;

    transition: 0.3s;

}
为两个form group 设置一定的间距,否则下面会挡住上面设置的 box-shadow
.container>.content>.form-group>:first-child {

    margin-bottom: 5px;

}
添加动态效果
.container>.content>.form-group>.form-control:focus,

.container>.content>.form-group>.form-control:valid {

    box-shadow: 0 1px #FF4081;

    border-color: #FF4081;

}

.container>.content>.form-group>.form-control:focus+.form-label,

.container>.content>.form-group>.form-control:valid+.form-label {

    font-size: 12px;

    -ms-transform: translateY(-20px);

    -webkit-transform: translateY(-20px);

    transform: translateY(-25px);

}
下面就到了底部option ,也分为两部分,option-left 和 option-right
.container>.content>.option {

    width: 100%;

    height: 14px;

    margin-top: 24px;

    font-size: 16px;

}

.container>.content>.option>.option-left {

    width: 50%;

    float: left;

}

.container>.content>.option>.option-left>a,

.container>.content>.option>.option-left>a:hover {

    color: #FF4081;

    text-decoration: none;

}
在option-right 中,要注意 这个复选框并不是原生的Input,而是使用div 旋转而得,因为原生的checkbox无法更改样式.
.container>.content>.option>.option-right {

    width: 50%;

    float: right;

    text-align: right;

    position: relative;

}

.container>.content>.option>.option-right>.md-checkbox {

    height: 18px;

    width: 18px;

    display: inline-block;

    box-sizing: border-box;

    position: absolute;

    background-color: #FF4081;

    cursor: pointer;

    position: absolute;

    top: 3px;

    right: 68px;

}

.container>.content>.option>.option-right>.md-checkbox[checked]:after {

    content: " ";

    border-left: 2px solid #fff;

    border-bottom: 2px solid #fff;

    height: 8px;

    width: 15px;

    box-sizing: border-box;

    position: absolute;

    transform: rotate(-45deg);

    top: 3px;

    left: 2px;

}
这里使用css3 中的旋转,而模仿一个选中效果
注意: 虽然div无法直接选中,但还是可以为其添加一个checkd属性, 这个属性是一个特殊的css 事件效果,可以通过js来控制.
最后,登录按钮.
这里,也必须使用绝对定位,参照点是bottom和right
.container>.login-button {

    position: absolute;

    height: 60px;

    width: 60px;

    border: 0px;

    outline: 0px;

    background-color: #FF4081;

    border-radius: 30px;

    right: -30px;

    bottom: 91px;

    box-shadow: 2px 0 0 rgba(0, 0, 0, 0.3) inset;

}
通过 box-shadow: 2px 0 0 rgba(0, 0, 0, 0.3) inset; 这句话可以知道一个内嵌效果.
中间的按钮在不适用字体图标的情况下也必须要用div 旋转来模仿了
.container>.login-button >.icon-login {

    box-sizing: border-box;

    position: relative;

    width: 18px;

    height: 3px;

    background-color: #fff;

    transition: 0.3s;

    display: block;

    margin: auto;

}

.container>.login-button >.icon-login::after {

    content: ' ';

    box-sizing: border-box;

    position: absolute;

    left: 8px;

    height: 12px;

    width: 12px;

    border-top: 3px solid #fff;

    border-right: 3px solid #fff;

    transform: rotate(45deg);

    top: -4px;

}
最后是鼠标hover上的放大和阴影效果
.container>.login-button:hover {

    box-shadow: 0 0 0 rgba(0, 0, 0, 0.3) inset, 0 3px 6px rgba(0, 0, 0, 0.16), 0 5px 11px rgba(0, 0, 0, 0.23)

}

.container>.login-button:hover>.icon-login {

    -ms-transform: scale(1.2);

    =webkit-transform: scale(1.2);

    transform: scale(1.2);

}
至此,所有的css已经结束了,查看效果
transition bug修复
当我刷新页面或者点击忘记密码的时候,input框就会抖动一下,这个问题只会出现在chrome 浏览器上,firefox 或者edge都不会重现,所以我才这应该是兼容性的问题。
在不断尝试中,我发现,只有取消 transition属性,就不会产生抖动。
这个问题困扰了我3天,真实百思不得其姐。
在某度中查询半天,未果 。
后来终于在 StackOverFlow 中,搜索chrome input transition 时,终于一个回到让我貌似顿开。
this bug has been reported, adding an script tag somewhere can advoid it.
之后,我在页面尾部添加一个下面节点,终于顺利解决。
<script src="./app.js type=" text/javascript "></script>
在阅读过一些文章之后,总结为
当chrome 的input 默认属性向自定义过度时,因为存在transition,所以会产生抖动。
而基本上所有的页面都有script标签,所以这个bug 几乎很难被重现。
而我遇到,算是运气好吧。。
至此,这个页面全部内容已经完成。
material-design 很赞,angular-material 是使用 AngularJS 封装了 material-design 的UI 库,很漂亮。不同于 bootstrap的完全扁平化风格,它采用的是盒子堆砌效果,动画效果也比较赞。
在下面的一段时间,想着重研究研究这个UI库。
其实国内的妹子UI 也挺棒,github 上面的star 也很多,但是因为bootstrap太优秀,把它直接盖过了。
代码托管至github:https://github.com/apawn/HFLib/tree/master/HFLib/login-page
使用CSS3 制作一个material-design 风格登录界面的更多相关文章
- Material Design风格登录注册
本文实现了以下功能 完整的代码和样例托管在Github 当接口锁定时,防止后退按钮显示在登录Activity 上. 自定义 ProgressDialog来显示加载的状态. 符合材料设计规范. 悬浮标签 ...
- 基于jQuery和CSS3超酷Material Design风格滑动菜单导航特效
分享一款效果非常炫酷的谷歌 Material Design 风格jQuery和CSS3滑动选项卡特效.该选项卡特效集合了扁平风格设计和按钮点击波特效.是一款设计的非常不错的Material Desig ...
- 在 WinForm/WPF 下制作 Google Material Design 风格程序
国内社区没有,顺手转.WinForm: https://github.com/IgnaceMaes/MaterialSkin演示:https://www.youtube.com/watch?v=A8o ...
- 开发Google Material Design风格的WPF程序
今天在网上看到了一个Material Design风格的WPF皮肤,看上去还是挺不错的 这个项目是开源的,感兴趣的朋友可以下载试下: https://github.com/ButchersBoy/Ma ...
- 自定义 Material Design风格的提示框
关闭 自定义 Material Design风格的提示框 2016-04-24 10:55 152人阅读 评论(0) 收藏 举报 版权声明:本文为博主原创文章,未经博主允许不得转载. 其实在14年谷歌 ...
- Material Design风格的水波涟漪效果(Ripple Effect)的实现
Material Design是Google在2014年Google I/O大会上推出的一套全新的设计语言,经过接近两年的发展,可谓是以燎原之势影响着整个设计交互生态,和Material Design ...
- [原创]自定义view之:快速开发一款Material Design风格的dialog的开源项目MDDialog
随着google开始主导Material Design风格的设计,越来越多的app开始使用Material Design风格来设计自己的UI.虽然在Android Studio中集成了多种快速开发框架 ...
- Android实现Material Design风格的设置页面(滑动开关控件)
前言 本文链接 http://blog.csdn.net/never_cxb/article/details/50763271 转载请注明出处 參考了这篇文章 Material Design 风格的设 ...
- Android开发实战之拥有Material Design风格的侧滑布局
在实现开发要求中,有需要会使用抽屉式布局,类似于QQ5.0的侧滑菜单,实现的方式有很多种,可以自定义控件,也可以使用第三方开源库. 同样的谷歌也推出了自己的侧滑组件——DrawLayout,使用方式也 ...
- 创建Material Design风格的Android应用--应用主题
本人全部文章首先公布于个人博客,欢迎关注,地址:http://blog.isming.me 昨天正式公布了android 5,同一时候android developer站点也更新了,添加了创建Mate ...
随机推荐
- druid sql黑名单 报异常 sql injection violation, part alway true condition not allow
最近使用druid,发现阿里这个连接池 真的很好用,可以监控到连接池活跃连接数 开辟到多少个连接数 关闭了多少个,对于我在项目中查看错误 问题,很有帮助, 但是最近发现里面 有条sql语句 被拦截了, ...
- 关于dev无法更新、调试的问题
- GIT 版本控制常用命令学习汇总
GIT 版本控制常用命令汇总 git version 查看当前git版本信息 git help 获取全部命令帮助信息 git help <command> 获取指定命令帮助信息 git c ...
- swiper的初步使用
1.引入文件,顺序引入(此处基于jquery,且版本至少1.7以上) <link rel="stylesheet" href="path/to/swiper-3.4 ...
- java .bat批处理(java cmd命令)
参考:http://www.iitshare.com/under-the-cmd-compile-the-java.html 参考:http://zhidao.baidu.com/link?url=Y ...
- 关于ubuntu16.04中mysql root登陆不了的情况下(大多是未设置密码的情况)
1.先将当前用户改成 root用户:sudo su 2.进入安装路径,我的是:cd /etc/mysql/ 3.打开debian.cnf : gedit debian.cnf 4.找到:user pa ...
- UI控件(UIScrollView)
@implementation ViewController - (void)viewDidLoad { [super viewDidLoad]; //创建一个scrollview UIScrollV ...
- Python黑帽编程2.8 套接字编程
Python黑帽编程2.8 套接字编程 套接字编程在本系列教程中地位并不是很突出,但是我们观察网络应用,绝大多数都是基于Socket来做的,哪怕是绝大多数的木马程序也是如此.官方关于socket编程的 ...
- 【读书笔记】Asp.Net MVC 上传图片到数据库(会的绕行)
之前上传图片的做法都是上传到服务器上的文件夹中,再将url保存到数据库.其实在MVC中将图片上传到数据库很便捷的事情,而且不用去存url了.而且这种方式支持ie6(ie6不支持jquery自动提交fo ...
- 修改Hosts为何不生效,是DNS缓存?
Update: 如果浏览器使用了代理工具,修改 Hosts 也不会生效.这里是因为,浏览器会优先考虑代理工具(如添加 pac 文件.SwitchySharp等)的代理,建议调试的时候先关闭这些代理. ...