
转载:APP a打开b软件的附件
Importing & Exporting Documents in iOS


https://mobiforge.com/design-development/importing-exporting-documents-ios
One of the common tasks that an iOS developer has to do is to import or export documents from his iOS application. For example, suppose you are developing a document reader and you want to allow the user to import documents into your application so that it can be read offline. Also, your reader might also support the exporting of documents so that other applications can make use of the document.
In this article, I will walk you through the different techniques you can employ to allow documents to be imported or exported from your iOS application.
Creating the Project
As usual, I will be using an example to illustrate the various techniques discussed in this article. Using Xcode, create a new View-based Application (iPhone) project and name it OfflineReader.
Double-click on the OfflineReaderViewController.xib to open it in Interface Builder and populate it with the following views (see Figure 1):
- WebView
- Round Rect Button
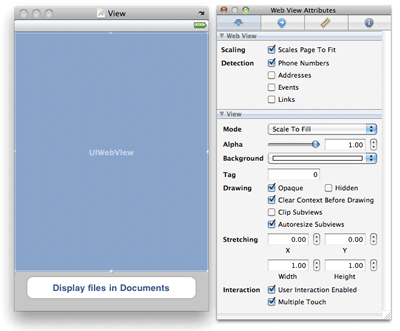
Figure 1. Populating the View windowIn the Attributes Inspector window for the WebView, ensure that you check the “Scales Page to Fit” item.
In the OfflineReaderViewController.xib file, add in the following statements in bold:
#import <UIKit/UIKit.h>


@interface OfflineReaderViewController : UIViewController

    <UIDocumentInteractionControllerDelegate> {

    IBOutlet UIWebView *webView;

}


-(void)openDocumentIn;

-(void)handleDocumentOpenURL:(NSURL *)url;

-(void)displayAlert:(NSString *) str;

-(void)loadFileFromDocumentsFolder:(NSString *) filename;

-(void)listFilesFromDocumentsFolder;


- (IBAction) btnDisplayFiles;


@end
Back in Interface Builder, connect the outlet and action to the WebView and Button views. Right-clicking on the File’s Owner in the OfflineReaderViewController.xib window should now reveal the connections as shown in Figure 2.
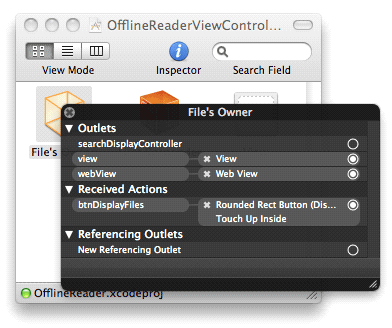
Figure 2. Confirmation the connections of the action and outletDrag and drop two files into the Resources folder of the project (see
Figure 3). In this example, I have a PDF file named “Courses for Q2
2011.pdf” and an image file named icon.jpg.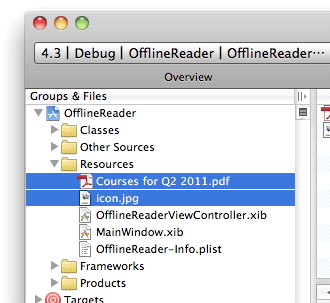
Figure 3. Adding two files to the Resources folder of the projectIn the OfflineReader-Info.plist file, set the “Icon file” key to “icon.jpg”.
So now you have an iPhone application with the icon set. It also has a PDF document in the Resources folder.
Exporting Documents
The first thing you will learn is how to export a document from your
application. For example, in the Mail application on your iPhone, when
you received a PDF file, you can either tap on the icon (see Figure 4)
to view the document within the Mail application, or tap and hold onto
the icon.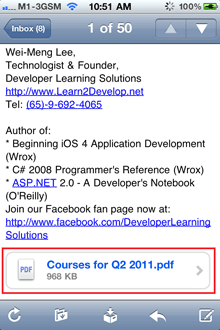
Figure 4. A PDF document in MailIf you do the latter, an action sheet would be displayed (see Figure
5). You can tap on the “Open in...” button to see a list of applications
that your document can be exported to.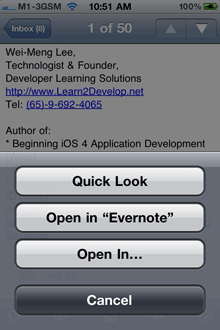
Figure 5. Viewing your application in an external applicationIn my case, it will display the list as shown in Figure 6.
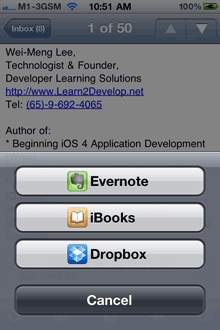
Figure 6. A list of applications able to handle your documentSo let’s now modify our application so that we can export the PDF document in the Resources project to an external application.
First, declare a variable of type UIDocumentInteractionController in the OfflineReaderViewController.m file:
#import "OfflineReaderViewController.h"


@implementation OfflineReaderViewController


UIDocumentInteractionController *documentController;
The UIDocumentInteractionController class provides in-app support for providing user interaction with files in your application. In this example, you will use it to export a document to an external application.
Next, define the following methods:
-(void)openDocumentIn {

    NSString * filePath =

        [[NSBundle mainBundle]

        pathForResource:@"Courses for Q2 2011" ofType:@"pdf"];

    documentController =

        [UIDocumentInteractionController

            interactionControllerWithURL:[NSURL fileURLWithPath:filePath]];

    documentController.delegate = self;

    [documentController retain];

    documentController.UTI = @"com.adobe.pdf";

    [documentController presentOpenInMenuFromRect:CGRectZero

                                                   inView:self.view

                                                 animated:YES];

}


-(void)documentInteractionController:(UIDocumentInteractionController *)controller

         willBeginSendingToApplication:(NSString *)application {


}


-(void)documentInteractionController:(UIDocumentInteractionController *)controller

             didEndSendingToApplication:(NSString *)application {


}


-(void)documentInteractionControllerDidDismissOpenInMenu:

(UIDocumentInteractionController *)controller {


}
The openDocumentIn method basically creates the path to point to the PDF document (that you want to export) and then uses it to feed into the documentController object. You need to set the UTI (Uniform Type Identifiers) for the documentController object so that it can help the system find the appropriate application to open your document. In this case, it is set to “com.adobe.pdf”, which represents a PDF document. Other common UTIs are "com.apple.quicktime-movie" (QuickTime movies), "public.html" (HTML documents), and "public.jpeg" (JPEG files).
The other three methods are the methods defined in the UIDocumentInteractionControllerDelegate protocol. They are fired when the documentController object is being invoked. For this example, you don’t really need to code anything within these methods.
Finally, in the viewDidLoad method, add the following statement:
- (void)viewDidLoad {

    [super viewDidLoad];

    [self openDocumentIn];

}
Press Command-R to test the application on a real device (the Simulator won't work in this case). When the View window is loaded, you will see an action sheet displaying the list of applications that you can export your document to (see Figure 7).
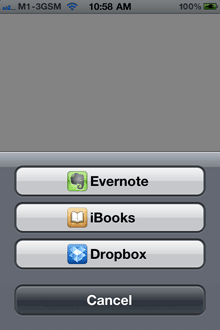
Figure 7. Exporting our PDF document to an external applicationIf you select iBooks, the PDF document will appear in iBooks (see Figure 8).
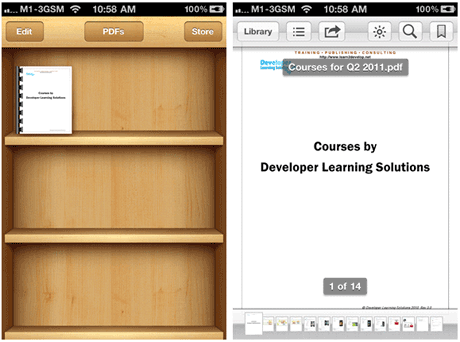
Figure 8. iBooks showing our PDF documentFile Sharing
The previous section showed how you can export a document to an
external application. What about the other way round – importing a
document into your application? In iOS, there are two ways to get files
into your application:- File Sharing through iTunes
- Through exchanges between applications (like the one you just saw in the previous section)
Let’s discuss the first method first. The first method presents a
very easy and direct way for users to transfer large number of files
into or out of an application. In the OfflineReader-Info.plist file, add
a new key named UIFileSharingEnabled and check it (see Figure 9).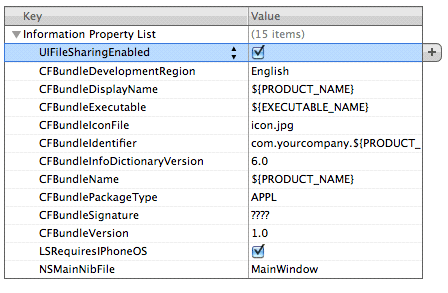
Figure 9. Adding a new key to enable file sharing for your applicationPress Command-R to redeploy the application onto the real device
again. Launch iTunes and select the device name, followed by the Apps
tab. Figure 10 shows that the OfflineReader application now appears
under the File Sharing section.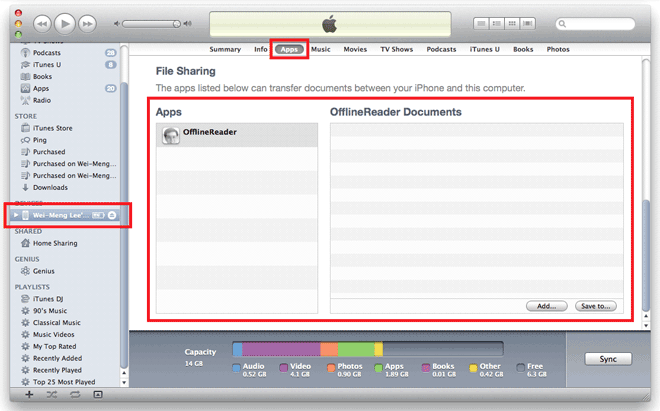
Figure 10. The application is now listed under the File Sharing section of iTunesTo copy a file into the application, simply drag and drop it into the
rectangle labeled OfflineReader Documents. Figure 11 shows that I have
copied a PDF document into the application. All documents copied will
reside in the Documents folder of your application.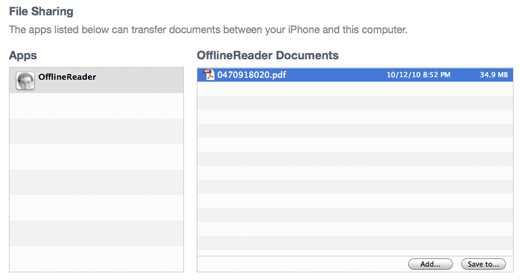
Figure 11. Copying a document into the applicationIf you want to extract the files from the application and save it
locally onto your computer, select the file(s) and click the Save to…
button.Now, to prove that the files are really copied into the Documents
folder of your application, add the following code to the
OfflineReaderViewController.m file:-(void) displayAlert:(NSString *) str {
UIAlertView *alert =
[[UIAlertView alloc] initWithTitle:@"Alert"
message:str
delegate:self
cancelButtonTitle:@"OK"
otherButtonTitles:nil];
[alert show];
[alert release];
}
- (void)handleDocumentOpenURL:(NSURL *)url {
NSURLRequest *requestObj = [NSURLRequest requestWithURL:url];
[webView setUserInteractionEnabled:YES];
[webView loadRequest:requestObj];
}
-(void)loadFileFromDocumentsFolder:(NSString *) filename {
//---get the path of the Documents folder---
NSArray *paths = NSSearchPathForDirectoriesInDomains(
NSDocumentDirectory, NSUserDomainMask, YES);
NSString *documentsDirectory = [paths objectAtIndex:0];
NSString *filePath = [documentsDirectory
stringByAppendingPathComponent:filename];
NSURL *fileUrl = [NSURL fileURLWithPath:filePath];
[self handleDocumentOpenURL:fileUrl];
}
-(void)listFilesFromDocumentsFolder {
//---get the path of the Documents folder---
NSArray *paths = NSSearchPathForDirectoriesInDomains(
NSDocumentDirectory, NSUserDomainMask, YES);
NSString *documentsDirectory = [paths objectAtIndex:0];
NSFileManager *manager = [NSFileManager defaultManager];
NSArray *fileList =
[manager contentsOfDirectoryAtPath:documentsDirectory error:nil];
NSMutableString *filesStr =
[NSMutableString stringWithString:@"Files in Documents folder \n"];
for (NSString *s in fileList){
[filesStr appendFormat:@"%@ \n", s];
}
[self displayAlert:filesStr];
[self loadFileFromDocumentsFolder:@"0470918020.pdf"];
}
- (IBAction) btnDisplayFiles {
[self listFilesFromDocumentsFolder];
}Here, the displayAlert: method is simply a helper method to display an Alert View on the screen. The handleDocumentOpenURL: method takes in a NSURL object and loads the WebView with its content. The loadFileFromDocumentsFolder: method takes in a filename and converts its path into a NSURL object. The listFilesFromDocumentsFolder method displays all the files and folders contained within the Documents folder of the application. Here, I have hardcoded it to display the PDF document named “0470918020.pdf” (which is what I have copied earlier).
Press Command-R to deploy the application on the device again. Tapping the Display files in Documents button will display the filename and at the same time load the PDF document in the WebView (see Figure 12), proving that the file was transferred into the application successfully.
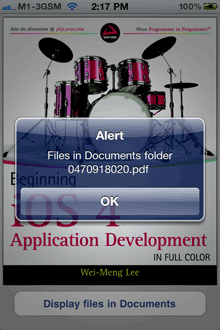
Figure 12. Displaying the files in the Documents folder and loading the PDF documentImporting Documents
The second method to transfer documents into an application is
through another application (as seen in the first section of this
article). In the beginning of this article, you saw how a PDF document
in your application can be transferred to the iBooks application for
viewing. This time round, you will learn how a document can be
transferred into your own application.For a start, you shall modify the application to accept PDF
documents. What you need to do is to get your application to register
with the iOS that it is able to accept PDF document. To do this, you
need to modify the OfflineReader-Info.plist file.Add the new CFBundleDocumentTypes key as shown in Figure 13.
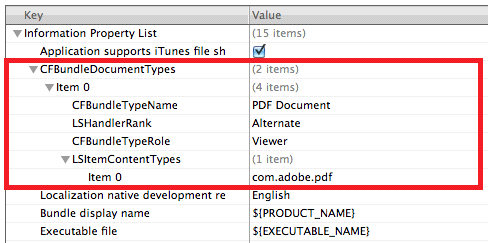
Figure 13. Add a new key to support PDF documentsNote the following:
- The CFBundleDocumentTypes key is of type Array. It contains an array
of dictionaries describing the types of documents supported by your
application. - Item 0 is of type Dictionary.
- The CFBundleTypeName key specifies the abstract name for the specified document type.
- The LSHandlerRank key specifies whether the application is the owner
(creator of this file type), Alternate (secondary viewer of this file
type), None, or Default. - The CFBundleTypeRole key specifies the application’s role with respect to the type - Editor, Viewer, Shell, or None.
- The LSItemContentTypes key is of type Array. It contains an array of UTIs specifying the file type.
The above entry in the OfflineReader-Info.plist file will register
with iOS that the application is capable of handling PDF documents.When a PDF document is passed into the application, the application
will fire a particular method –
application:openURL:sourceApplication:annotation:. This method must be
implemented in the application delegate.Hence, add the following in the OfflineReaderAppDelegate.m file:
#import "OfflineReaderAppDelegate.h"

#import "OfflineReaderViewController.h"


@implementation OfflineReaderAppDelegate


@synthesize window;

@synthesize viewController;


-(BOOL)application:(UIApplication *)application

           openURL:(NSURL *)url

 sourceApplication:(NSString *)sourceApplication

        annotation:(id)annotation {

    if (url != nil && [url isFileURL]) {

        [self.viewController handleDocumentOpenURL:url];

    }

    return YES;

}
When a document is passed into your application, it will be copied into a folder called Inbox, located within the Documents folder. The url argument contains the path to the document in the Inbox folder. In the above, once the document is passed in, you will call the handleDocumentOpenURL: method defined in the OfflineReaderViewController class to load the document in the WebView.
To see the URL of an imported document, add the following statement to the handleDocumentOpenURL: method:
- (void)handleDocumentOpenURL:(NSURL *)url {

    [self displayAlert:[url absoluteString]];

    NSURLRequest *requestObj = [NSURLRequest requestWithURL:url];

    [webView setUserInteractionEnabled:YES];

    [webView loadRequest:requestObj];

}
Press Command-R to deploy the application onto the real device again. This time, if you go back to the same email containing the PDF document and tap and hold on to it, you will find that you have the option to open the document in the OfflineReader application (see Figure 14).
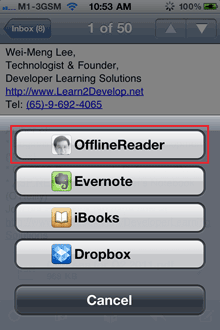
Figure 14. Your application is capable of handling PDF documentWhen the document is opened in OfflineReader, you will see the path of the document as shown in Figure 15.
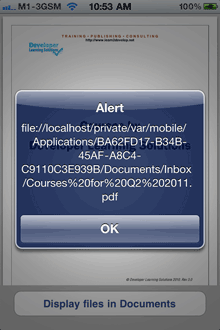
Figure 15. Confirming the path of the document in the Documents/Inbox folderImporting Self-Defined Documents
The previous section showed how to import well-known document
types, such as PDF. What happens if you want to import your own
self-defined document types? For example, you are writing a Sudoku game
and wanted to implement your own file format for saving the state of a
Sudoku game. In this case, your file might have the .sdk extension,
which is only used by your application.To ensure that your application can handle files with the .sdk
extension, you will add the keys as shown in Figure 16 to the
OfflineReader-Info.plist file.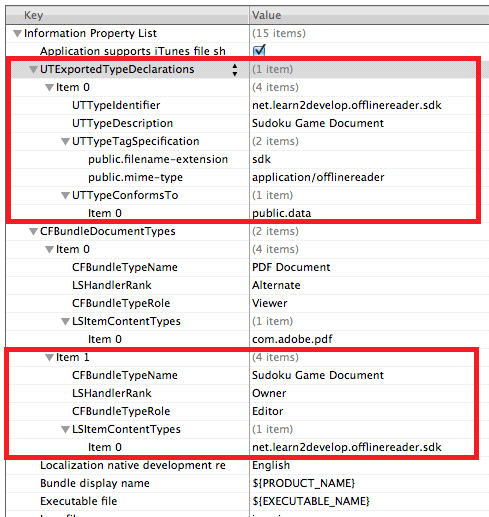
Figure 16. Adding new keys to support self-defined document typesNote that you added another key to the CFBundleDocumentTypes array.
You set the LSItemContentTypes to a unique value, using the reverse
domain name of your company and the type you are defining. Since this is
a self-defined content type, you have to define it using the
UTExportedTypeDeclarations key.Note: For more information on UTI, refer to Apple’s documentations – “Introduction to Uniform Type Identifiers Overview”.
Press Command-R to test the application on a real device again. This
time round, if your email contains a document of extension .sdk, you
will see the icon of your application displayed next to the document
name (see Figure 17). When you tap on the document name, you will see a
list of options to open your documents with.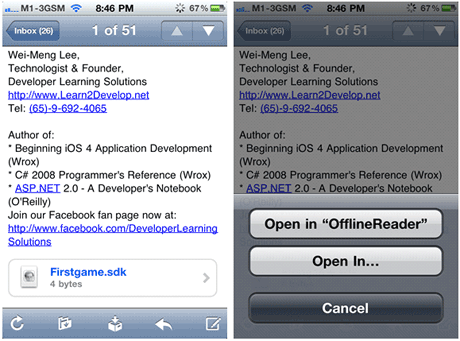
Figure 17. Opening a file of type .sdkSummary
In this article, you have seen the different techniques for handling
documents in your application. With this knowledge, you will be able to
write cool iOS applications that allows them to interact with the
outside world!
转载:APP a打开b软件的附件的更多相关文章
- 在app中打开appStore中其他app
var str = "https://itunes.apple.com/cn/app/zhang-jiange-hao-tou-zi-ke/id402382976?mt=8"//这 ...
- 浅谈传统语音通信和APP语音通信音频软件开发之不同点
本人在传统的语音通信公司做过手机和IP电话上的语音软件开发,也在移动互联网公司做过APP上的语音软件开发.现在带实时语音通信功能的APP有好多,主流的有微信语音.QQ电话.钉钉等,当然也包括我开发过的 ...
- 有哪些api接口可以实现微信自动唤醒浏览器,下载app,打开网页
现在微信渠道可以说是拉新最快的渠道,因为微信具备强裂变性.但是目前微信对第三方下载链接的拦截是越来越严格了,那么想要在微信内肆无忌惮地推广链接就需要用到微信跳转浏览器的接口,那如何获取该接口呢? ...
- js 判断是否可以打开本地软件
js判断时候可以打开本地的软件或者插件 点击一个按钮,打开本地的软件,比如问题反馈,需要调起本地的邮箱,填入一些信息. 这个功能<a>标签有提供支持,但是如果本地没有安装邮箱,则无法打开, ...
- 林兴爆料小程序很快可以支持各个 App 直接打开小程序
在微信开放平台基础高级产品经理林兴演讲的当场,他爆料了微信小程序一个轰动性新能力:小程序很快可以支持各个 App 直接打开小程序!没错,你没有听错,简单来说,在不久以后,所有的 App 里面都可以看到 ...
- 微信即将支持App直接打开小程序
“今年,微信将更快速地支持各APP直接打开小程序.”微信开放平台基础部高级产品经理林兴表示.对于官方即将支持的App直接打开小程序,林兴解释说,正如大家都喜欢微信钱包里的各种便捷服务,以后一个旅游攻略 ...
- 【JS】点击页面判断是否安装app并打开,否则跳转下载的方法
应用场景 App产品在运营推广上有一个需求,就是要求可以让用户在访问我们的推广网页时,就可以判断出这个用户手机上是否安装了我们的App,如果安装了则可以直接在网页上打开,否则就引导用户前往下载.从而形 ...
- C# 打开电子邮件软件
使用客户端打开指定的URL 使用Process.Start方法可以在浏览器打开指定的URL.代码如下所示. [C#] //使用客户端打开“http://www.baidu.com” System.Di ...
- 前端判断是否APP客户端打开触屏,实现跳转APP原生组件交互之遐想
今天做了一个html的活动页面,本来马上就要完工,准备开开心心收尾,结果~... 产品突然提出需要说,要讲html中的某些交互和APP原生组件挂钩,心里一万头xxx奔过~ 静下心来思考 以往我们是判断 ...
随机推荐
- phalcon之视图缓存
phalcon官方站点上的视图缓存用法根本就是不通的 现提供一种行的通的方法例如以下: public function testAction() { if( $this->view->ge ...
- Apache中PHP5.3 php5.4如何使用ZEND
Apache中PHP5.3 php5.4如何使用ZEND 有一套zend加密程序,需要安装ZEND,经过多次尝试,结果如下 由于PHP有安全线程(TS)和非安全线程(NTS)区分,PHP官方网站上说, ...
- Iptables-主机防火墙设置
基于Iptables构建主机防火墙 Iptables优点: 数据包过滤机制,它会对数据包包头数据进行分析. 1.1.1 加载相关薄块到内核 [root@centos7 ~]# lsmod | egre ...
- vue权限控制菜单显示的简单实现
为了对于不同角色显示不同的菜单 思路1: 本地放一份完整的菜单数据,通过后台返回角色的菜单列表.两者对比,筛选需要显示的菜单数据绑定, 这里有个问题就是路由vue实例初始化就生成了,加载的全部,人为输 ...
- Dcloud开发webApp踩过的坑
Dcloud开发webApp踩过的坑 一.总结 一句话总结:HTML5+扩展了JavaScript对象plus,使得js可以调用各种浏览器无法实现或实现不佳的系统能力,设备能力如摄像头.陀螺仪.文件系 ...
- JS实现时钟效果
<!DOCTYPE html> <html> <head> <meta charset="UTF-8"> <title> ...
- HTTP--Request Headers及Cookies
简介: HTTP客户程序(例如浏览器),向服务器发送请求的时候必须指明请求类型(一般是GET或者POST).如有必要,客户程序还可以选择发送其他的请求头.大多数请求头并不是必需的,但Content-L ...
- jmeter--参数化的四种方法
本文转自:http://www.cnblogs.com/imyalost/p/6229355.html 参数化是自动化测试脚本的一种常用技巧.简单来说,参数化的一般用法就是将脚本中的某些输入使用参数来 ...
- 原生js大总结二
011.if语句的优化 1.把次数多的条件和执行结果放到最前面 2.减少第一次无用的判断,可以用嵌套判断 3.判断语句禁止出现三次嵌套 012.谈谈你对switch的理解 1. ...
- STL algorithm算法mov,move_backward(38)
move原型: std::move template <class InputIterator, class OutputIterator> OutputIterator move (In ...