
CSS常用样式及示例
-
CSS常用样式及示例
 <!DOCTYPE html>

 <html lang="en">

 <head>

     <meta charset="UTF-8">

     <title>Title</title>

 </head>

 <body>

     <!--设置背景颜色,文本颜色-->

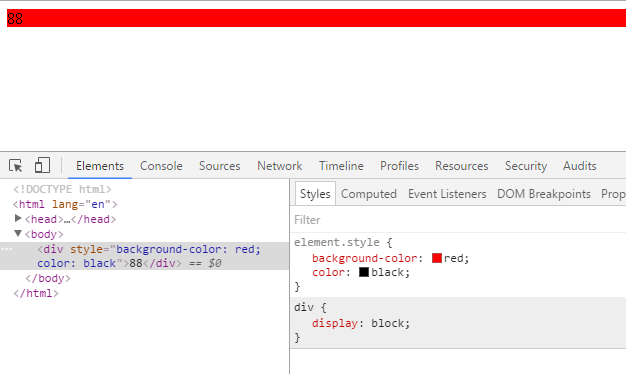
     <div style="background-color: red;color: black">88</div>

 </body>

 </html>
结果:
b:放置在HTML头部
 <!DOCTYPE html>

 <html lang="en">

 <head>

     <meta charset="UTF-8">

     <title>Title</title>

     <style>

         div{

             background-color: red;

             color: black;

         }

     </style>

 </head>

 <body>

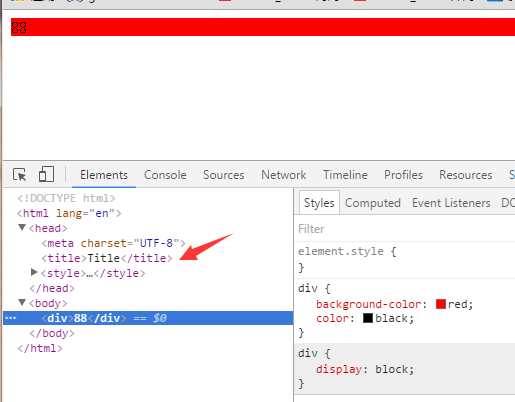
     <div >88</div>

 </body>

 </html>
结果为:
c:存放在文件中
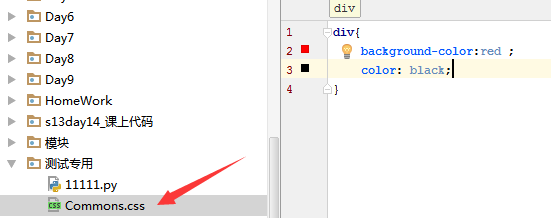
定义CSS文件Commons
引入文件:
 <!DOCTYPE html>

 <html lang="en">

 <head>

     <meta charset="UTF-8">

     <title>Title</title>

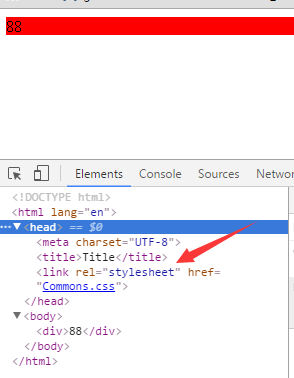
     <link rel="stylesheet" href="Commons.css">#引用文件

 </head>

 <body>

     <div >88</div>

 </body>

 </html>
结果:
优先级:
css标签内-->文件头部-->文件,依次从高到低。这里不展示示例,可以自己动手查看结果。
2.CSS标签选择器
 <!DOCTYPE html>

 <html lang="en">

 <head>

     <meta charset="UTF-8">

     <title>Title</title>

     <style>

         /*<!--标签选择器-->*/

         div{

             color: green;

         }

         /*ID选择器*/

         #i1{

             font-size: 56px;

         }

         /*class选择器*/

         .c1{

             background-color: white;

         }

         /*层级选择器*/

         .c1 div p .c3{

            color: red;

             font-size: 56px;

         }

         /*组合选择器*/

         .c4,.c5,.c6{

             background-color: rebeccapurple;

         }

         /*属性选择器*/

         .c1[alex='123']{

             color: red;

         }

     </style>

 </head>

 <body>

     <div class="c4"></div>

     <div class="c5"></div>

     <div class="c6"></div>

     <hr/>

     <!--/*class选择器*/-->

     <span class="c1">1</span>

     <span class="c1">2</span>

     <span class="c1">3</span>

     <!--/*ID选择器*/-->

     <a id="i1">baidu</a>

     <hr/>

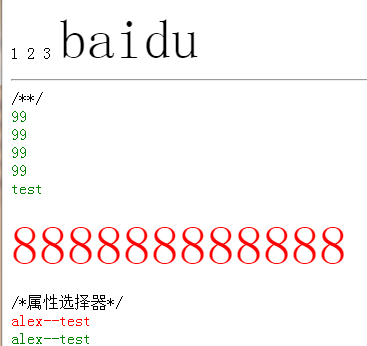
      /*<!--标签选择器-->*/

     <div>99</div>

     <div>99</div>

     <div>99</div>

     <div>99</div>

     <div class="c1">test

         <div>

             <p>

             <!--<p>  /*层级选择器*/-->

                 <span class="c3">888888888888</span>

             </p>

         </div>

     </div>

           /*属性选择器*/

     <div class="c1" alex="123" > alex--test</div>

     <div class="c1" > alex--test</div>

 </body>

 </html>
显示结果:
3.基本样式
3.1显示背景颜色
 <html>

 <head>

 <style type="text/css">

 body {background-color: yellow}

 h1 {background-color: #00ff00}

 h2 {background-color: transparent}

 p {background-color: rgb(250,0,255)}

 p.no2 {background-color: gray; padding: 20px;}

 </style>

 </head>

 <body>

 <h1>这是标题 1</h1>

 <h2>这是标题 2</h2>

 <p>这是段落</p>

 <p class="no2">这个段落设置了内边距。</p>

 </body>

 </html>
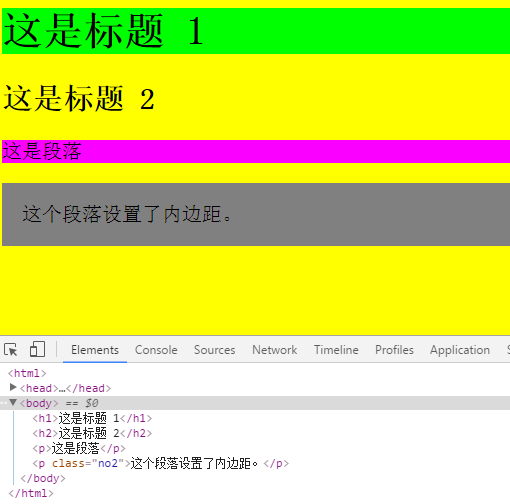
结果:
3.2设置文本颜色
 <html>

 <head>

 <meta charset="utf-8" />

 <style type="text/css">

 span.highlight

 {

 background-color:yellow

 }

 </style>

 </head>

 <body>

 <p>

 <span class="highlight">这是文本。</span> 这是文本。 这是文本。 <span class="highlight">这是文本。</span>

 </p>

 </body>

 </html>
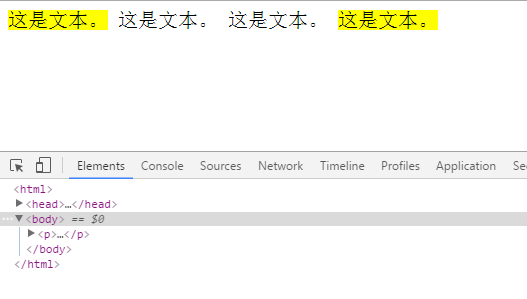
结果:
3.3设置背景图片(背景图片重复)
 <html>

 <head>

 <meta charset="utf-8" />

 <style type="text/css">

 body {background-image:url(2.jpg);

       }

 </style>

 </head>

 <body>

 <p>

 <span class="highlight">这是文本。</span> 这是文本。 这是文本。 <span class="highlight">这是文本。</span>

 </p>

 </body>

 </html>
3.4背景图片不重复
 <html>

 <head>

 <meta charset="utf-8" />

 <style type="text/css">

 body {background-image:url(2.jpg);

       background-repeat:no-repeat }

 </style>

 </head>

 <body>

 <p>

 <span class="highlight">这是文本。</span> 这是文本。 这是文本。 <span class="highlight">这是文本。</span>

 </p>

 </body>

 </html>
3.5图片页面固定
 <html>

 <head>

 <style type="text/css">

 body

 {

   background-image:url('/i/eg_bg_03.gif');

   background-repeat:no-repeat;

   background-attachment:fixed;

   background-position:center;

 }

 </style>

 </head>

 <body>

 <body>

 <p><b>提示:</b>您需要把 background-attachment 属性设置为 "fixed"。</p>

 </body>

 </body>

 </html>
3.6使用%设置固定图片大小
 <html>

 <head>

 <style type="text/css">

 body

 {

 background-image: url('/i/eg_bg_03.gif');

 background-repeat: no-repeat;

 background-attachment:fixed;

 background-position: 30% 20%;

 }

 </style>

 </head>

 <body>

 <p><b>注释:</b>为了在 Mozilla 中实现此效果,background-attachment 属性必须设置为 "fixed"。</p>

 </body>

 </html>
3.7 将背景属性放在一个申明里面
 <html>

 <head>

 <style type="text/css">

 body

 {

 background: #ff0000 url(/i/eg_bg_03.gif) no-repeat fixed center;

 }

 </style>

 </head>

 <body>

 <p>这是一些文本。</p>

 <p>这是一些文本。</p>

 <p>这是一些文本。</p>

 <p>这是一些文本。</p>

 <p>这是一些文本。</p>

 <p>这是一些文本。</p>

 <p>这是一些文本。</p>

 <p>这是一些文本。</p>

 </body>

 </html>
3.8设置文本颜色及文本背景颜色
 <html>

 <head>

 <style type="text/css">

 body {color:red}

 h1 {color:#00ff00}

 p.ex {color:rgb(0,0,255)}

 span.highlight

 {

 background-color:yellow

 }

 </style>

 </head>

 <body>

 <p>

 <span class="highlight">这是文本。</span> 这是文本。 这是文本。 这是文本。 这是文本。 这是文本。 这是文本。 这是文本。 这是文本。 这是文本。 这是文本。 这是文本。 这是文本。 这是文本。 这是文本。 这是文本。 这是文本。 <span class="highlight">这是文本。</span>

 </p>

 <h1>这是 heading 1</h1>

 <p>这是一段普通的段落。请注意,该段落的文本是红色的。在 body 选择器中定义了本页面中的默认文本颜色。</p>

 <p class="ex">该段落定义了 class="ex"。该段落中的文本是蓝色的。</p>

 </body>

 </html>
3.9设置字体大小
 <html>

 <head>

 <style type="text/css">

 h1 {font-size: 300%}

 h2 {font-size: 200%}

 p {font-size: 100%}

 </style>

 </head>

 <body>

 <h1>This is header 1</h1>

 <h2>This is header 2</h2>

 <p>This is a paragraph</p>

 </body>

 </html>
3.10将边框属性写在同一个申明里
 <html>

 <head>

 <style type="text/css">

 p

 {

 border: medium double rgb(250,0,255)

 }

 </style>

 </head>

 <body>

 <p>Some text</p>

 </body>

 </html>
3.11设置四边框样式
 <html>

 <head>

 <style type="text/css">

 p.dotted {border-style: dotted}

 p.dashed {border-style: dashed}

 p.solid {border-style: solid}

 p.double {border-style: double}

 p.groove {border-style: groove}

 p.ridge {border-style: ridge}

 p.inset {border-style: inset}

 p.outset {border-style: outset}

 </style>

 </head>

 <body>

 <p class="dotted">A dotted border</p>

 <p class="dashed">A dashed border</p>

 <p class="solid">A solid border</p>

 <p class="double">A double border</p>

 <p class="groove">A groove border</p>

 <p class="ridge">A ridge border</p>

 <p class="inset">An inset border</p>

 <p class="outset">An outset border</p>

 </body>

 </html>
3.12设置每一边的边框
 <html>

 <head>

 <style type="text/css">

 p.soliddouble {border-style: solid double}

 p.doublesolid {border-style: double solid}

 p.groovedouble {border-style: groove double}

 p.three {border-style: solid double groove}

 </style>

 </head>

 <body>

 <p class="soliddouble">Some text</p>

 <p class="doublesolid">Some text</p>

 <p class="groovedouble">Some text</p>

 <p class="three">Some text</p>

 </body>

 </html>
3.13设置下边框颜色(左右上类似)
 <html>

 <head>

 <style type="text/css">

 p

 {

 border-style:solid;

 border-bottom-color:#ff0000;

 }

 </style>

 </head>

 <body>

 <p>This is some text in a paragraph.</p>

 </body>

 </html>
3.14设置外边距(厘米,像素,%都可以)
 <html>

 <head>

 <style type="text/css">

 p.leftmargin {margin-left: 2cm}

 </style>

 </head>

 <body>

 <p>这个段落没有指定外边距。</p>

 <p class="leftmargin">这个段落带有指定的左外边距。</p>

 </body>

 </html>
3.15设置内边距(厘米,像素,%都可以)
 <html>

 <head>

 <style type="text/css">

 td

 {

 padding-bottom: 10%

 }

 </style>

 </head>

 <body>

 <table border="1">

 <tr>

 <td>

 这个表格单元拥有下内边距。

 </td>

 </tr>

 </table>

 </body>

 </html>
3.14合并表格边框
 <!DOCTYPE html PUBLIC "-//W3C//DTD XHTML 1.0 Transitional//EN" "http://www.w3.org/TR/xhtml1/DTD/xhtml1-transitional.dtd">

 <html>

 <head>

 <style type="text/css">

 table

   {

   border-collapse:collapse;

   }

 table, td, th

   {

   border:1px solid black;

   }

 </style>

 </head>

 <body>

 <table>

 <tr>

 <th>Firstname</th>

 <th>Lastname</th>

 </tr>

 <tr>

 <td>Bill</td>

 <td>Gates</td>

 </tr>

 <tr>

 <td>Steven</td>

 <td>Jobs</td>

 </tr>

 </table>

 <p><b>注释:</b>如果没有规定 !DOCTYPE,border-collapse 属性可能会引起意想不到的错误。</p>

 </body>

 </html>
3.16把段落元素设置为内联元素
 <html>

 <head>

 <style type="text/css">

 p {display: inline}

 div {display: none}

 </style>

 </head>

 <body>

 <p>本例中的样式表把段落元素设置为内联元素。</p>

 <p>而 div 元素不会显示出来!</p>

 <div>div 元素的内容不会显示出来!</div>

 </body>

 </html>
3.17把 span 元素设置为块级元素
 <html>

 <head>

 <style type="text/css">

 span

 {

 display: block

 }

 </style>

 </head>

 <body>

 <span>本例中的样式表把 span 元素设置为块级元素。</span>

 <span>两个 span 元素之间产生了一个换行行为。</span>

 </body>

 </html>
3.18浮动简单应用
 <html>

 <head>

 <style type="text/css">

 img

 {

 float:right

 }

 </style>

 </head>

 <body>

 <p>在下面的段落中,我们添加了一个样式为 <b>float:right</b> 的图像。结果是这个图像会浮动到段落的右侧。</p>

 <p>

 <img src="/i/eg_cute.gif" />

 This is some text. This is some text. This is some text.

 This is some text. This is some text. This is some text.

 This is some text. This is some text. This is some text.

 This is some text. This is some text. This is some text.

 This is some text. This is some text. This is some text.

 This is some text. This is some text. This is some text.

 This is some text. This is some text. This is some text.

 This is some text. This is some text. This is some text.

 This is some text. This is some text. This is some text.

 This is some text. This is some text. This is some text.

 </p>

 </body>

 </html>
3.19创建水平菜单
 <html>

 <head>

 <style type="text/css">

 ul

 {

 float:left;

 width:100%;

 padding:;

 margin:;

 list-style-type:none;

 }

 a

 {

 float:left;

 width:7em;

 text-decoration:none;

 color:white;

 background-color:purple;

 padding:0.2em 0.6em;

 border-right:1px solid white;

 }

 a:hover {background-color:#ff3300}

 li {display:inline}

 </style>

 </head>

 <body>

 <ul>

 <li><a href="#">Link one</a></li>

 <li><a href="#">Link two</a></li>

 <li><a href="#">Link three</a></li>

 <li><a href="#">Link four</a></li>

 </ul>

 <p>

 在上面的例子中,我们把 ul 元素和 a 元素浮向左浮动。li 元素显示为行内元素(元素前后没有换行)。这样就可以使列表排列成一行。ul 元素的宽度是 100%,列表中的每个超链接的宽度是 7em(当前字体尺寸的 7 倍)。我们添加了颜色和边框,以使其更漂亮。

 </p>

 </body>

 </html>
3.20相对定位
 <html>

 <head>

 <style type="text/css">

 h2.pos_left

 {

 position:relative;

 left:-20px

 }

 h2.pos_right

 {

 position:relative;

 left:20px

 }

 </style>

 </head>

 <body>

 <h2>这是位于正常位置的标题</h2>

 <h2 class="pos_left">这个标题相对于其正常位置向左移动</h2>

 <h2 class="pos_right">这个标题相对于其正常位置向右移动</h2>

 <p>相对定位会按照元素的原始位置对该元素进行移动。</p>

 <p>样式 "left:-20px" 从元素的原始左侧位置减去 20 像素。</p>

 <p>样式 "left:20px" 向元素的原始左侧位置增加 20 像素。</p>

 </body>

 </html>
3.21绝对定位
 <html>

 <head>

 <style type="text/css">

 h2.pos_abs

 {

 position:absolute;

 left:100px;

 top:150px

 }

 </style>

 </head>

 <body>

 <h2 class="pos_abs">这是带有绝对定位的标题</h2>

 <p>通过绝对定位,元素可以放置到页面上的任何位置。下面的标题距离页面左侧 100px,距离页面顶部 150px。</p>

 </body>

 </html>
3.22固定定位
 <html>

 <head>

 <style type="text/css">

 p.one

 {

 position:fixed;

 left:5px;

 top:5px;

 }

 p.two

 {

 position:fixed;

 top:30px;

 right:5px;

 }

 </style>

 </head>

 <body>

 <p class="one">一些文本。</p>

 <p class="two">更多的文本。</p>

 </body>

 </html>
3.23标签内页面固定
 <!DOCTYPE html>

 <html lang="en">

 <head>

     <meta charset="UTF-8">

     <title></title>

 </head>

 <body>

     <div style="height: 500px;width: 400px;border: 1px solid red;position: relative">

         <div style="height: 200px;background-color: red;">

             <div style="position: absolute;bottom: 0;right: 0;">111</div>

         </div>

     </div>

 </body>

 </html>
3.24元素不可见
 <html>

 <head>

 <style type="text/css">

 h1.visible {visibility:visible}

 h1.invisible {visibility:hidden}

 </style>

 </head>

 <body>

 <h1 class="visible">这是可见的标题</h1>

 <h1 class="invisible">这是不可见的标题</h1>

 </body>

 </html>
3.25改变光标
 <html>

 <body>

 <p>请把鼠标移动到单词上,可以看到鼠标指针发生变化:</p>

 <span style="cursor:auto">

 Auto</span><br />

 <span style="cursor:crosshair">

 Crosshair</span><br />

 <span style="cursor:default">

 Default</span><br />

 <span style="cursor:pointer">

 Pointer</span><br />

 <span style="cursor:move">

 Move</span><br />

 <span style="cursor:e-resize">

 e-resize</span><br />

 <span style="cursor:ne-resize">

 ne-resize</span><br />

 <span style="cursor:nw-resize">

 nw-resize</span><br />

 <span style="cursor:n-resize">

 n-resize</span><br />

 <span style="cursor:se-resize">

 se-resize</span><br />

 <span style="cursor:sw-resize">

 sw-resize</span><br />

 <span style="cursor:s-resize">

 s-resize</span><br />

 <span style="cursor:w-resize">

 w-resize</span><br />

 <span style="cursor:text">

 text</span><br />

 <span style="cursor:wait">

 wait</span><br />

 <span style="cursor:help">

 help</span>

 </body>

 </html>
3.26清除元素
<html>

<head>

<style type="text/css">

img

  {

  float:left;

  clear:both;

  }

</style>

</head>

<body>

<img src="/i/eg_smile.gif" />

<img src="/i/eg_smile.gif" />

</body>

</html>
3.27设置元素形状
 <html>

 <head>

 <style type="text/css">

 img

 {

 position:absolute;

 clip:rect(0px 50px 200px 0px)

 }

 </style>

 </head>

 <body>

 <p>clip 属性剪切了一幅图像:</p>

 <p><img border="0" src="/i/eg_bookasp.gif" width="120" height="151"></p>

 </body>

 </html>
3.28使用滚动条显示溢出文本内容
 <html>

 <head>

 <style type="text/css">

 div

 {

 background-color:#00FFFF;

 width:150px;

 height:150px;

 overflow: scroll

 }

 </style>

 </head>

 <body>

 <p>如果元素中的内容超出了给定的宽度和高度属性,overflow 属性可以确定是否显示滚动条等行为。</p>

 <div>

 这个属性定义溢出元素内容区的内容会如何处理。如果值为 scroll,不论是否需要,用户代理都会提供一种滚动机制。因此,有可能即使元素框中可以放下所有内容也会出现滚动条。默认值是 visible。

 </div>

 </body>

 </html>
3.29浏览器自动处理元素文本溢出
 <html>

 <head>

 <style type="text/css">

 div

 {

 background-color:#00FFFF;

 width:150px;

 height:150px;

 overflow: auto

 }

 </style>

 </head>

 <body>

 <p>如果元素中的内容超出了给定的宽度和高度属性,overflow 属性可以确定是否显示滚动条等行为。</p>

 <div>

 这个属性定义溢出元素内容区的内容会如何处理。如果值为 scroll,不论是否需要,用户代理都会提供一种滚动机制。因此,有可能即使元素框中可以放下所有内容也会出现滚动条。默认值是 visible。

 </div>

 </body>

 </html>
3.30将一个元素放置在另一个元素背后
 <html>

 <head>

 <style type="text/css">

 img.x

 {

 position:absolute;

 left:0px;

 top:0px;

 z-index:-1

 }

 </style>

 </head>

 <body>

 <h1>这是一个标题</h1>

 <img class="x" src="/i/eg_mouse.jpg" />

 <p>默认的 z-index 是 0。Z-index -1 拥有更低的优先级。</p>

 </body>

 </html>
3.31使用固定值设置图像边缘
 <html>

 <head>

 <style type="text/css">

 img

 {

 position:absolute;

 top:0px

 }

 </style>

 </head>

 <body>

 <h1>This is a Heading</h1>

 <img class="normal" src="/i/eg_smile.gif" />

 <p>一些文本。一些文本。一些文本。一些文本。一些文本。一些文本。</p>

 </body>

 </html>
3.32CSS伪类
 <html>

 <head>

 <style type="text/css">

 a:link {color: #FF0000}

 a:visited {color: #00FF00}

 a:hover {color: #FF00FF}

 a:active {color: #0000FF}

 </style>

 </head>

 <body>

 <p><b><a href="/index.html" target="_blank">这是一个链接。</a></b></p>

 <p><b>注释:</b>在 CSS 定义中,a:hover 必须位于 a:link 和 a:visited 之后,这样才能生效!</p>

 <p><b>注释:</b>在 CSS 定义中,a:active 必须位于 a:hover 之后,这样才能生效!</p>

 </body>

 </html>
示例2:
 <html>

 <head>

 <style type="text/css">

 a.one:link {color: #ff0000}

 a.one:visited {color: #0000ff}

 a.one:hover {color: #ffcc00}

 a.two:link {color: #ff0000}

 a.two:visited {color: #0000ff}

 a.two:hover {font-size: 150%}

 a.three:link {color: #ff0000}

 a.three:visited {color: #0000ff}

 a.three:hover {background: #66ff66}

 a.four:link {color: #ff0000}

 a.four:visited {color: #0000ff}

 a.four:hover {font-family: monospace}

 a.five:link {color: #ff0000; text-decoration: none}

 a.five:visited {color: #0000ff; text-decoration: none}

 a.five:hover {text-decoration: underline}

 </style>

 </head>

 <body>

 <p>请把鼠标移动到这些链接上,以查看效果:</p>

 <p><b><a class="one" href="/index.html" target="_blank">这个链接改变颜色</a></b></p>

 <p><b><a class="two" href="/index.html" target="_blank">这个链接改变字体大小</a></b></p>

 <p><b><a class="three" href="/index.html" target="_blank">这个链接改变背景颜色</a></b></p>

 <p><b><a class="four" href="/index.html" target="_blank">这个链接改变字体系列</a></b></p>

 <p><b><a class="five" href="/index.html" target="_blank">这个链接改变文本装饰</a></b></p>

 </body>

 </html>
CSS遮罩层示例:
 <!DOCTYPE html>

 <html lang="en">

 <head>

     <meta charset="UTF-8">

  <title>DIV CSS遮罩层</title>

  <script language="javascript" type="text/javascript">

  function showdiv() {

  document.getElementById("bg").style.display ="block";

  document.getElementById("show").style.display ="block";

  }

  function hidediv() {

  document.getElementById("bg").style.display ='none';

  document.getElementById("show").style.display ='none';

  }

 </script>

  <style type="text/css">

  *#bg{ display: none; position: absolute; top:; left:; width: 100%; height: 100%; background-color: black; z-index:; -moz-opacity: 0.7; opacity:.70; filter: alpha(opacity=70);}*/

  *#show{display: none; position: absolute; top: 25%; left: 22%; width: 53%; height: 49%; padding: 8px; border: 8px solid #E8E9F7; background-color: white; z-index:; overflow: auto;}*/

  </style>

  </head>

  <body>

  <input id="btnshow" type="button" value="Show" onclick="showdiv();"/>

  <div id="bg"></div>

  <div id="show">测试

  <input id="btnclose" type="button" value="Close" onclick="hidediv();"/>

  </div>

  </body>

  </html>
CSS常用样式及示例的更多相关文章
- CSS常用样式(四)之animation
上篇CSS常用样式(三)这篇博文中已经介绍过了CSS中具有动画效果的transition.transform,今天来大概说说CSS中的animation.animation的加入会使得动画效果更加乐观 ...
- 从零开始学习前端开发 — 9、标签嵌套规则及CSS常用样式覆盖
1. 块级元素可以包含内联元素或某些块级元素,但内联元素却不能包含块级元素,它只能包含其它的内联元素: <div><h1></h1><p></p& ...
- css常用样式对文本的处理演练
CSS文本属性可定义文本的外观,这是毫无疑问的,其次css可以通过以下属性改变文字的排版,比方说letter-spacing实现字符间距text-indent: 2em;完成首行缩进2字符word-s ...
- css常用样式font控制字体的多种变换
CSS 字体属性定义文本的字体系列.大小.加粗.风格(如斜体)和变形(如小型大写字母)font-family控制字体,由于各个电脑系统安装的字体不尽相同,但是基本装有黑体.宋体与微软雅黑这三款字体,通 ...
- CSS常用样式属性
1.CSS字体和文本相关属性 属性 font-family 规定文本的字体系列,比如:“serif” ''sans-serif" font-size 规定文本的字体尺寸 font-style ...
- css常用样式属性详细介绍
对于初学css的来说,肯定会觉得这么多样式不好记,而且记住了也容易忘,其实刚开始我们不用去记这么多的样式,确实是记了也会忘,刚开始只需记住一些常用的就可以了,然后在慢慢的使用过程当中接触并学习一些高级 ...
- CSS常用样式整理
元素边框显示圆角:-moz-border-radius适用于火狐浏览器,-webkit-border-radius适用于Safari和Chrome两种浏览器. 浏览器渐变背景颜色: FILTER: p ...
- css 常用样式命名规则
大家在写css的时候,对一些html标签起一个合适的名字是个很头疼的事情,现在给大家分享项目中常用的名字供参考. 外套:wrap ——用于最外层 头部:header ——用于头部 主要内容:mai ...
- CSS常用样式--font
CSS font 属性 参考:W3school- CSS font 所有浏览器都支持 font 属性,可在一个声明中设置所有字体属性,各属性需按顺序,语法如下: selector{ font:styl ...
随机推荐
- apache https 伪静态
今天很是郁闷,配置了一个https成功了,但是伪静态不成功,经过多方面查看资料终于配置成功了: <VirtualHost *:443> DocumentRoot /var/www/juba ...
- Singly Linked List
Singly Linked List Singly linked list storage structure:typedef struct Node{ ElemType data; struct N ...
- 安装dubbo-admin遇到的问题和解决之道
这里不多说dubbo的相关知识.简单提示dubbo-admin所需的环境.java的jdk和jre,dubbo-admin.war,tomcat. 今天只是把在win7环境下安装了dubbo-admi ...
- liunx之:解决liunx下dns配置重启失效的问题
有时候能ping同ip地址,却ping不通域名,这就是dns没有配置的缘故. 但是DNS配置文件 /etc/resolv.conf 每次重启就会失效. 打开这个配置文件,发现有注释提示: Dynami ...
- window.onload与$(document).ready()区别
2013-12-08 17:11:34 window.onload一次只能执行一个程序,而$(document).ready()可以按照先后顺序执行多个程序. eg: function one(){ ...
- css 超过宽度显示...
一般使用 display:block;white-space:nowrap; overflow:hidden; text-overflow:ellipsis; *****************未实验 ...
- rabbitmq, windows/linux, c/c++/node.js/golang/dotnet
官网:http://www.rabbitmq.com/ zeromq 相当于 message backbone,而rabbitmq相当于message broker.有的应用系统中,二者并存. (1) ...
- rabiitmq集群完整安装
通过 Erlang 的分布式特性(通过 magic cookie 认证节点)进行 RabbitMQ 集群,各 RabbitMQ 服务为对等节点,即每个节点都提供服务给客户端连接,进行消息发送与接收. ...
- putty远程连接ubuntu
步骤一.在ubuntu系统中安装ssh,可使用如下的命令进行安装: sudo apt-get install openssh-server步骤二.为了保险起见,安装完成后重启一下ssh服务,命令如 ...
- MFC ADO连接Sql Server数据库报无效指针的问题
相关症状: Win7sp1上编译的ADO程序无法在低版本系统上运行,创建ADO时提示错误:0x80004002 解决办法如下: 1.下载: http://download.microsoft.c ...