
Linux中安装PostgreSQL-10.1
环境说明
- Linux版本:CentOS Linux release 7.6.1810 (Core)
- PostgreSQL版本:PostgreSQL-10.1
- PostgreSQL下载网址:https://www.postgresql.org/ftp/source/v10.1/
下载符合自己操作系统的版本即可( postgresql-10.1.tar.gz)
- 参考文档:http://www.postgres.cn/docs/9.3/install-short.html
- DBeaver下载地址:https://dbeaver.jkiss.org/download/
我下载的是Windows 64 bit(zip archive):dbeaverce614.zip(dbeaver-ce-6.1.4-x86_64-setup)
- DBeaver jdbc驱动下载地址:https://jdbc.postgresql.org/download.html#current
我下载的是:PostgreSQL JDBC 4.2 Driver, 42.1.4
安装部署
将下载好的源码包上传到服务器/tmp/目录下
 [root@VM_0_16_centos tmp]# ls | grep postgresql

 postgresql-10.1.tar.gz
安装路径为:/usr/local/pgsql
1.解压
 [root@VM_0_16_centos tmp]# tar -zxf postgresql-10.1.tar.gz -C /usr/local/

 [root@VM_0_16_centos tmp]# cd /usr/local/postgresql-10.1/
2.编译安装
依次执行如下操作:
[root@VM_0_16_centos postgresql-10.1]# ./configure

checking for getpwuid_r... yes

checking for gethostbyname_r... yes

checking whether strerror_r returns int... no

checking for main in -lm... yes

checking for library containing setproctitle... no

checking for library containing dlopen... -ldl

checking for library containing socket... none required

checking for library containing shl_load... no

checking for library containing getopt_long... none required

checking for library containing crypt... -lcrypt

checking for library containing shm_open... -lrt

checking for library containing shm_unlink... none required

checking for library containing clock_gettime... none required

checking for library containing fdatasync... none required

checking for library containing sched_yield... none required

checking for library containing gethostbyname_r... none required

checking for library containing shmget... none required

checking for library containing readline... no

configure: error: readline library not found

If you have readline already installed, see config.log for details on the

failure.  It is possible the compiler isn't looking in the proper directory.

Use --without-readline to disable readline support.
如上报错参考:https://www.linuxidc.com/Linux/2012-02/53982.htm
报错1:configure: error: no acceptable C compiler found in $PATH:
解决:yum install gcc
报错2:configure: error: no acceptable C compiler found in $PATH:
根据提示大概是readline包未安装
解决:yum install readline-devel
安装readline-devel包
[root@VM_0_16_centos postgresql-10.1]# yum -y install readline-devel
Loaded plugins: fastestmirror, langpacks
Repository epel is listed more than once in the configuration
Loading mirror speeds from cached hostfile
epel | 5.3 kB 00:00:00
extras | 3.4 kB 00:00:00
os | 3.6 kB 00:00:00
updates | 3.4 kB 00:00:00
(1/2): epel/7/x86_64/updateinfo | 997 kB 00:00:00
(2/2): epel/7/x86_64/primary_db | 6.8 MB 00:00:00
Resolving Dependencies
--> Running transaction check
---> Package readline-devel.x86_64 0:6.2-10.el7 will be installed
--> Processing Dependency: ncurses-devel for package: readline-devel-6.2-10.el7.x86_64
--> Running transaction check
---> Package ncurses-devel.x86_64 0:5.9-14.20130511.el7_4 will be installed
--> Finished Dependency Resolution
Dependencies Resolved
========================================================================================================================================================================
Package Arch Version Repository Size
========================================================================================================================================================================
Installing:
readline-devel x86_64 6.2-10.el7 os 138 k
Installing for dependencies:
ncurses-devel x86_64 5.9-14.20130511.el7_4 os 712 k
Transaction Summary
========================================================================================================================================================================
Install 1 Package (+1 Dependent package)
Total download size: 851 k
Installed size: 2.4 M
Downloading packages:
(1/2): readline-devel-6.2-10.el7.x86_64.rpm | 138 kB 00:00:00
(2/2): ncurses-devel-5.9-14.20130511.el7_4.x86_64.rpm | 712 kB 00:00:00
------------------------------------------------------------------------------------------------------------------------------------------------------------------------
Total 5.3 MB/s | 851 kB 00:00:00
Running transaction check
Running transaction test
Transaction test succeeded
Running transaction
Installing : ncurses-devel-5.9-14.20130511.el7_4.x86_64 1/2
Installing : readline-devel-6.2-10.el7.x86_64 2/2
Verifying : readline-devel-6.2-10.el7.x86_64 1/2
Verifying : ncurses-devel-5.9-14.20130511.el7_4.x86_64 2/2
Installed:
readline-devel.x86_64 0:6.2-10.el7
Dependency Installed:
ncurses-devel.x86_64 0:5.9-14.20130511.el7_4
Complete!
安装完后再次运行./configure即可
[root@VM_0_16_centos postgresql-10.1]# ./configure
编译安装
 [root@VM_0_16_centos postgresql-10.1]# make

 [root@VM_0_16_centos postgresql-10.1]# su

 [root@VM_0_16_centos postgresql-10.1]# make install
 [root@VM_0_16_centos postgresql-10.1]# adduser postgres

 [root@VM_0_16_centos postgresql-10.1]# mkdir /usr/local/pgsql/data

 [root@VM_0_16_centos postgresql-10.1]# chown postgres /usr/local/pgsql/data

 [root@VM_0_16_centos local]# su - postgres

 Last login: Tue Aug  :: CST  on pts/

 [postgres@VM_0_16_centos ~]$ /usr/local/pgsql/bin/initdb -D /usr/local/pgsql/data/

 The files belonging to this database system will be owned by user "postgres".

 This user must also own the server process.

 The database cluster will be initialized with locale "C".

 The default database encoding has accordingly been set to "SQL_ASCII".

 The default text search configuration will be set to "english".

 Data page checksums are disabled.

 fixing permissions on existing directory /usr/local/pgsql/data ... ok

 creating subdirectories ... ok

 selecting default max_connections ...

 selecting default shared_buffers ... 128MB

 selecting dynamic shared memory implementation ... posix

 creating configuration files ... ok

 running bootstrap script ... ok

 performing post-bootstrap initialization ... ok

 syncing data to disk ... ok

 WARNING: enabling "trust" authentication for local connections

 You can change this by editing pg_hba.conf or using the option -A, or

 --auth-local and --auth-host, the next time you run initdb.

 Success. You can now start the database server using:

     /usr/local/pgsql/bin/pg_ctl -D /usr/local/pgsql/data/ -l logfile start

 [postgres@VM_0_16_centos ~]$ /usr/local/pgsql/bin/postgres -D /usr/local/pgsql/data/ > logfile 2>&1 &

34 [1] 12283

 [postgres@VM_0_16_centos ~]$ /usr/local/pgsql/bin/createdb test

 [postgres@VM_0_16_centos ~]$ /usr/local/pgsql/bin/psql test

 psql (10.1)

 Type "help" for help.

 test=#
3.启动或重启服务
确保切换到/usr/local/pgsql/bin/目录下,并切换为postgres用户
  [postgres@VM_0_16_centos ~]$ cd /usr/local/pgsql/bin/

  [postgres@VM_0_16_centos bin]$ su - postgres  #输入密码,但安装时不知道密码,如果已在该用户下可不切换,默认第一次进来不输入密码
启动服务
 [postgres@VM_0_16_centos bin]$ ./pg_ctl start -D /usr/local/pgsql/data/

4 pg_ctl: another server might be running; trying to start server anyway

5 waiting for server to start....2019-08-20 10:18:45.034 CST [16027] FATAL:  lock file "postmaster.pid" already exists

6 2019-08-20 10:18:45.034 CST [16027] HINT:  Is another postmaster (PID 12283) running in data directory "/usr/local/pgsql/data"?

7  stopped waiting

8 pg_ctl: could not start server

9 Examine the log output.
启动不了,是由于上面在后台运行的语句,以及产生了pid文件(/usr/local/pgsql/data)
[postgres@VM_0_16_centos bin]$ pkill 12283
[postgres@VM_0_16_centos bin]$ ./pg_ctl start -D /usr/local/pgsql/data/
pg_ctl: another server might be running; trying to start server anyway
waiting for server to start....2019-08-20 10:19:23.881 CST [16139] FATAL: lock file "postmaster.pid" already exists
2019-08-20 10:19:23.881 CST [16139] HINT: Is another postmaster (PID 12283) running in data directory "/usr/local/pgsql/data"?
stopped waiting
pg_ctl: could not start server
Examine the log output.
将pid文件删除即可
[postgres@VM_0_16_centos bin]$ rm -rf /usr/local/pgsql/data/postmaster.pid
再次运行启动命令,如下图即为成功
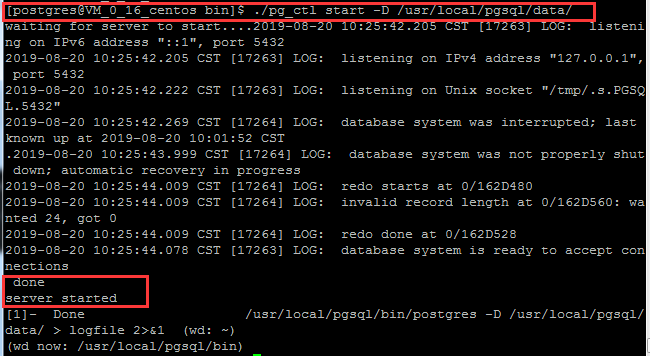
至此PostgreSQL安装完成
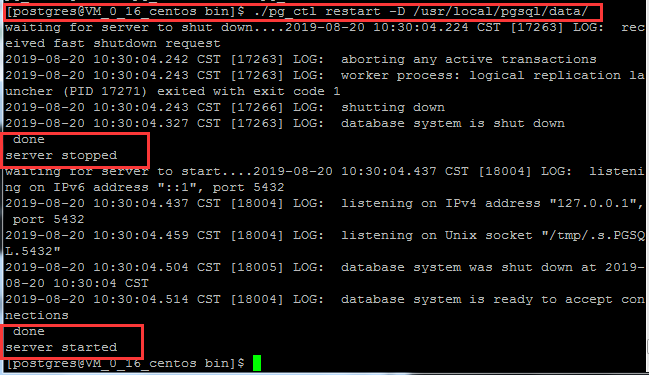
重启服务
[postgres@VM_0_16_centos bin]$ ./pg_ctl restart -D /usr/local/pgsql/data/
4.新建数据库和可以登录数据库的用户密码
确保切换到/usr/local/pgsql/bin/目录下
创建数据库:
[postgres@VM_0_16_centos bin]$ ./createdb thydb
创建用户(用户名:thy,密码:TanHuiyuan)两种方式:
第一种:CREATE USER或CREATE ROLE:CREATE USER是CREATE ROLE的一个别名。 唯一的区别是CREATE USER命令缺省是LOGIN, 而CREATE ROLE命令缺省是NOLOGIN。
进入默认数据库postgres:
 [postgres@VM_0_16_centos bin]$ ./psql

 psql (10.1)

 Type "help" for help.
执行(区分大小写):
 postgres=# CREATE USER thy WITH PASSWORD 'TanHuiyuan';

 CREATE ROLE
创建成功如下:

第二种:pg封装的命令方式:
如果已经存在改用户了则不能重复创建
[postgres@VM_0_16_centos bin]$ ./createuser -P thy

5.访问数据库
确保切换到/usr/local/pgsql/bin/目录下
以默认用户名访问默认数据库(默认的用户名和数据库名都是postgres),进入PG交互终端
[postgres@VM_0_16_centos bin]$ ./psql

以名为thy角色登录名为thydb的数据库:
[postgres@VM_0_16_centos bin]$ ./psql thydb -U thy

可以看出,当psql终端的提示符为=#时,表示当前登录的是超级用户,而当提示符为=>时则为普通用户
6.远程访问数据库设置
远程访问数据库的认证方式主要有很多方式,这里设置基于TCP/IP连接的trust认证方式
需要设置两个配置文件:
1)修改配置文件postgresql.conf
[root@VM_0_16_centos ~]# vi /usr/local/pgsql/data/postgresql.conf
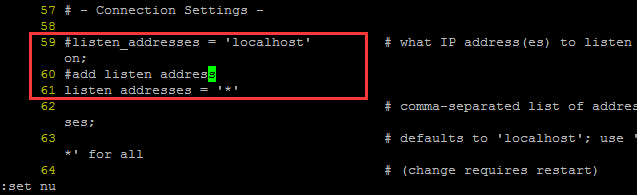
修改监听地址:
  #listen_addresses = 'localhost'

 改为

  listen_addresses = '*'
 listen_addresses = '*'
2)修改配置文件/pgsql/data/pg_hba.conf
[root@VM_0_16_centos ~]# vi /usr/local/pgsql/data/pg_hba.conf
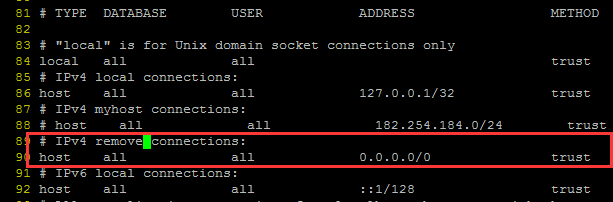
添加一条IP授权记录(如182.254.184.102),可以对一个网段授权
  # IPv4 myhost connections:

     host    all             all             182.254.184.0/        trust
即

也可以设置所有网段ip访问
1 # IPv4 remove connections:
host all all 0.0.0.0/0 trust
即
配置之后需重启数据库才会生效:
需在postgres用户下执行:
[postgres@VM_0_16_centos ~]$ /usr/local/pgsql/bin/pg_ctl restart -D /usr/local/pgsql/data/
7.Windows图形化界面DBeaver客户端访问PG
Dbeaver需要指定jdbc驱动,可到https://jdbc.postgresql.org/download.html#current下载
由于前面设置的是基于TCP/IP的trust认证,所以这里也只要设置如下参数就可:
将下载好的安装包解压到相应的盘符
安装步骤参考:https://jingyan.baidu.com/article/0aa223756a2eed88cd0d644a.html
Host:搭建PG的主机ip地址,这里我把自己的主机IP码掉啦
Port:默认为5432
Database:就是我们前面建立的数据库thydb
User:前面创建的用户名thy
Password:用户名对应的密码TanHuiyuan
本次使用默认数据库
驱动配置参考:https://jingyan.baidu.com/article/7c6fb428ab34e1c0642c9096.html
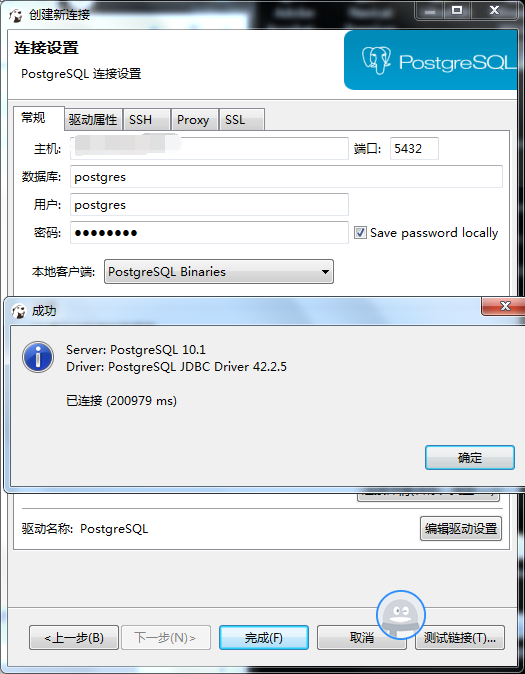
成功连接

参考博客:https://www.cnblogs.com/LinBug/p/8082790.html
Linux中安装PostgreSQL-10.1的更多相关文章
- Ubuntu下编译安装postgreSQL 10.5
Ubuntu下编译安装postgreSQL 10.5 ubuntu 16.04 LTS系统postgreSQL 10.5 安装包准备 1.从PostgreSQL官网下载PostgreSQL的安装包 安 ...
- 如何在Raspberry Pi 3B中安装Windows 10 IoT Core
Windows 10 IoT Core简介 Windows 10 IoT是微软专门为物联网生态打造的操作系统,Windows 10 IoT Core则是Windows 10 IoT 操作系统的核心版本 ...
- Linux下安装PostgreSQL 转载linux社区
Linux下安装PostgreSQL [日期:2016-12-25] 来源:Linux社区 作者:xiaojian [字体:大 中 小] 在Linux下安装PostgreSQL有二进制格式安装和 ...
- Linux中安装nodejs及插件
Linux中安装nodejs及插件 1.去官网下载安装包 英文网址:https://nodejs.org/en/download/ 中文网址:http://nodejs.cn/download/ 通过 ...
- Linux中安装配置spark集群
一. Spark简介 Spark是一个通用的并行计算框架,由UCBerkeley的AMP实验室开发.Spark基于map reduce 算法模式实现的分布式计算,拥有Hadoop MapReduce所 ...
- 在Linux中安装和配置OpenVPN Server的最简便方法!
本文介绍了如何在基于RPM和DEB的系统中安装和配置OpenVPN服务器.我们在本文中将使用一个名为openvpn-install的脚本,它使整个OpenVPN服务器的安装和配置过程实现了自动化.该脚 ...
- 在CentOS 7 / RHEL 7安装PostgreSQL 10
CentOS 到了7.x版本, PostgreSQL也来到了10.x版本. 前些天MySQL都直接跨到了8.0版本. 本文是一篇在CentOS 7.4上安装安装PostgreSQL 10.3 的教程. ...
- Linux中安装字体
Linux中安装字体 查看系统中的字体 fc-list 查看系统中的中文字体 fc-list :lang=zh将然后将字体文件拷贝到/usr/share/fonts/中 cp aa.ttl /usr/ ...
- Linux中安装C++编译器codeBlock,并配置opencv链接库
1.Linux中安装codeBlock https://blog.csdn.net/xinyunyishui/article/details/50967395 2.CodeBlock中的中文显示不完全 ...
- Linux中一个文件10行内容,如何输出5-8内容到屏幕
题目是这样的,Linux中一个文件10行内容,如何输出5-8内容到屏幕首先我们模拟一下这样的环境: [root@localhost question]# pwd /root/question [roo ...
随机推荐
- rabbitMQ_rpc(六)
远程过程调用(RPC) 在前面我们已经学习了如何使用工作队列在多个消费者之间分配耗时的任务. 但是如果我们需要在远程计算机上运行功能并等待结果怎么办?那将会是一个不同的故事.此模式通常称为远程过程调用 ...
- unc路径
1.什么是UNC路径?UNC路径就是类似\\softer这样的形式的网络路径.UNC为网络(主要指局域网)上资源的完整 Windows 2000 名称.格式: \\servername\sharena ...
- 【iOS】Xcode 使用 CocoaPods 导入第三方库后没有提示
Github 上下载的开源项目,运行后出现的 [iOS]build diff: /../Podfile.lock: No such file or directory 解决后,又出现了这个问题. 解决 ...
- C++ protobuffer 前后端通信 简单应用
后端发送多个protobuffer消息到前端,前端用socket监听,如何区分消息类型呢? //定义心跳包 DseHeartbeat _DseHeartbeat; DseHeartbeat _DseH ...
- mule优缺点和MEL
优点1.开源 https://github.com/mulesoft/mule2.丰富的connector ,可以通过不同的形式来连接各个系统JMS.Web Service.JDBC.HTTP等3.c ...
- MySQL-5.7.21非图形化下载、安装、连接问题记录
1.安装包下载链接:https://cdn.mysql.com//Downloads/MySQL-5.7/mysql-5.7.21-winx64.zip 官网:https://www.mysql.co ...
- Linux基础文件权限
一.基本权限 文件权限设置: 可以赋于某个用户或组 能够以何种方式 访问某个文件 权限对象:属主: u属组: g其他人: o 基本权限类型:读:r 4写:w 2执行: x 1 rwx rw- r-- ...
- 【Java例题】2.4求函数
4.输入x,编程试求函数 y=sin(x^2)/(1-cosx)的值. 这里的"^"表示乘方. package study; import java.util.Scanner; p ...
- web面试
什么是面向对象? 程序中的事物都是用对象结构来描述的,所有的程序都是用面向对象的思想,管理数据和功能的. 面向对象三大特点:封装 继承 多态 什么是封装? 创建一个对象结构,用来保存一个事物的属性和方 ...
- SoapSerialization——手机号码归属地
public class MainActivity extends AppCompatActivity { private EditText etNumber; private TextView tv ...