IDEA下基于MAVEN的SSM框架整合
源码可以以上传github https://github.com/ingxx/ssm_first
最近把用IDEA把SSM框架整合一遍遇到了不少坑,在这里写出来
这里maven我使用的是自己下载的3.5.3版本,使用IDEA自带的MAVEN也可以。MAVEN的使用不再赘述。

新建maven项目使用wbapp模板 NEXT

GroupId填组织名称,artifactId填项目名称 下一步
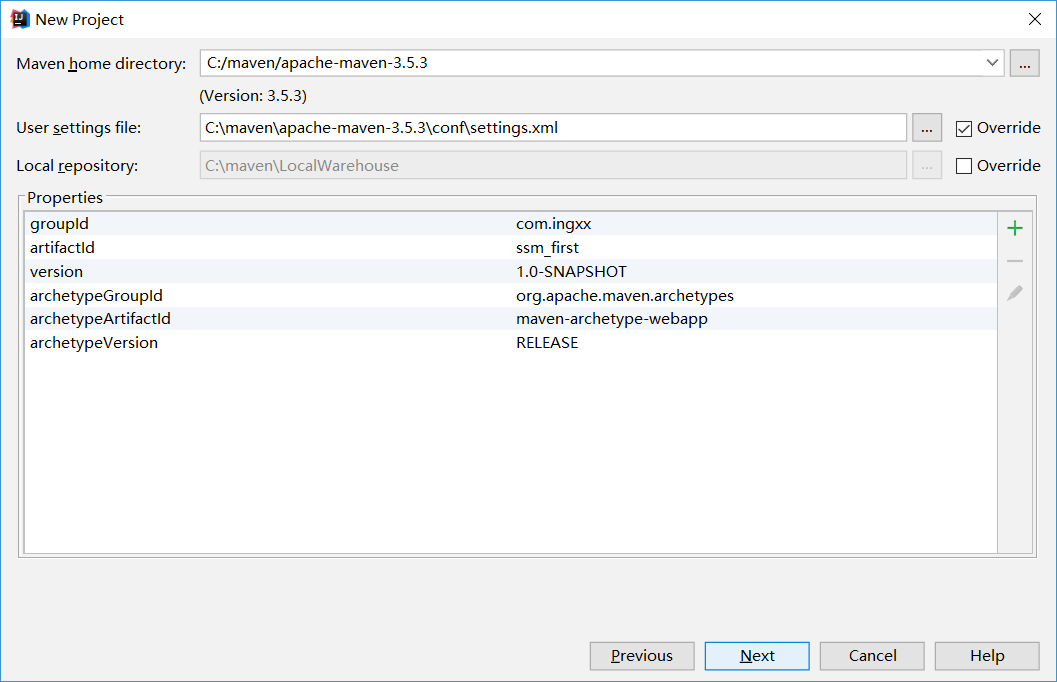
这里我的MAVEN是自己下的如果使用默认则不需要配置,如果网络不好,请查找资料更改仓库为阿里的仓库。

Finish即可
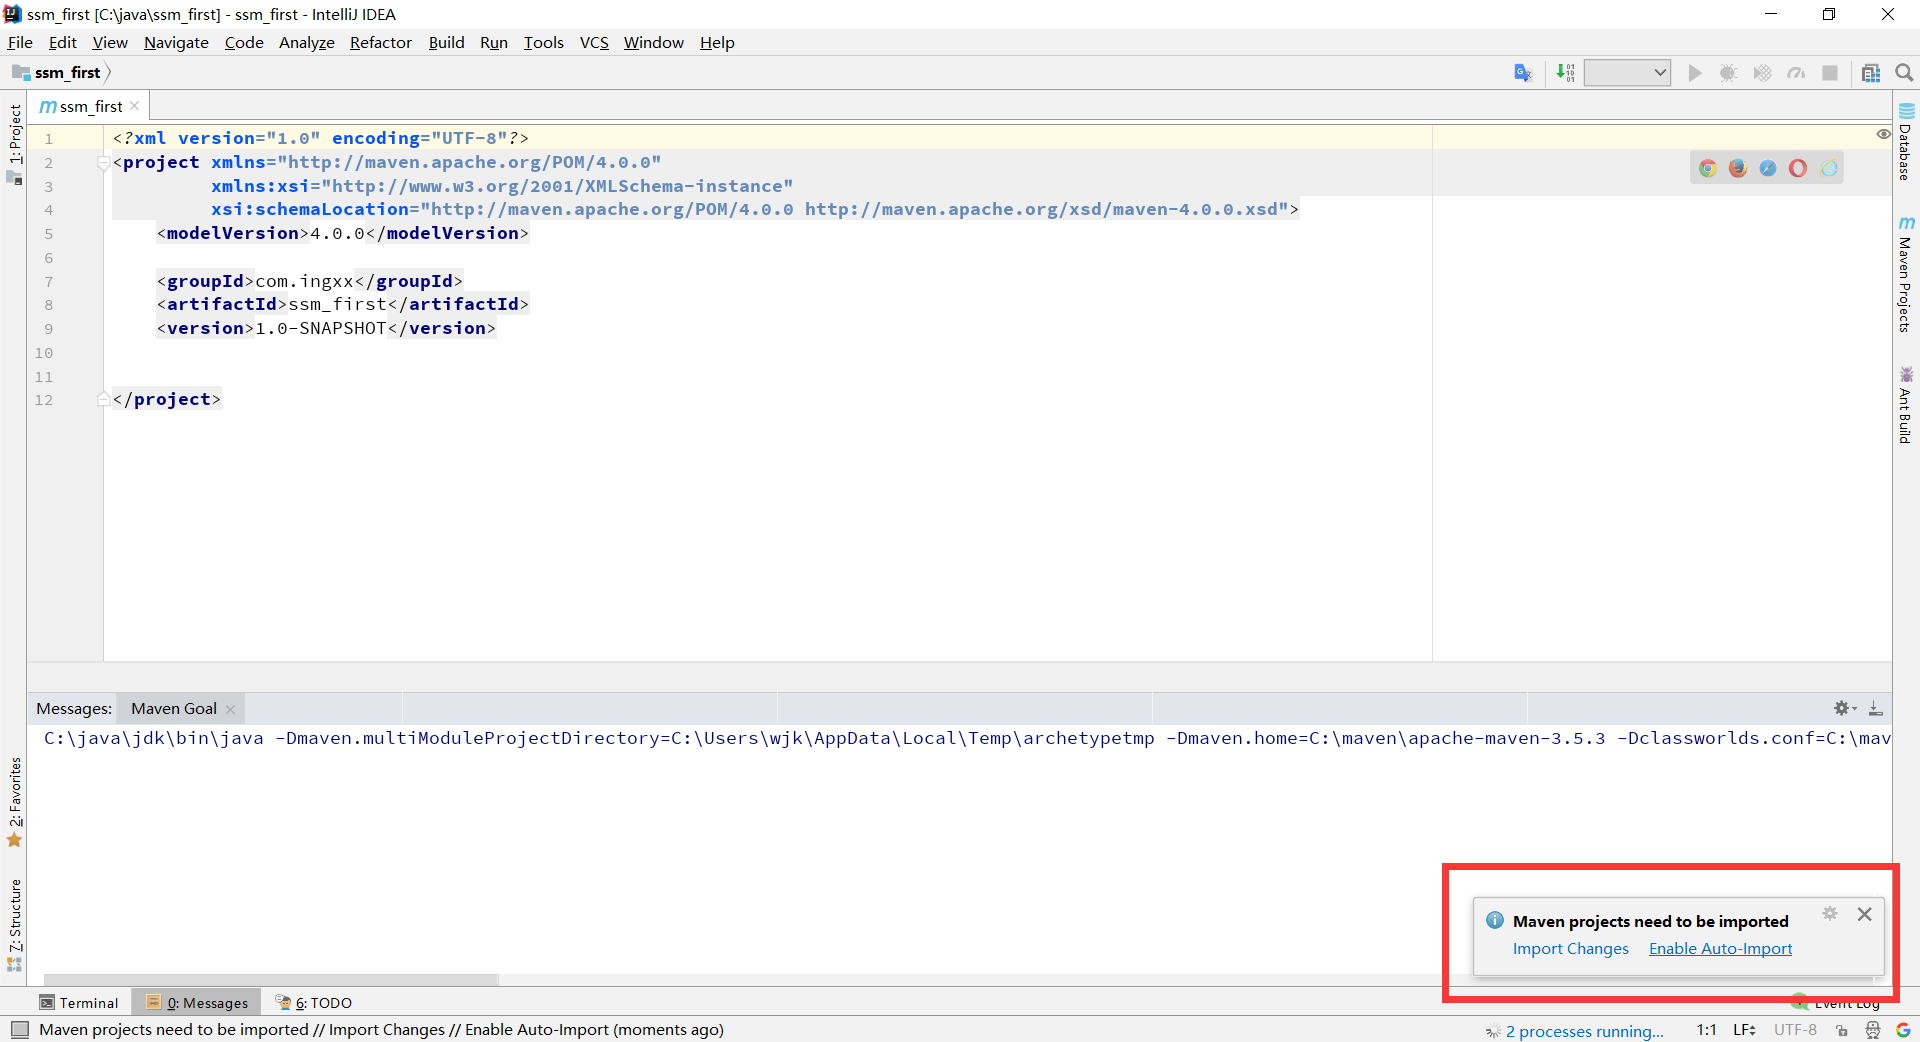
这里选enable-auto-import
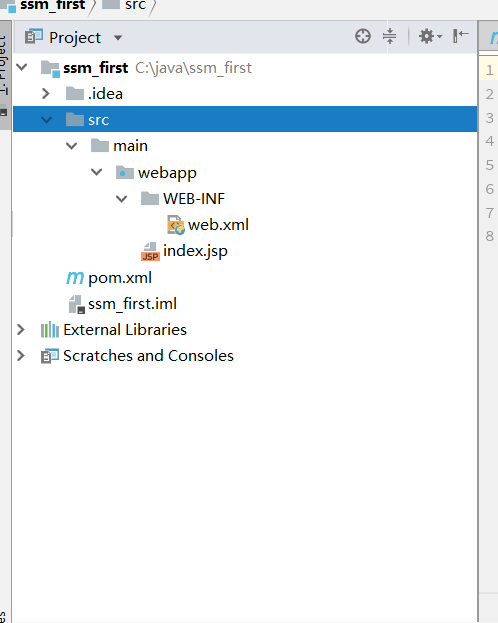
此时项目结构如图所示

建立如上结构
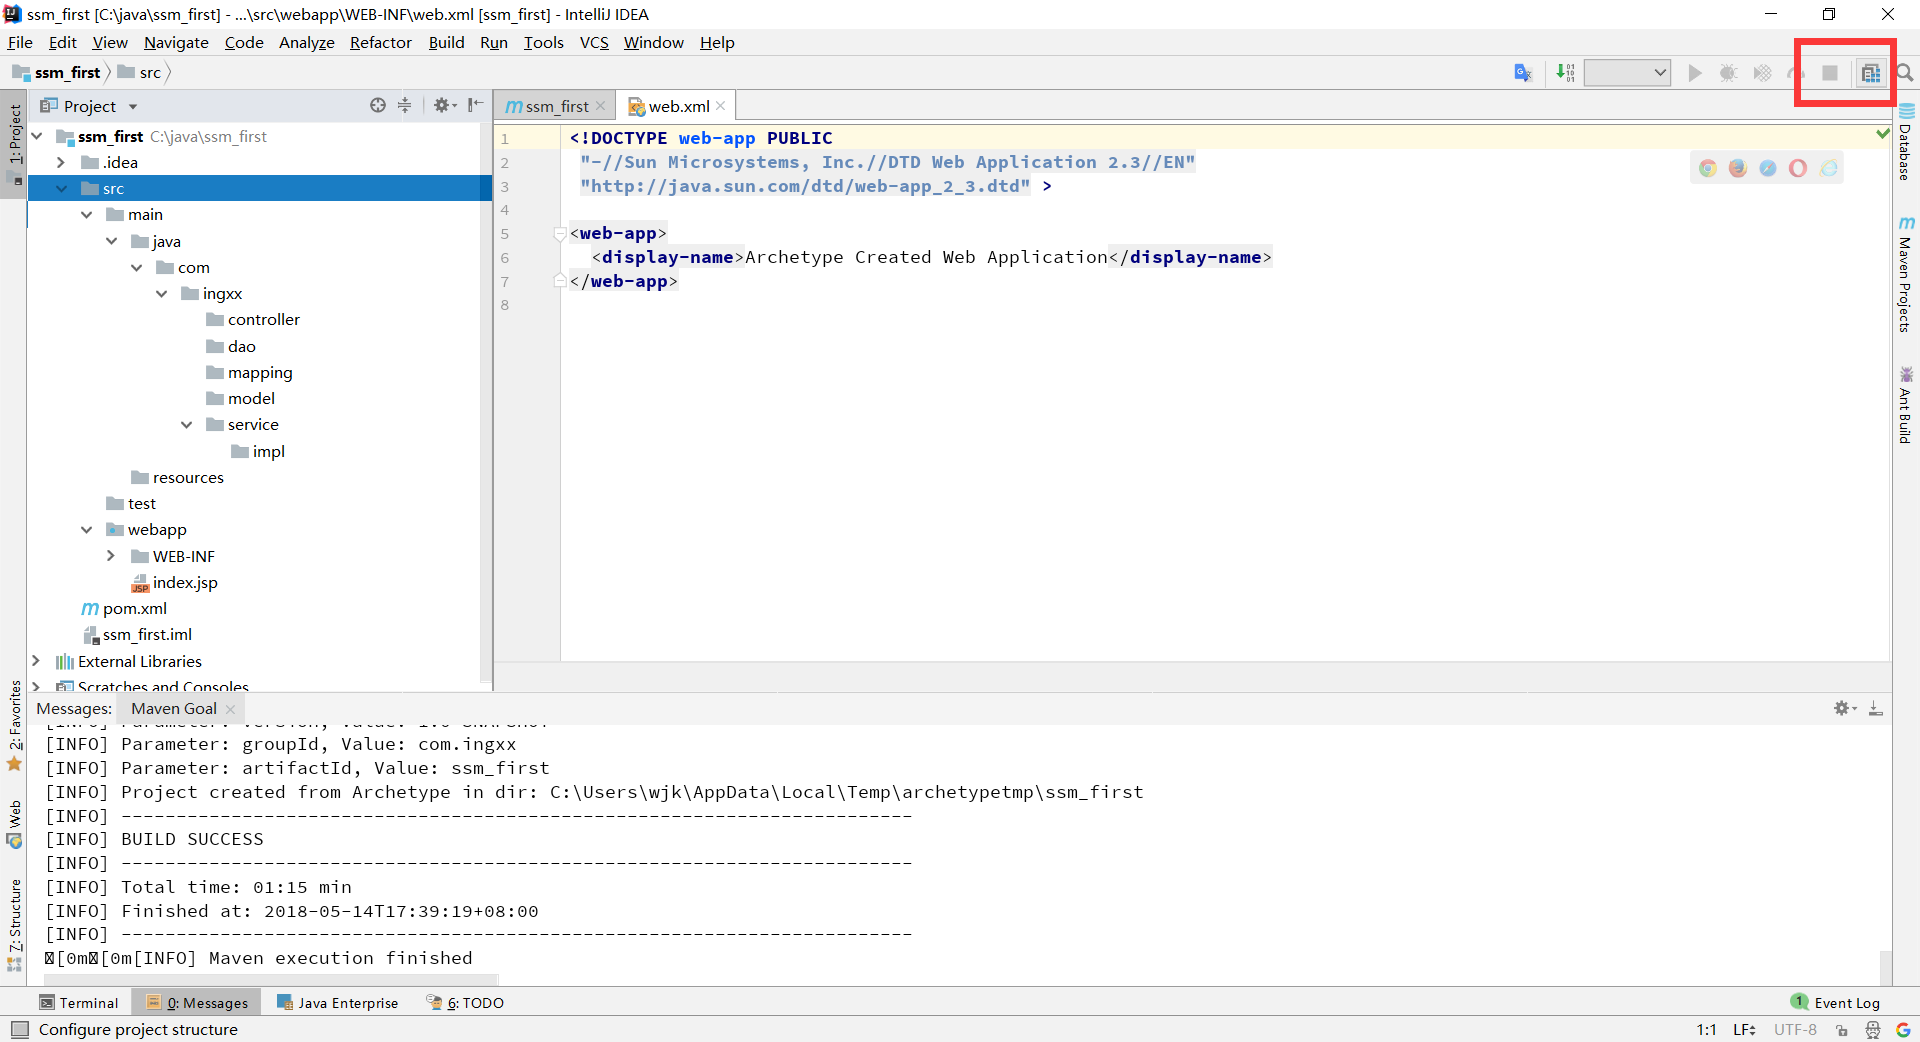
点击这个图标进行配置
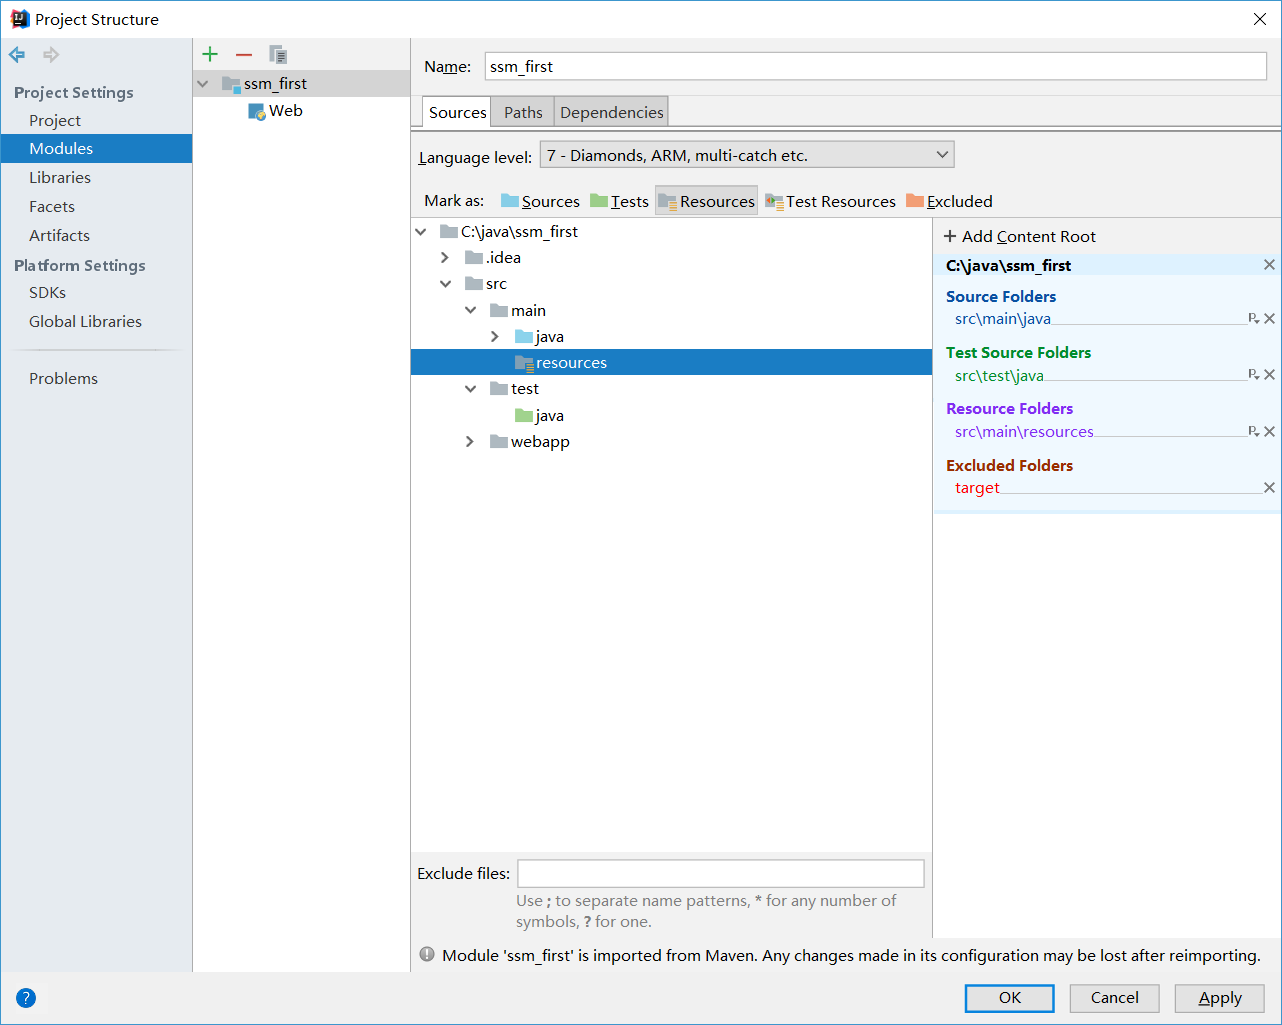
设置IDEA识别目录
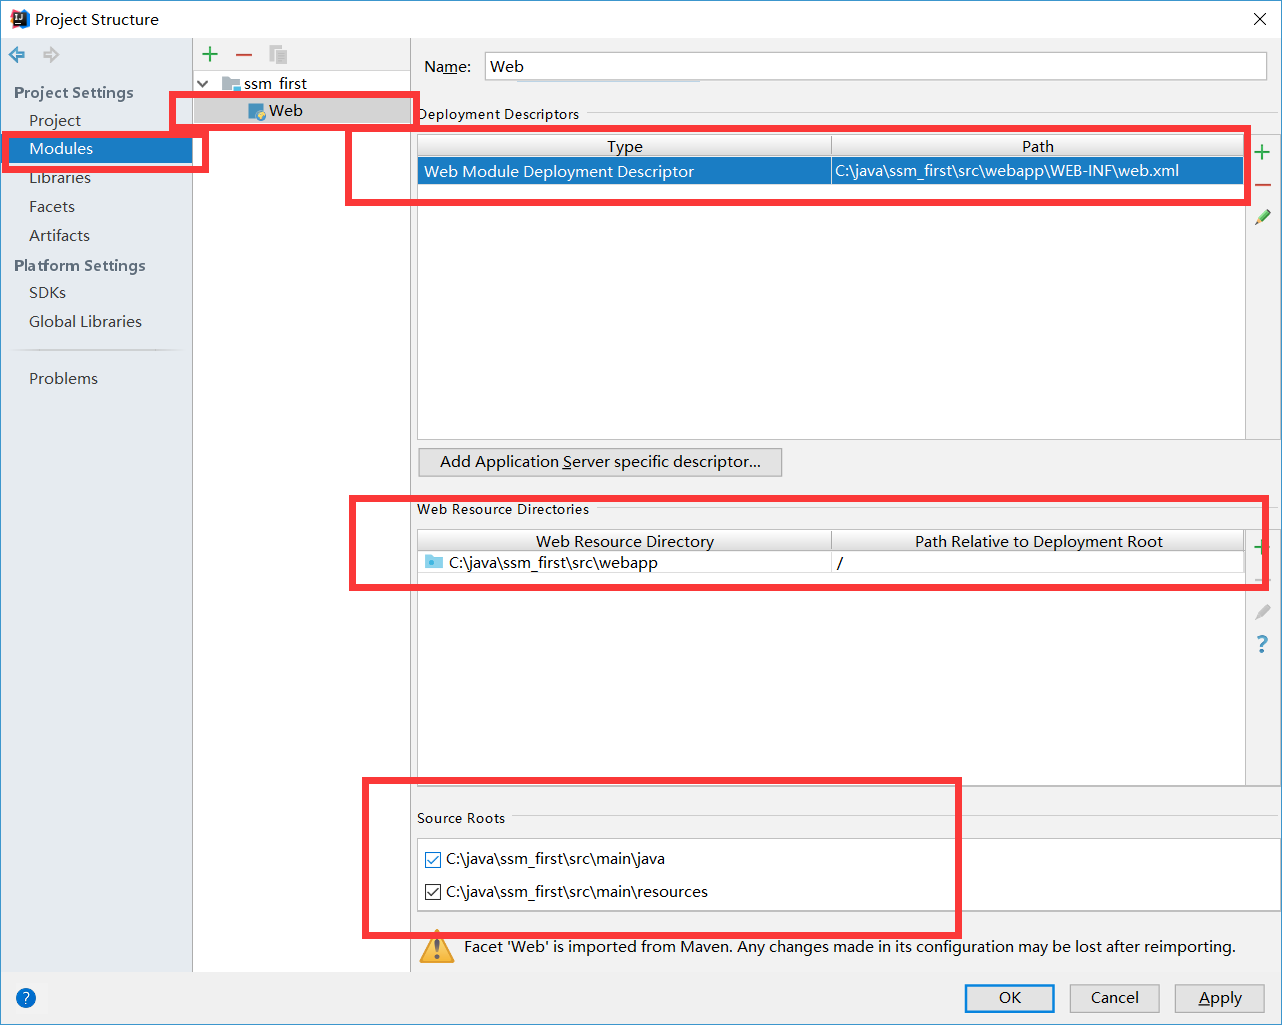
设置web.xml目录和网站根目录等
打开pom.xml文件在properties节点添加版本信息
        <!--srping版本-->

        <spring.version>4.3.14.RELEASE</spring.version>

        <!--mybatis版本-->

        <mybatis.version>3.4.0</mybatis.version>
在dependencies节点下添加依赖 注释已有解释不再赘述
       <dependency>

            <groupId>junit</groupId>

            <artifactId>junit</artifactId>

            <version>4.11</version>

            <scope>test</scope>

        </dependency>

        <!-- mybatis核心包 -->

        <dependency>

            <groupId>org.mybatis</groupId>

            <artifactId>mybatis</artifactId>

            <version>${mybatis.version}</version>

        </dependency>

        <!-- mybatis/spring包 -->

       <dependency>

            <groupId>org.mybatis</groupId>

            <artifactId>mybatis-spring</artifactId>

            <version>1.3.0</version>

        </dependency>

        <!--spring单元测试依赖 -->

        <dependency>

            <groupId>org.springframework</groupId>

            <artifactId>spring-test</artifactId>

            <version>${spring.version}</version>

            <scope>test</scope>

        </dependency>

        <!-- springMVC核心包 -->

        <dependency>

            <groupId>org.springframework</groupId>

            <artifactId>spring-webmvc</artifactId>

            <version>${spring.version}</version>

        </dependency>

        <!-- spring核心包 -->

        <dependency>

            <groupId>org.springframework</groupId>

            <artifactId>spring-core</artifactId>

            <version>${spring.version}</version>

        </dependency>

        <dependency>

            <groupId>org.springframework</groupId>

            <artifactId>spring-beans</artifactId>

            <version>${spring.version}</version>

        </dependency>

        <dependency>

            <groupId>org.springframework</groupId>

            <artifactId>spring-context</artifactId>

            <version>${spring.version}</version>

        </dependency>

        <dependency>

            <groupId>org.springframework</groupId>

            <artifactId>spring-context-support</artifactId>

            <version>${spring.version}</version>

        </dependency>

        <dependency>

            <groupId>org.springframework</groupId>

            <artifactId>spring-tx</artifactId>

            <version>${spring.version}</version>

        </dependency>

        <dependency>

            <groupId>org.springframework</groupId>

            <artifactId>spring-web</artifactId>

            <version>${spring.version}</version>

        </dependency>

        <dependency>

            <groupId>org.springframework</groupId>

            <artifactId>spring-jdbc</artifactId>

            <version>${spring.version}</version>

        </dependency>

        <dependency>

            <groupId>javax.servlet</groupId>

            <artifactId>javax.servlet-api</artifactId>

            <version>3.0.1</version>

            <scope>provided</scope>

        </dependency>

        <dependency>

            <groupId>javax.servlet.jsp</groupId>

            <artifactId>jsp-api</artifactId>

            <version>2.2</version>

            <scope>provided</scope>

        </dependency>

        <!--mysql数据库链接包-->

        <dependency>

            <groupId>mysql</groupId>

            <artifactId>mysql-connector-java</artifactId>

            <version>5.1.30</version>

        </dependency>

        <!--阿里数据源-->

        <dependency>

            <groupId>com.alibaba</groupId>

            <artifactId>druid</artifactId>

            <version>1.1.9</version>

        </dependency>

        <!-- JSTL标签类 -->

        <dependency>

            <groupId>jstl</groupId>

            <artifactId>jstl</artifactId>

            <version>1.2</version>

        </dependency>

        <!-- 日志文件管理包 -->

        <dependency>

            <groupId>log4j</groupId>

            <artifactId>log4j</artifactId>

            <version>1.2.17</version>

        </dependency>

        <!-- 上传组件包 -->

        <dependency>

            <groupId>commons-fileupload</groupId>

            <artifactId>commons-fileupload</artifactId>

            <version>1.3.1</version>

        </dependency>

        <dependency>

            <groupId>commons-io</groupId>

            <artifactId>commons-io</artifactId>

            <version>2.4</version>

        </dependency>

        <dependency>

            <groupId>commons-codec</groupId>

            <artifactId>commons-codec</artifactId>

            <version>1.9</version>

        </dependency>
由于mybatis映射文件不在资源目录下所以在build节点下添加如下配置
        <resources>

            <resource>

                <directory>src/main/java</directory>

                <includes>

                    <include>**/*.properties</include>

                    <include>**/*.xml</include>

                </includes>

                <filtering>false</filtering>

            </resource>

            <resource>

                <directory>src/main/resources</directory>

                <includes>

                    <include>**/*.properties</include>

                    <include>**/*.xml</include>

                </includes>

                <filtering>false</filtering>

            </resource>

        </resources>
接着在resources下新建jdbc.properties配置文件
jdbc.driver=com.mysql.jdbc.Driver

jdbc.url=jdbc:mysql://localhost:3306/test?useUnicode=true&characterEncoding=utf-8

jdbc.username=root

jdbc.password=

#定义初始连接数

jdbc.initialSize=0

#定义最大连接数

jdbc.maxActive=20

#定义最长等待时间

jdbc.maxWait=60000
然后在resources新建applicationContext.xml spring核心配置文件 也可以叫spring-server.xml这样加web.xml加载时可以用spring-*加载
<?xml version="1.0" encoding="UTF-8"?>

<beans xmlns="http://www.springframework.org/schema/beans"

       xmlns:xsi="http://www.w3.org/2001/XMLSchema-instance"

       xmlns:context="http://www.springframework.org/schema/context" xmlns:tx="http://www.springframework.org/schema/tx"

       xsi:schemaLocation="http://www.springframework.org/schema/beans http://www.springframework.org/schema/beans/spring-beans.xsd http://www.springframework.org/schema/context http://www.springframework.org/schema/context/spring-context.xsd http://www.springframework.org/schema/tx http://www.springframework.org/schema/tx/spring-tx.xsd">

    <context:component-scan base-package="com.ingxx.service"/>

    <!--加载配置文件-->

    <context:property-placeholder location="classpath:jdbc.properties"/>

    <!--配置数据源-->

    <bean id="dataSource" class="com.alibaba.druid.pool.DruidDataSource">

        <property name="driverClassName" value="${jdbc.driver}"/>

        <property name="url" value="${jdbc.url}"/>

        <property name="username" value="${jdbc.username}"/>

        <property name="password" value="${jdbc.password}"/>

        <property name="initialSize" value="${jdbc.initialSize}"/>

        <property name="maxActive" value="${jdbc.maxActive}"/>

        <property name="maxWait" value="${jdbc.maxWait}"/>

    </bean>

    <!--配置session工厂-->

    <bean id="sessionFactory" class="org.mybatis.spring.SqlSessionFactoryBean">

        <property name="dataSource" ref="dataSource"/>

        <!--加载mybatis配置文件-->

        <property name="configLocation" value="classpath:mybatis-config.xml"/>

        <!--加载mapper配置文件-->

        <property name="mapperLocations" value="classpath*:com/ingxx/mapping/*.xml"/>

    </bean>

    <!--mybatis动态代理设置 自动扫描dao接口并添加到spring -->

    <bean class="org.mybatis.spring.mapper.MapperScannerConfigurer">

        <property name="sqlSessionFactoryBeanName" value="sessionFactory"/>

        <!--扫描dao接口生成实现-->

        <property name="basePackage" value="com.ingxx.dao"/>

    </bean>

    <!--配置事务管理器-->

    <bean id="transactionManager" class="org.springframework.jdbc.datasource.DataSourceTransactionManager">

        <property name="dataSource" ref="dataSource"/>

    </bean>

    <!--事物注解-->

    <tx:annotation-driven/>

</beans>
接着在resources下新建mybatis-config.xml mybatis配置文件因为spinrg配置了动态代理扫描所以不需要配置什么配置
<?xml version="1.0" encoding="UTF-8" ?>

<!DOCTYPE configuration

        PUBLIC "-//mybatis.org//DTD Config 3.0//EN"

        "http://mybatis.org/dtd/mybatis-3-config.dtd">

<configuration>

    <!--设置别名-->

    <!--<typeAliases>-->

        <!--<package name="com.ingxx.dao"/>-->

    <!--</typeAliases>-->

</configuration>
接着在resources下新建spring-mvc.xml spring mvc配置文件 这是一个基本的配置文件没有配置POST乱码问题 可以自己添加
<?xml version="1.0" encoding="UTF-8"?>

<beans xmlns="http://www.springframework.org/schema/beans"

       xmlns:xsi="http://www.w3.org/2001/XMLSchema-instance" xmlns:mvc="http://www.springframework.org/schema/mvc"

       xmlns:context="http://www.springframework.org/schema/context"

       xsi:schemaLocation="http://www.springframework.org/schema/beans http://www.springframework.org/schema/beans/spring-beans.xsd http://www.springframework.org/schema/mvc http://www.springframework.org/schema/mvc/spring-mvc.xsd http://www.springframework.org/schema/context http://www.springframework.org/schema/context/spring-context.xsd">

    <!--扫描控制层标签 如果扫描全部 事物无法使用-->

    <context:component-scan base-package="com.ingxx.controller"/>

    <!--开始注解,相当于更改了映射器和适配器-->

    <mvc:annotation-driven/>

    <!--配置页面视图-->

    <bean class="org.springframework.web.servlet.view.InternalResourceViewResolver">

        <property name="prefix" value="/WEB-INF/jsp/"/>

        <property name="suffix" value=".jsp"/>

    </bean>

</beans>
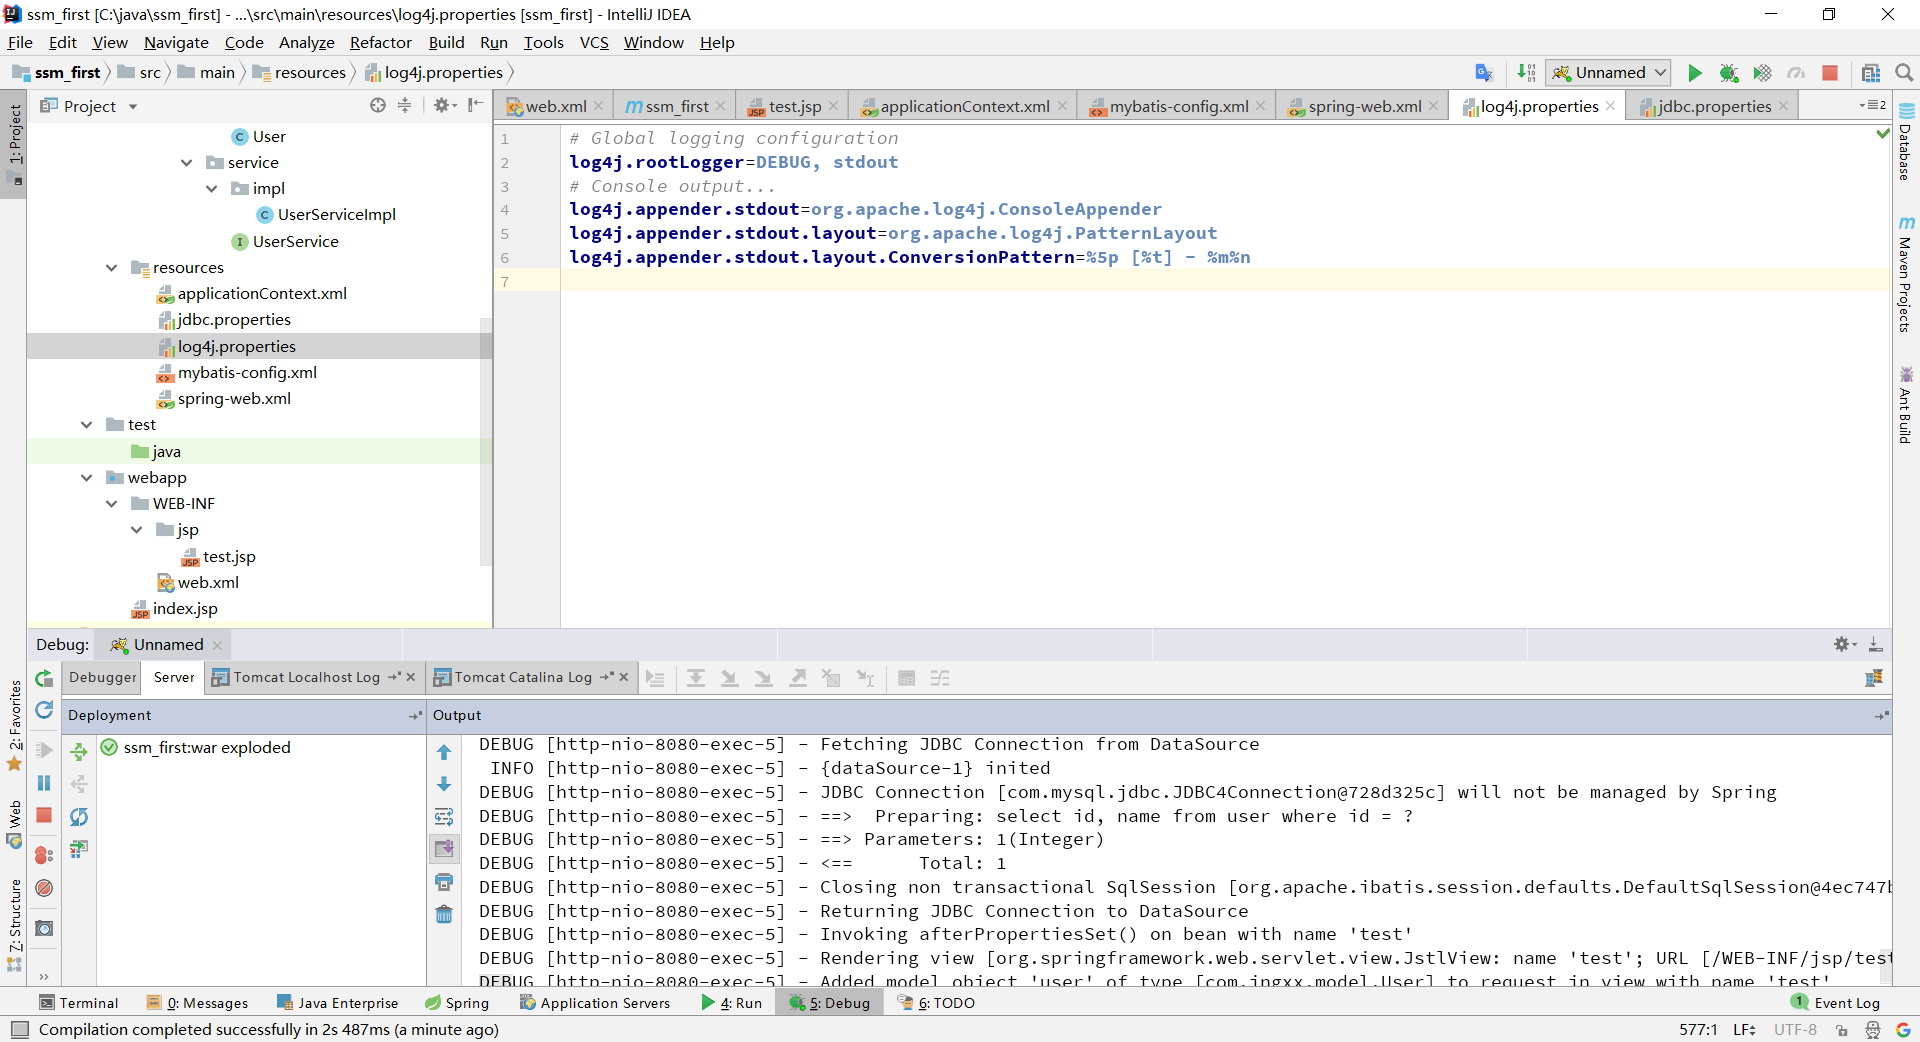
然后再resources下添加log4j.properties文件
# Global logging configuration

log4j.rootLogger=DEBUG, stdout

# Console output...

log4j.appender.stdout=org.apache.log4j.ConsoleAppender

log4j.appender.stdout.layout=org.apache.log4j.PatternLayout

log4j.appender.stdout.layout.ConversionPattern=%5p [%t] - %m%n
接着配置web.xml
<!DOCTYPE web-app PUBLIC

        "-//Sun Microsystems, Inc.//DTD Web Application 2.3//EN"

        "http://java.sun.com/dtd/web-app_2_3.dtd" >

<web-app xmlns="http://xmlns.jcp.org/xml/ns/javaee" xmlns:xsi="http://www.w3.org/2001/XMLSchema-instance"

         xsi:schemaLocation="http://xmlns.jcp.org/xml/ns/javaee

                      http://xmlns.jcp.org/xml/ns/javaee/web-app_3_1.xsd"

         version="3.1" metadata-complete="true">

    <display-name>Archetype Created Web Application</display-name>

    <!--加载spring配置文件到上下文如果在前端控制器配置可以不用写-->

    <context-param>

        <param-name>contextConfigLocation</param-name>

        <param-value>classpath:applicationContext.xml</param-value>

    </context-param>

    <!--加载spring上下文监听器,如果在前端控制器配置可以不用写-->

    <listener>

        <listener-class>org.springframework.web.context.ContextLoaderListener</listener-class>

    </listener>

    <!--加载前端控制器-->

    <servlet>

        <servlet-name>springmvc</servlet-name>

        <servlet-class>org.springframework.web.servlet.DispatcherServlet</servlet-class>

        <init-param>

            <!--加载配置文件到上下文,如果使用spring-*.xml则不用配置context-param和spring监听器-->

            <param-name>contextConfigLocation</param-name>

            <param-value>classpath:spring-web.xml</param-value>

        </init-param>

        <load-on-startup>1</load-on-startup>

    </servlet>

    <servlet-mapping>

        <servlet-name>springmvc</servlet-name>

        <!--

        * 拦截所有jsp js png等等

        *.action 拦截以action结尾的请求

        /拦截所有请求除了jsp-->

        <url-pattern>/</url-pattern>

    </servlet-mapping>

</web-app>
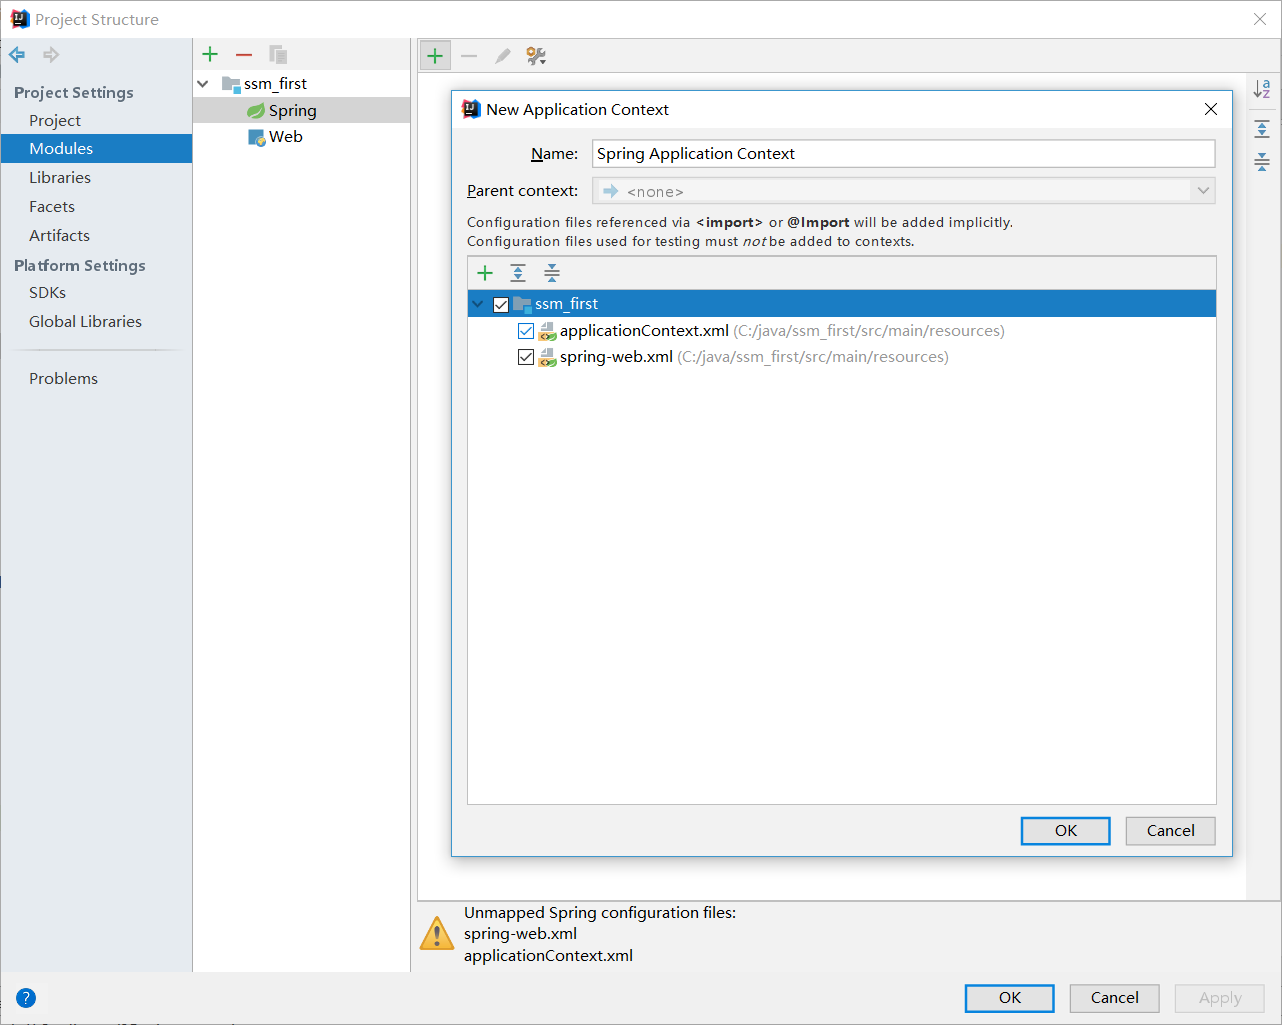
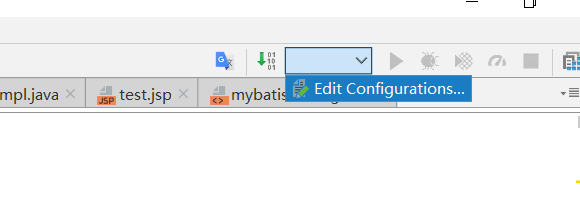
让idea加载配置文件
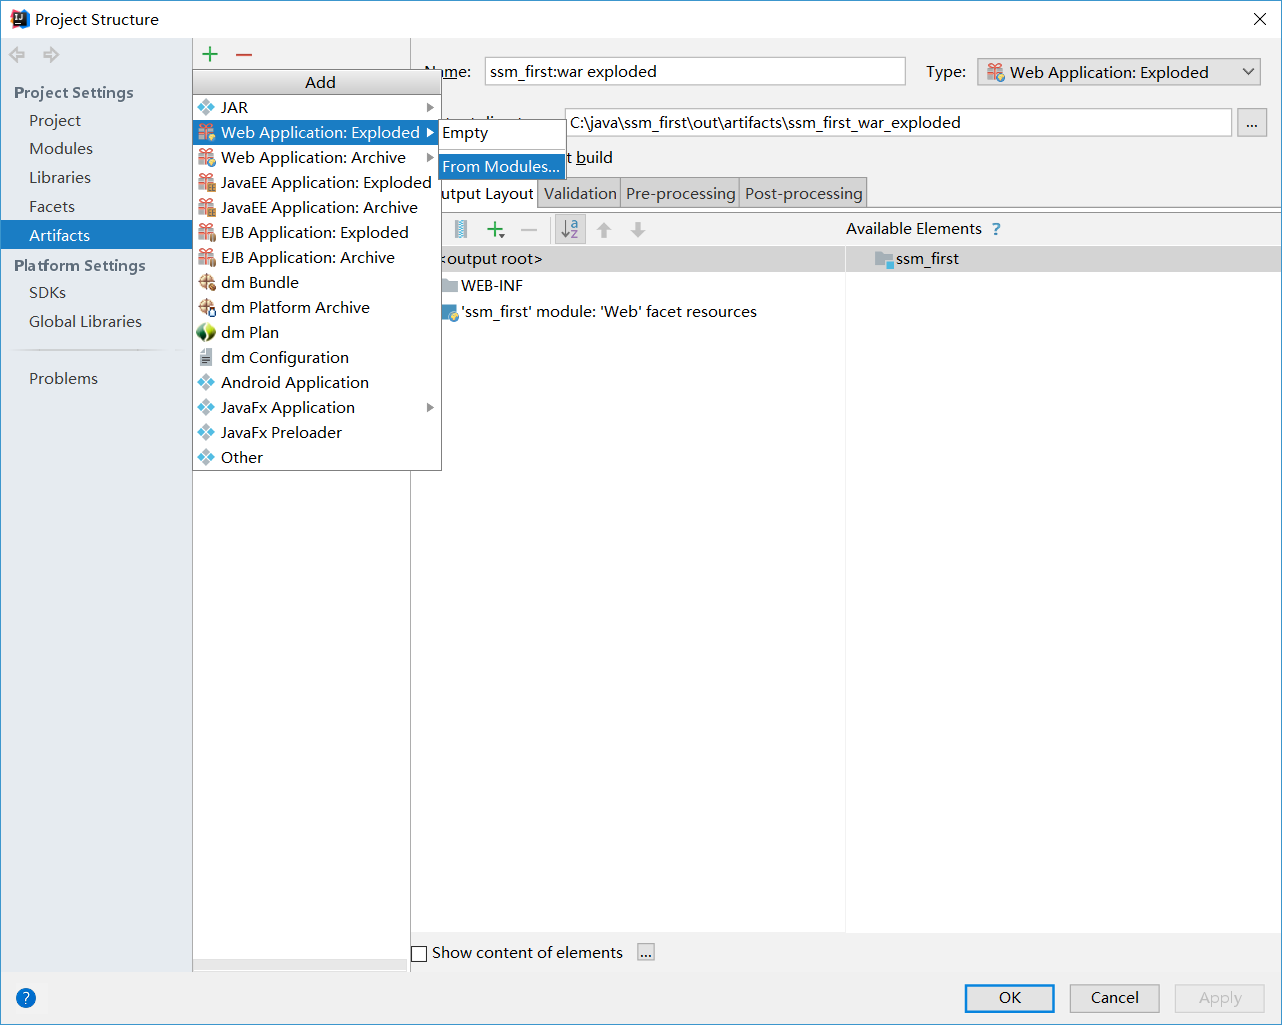
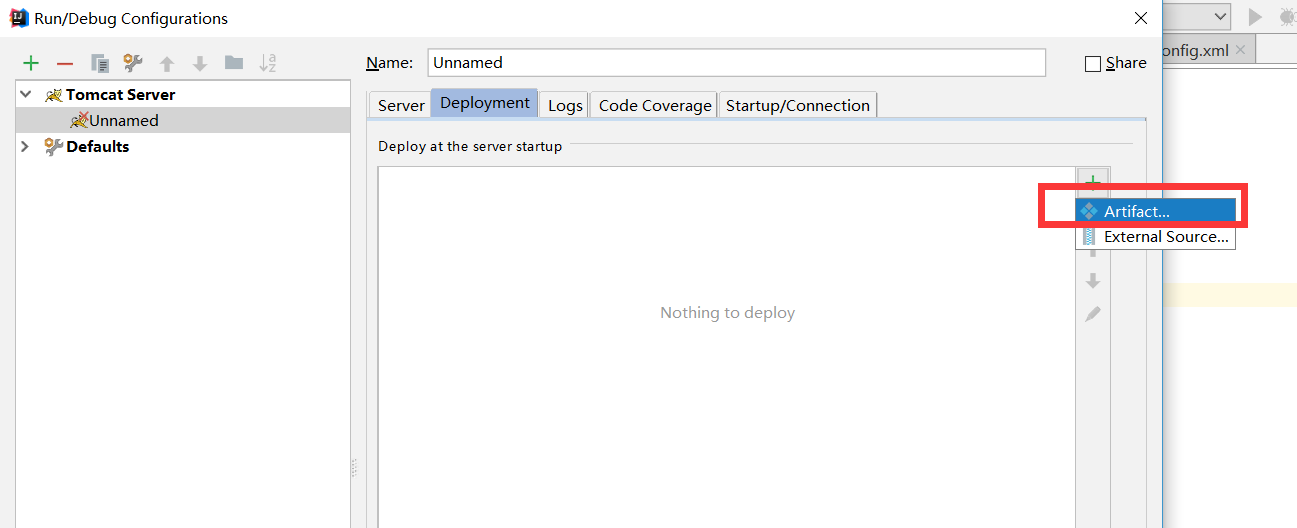
添加发布设置

配置TOMCAT
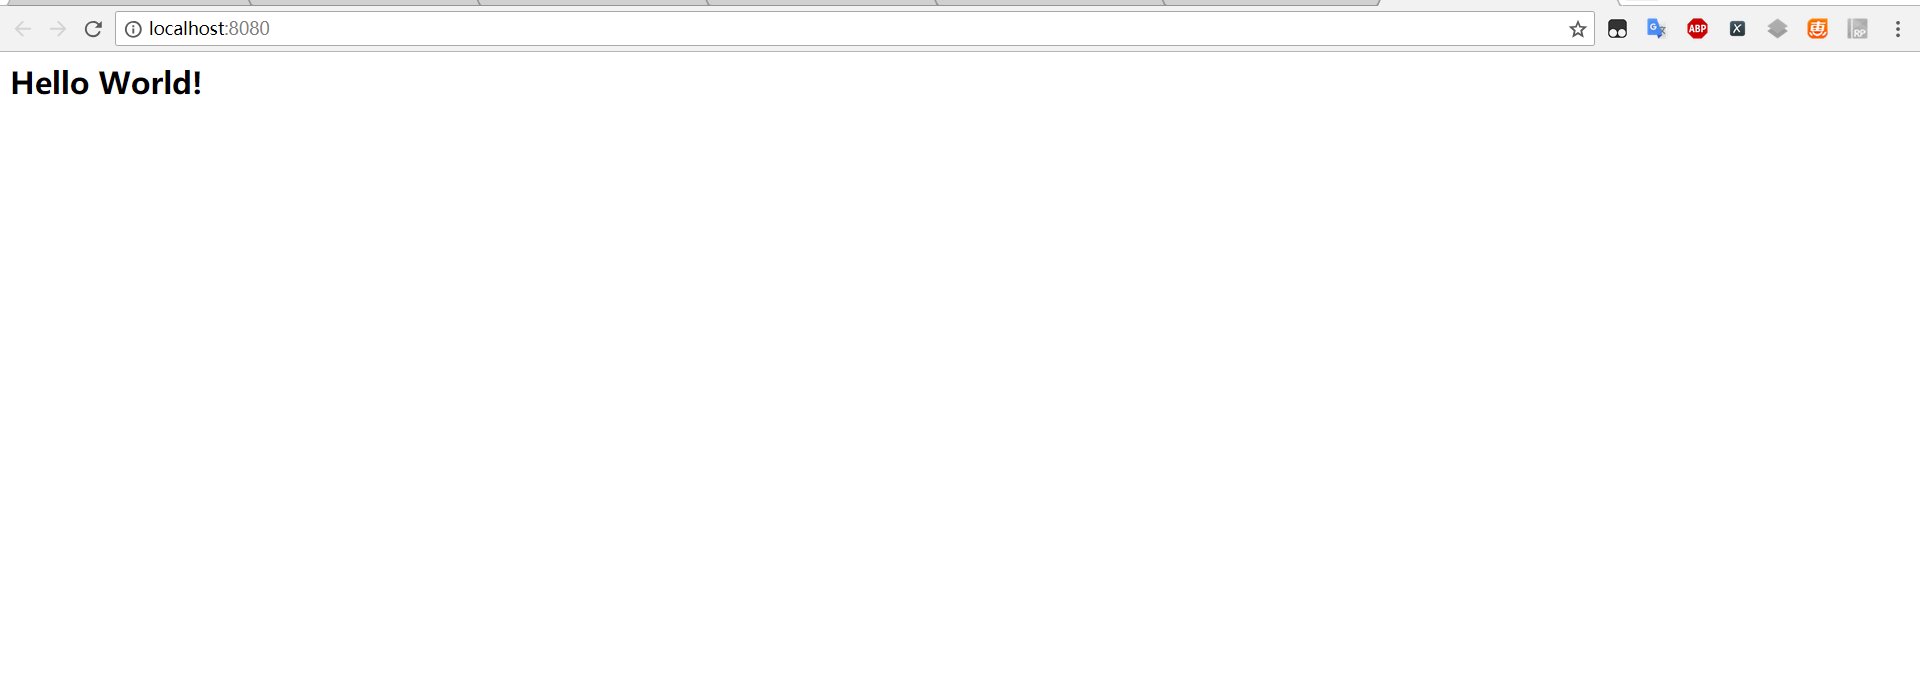
这时整合就完成了,后期需要什么功能可以自己添加
如果不能使用请重新配置环境
IDEA下基于MAVEN的SSM框架整合的更多相关文章
- 基于maven的ssm框架整合
基于maven的ssm框架整合 第一步:通过maven建立一个web项目. 第二步:pom文件导入jar包 (1 ...
- 基于Maven的SSM框架搭建
Maven + Spring + Spring MVC + Mybatis + MySQL整合SSM框架 1.数据库准备 本文主要想实现SSM框架的搭建,并基于该框架实现简单的登录功能,那么先新建一张 ...
- MyEclipse的多模块Maven web(ssm框架整合)
Maven的多模块可以让项目结构更明确,提高功能的内聚,降低项目的耦合度,真正的体现出分层这一概念. 我们在操作中,要明白为什么这样做,要了解到更深的层次,这样,我们就不限于个别软件了. 话不多说,直 ...
- IDEA使用maven搭建SSM框架整合项目(超级详细,值得一看)
目录 温馨提示 简单介绍下SSM 搭建过程 一.框架介绍 二.下载Maven 三.创建Maven项目 四.Maven工程需要引入的Jar 包 五.整合SSM框架.需要的相关配置文件配置项目 六.工程导 ...
- 使用Maven完成SSM框架整合环境构建——基于Spring4和Mybatis3
只言片语 使用Maven来搭建一个SSM环境,其实和使用手工倒入jar的过程没有多大区别,所用的jar包都是一样的,但是区别在与不用你手动导入jar包了,而是只修改pom.xml,maven会自动根据 ...
- 搭建基于Maven的SSM框架
先展示文件结构图对工程结构有大致了解: 主要为 ssm-parent (用来管理jar包版本)是每个工程的父工程,ssm-common(用来处理底层数据),ssm-manager(对数据库信息进行操 ...
- maven项目快速搭建SSM框架(一)创建maven项目,SSM框架整合,Spring+Springmvc+Mybatis
首先了解服务器开发的三层架构,分配相应的任务,这样就能明确目标,根据相应的需求去编写相应的操作. 服务器开发,大致分为三层,分别是: 表现层 业务层 持久层 我们用到的框架分别是Spring+Spri ...
- 基于 maven 的ssm 框架搭建
1.新建一个 maven 工程, war 包 2.引入 pom 文件(springmvc+spring+mybatis) 3.引入配置文件 4.引入页面,编写 contorller 层测试 5.编写查 ...
- SSM框架整合环境构建——基于Spring4和Mybatis3
目录 环境 配置说明 所需jar包 配置db.properties 配置log4j.properties 配置spring.xml 配置mybatis-spring.xml 配置springmvc.x ...
随机推荐
- 信鸽推送在springboot中出现jar包冲突问题
错误提示 : java.lang.NoSuchMethodError: org.json.JSONObject.put(Ljava/lang/String;Ljava/util/Collection; ...
- Hadoop编程踩坑
Hadoop踩坑 在hadoop所有组件编程中,遇到在Windows下运行程序出现 java.io.IOException: Could not locate executable null\bin\ ...
- 对def函数的参数认识
转载:https://www.cnblogs.com/Guido-admirers/p/6068702.html 如何理解函数的形式参数*args,**kwargs 形参*args的输出形式为tupl ...
- Python自学day-7
一.静态方法(@staticmethod) class Dog(object): def __init__(self): pass @staticmethod def talk(): #静态方法 pa ...
- Hadoop 学习之路(七)—— HDFS Java API
一. 简介 想要使用HDFS API,需要导入依赖hadoop-client.如果是CDH版本的Hadoop,还需要额外指明其仓库地址: <?xml version="1.0" ...
- wireshark数据包分析实战 第三、四章
1,wireshark支持的协议上千种,开源的. 2,wireshark需要winpcap驱动支持.winpcap驱动的作用通过操作系统捕捉原始数据包.应用过滤器.将网卡切换为混杂模式. 3,捕获文件 ...
- 8天入门docker系列 —— 第七天 让你的container实现跨主机访问
当你有若干个容器之后,你可能就希望实现容器的跨机部署访问了,比如aspnetcore在一台host上,mysql在另外一个host上,如果要实现这样的功能,需要你借助 docker自带的overlay ...
- C#学习笔记:ListBox控件的用法
样式如下: 实现的代码一: using System;using System.Collections.Generic;using System.ComponentModel;using System ...
- java-NIO-FileChannel(文件IO)
Java NIO中的FileChannel是一个连接到文件的通道.可以通过文件通道读写文件. FileChannel无法设置为非阻塞模式,它总是运行在阻塞模式下. 对于文件的复制,平时我们都是使用输入 ...
- flutter 如何实现文件读写(使用篇)
flutter文件读写可以对磁盘文件进行操作,实现某些业务场景,那么我们开始来讲下这个文件读写操作. 使用的库插件(package) dart:io(用于数据处理) path_provider (用于 ...