cygwin下安装hadoop0.20
安装时选择软件包:
editor-两个VIM、base-SED、Net-OPENSSH、OPENSSL、libs-libintl3和libintl8
环境变量:
path=%JAVA_HOME%\bin;%JAVA_HOME%\jre6\bin;D:\Program Files\MySQL\MySQL Server 5.5\bin;D:\Program Files\Python2.;D:\Program Files\MongoDB\bin;D:\Program Files\TortoiseSVN\bin;%MAVEN_HOME%\bin;D:\cygwin64\bin;D:\cygwin64\usr\bin
和
CYGWIN=ntsec tty
然后开始安装,安装完开始启动sshd服务:
进入终端执行:
tree@treePC ~

$ ssh-host-config

*** Query: Overwrite existing /etc/ssh_config file? (yes/no) yes

*** Info: Creating default /etc/ssh_config file

*** Query: Overwrite existing /etc/sshd_config file? (yes/no) yes

*** Info: Creating default /etc/sshd_config file

*** Info: Privilege separation is set to yes by default since OpenSSH 3.3.

*** Info: However, this requires a non-privileged account called 'sshd'.

*** Info: For more info on privilege separation read /usr/share/doc/openssh/README.privsep.

*** Query: Should privilege separation be used? (yes/no) no

*** Info: Updating /etc/sshd_config file

*** Query: Do you want to install sshd as a service?

*** Query: (Say "no" if it is already installed as a service) (yes/no) yes

*** Query: Enter the value of CYGWIN for the daemon: [] ntsec

*** Info: On Windows Server , Windows Vista, and above, the

*** Info: SYSTEM account cannot setuid to other users -- a capability

*** Info: sshd requires.  You need to have or to create a privileged

*** Info: account.  This script will help you do so.

*** Info: You appear to be running Windows XP 64bit, Windows  Server,

*** Info: or later.  On these systems, it's not possible to use the LocalSystem

*** Info: account for services that can change the user id without an

*** Info: explicit password (such as passwordless logins [e.g. public key

*** Info: authentication] via sshd).

*** Info: If you want to enable that functionality, it's required to create

*** Info: a new account with special privileges (unless a similar account

*** Info: already exists). This account is then used to run these special

*** Info: servers.

*** Info: Note that creating a new user requires that the current account

*** Info: have Administrator privileges itself.

*** Info: No privileged account could be found.

*** Info: This script plans to use 'cyg_server'.

*** Info: 'cyg_server' will only be used by registered services.

*** Query: Do you want to use a different name? (yes/no) no

*** Query: Create new privileged user account 'cyg_server'? (yes/no) yes

*** Info: Please enter a password for new user cyg_server.  Please be sure

*** Info: that this password matches the password rules given on your system.

*** Info: Entering no password will exit the configuration.

*** Query: Please enter the password:

*** Query: Reenter:

*** Info: User 'cyg_server' has been created with password 'lee**jan'.

*** Info: If you change the password, please remember also to change the

*** Info: password for the installed services which use (or will soon use)

*** Info: the 'cyg_server' account.

*** Info: Also keep in mind that the user 'cyg_server' needs read permissions

*** Info: on all users' relevant files for the services running as 'cyg_server'.

*** Info: In particular, for the sshd server all users' .ssh/authorized_keys

*** Info: files must have appropriate permissions to allow public key

*** Info: authentication. (Re-)running ssh-user-config for each user will set

*** Info: these permissions correctly. [Similar restrictions apply, for

*** Info: instance, for .rhosts files if the rshd server is running, etc].

*** Info: The sshd service has been installed under the 'cyg_server'

*** Info: account.  To start the service now, call `net start sshd' or

*** Info: `cygrunsrv -S sshd'.  Otherwise, it will start automatically

*** Info: after the next reboot.

*** Info: Host configuration finished. Have fun!
OK,启动SSH:

配置无密码SSH:
在终端执行
tree@treePC ~/.ssh

$ ssh-keygen

Generating public/private rsa key pair.

Enter file in which to save the key (/home/tree/.ssh/id_rsa):

Enter passphrase (empty for no passphrase):

Enter same passphrase again:

Your identification has been saved in /home/tree/.ssh/id_rsa.

Your public key has been saved in /home/tree/.ssh/id_rsa.pub.

The key fingerprint is:

a0:4c:cd::e4::6f:c4::::eb:d6::c9: tree@treePC

The key's randomart image is:

+--[ RSA ]----+

|    .+=          |

|    .B +         |

|    +.O o  .     |

|   o.+ =  E      |

|   .o.  So .     |

|    o ... +      |

|   .   . .       |

|                 |

|                 |

+-----------------+
将公钥加入公钥授权文件中:
tree@treePC ~/.ssh

$ pwd

/home/tree/.ssh

tree@treePC ~/.ssh

$ ls

id_rsa  id_rsa.pub

tree@treePC ~/.ssh

$ cp id_rsa.pub authorized_keys

tree@treePC ~/.ssh

$ ls

authorized_keys  id_rsa  id_rsa.pub
弄完之后重启cygWin,ssh localhost试试能不能连接。
如果报错,重启sshd服务。然后重启cygWin试试。
创建连接,将C盘的jdk链接进来:
tree@treePC ~

$ ln -s "/cygdrive/c/Program Files/Java/jdk1.6.0_43" "/usr/local/jdk"
配置文件:
hadoop-env.sh文件加上JDK
# The java implementation to use.  Required.

export JAVA_HOME=/usr/local/jdk
core-site.xml
<?xml version="1.0"?>

<?xml-stylesheet type="text/xsl" href="configuration.xsl"?>

<!-- Put site-specific property overrides in this file. -->

<configuration>

    <property>

        <name>hadoop.tmp.dir</name>

        <value>/hadoop-0.20.2/temp</value>

    </property>

    <property>

        <name>fs.default.name</name>

        <value>hdfs://localhost:9000</value>

    </property>

</configuration>
hdfs-site.xml
<?xml version="1.0"?>

<?xml-stylesheet type="text/xsl" href="configuration.xsl"?>

<!-- Put site-specific property overrides in this file. -->

<configuration>

    <property>

        <name>dfs.name.dir</name>

        <value>/hadoop-0.20.2/hdfs/name</value>

    </property>

    <property>

        <name>dfs.data.dir</name>

        <value>/hadoop-0.20.2/hdfs/data</value>

    </property>

    <property>

        <name>dfs.replication</name>

        <value>1</value>

    </property>

</configuration>
mapred-site.xml
<?xml version="1.0"?>

<?xml-stylesheet type="text/xsl" href="configuration.xsl"?>

<!-- Put site-specific property overrides in this file. -->

<configuration>

    <property>

        <name>mapred.job.tracker</name>

        <value>localhost:9001</value>

    </property>

    <property>

        <name>mapred.local.dir</name>

        <value>/hadoop-0.20.2/mapred</value>

    </property>

</configuration>
配置完之后,格式化namenode:
tree@treePC /hadoop-0.20./bin

$ ./hadoop namenode -format

// :: INFO namenode.NameNode: STARTUP_MSG:

/************************************************************

STARTUP_MSG: Starting NameNode

STARTUP_MSG:   host = treePC/192.168.0.157

STARTUP_MSG:   args = [-format]

STARTUP_MSG:   version = 0.20.2

STARTUP_MSG:   build = https://svn.apache.org/repos/asf/hadoop/common/branches/branch-0.20 -r 911707; compiled by 'chrisdo' on Fri Feb 19 08:07:34 UTC 2010

************************************************************/

// :: INFO namenode.FSNamesystem: fsOwner=treepc\tree,None,root,Administrators,Users,HomeUsers,ora_dba

// :: INFO namenode.FSNamesystem: supergroup=supergroup

// :: INFO namenode.FSNamesystem: isPermissionEnabled=true

// :: INFO common.Storage: Image file of size  saved in  seconds.

// :: INFO common.Storage: Storage directory \hadoop-0.20.\hdfs\name has been successfully formatted.

// :: INFO namenode.NameNode: SHUTDOWN_MSG:

/************************************************************

SHUTDOWN_MSG: Shutting down NameNode at treePC/192.168.0.157

************************************************************/
启动:
tree@treePC /hadoop-0.20./bin

$ ./start-all.sh

starting namenode, logging to /hadoop-0.20./bin/../logs/hadoop-tree-namenode-treePC.out

localhost: starting datanode, logging to /hadoop-0.20./bin/../logs/hadoop-tree-datanode-treePC.out

localhost: starting secondarynamenode, logging to /hadoop-0.20./bin/../logs/hadoop-tree-secondarynamenode-treePC.out

starting jobtracker, logging to /hadoop-0.20./bin/../logs/hadoop-tree-jobtracker-treePC.out

localhost: starting tasktracker, logging to /hadoop-0.20./bin/../logs/hadoop-tree-tasktracker-treePC.out
运行一个圆周率DEMO:
tree@treePC /hadoop-0.20./bin

$ ./hadoop jar ../hadoop-0.20.-examples.jar pi

Number of Maps  =

Samples per Map =

Wrote input for Map #

Wrote input for Map #

Starting Job

// :: INFO mapred.FileInputFormat: Total input paths to process :

// :: INFO mapred.JobClient: Running job: job_201402281919_0001

// :: INFO mapred.JobClient:  map % reduce %

// :: INFO mapred.JobClient:  map % reduce %

// :: INFO mapred.JobClient:  map % reduce %

// :: INFO mapred.JobClient: Job complete: job_201402281919_0001

// :: INFO mapred.JobClient: Counters:

// :: INFO mapred.JobClient:   Job Counters

// :: INFO mapred.JobClient:     Launched reduce tasks=

// :: INFO mapred.JobClient:     Launched map tasks=

// :: INFO mapred.JobClient:     Data-local map tasks=

// :: INFO mapred.JobClient:   FileSystemCounters

// :: INFO mapred.JobClient:     FILE_BYTES_READ=

// :: INFO mapred.JobClient:     HDFS_BYTES_READ=

// :: INFO mapred.JobClient:     FILE_BYTES_WRITTEN=

// :: INFO mapred.JobClient:     HDFS_BYTES_WRITTEN=

// :: INFO mapred.JobClient:   Map-Reduce Framework

// :: INFO mapred.JobClient:     Reduce input groups=

// :: INFO mapred.JobClient:     Combine output records=

// :: INFO mapred.JobClient:     Map input records=

// :: INFO mapred.JobClient:     Reduce shuffle bytes=

// :: INFO mapred.JobClient:     Reduce output records=

// :: INFO mapred.JobClient:     Spilled Records=

// :: INFO mapred.JobClient:     Map output bytes=

// :: INFO mapred.JobClient:     Map input bytes=

// :: INFO mapred.JobClient:     Combine input records=

// :: INFO mapred.JobClient:     Map output records=

// :: INFO mapred.JobClient:     Reduce input records=

Job Finished in 24.927 seconds

Estimated value of Pi is 3.80000000000000000000
上浏览器看看:
mapreduce:
http://localhost:50030

HDFS:
http://localhost:50070
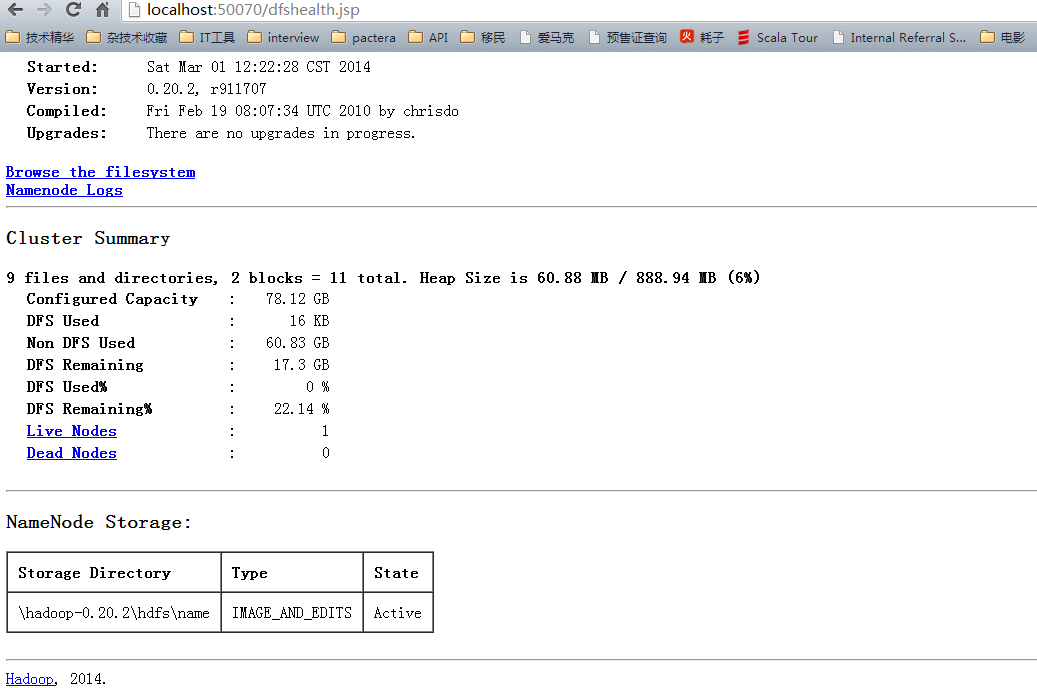
OK,运行成功就证明安装成功了。
cygwin下安装hadoop0.20的更多相关文章
- cygwin 下安装python MySQLdb
cygwin 下安装python MySQLdb 1) cygwin 更新 运行 cygwin/setup-x86_64.exe a 输入mysql,选择下面的包安装: libmysqlclient- ...
- cygwin下安装软件
cygwin下安装软件cygwin工具安装新的软件和常见的命令windows8.1下安装Cygwin并通过apt-cyg安装软件包Cygwin利用apt-cyg安装gcc.g++.make和gdb 首 ...
- Cygwin下安装vim后,vim中退格键无法正常使用
问题描述: 在Cygwin中安装完vim后 进入vim,发现上下左右键和退格键都无法正常使用 问题分析: 首先考虑到的就是缺少vim的配置文件,首先查看/etc路径下是否有vim的配置文件 admin ...
- eclipse安装Hadoop-0.20.2插件
因为在使用Hadoop-0.20.2这个古董,需要使用它自带的eclipse插件,而我最初安装的是现代的eclipse4.10.0. 在经历两天,以及以下种种尝试之后,均以失败告终: 1.网上找适合的 ...
- windows7 Cygwin 下安装 YouCompleteMe 插件
原创文章,欢迎指正!转载请注明~ 从上周就开始想在cygwin上安装YouCompleteMe插件,按照GITHUB上的官方教程安装,由于自己的理解失误,一直搞不清是按照在windows上安装还是按照 ...
- cygwin下安装NCL
1.安装cygwin 到cygwin官网https://www.cygwin.com/下载安装程序,setup-x86.exe,注意能下载这个安装程序, setup-x86_64.exe64位不支 ...
- cygwin下安装c语言开发环境
1.到官网cygwin.com下载安装程序. 2.添加清华的cygwin镜像:https://mirrors.tuna.tsinghua.edu.cn/cygwin/ 3.在安装:vim,git,gc ...
- 在cygwin下安装ns2
首先下载ns2.可以到sourceforge去下载最新的all-in-one版本2.31,url为http://sourceforge.net/project/showfiles.php?group_ ...
- cygwin下安装scws
安装gcc和make命令 1.找到cygwin的etc目录中有一个名为passwd的文件. 2.用UE或记事本打开passwd这个文件,找到以下部分,把其中的windows用户名admin换成ro ...
随机推荐
- 浅谈.prop() 和 attr() 的区别
今天编码时遇到一个问题,通过后台查询的数据设置前端checkbox的选中状态,设置选中状态为.attr('checked','true');没有问题,但是当数据重新加载时,checkbox应清空即所有 ...
- 用eclipse建立简单WebService客户端,使用WSDL,用于短信接口发送
使用工具:eclipse 标准版,不用任何插件. 操作步骤: 建立java Project 命名为mess: 再在project上右键,选择other,选择web service文件类别,选择web ...
- 解决DataGridView.DataSource重复赋值而不显示问题
List<Person> list=new List<Person>(); ;i<;i++) { list.Add(new Person(){........}) } d ...
- 回答了个问题,9x9 乘法表生成器
# -*- coding: utf-8 -*- from prettytable import PrettyTable pt = PrettyTable() # 需要安装prettytable这个库来 ...
- Scala的Option类型
Scala的Option类型 为了让所有东西都是对象的目标更加一致,也为了遵循函数式编程的习惯,Scala鼓励你在变量和函数返回值可能不会引用任何值的时候使用Option类型.在没有值的时候,使用No ...
- C语言-04函数
1.参数 参数注意点 1.形式参数:定义函数时函数名后面中的参数,简称形参 2.实际参数:调用函数式传入的具体数据,简称实参 3.实参个数必须等于形参个数 4.函数体内部不能定义和形参一样的变量 5. ...
- STM32启动过程--启动文件--分析
一.概述 1.说明 每一款芯片的启动文件都值得去研究,因为它可是你的程序跑的最初一段路,不可以不知道.通过了解启动文件,我们可以体会到处理器的架构.指令集.中断向量安排等内容,是非常值得玩味的. ST ...
- Redis总录
设计 选择合适的数据对象来存储对象:String,List,Hash(Entity角色对象),Set,Zset(需要排序): 选择存储是全局的,还是局部的: 机制 批处理(pipeline) 事务(w ...
- AndroidStudio Gradle版本不匹配问题
报错信息: p.p1 { margin: 0.0px 0.0px 0.0px 0.0px; font: 12.0px Helvetica } Error:(1, 1) A problem occurr ...
- 移动App双周版本迭代实战--转载备用
对于移动互联网产品来说,迭代的速度就是生命.我创业时做移动App时是一周一版,而现在是2周1版.相比起小公司,大公司迭代时间虽长,却更为不易,因为大公司流程更多,参与人数更多,需求更多,实现这样的快速 ...