Linux操作系统之更改启动菜单的背景图实战案例
Linux操作系统之更改启动菜单的背景图实战案例
作者:尹正杰
版权声明:原创作品,谢绝转载!否则将追究法律责任。
一.制作图像并上传到服务器
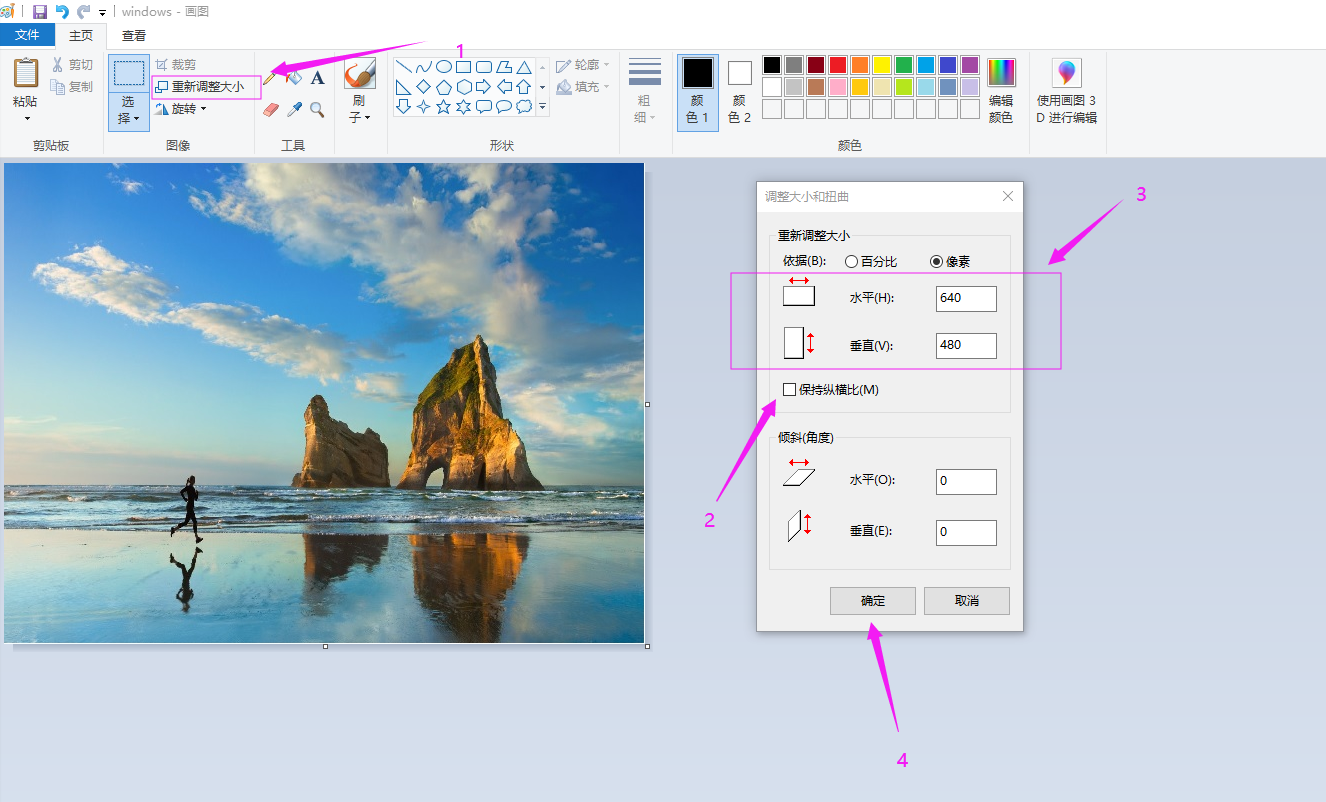
1>.使用window 10操作系统自带的画图工具指定像素的图片并保存到本地(推荐报错为"JPEG"类型)
2>.安装Linux上传工具包
[root@yinzhengjie ~]# yum -y install lrzsz

Loaded plugins: fastestmirror, refresh-packagekit, security

Setting up Install Process

Loading mirror speeds from cached hostfile

 * base: mirrors.huaweicloud.com

 * extras: mirrors.huaweicloud.com

 * updates: mirrors.huaweicloud.com

base                                                                                                                                                 | 3.7 kB     :

extras                                                                                                                                               | 3.4 kB     :

updates                                                                                                                                              | 3.4 kB     :

Resolving Dependencies

--> Running transaction check

---> Package lrzsz.x86_64 :0.12.-27.1.el6 will be installed

--> Finished Dependency Resolution

Dependencies Resolved

============================================================================================================================================================================

 Package                               Arch                                   Version                                            Repository                            Size

============================================================================================================================================================================

Installing:

 lrzsz                                 x86_64                                 0.12.-27.1.el6                                   base                                   k

Transaction Summary

============================================================================================================================================================================

Install        Package(s)

Total download size:  k

Installed size:  k

Downloading Packages:

lrzsz-0.12.-27.1.el6.x86_64.rpm                                                                                                                    |   kB     :

Running rpm_check_debug

Running Transaction Test

Transaction Test Succeeded

Running Transaction

  Installing : lrzsz-0.12.-27.1.el6.x86_64                                                                                                                            /

  Verifying  : lrzsz-0.12.-27.1.el6.x86_64                                                                                                                            /

Installed:

  lrzsz.x86_64 :0.12.-27.1.el6

Complete!

[root@yinzhengjie ~]#
[root@yinzhengjie ~]# yum -y install lrzsz
3>.使用rz工具将我们制作好的图片上传到服务器上
[root@yinzhengjie ~]# rz

[root@yinzhengjie ~]#

[root@yinzhengjie ~]# ll

total

-rw-r--r--  root root  Dec     windows.jpg

[root@yinzhengjie ~]#
二.使用convert工具(相当于windows中的PS软件)将双穿的图片进行压缩处理
1>.安装convert软件包
[root@yinzhengjie ~]# yum -y install ImageMagick

Loaded plugins: fastestmirror, refresh-packagekit, security

Setting up Install Process

Loading mirror speeds from cached hostfile

 * base: mirrors.zju.edu.cn

 * extras: mirrors.zju.edu.cn

 * updates: mirrors.zju.edu.cn

Resolving Dependencies

--> Running transaction check

---> Package ImageMagick.x86_64 :6.7.2.7-.el6 will be installed

--> Processing Dependency: libwmflite-0.2.so.()(64bit) for package: ImageMagick-6.7.2.7-.el6.x86_64

--> Processing Dependency: libwmf-0.2.so.()(64bit) for package: ImageMagick-6.7.2.7-.el6.x86_64

--> Processing Dependency: libImath.so.()(64bit) for package: ImageMagick-6.7.2.7-.el6.x86_64

--> Processing Dependency: libIlmThread.so.()(64bit) for package: ImageMagick-6.7.2.7-.el6.x86_64

--> Processing Dependency: libIlmImf.so.()(64bit) for package: ImageMagick-6.7.2.7-.el6.x86_64

--> Processing Dependency: libIex.so.()(64bit) for package: ImageMagick-6.7.2.7-.el6.x86_64

--> Processing Dependency: libHalf.so.()(64bit) for package: ImageMagick-6.7.2.7-.el6.x86_64

--> Running transaction check

---> Package OpenEXR-libs.x86_64 :1.6.-8.1.el6 will be installed

---> Package ilmbase.x86_64 :1.0.-6.1.el6 will be installed

---> Package libwmf.x86_64 :0.2.8.4-.el6_7 will be installed

---> Package libwmf-lite.x86_64 :0.2.8.4-.el6_7 will be installed

--> Finished Dependency Resolution

Dependencies Resolved

============================================================================================================================================================================

 Package                                    Arch                                 Version                                           Repository                          Size

============================================================================================================================================================================

Installing:

 ImageMagick                                x86_64                               6.7.2.7-.el6                                     base                               1.9 M

Installing for dependencies:

 OpenEXR-libs                               x86_64                               1.6.-8.1.el6                                     base                                k

 ilmbase                                    x86_64                               1.0.-6.1.el6                                     base                                 k

 libwmf                                     x86_64                               0.2.8.4-.el6_7                                  base                                k

 libwmf-lite                                x86_64                               0.2.8.4-.el6_7                                  base                                 k

Transaction Summary

============================================================================================================================================================================

Install        Package(s)

Total download size: 2.4 M

Installed size: 8.7 M

Downloading Packages:

(/): ImageMagick-6.7.2.7-.el6.x86_64.rpm                                                                                                          | 1.9 MB     :

(/): OpenEXR-libs-1.6.-8.1.el6.x86_64.rpm                                                                                                         |  kB     :

(/): ilmbase-1.0.-6.1.el6.x86_64.rpm                                                                                                              |   kB     :

(/): libwmf-0.2.8.4-.el6_7.x86_64.rpm                                                                                                            |  kB     :

(/): libwmf-lite-0.2.8.4-.el6_7.x86_64.rpm                                                                                                       |   kB     :

----------------------------------------------------------------------------------------------------------------------------------------------------------------------------

Total                                                                                                                                       3.3 MB/s | 2.4 MB     :

Running rpm_check_debug

Running Transaction Test

Transaction Test Succeeded

Running Transaction

  Installing : libwmf-lite-0.2.8.4-.el6_7.x86_64                                                                                                                      /

  Installing : ilmbase-1.0.-6.1.el6.x86_64                                                                                                                             /

  Installing : OpenEXR-libs-1.6.-8.1.el6.x86_64                                                                                                                        /

  Installing : libwmf-0.2.8.4-.el6_7.x86_64                                                                                                                           /

  Installing : ImageMagick-6.7.2.7-.el6.x86_64                                                                                                                         /

  Verifying  : libwmf-0.2.8.4-.el6_7.x86_64                                                                                                                           /

  Verifying  : ilmbase-1.0.-6.1.el6.x86_64                                                                                                                             /

  Verifying  : libwmf-lite-0.2.8.4-.el6_7.x86_64                                                                                                                      /

  Verifying  : ImageMagick-6.7.2.7-.el6.x86_64                                                                                                                         /

  Verifying  : OpenEXR-libs-1.6.-8.1.el6.x86_64                                                                                                                        /

Installed:

  ImageMagick.x86_64 :6.7.2.7-.el6

Dependency Installed:

  OpenEXR-libs.x86_64 :1.6.-8.1.el6         ilmbase.x86_64 :1.0.-6.1.el6         libwmf.x86_64 :0.2.8.4-.el6_7         libwmf-lite.x86_64 :0.2.8.4-.el6_7

Complete!

[root@yinzhengjie ~]#
[root@yinzhengjie ~]# yum -y install ImageMagick
2>.查看conver命令的相关信息
[root@yinzhengjie ~]# which convert

/usr/bin/convert

[root@yinzhengjie ~]#

[root@yinzhengjie ~]# rpm -qf /usr/bin/convert

ImageMagick-6.7.2.7-.el6.x86_64

[root@yinzhengjie ~]#
3>.将上传的jpg格式转换成xpm格式
[root@yinzhengjie ~]# ll
total
-rw-r--r-- root root Dec windows.jpg
[root@yinzhengjie ~]#
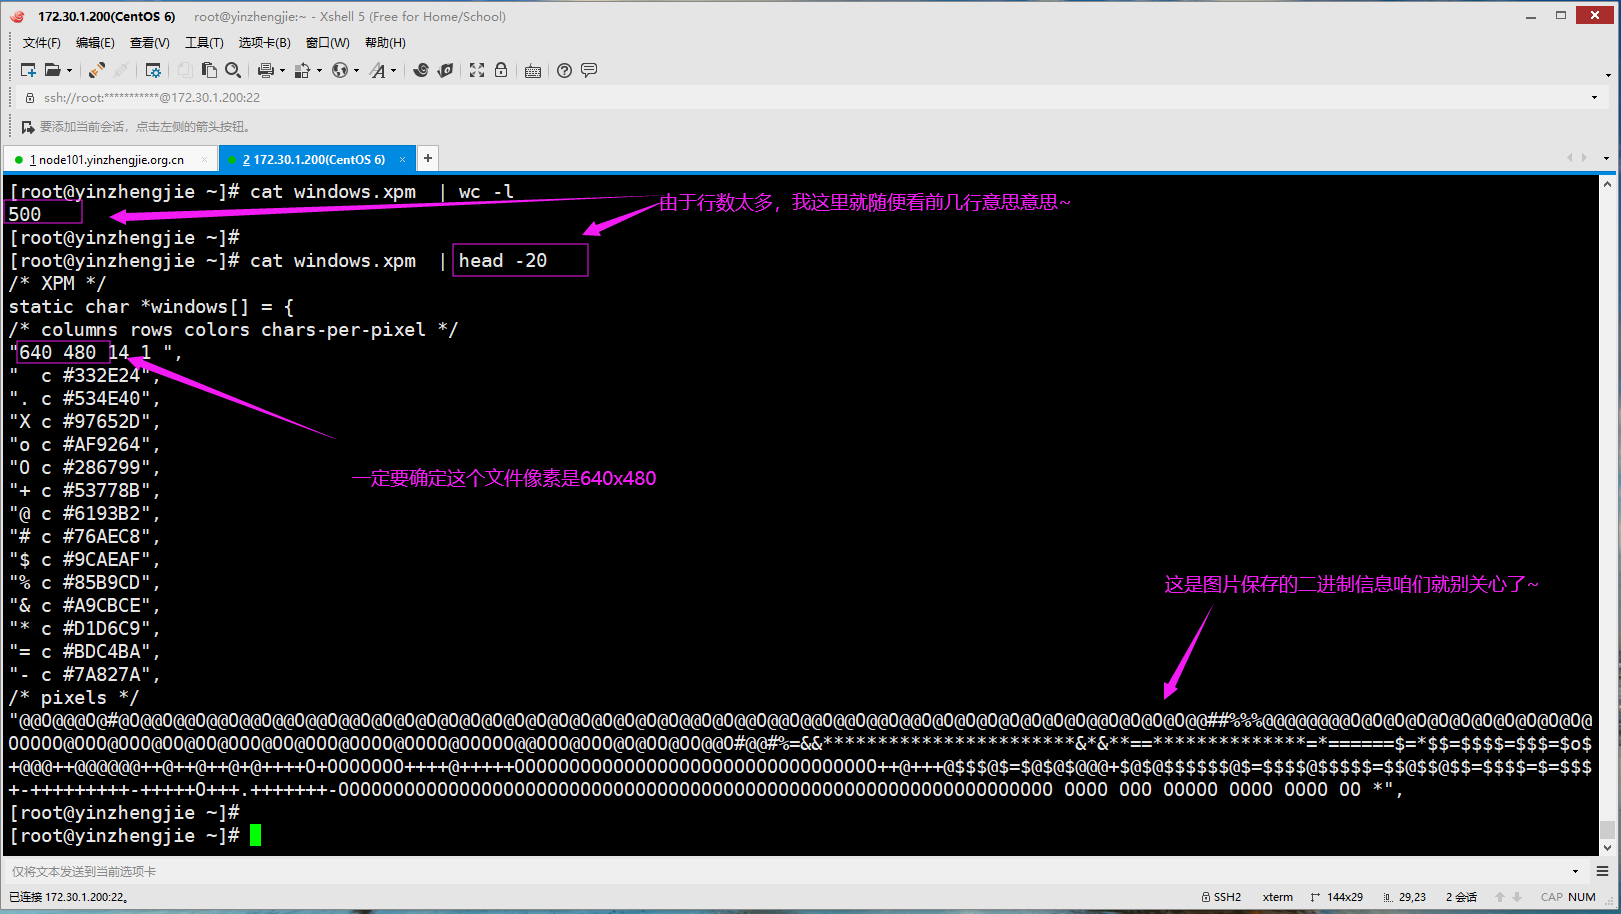
[root@yinzhengjie ~]# convert -resize 640x480 -colors windows.jpg windows.xpm #指定像素为"640x480",指定颜色深度为14,将windows.jps转换成windows.xpm
[root@yinzhengjie ~]#
[root@yinzhengjie ~]# ll
total
-rw-r--r-- root root Dec windows.jpg
-rw-r--r-- root root Dec : windows.xpm
[root@yinzhengjie ~]#
[root@yinzhengjie ~]# file windows.xpm #这是一个图片文件,内部信息如下图所示
windows.xpm: X pixmap image text
[root@yinzhengjie ~]#
三.修改"/boot/grub/grub.conf"配置文件
1>.使用gzip命令将xpm格式文件进行压缩
[root@yinzhengjie ~]# ll

total

-rw-r--r--  root root   Dec     windows.jpg

-rw-r--r--  root root  Dec   : windows.xpm

[root@yinzhengjie ~]#

[root@yinzhengjie ~]# gzip windows.xpm

[root@yinzhengjie ~]#

[root@yinzhengjie ~]# ll

total

-rw-r--r--  root root  Dec     windows.jpg

-rw-r--r--  root root  Dec   : windows.xpm.gz

[root@yinzhengjie ~]#
2>.将"windows.xpm.gz"移动到"/boot/grub"目录并修改"/boot/grub/grub.conf"文件内容,将背景图片名称改为咱们自定义的图片即可
[root@yinzhengjie ~]# mv windows.xpm.gz /boot/grub/

[root@yinzhengjie ~]#

[root@yinzhengjie ~]# ll /boot/grub/windows.xpm.gz

-rw-r--r--  root root  Dec   : /boot/grub/windows.xpm.gz

[root@yinzhengjie ~]#

[root@yinzhengjie ~]# grep splashimage /boot/grub/grub.conf

splashimage=(hd0,)/grub/splash.xpm.gz

[root@yinzhengjie ~]#

[root@yinzhengjie ~]# vim /boot/grub/grub.conf

[root@yinzhengjie ~]#

[root@yinzhengjie ~]# grep splashimage /boot/grub/grub.conf

splashimage=(hd0,)/grub/windows.xpm.gz

[root@yinzhengjie ~]#

[root@yinzhengjie ~]#
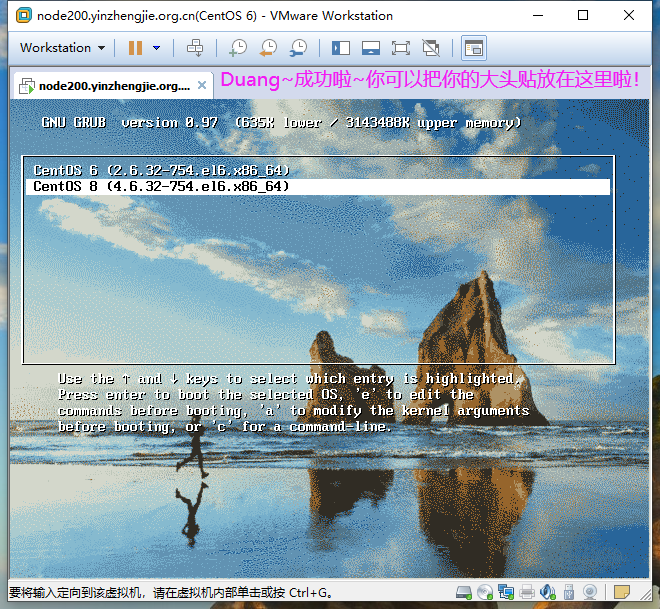
3>.重启操作系统,观察启动菜单背景是否更改成咱们自定义的图片即可
[root@yinzhengjie ~]# reboot

Broadcast message from root@yinzhengjie

    (/dev/pts/) at : ...

The system is going down for reboot NOW!

[root@yinzhengjie ~]#
4>."/boot/grub/grub.conf"配置文件说明
[root@yinzhengjie ~]# cat /boot/grub/grub.conf

# grub.conf generated by anaconda

#

# Note that you do not have to rerun grub after making changes to this file

# NOTICE:  You have a /boot partition.  This means that

#          all kernel and initrd paths are relative to /boot/, eg.

#          root (hd0,)

#          kernel /vmlinuz-version ro root=/dev/mapper/vg_node200-lv_root

#          initrd /initrd-[generic-]version.img

#boot=/dev/sda

default=1                    #默认使用菜单1

timeout=5                    #指定超时时长为5秒

splashimage=(hd0,)/grub/windows.xpm.gz  #指定背景图片

hiddenmenu                                #默认隐藏菜单选择执行默认的菜单1,当然我们只需要在启动操作系统时敲击任意键就会弹出菜单选项框,如果我们删除了该项,那么在启动操作系统时不管我们是否有按任意键都会弹出启动菜单,在指定的$timeout之内没有选择就会走选择$default菜单。


title CentOS  (2.6.-.el6.x86_64)    #菜单0

    root (hd0,)

    kernel /vmlinuz-2.6.-.el6.x86_64 ro root=/dev/mapper/vg_node200-lv_root nomodeset rd_NO_LUKS LANG=en_US.UTF- rd_LVM_LV=vg_node200/

lv_swap rd_NO_MD SYSFONT=latarcyrheb-sun16 crashkernel=128M rd_LVM_LV=vg_node200/lv_root  KEYBOARDTYPE=pc KEYTABLE=us rd_NO_DM rhgb quiet

  initrd /initramfs-2.6.-.el6.x86_64.img

title CentOS  (4.6.-.el6.x86_64)    #菜单1

    kernel (hd0,)/vmlinuz-2.6.-.el6.x86_64 ro root=/dev/mapper/vg_node200-lv_root nomodeset rd_NO_LUKS LANG=en_US.UTF- rd_LVM_LV=vg_n

ode200/lv_swap rd_NO_MD SYSFONT=latarcyrheb-sun16 crashkernel=128M rd_LVM_LV=vg_node200/lv_root  KEYBOARDTYPE=pc KEYTABLE=us rd_NO_DM

  initrd (hd0,)/initramfs-2.6.-.el6.x86_64.img

[root@yinzhengjie ~]#
Linux操作系统之更改启动菜单的背景图实战案例的更多相关文章
- linux操作系统语言更改
有时候我们的服务器在安装时安装的默认语言不支持中文,导致程序.文档中的汉子显示乱码,从而使系统报一些莫名其妙的错误,这是可以更改操作系统的默认语言 1.echo $LANG 查看当前操作系统的语 ...
- Linux操作系统-CentOS6启动流程和服务管理
Linux操作系统-CentOS6启动流程和服务管理 作者:尹正杰 版权声明:原创作品,谢绝转载!否则将追究法律责任. 一.Linux组成 1>.Linux: kernel+rootfs ker ...
- 自制Linux操作系统
自制Linux操作系统 作者:尹正杰 版权声明:原创作品,谢绝转载!否则将追究法律责任. 一.添加一块新的磁盘设备 1>.将虚拟机关机,点击"编辑虚拟机设置" 2>.点 ...
- 本地访问weblogic控制台无反应,关闭linux操作系统防火墙
有时候,我们在Linux操作系统上成功启动了weblogic,也查看了7001端口的状态是开启的.但是访问weblogic控制台没有反应,也没有报错. 使用 netstat -ano | grep 7 ...
- CentOS7.5更改grub2菜单背景&开机动态画面
Grub2菜单背景 红帽企业版 Linux 7 的引导装载程序是“GRUB 2”.您可以更改“GRUB 2”外观的几个部分.以下几小节将向您展示如何改变 Linux 发行版名称.菜单颜色,和背景图片. ...
- 启动VMware环境下的Linux操作系统,添加新分区
启动VMware环境下的Linux操作系统,添加新分区,需要root账号身份. 3.1 [fdisk -l] 最大分区为/dev/sda3,说明新创建的分区将会是sda4 3.2 输入[fdisk / ...
- Linux操作系统-CentOS7启动流程和服务管理
Linux操作系统-CentOS7启动流程和服务管理 作者:尹正杰 版权声明:原创作品,谢绝转载!否则将追究法律责任. 一.systemd POST --> Boot Sequence --&g ...
- 献给初学者:谈谈如何学习Linux操作系统
本文出自 “技术成就梦想” 博客,请务必保留此出处http://ixdba.blog.51cto.com/2895551/569329. 为了能把这篇不错的文章分享给大家.所以请允许我暂时用原创的形式 ...
- (转)Linux 开机引导和启动过程详解
Linux 开机引导和启动过程详解 编译自:https://opensource.com/article/17/2/linux-boot-and-startup作者: David Both 原创:LC ...
随机推荐
- (原)关于OpenGL中的几个坐标系统的理解
在我们使用opengl做图像处理的过程中,其中必不可少的基本都会用到顶点着色器和片元着色器. 完整的渲染管线图: 那么在这两个着色器程序中,我们需要绘制我们的图像的时候,他们的坐标和位置对应关系是如何 ...
- EasyNVR摄像机网页无插件直播方案H5前端构建之:bootstrap-datepicker日历插件的实时动态展现
EasyNVR场景需求 基础:不管是城市监控还是园区管理或者是幼儿园监控,这些安防监控需求已经成为我们生活中不可或缺的重要一环,这不仅仅是提升城市管理水平和人民群众安全感的现实需求,也是完善社会治安消 ...
- 【Spring Boot学习之十二】mybatis3 分页打印sql日志
环境 eclipse 4.7 jdk 1.8 Spring Boot 1.5.2 参考: mybatis手册 Mybatis的插件 PageHelper 分页查询使用方法MyBatis中Like语句使 ...
- 【转帖】Kafka入门介绍
Kafka入门介绍 https://www.cnblogs.com/swordfall/p/8251700.html 最近在看hdoop的hdfs 以及看了下kafka的底层存储,发现分布式的技术基本 ...
- Android调试桥 adb安装详解
Android调试桥(adb) 一.简介 Android 调试桥 (adb) 是一种功能多样的命令行工具,可让您与设备进行通信.adb 命令便于执行各种设备操作(例如安装和调试应用),并提供对 Uni ...
- Linux磁盘设备基础
free -m 查看系统内存 [root@zhang /]# free -m total used free shared buffers cached ...
- 【翻译】REST framework JWT Auth(django rest framework-jwt)
JWT认证的REST框架 原文链接 概述 这个包提供对Django REST framework的JSON Web Token 认证支持. 需要满足条件 Python (2.7, 3.3, 3.4, ...
- GreenPlum 最佳实践
数据模型 Greenplum数据库是一种shared nothing的分析型MPP数据库.这种模型与高度规范化的/事务型的SMP数据库有显著区别.Greenplum数据库使用非规范化的模式设计会工作得 ...
- Win10家庭版升级到企业版的方法
一.家庭版升级企业版 1.右键单击[此电脑]——>属性 2.点击更改产品密钥 3.输入密钥:NPPR9-FWDCX-D2C8J-H872K-2YT43 4.点击下一步,验证结束后点击开始升级,然 ...
- 2019 小米java面试笔试题 (含面试题解析)
本人5年开发经验.18年年底开始跑路找工作,在互联网寒冬下成功拿到阿里巴巴.今日头条.小米等公司offer,岗位是Java后端开发,因为发展原因最终选择去了小米,入职一年时间了,也成为了面试官,之 ...