How to create vlan on Linux (with Cisco Catalyst Switch)
In this article I want to share to you on how to create and configure vlan on Linux through Cisco Catalyst Switch.
Requirements:
1. Linux installed on a PC with one or more NICs (Network Interface Card). I use Centos 5.4 using 2.6.18-164.11.1.el5PAE kernel. It should be applicable on other Linux distros such as Slackware, Ubuntu, Fedora, Debian, etc.
2. Cisco Catalyst Switch 2950
3. 2 PC/Laptop running Windows/Linux/BSD/MacOSX
4. 3 straight cables
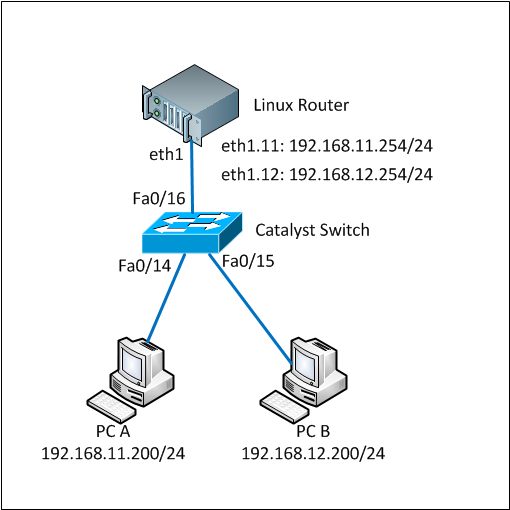
This tutorial is based-on network diagram below:
Here are the full steps.
1. Load 802.1q module into the system
By default the 802.1q module is not loaded so we firstly have to load it. You can check whether it is already loaded or not by using ‘lsmod’ command.
lsmod |grep 802
If there is nothing shown by lsmod command, it means the module has not been loaded yet. Run ‘modprobe’ to load it.
modprobe 8021q
Make sure the module was successfully loaded by running the ‘lsmod’ again
lsmod |grep 802

8021q                  24649  0
If you see something similar like above, the 8021q has been successfully loaded.
2. Create vlan interface
We will use eth1 interface in the Linux box. We have to bring the interface up without IP address assigned to it before we can use it.
ifconfig eth1 0.0.0.0 up
We will create interface vlan 11 and vlan 12 on this eth1 interface. To create a vlan interface, use ‘vconfig add’ command as below:
vconfig add eth1 11

Added VLAN with VID == 11 to IF -:eth1:-

vconfig add eth1 12

Added VLAN with VID == 12 to IF -:eth1:-
These commands above will create devices eth1.11 and eth1.12 to your system. Linux will consider these as another network devices so you can configure and assign IP address like other.
You also see the vlan interfaces by typing ‘ifconfig -a’ command.
ifconfig -a

eth1.11   Link encap:Ethernet  HWaddr 00:30:48:BF:4E:BD

          BROADCAST MULTICAST  MTU:1500  Metric:1

          RX packets:0 errors:0 dropped:0 overruns:0 frame:0

          TX packets:0 errors:0 dropped:0 overruns:0 carrier:0

          collisions:0 txqueuelen:0

          RX bytes:0 (0.0 b)  TX bytes:0 (0.0 b)

eth1.12   Link encap:Ethernet  HWaddr 00:30:48:BF:4E:BD

          BROADCAST MULTICAST  MTU:1500  Metric:1

          RX packets:0 errors:0 dropped:0 overruns:0 frame:0

          TX packets:0 errors:0 dropped:0 overruns:0 carrier:0

          collisions:0 txqueuelen:0

          RX bytes:0 (0.0 b)  TX bytes:0 (0.0 b)
3. Assign IP address to the vlan interfaces
The vlan interfaces were successfully created on the previous step. Now we assign IP address on those interfaces using ifconfig command as below:
ifconfig eth1.11 192.168.11.254 netmask 255.255.255.0 up

ifconfig eth1.12 192.168.12.254 netmask 255.255.255.0 up
Make sure that the IP addresses were assigned successfully on the interfaces.
ifconfig eth1.11

eth1.11   Link encap:Ethernet  HWaddr 00:30:48:BF:4E:BD

          inet addr:192.168.11.254  Bcast:192.168.11.255  Mask:255.255.255.0

          UP BROADCAST MULTICAST  MTU:1500  Metric:1

          RX packets:0 errors:0 dropped:0 overruns:0 frame:0

          TX packets:0 errors:0 dropped:0 overruns:0 carrier:0

          collisions:0 txqueuelen:0

          RX bytes:0 (0.0 b)  TX bytes:0 (0.0 b)

ifconfig eth1.12

eth1.12   Link encap:Ethernet  HWaddr 00:30:48:BF:4E:BD

          inet addr:192.168.12.254  Bcast:192.168.12.255  Mask:255.255.255.0

          UP BROADCAST MULTICAST  MTU:1500  Metric:1

          RX packets:0 errors:0 dropped:0 overruns:0 frame:0

          TX packets:0 errors:0 dropped:0 overruns:0 carrier:0

          collisions:0 txqueuelen:0

          RX bytes:0 (0.0 b)  TX bytes:0 (0.0 b)
Until this step, creating and configuring vlans have been done on the Linux box. Now we are going to configure vlan and trunk on the Cisco Catalyst switch.
4. Configure cisco catalyst switch, add vlan database, configure interface access vlan and trunk
As said before, we use vlan 11 and vlan 12 on this tutorial. So those vlan must be added into the vlan database of the switch.
switch#conf terminal

Enter configuration commands, one per line.  End with CNTL/Z.

switch(config)#vlan 11

switch(config-vlan)#name test-vlan11

switch(config-vlan)#exit

switch(config)#vlan 12

switch(config-vlan)#name test-vlan12

switch(config-vlan)#exit

switch(config)#exit

switch#wr mem

Building configuration...

[OK]

switch#show vlan | include test-vlan

11   test-vlan11                      active

12   test-vlan12                      active
Vlan 11 and 12 have been successfully added to the database and active.
Now we have to configure 3 ports in the cisco catalyst switch. 1 port is for trunk between the switch and Linux box and 2 ports are for PC-A and PC-B.
We will use port Fa0/16 as trunk port and Fa0/14 and Fa0/15 as vlan access port connected to PC-A and PC-B respectively. Below are the commands:
switch#conf terminal

Enter configuration commands, one per line.  End with CNTL/Z.

switch(config)#int f0/14

switch(config-if)#description To_PC-A

switch(config-if)#swi acc vlan 11

switch(config-if)#no shutdown

switch(config-if)#exit

switch(config)#int f0/15

switch(config-if)#description To_PC-B

switch(config-if)#swi acc vlan 12

switch(config-if)#no shutdown

switch(config-if)#exit

switch(config)#int f0/16

switch(config-if)#description Trunk_To_Linux_Router

switch(config-if)#switchport trunk allowed vlan 11,12

switch(config-if)#switchport mode trunk

switch(config-if)#no shutdown

switch(config-if)#exit

switch(config)#exit

switch#wr mem

Building configuration...

[OK]

switch#

switch#show running-config interface f0/14

Building configuration...

Current configuration : 82 bytes

!

interface FastEthernet0/14

 description To_PC-A

 switchport access vlan 11

end

switch#show running-config interface f0/15

Building configuration...

Current configuration : 82 bytes

!

interface FastEthernet0/15

 description To_PC-B

 switchport access vlan 12

end

switch#show running-config interface f0/16

Building configuration...

Current configuration : 129 bytes

!

interface FastEthernet0/16

 description Trunk_To_Linux_Router

 switchport trunk allowed vlan 11,12

 switchport mode trunk

end

switch#
The configurations on both Linux box and Switch have completed.
Now it is the time to test whether PC-A and PC-B can ping to the same network on the Linux box. Make sure the cables are connected properly to each ports on the devices.
5. Test ping to Linux box using vlan ip address
Test from PC-A:
C:\Users\Fuad NAHDI>ping 192.168.11.254

Pinging 192.168.11.254 with 32 bytes of data:

Reply from 192.168.11.254: bytes=32 time=1ms TTL=64

Reply from 192.168.11.254: bytes=32 time
Test from PC-B:
C:\Users\Fuad NAHDI>ping 192.168.12.254

Pinging 192.168.12.254 with 32 bytes of data:

Reply from 192.168.12.254: bytes=32 time=2ms TTL=64

Reply from 192.168.12.254: bytes=32 time
6. Make everything active at boot
Everything we have done above is temporary configuration, meaning that it will be cleared from configuration when we reboot or shutdown the linux box.
To make it permanent or active at boot, simply add the following lines into the rc.local file (e.g Centos: /etc/rc.local ; Slackware: /etc/rc.d/rc.local):
modprobe 8021q

ifconfig eth1 0.0.0.0 up

vconfig add eth1 11

vconfig add eth1 12

ifconfig eth1.11 192.168.11.254 netmask 255.255.255.0 up

ifconfig eth1.12 192.168.12.254 netmask 255.255.255.0 up

转自:http://www.techonia.com/1227/create-vlan-on-linux-with-cisco-catalyst-switch
How to create vlan on Linux (with Cisco Catalyst Switch)的更多相关文章
- vlan 以及 Linux实现的IEEE 802.1Q VLAN
vlan 以及 Linux实现的IEEE 802.1Q VLAN Vlan的概念 VLAN技术介绍 VLANVLAN概述 以太网是一种基于CSMA/CD(Carrier Sense Multiple ...
- Cisco Catalyst 9800-CL Wireless Controller for Cloud
面向云的思科 Catalyst 9800-CL 无线控制器,专为基于意图的网络全新打造. 版本: C9800-CL-universalk9.17.04.01 (29-Nov-2020) C9800-C ...
- Linux和Cisco命令行通用快捷键。
Ctrl a e 行首,行尾(ahead,end)Esc f b 单词首,单词尾Ctrl f b 移动光标(forward,backwards) Ctrl u k 剪切光标前所有,剪切光标后所有Ctr ...
- 重新定位svn地址的方法(windows和linux),svn switch(sw)的帮助信息
今天公司的路由器出现问题,服务器的IP地址也跟着变了,但是原来的svn已经设置好了,现在需要更换地址 查询原地址的方法: root@jack-desktop:codes# svn info 路径: . ...
- Brocade,Cisco SAN Switch命令对比
- Linux下svn命令switch用法
# svn info /data/www/49you/api.49you.com Path: /data/www/49you/api.49you.comURL: svn://192.168.10.81 ...
- 在Cisco Catalyst 3750端口做策略限速 QOS
今天任务是在3750上限制端口的速率,本来以为是很简单的事,speed命令搞定,敲进去才知道speed命令只能叫端口速率改成10M或100M,也就是说只能起到端口高低速率的切换功能,不能自定义速率,后 ...
- Linux实现的IEEE 802.q VLAN
本文转载自: http://blog.chinaunix.net/uid-20786208-id-4291059.html Technorati 标签: Linux VLAN ---------- ...
- Cisco配置VLAN+DHCP中继代理+NAT转发上网
实验环境: 路由器 使得TP-link 设置NAT转发使用,tp-link路由器网关设置成 192.168.30.254 (核心层)Cisco 3550三层交换机(型号C3550-I5Q3L2-M)配 ...
随机推荐
- PowerShell中的基础数据类型
PowerShell是一个面向对象的语言,在申明变量的时候不强制要求申明数据类型,使用$开头来申明变量即可. 基本数据类型 PowerShell本身是基于.Net开发出来的,所以在.Net中的基本数据 ...
- Undefined class constant 'MYSQL_ATTR_INIT_COMMAND'
新下载的php3.23,本地访问数据库可以,服务器上不行.如下: :( Undefined class constant 'MYSQL_ATTR_INIT_COMMAND' 错误位置 FILE: /u ...
- 教你看懂 OpenStack 日志 - 每天5分钟玩转 OpenStack(29)
instance 从创建到删除的整个生命周期都是由 Nova 管理的. 后面各小节我们以 instance 生命周期中的不同操作场景为例,详细分析 Nova 不同组件如何协调工作,并通过日志分析加深大 ...
- 腾讯 Bugly for Xamarin Android 的插件
因为项目中需要异常控制,所以在 gpyer bugly 等 Bug 收集平台中选择,最后选定了 Bugly. 于是将 Bugly 的插件 进行了 Java Binding,打成了 Xamarin 可用 ...
- spark standalone ha spark submit
when you build a spark standalone ha cluster, when you submit your app, you should send it to the l ...
- ANSYS17.0详细安装图文教程
ANSYS 17.0是ANSYS的最新版.下面以图文方式详细描述该软件的安装过程. 1 安装前的准备 安装之前需要做的准备工作: 在硬盘上腾出30G的空间来.(视安装模块的多少,完全安装可能需要二十多 ...
- BestCoder Round #89 Fxx and string
问题描述 青年理论计算机科学家Fxx得到了一个只包含小写字母的字符串. 字符串的长度为\:nn,下标从1开始,第\:i\:i位的字母为\:s_isi,现在Fxx想知道有多少三元组\:(i,j,k ...
- python基础之dict、set及字符
python基础之dict.set及字符串处理 本节内容 字典介绍及内置方法 集合介绍 字符串处理 1.字典介绍及内置方法 字典是python中唯一的映射类型,采用键值对(key-value)的形式存 ...
- c#导出bugfree3.0的数据到禅道
环境:vs2012MVC4项目,mysql server5.6 准备:bugfree的数据库导出后.sql文件,禅道7.1的数据库文件 基本过程:这是个笨办法,也没有优化过代码,导入数据时候比较慢.禅 ...
- .Net JIT
.Net JIT(转) JIT