
Spring的简单使用(3)
一:SM框架的整合:
所需要的依赖:
<dependency>
        <groupId>junit</groupId>
        <artifactId>junit</artifactId>
        <version>4.12</version>
        <scope>test</scope>
    </dependency>
    <dependency>
        <groupId>org.springframework</groupId>
        <artifactId>spring-aspects</artifactId>
        <version>5.2.5.RELEASE</version>
    </dependency>
    <dependency>
        <groupId>org.springframework</groupId>
        <artifactId>spring-context</artifactId>
        <version>5.2.5.RELEASE</version>
    </dependency>
    <dependency>
        <groupId>org.springframework</groupId>
        <artifactId>spring-tx</artifactId>
        <version>5.2.5.RELEASE</version>
    </dependency>
    <dependency>
        <groupId>org.springframework</groupId>
        <artifactId>spring-jdbc</artifactId>
        <version>5.2.5.RELEASE</version>
    </dependency>
    <dependency>
        <groupId>org.mybatis</groupId>
        <artifactId>mybatis</artifactId>
        <version>3.5.1</version>
    </dependency>
    <dependency>
        <groupId>org.mybatis</groupId>
        <artifactId>mybatis-spring</artifactId>
        <version>1.3.1</version>
    </dependency>
    <dependency>
        <groupId>mysql</groupId>
        <artifactId>mysql-connector-java</artifactId>
        <version>5.1.32</version>
    </dependency>
    <dependency>
        <groupId>com.mchange</groupId>
        <artifactId>c3p0</artifactId>
        <version>0.9.5.4</version>
    </dependency>

</dependencies>
<build>
    <resources>

        <resource>
            <directory>src/main/resources</directory>
            <includes>
                <include>**/*.properties</include>
                <include>**/*.xml</include>
            </includes>
        </resource>

        <resource>
            <directory>src/main/java</directory>
            <includes>
                <include>**/*.properties</include>
                <include>**/*.xml</include>
            </includes>
        </resource>

    </resources>
mybatis核心配置文件:
<?xml version="1.0" encoding="UTF-8" ?>
<!DOCTYPE configuration
        PUBLIC "-//mybatis.org//DTD Config 3.0//EN"
        "http://mybatis.org/dtd/mybatis-3-config.dtd">
<configuration>

</configuration>
spring—mapper.核心配置文件(接管了mybatis的核心配置文件):
<?xml version="1.0" encoding="UTF-8"?>
<beans xmlns="http://www.springframework.org/schema/beans"
       xmlns:xsi="http://www.w3.org/2001/XMLSchema-instance"
       xmlns:context="http://www.springframework.org/schema/context"
       xsi:schemaLocation="http://www.springframework.org/schema/beans http://www.springframework.org/schema/beans/spring-beans.xsd http://www.springframework.org/schema/context http://www.springframework.org/schema/context/spring-context.xsd">
<!--读取jdbc配置文件-->
    <context:property-placeholder location="db.properties" system-properties-mode="FALLBACK"></context:property-placeholder>
<!--创建数据源-->
    <bean id="dataSource" class="com.mchange.v2.c3p0.ComboPooledDataSource">
        <property name="driverClass" value="${jdbc.driver}"/>
        <property name="jdbcUrl" value="${jdbc.url}"/>
        <property name="user" value="${jdbc.username}"/>
        <property name="password" value="${jdbc.password}"/>
    </bean>
<!--配置sqlsessionFactoryBean类-->
    <bean id="sqlSessionFactoryBeanName" class="org.mybatis.spring.SqlSessionFactoryBean">
    <!--    配置数据源-->
     <property name="dataSource" ref="dataSource"></property>
    <!--配置mybatis的核心配置文件-->
        <property name="configLocation" value="mybatis-config.xml"></property>
<!--        注册实体类别名-->
        <property name="typeAliasesPackage" value="com.ztb.pojo"></property>
    </bean>

<!--注册mapper.xml文件-->
    <bean class="org.mybatis.spring.mapper.MapperScannerConfigurer">
        <property name="basePackage" value="com.ztb.dao"></property>
    </bean>
</beans>
spring-service核心配置文件:
<?xml version="1.0" encoding="UTF-8"?>
<beans xmlns="http://www.springframework.org/schema/beans"
       xmlns:xsi="http://www.w3.org/2001/XMLSchema-instance" xmlns:context="http://mybatis.org/schema/mybatis-spring"
       xsi:schemaLocation="http://www.springframework.org/schema/beans http://www.springframework.org/schema/beans/spring-beans.xsd http://mybatis.org/schema/mybatis-spring http://mybatis.org/schema/mybatis-spring.xsd">
    <import resource="spring-mapper.xml"></import>
    <context:scan base-package="com.ztb.spring"></context:scan>

</beans>
database.properties:
jdbc.driver=com.mysql.jdbc.Driver
jdbc.url=jdbc:mysql://localhost:3306/mybatis?useSSL=false&useUnicode=true&characterEncoding=UTF-8
jdbc.username=root
jdbc.password=ztb
dao层:
dao层接口:
public interface UserMapper {
    int insert(User user);
}
dao层配置文件:
<?xml version="1.0" encoding="UTF-8" ?>
<!DOCTYPE mapper
        PUBLIC "-//mybatis.org//DTD Mapper 3.0//EN"
        "http://mybatis.org/dtd/mybatis-3-mapper.dtd">
<mapper namespace="com.ztb.dao.UserMapper">
    <insert id="insert" parameterType="com.ztb.pojo.User">
        insert into user values (#{id},#{name},#{pwd})
    </insert>
</mapper>
实体类:
package com.ztb.pojo;

public class User {
    private Integer id;
    private String name;
    private String pwd;

    public User() {
    }

    public User(Integer id, String name, String pwd) {
        this.id = id;
        this.name = name;
        this.pwd = pwd;
    }

    public Integer getId() {
        return id;
    }

    public void setId(Integer id) {
        this.id = id;
    }

    public String getName() {
        return name;
    }

    public void setName(String name) {
        this.name = name;
    }

    public String getPwd() {
        return pwd;
    }

    public void setPwd(String pwd) {
        this.pwd = pwd;
    }

    @Override
    public String toString() {
        return "User{" +
                "id=" + id +
                ", name='" + name + '\'' +
                ", pwd='" + pwd + '\'' +
                '}';
    }
}
service层:
service接口:
public interface UserService {
    int insert(User user);
}
service实现类:
@Service("user")
public class UserServiceImpl implements UserService{
    @Autowired
    UserMapper userMapper;

    @Override
    public int insert(User user) {
        return userMapper.insert(user);
    }
}
测试:
@Test
public void test1() {
    ApplicationContext context = new ClassPathXmlApplicationContext("spring-service.xml");
    UserService userServiceImpl = (UserService) context.getBean("user");
    int i = userServiceImpl.insert(new User(13, "张三", "2222"));
    System.out.println(i);
二:事务:
分为注解式事务和声明式事务:
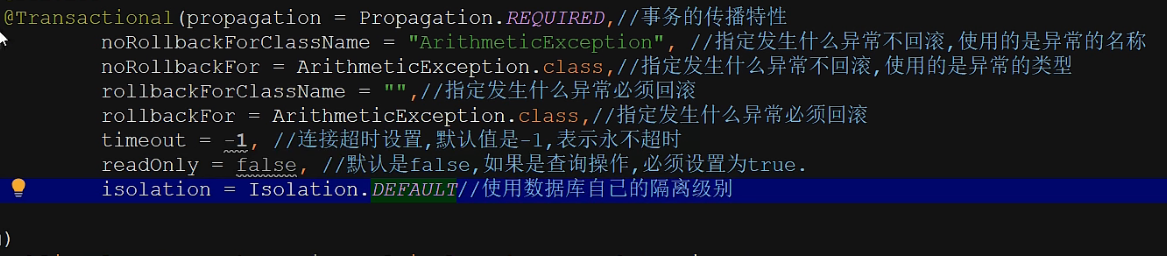
1:注解式事务:使用@Transactional注解完成事务控制,此注解可以添加到类上,,则对类中的所有方法都执行事务的处理。也可以添加到方法上,添加到方法上只是对该方法进行事务处理。
由于事务都是在业务逻辑层,所以所有的事务都必须配在service层:
首先需要在spring-service配置文件中添加支持注解式事务:
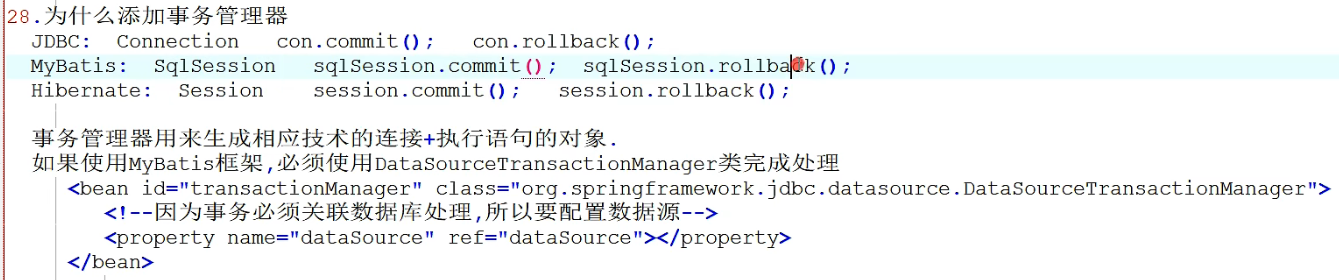
<!--    1添加事务管理器-->
    <bean id="transactionManager" class="org.springframework.jdbc.datasource.DataSourceTransactionManager">
<!--        因为事务必须关联数据库操作,所以要配置数据源-->
        <property name="dataSource" ref="dataSource"></property>
     </bean>
<!--    2添加事务的注解驱动-->
<tx:annotation-driven transaction-manager="transactionManager"></tx:annotation-driven>
注解式事务必须要在实现类上面添加注解:


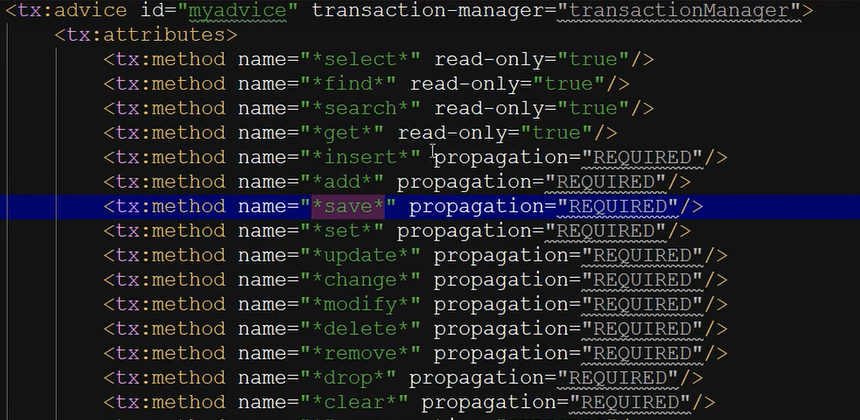
2:声明式事务(重要):在配置文件中添加一次,整个项目都遵循事物的设定。
声明式事务配置如下:
<!--    1添加事务管理器-->
    <bean id="transactionManager" class="org.springframework.jdbc.datasource.DataSourceTransactionManager">
<!--        因为事务必须关联数据库操作,所以要配置数据源-->
        <property name="dataSource" ref="dataSource"></property>
     </bean>
<!--    2添加事务的声明驱动-->
    <tx:advice id="myadvice" transaction-manager="transactionManager">
        <tx:attributes>
<!--     *指的是为所有方法添加事务       REQUIRED指的是增删改,-->
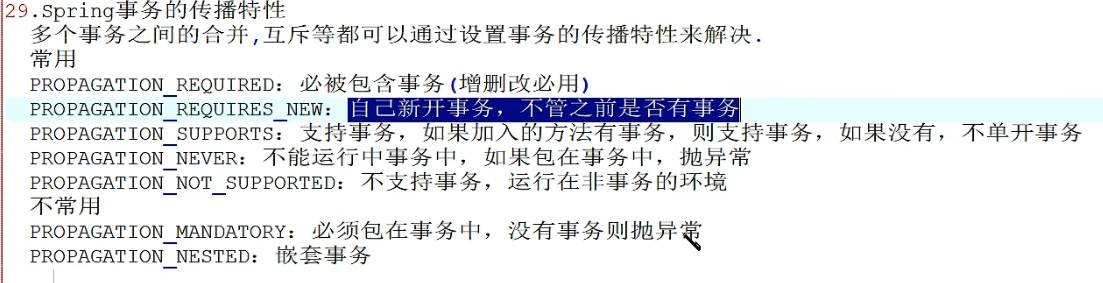
            <tx:method name="*" propagation="NOT_SUPPORTED"/>

        </tx:attributes>
    </tx:advice>
<!--    绑定切面和切入点-->
    <aop:config>
        <aop:pointcut id="mycut" expression="execution(* com.ztb.spring.*.*(..))"/>
<!--        把myadvice的事务绑定到mycut的service包(包名写错了sping)下的任意方法中-->
        <aop:advisor advice-ref="myadvice" pointcut-ref="mycut"></aop:advisor>
    </aop:config>
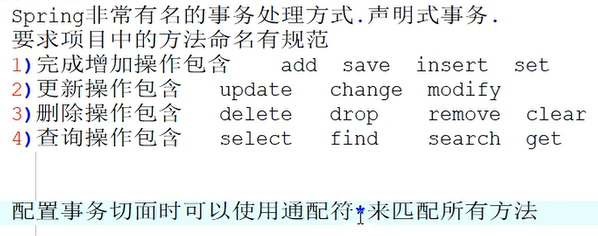
也可以如下写:
事务优先级的处理:
如果有一些方法和声明式事务不匹配,则可以设置优先级:
在配置文件中添加注解式事务,设置优先级比声明式要高,这样在方法上就会选择注解式事务来操作了
<tx:annotation-driven order="100"></tx:annotation-driven>注解式设置为100
<aop:advisor order="1" advice-ref="myadvice" pointcut-ref="mycut"></aop:advisor>声明式设置为1
Spring的简单使用(3)的更多相关文章
- Spring cache简单使用guava cache
Spring cache简单使用 前言 spring有一套和各种缓存的集成方式.类似于sl4j,你可以选择log框架实现,也一样可以实现缓存实现,比如ehcache,guava cache. [TOC ...
- Spring的简单demo
---------------------------------------- 开发一个Spring的简单Demo,具体的步骤如下: 1.构造一个maven项目 2.在maven项目的pom.xml ...
- 1.Spring IoC简单例子
Spring IoC简单例子 1.IHelloMessage.java package com.tony.spring.chapter01; public interface IHelloMessag ...
- Spring mvc系列一之 Spring mvc简单配置
Spring mvc系列一之 Spring mvc简单配置-引用 Spring MVC做为SpringFrameWork的后续产品,Spring 框架提供了构建 Web 应用程序的全功能 MVC 模块 ...
- 玩转spring boot——简单登录认证
前言 在一个web项目中,某些页面是可以匿名访问的,但有些页面则不能.spring mvc提供了HandlerInterceptor接口来应对,只需要重写preHandle方法便可以实现此功能.那么使 ...
- Spring.Net 简单实例-02(属性注入)
说明:接续Spring.Net 简单实例-01(IOC) 话不多说看操作 1:为UserInfo添加属性 2: 修改App.config中代码 <?xml version="1.0&q ...
- DI spring.net简单使用
IOC或DI spring.net简单使用 一.spring.net是什么? Spring 框架本是 Java 平台上一个应用非常多的.开源的框架.虽然语言是固定的,但是好的方法应该是通用的,于是 ...
- Spring的简单应用与基本原理
一:重要概念理解 Spring很简单,一定不要想得太复杂,只是有些东西很拗口而已 1:IOC(控制反转) 概念:利用反射的原理将对象创建的权利交给了Spring,Spring在运行的时候根据配置文件( ...
- Spring Framework简单介绍
Spring Framework 学习java编程不知不觉已经三年时间了,開始的时候,总是喜欢看着视频,然后按部就班的敲打着键盘,每当系统正常执行后.心里乐开了花.最開始的时候,所有的代 ...
- spring security 简单入门
spring security 简单入门示例 一.概述 Spring Security是一个能够为基于Spring的企业应用系统提供声明式的安全访问控制解决方案的安全框架 . 其中最主要的安全操作有两 ...
随机推荐
- 132_Power BI之建模必备要素&Power Query之数据表字段名称管理
博客:www.jiaopengzi.com 焦棚子的文章目录 请点击下载附件 一.背景 近段时间比较忙,也没有看到很好的DAX素材,很久没有更新文章了,刚好有时间就来凑个热闹. 今天主题是Power ...
- Fail2ban 使用Fail2ban监禁SSH服务的恶意IP
Fail2ban自带了很多服务的过滤器(filter)和动作(action),它已经帮你做好了,所以一般情况下我们无需定义,直接引用即可. 这边只是一个示例. 系统版本:Ubuntu 16.04.5 ...
- 『忘了再学』Shell基础 — 17、预定义变量
目录 1.预定义变量$? 2.预定义变量$$和$! 我们之前说过,Shell中的变量不是按照变量值的类型来进行分类的,而是按照Linux系统中定义的变量类别来分类的. 预定义变量就是,事先把变量的名称 ...
- docker安装nginx,配置SSL
nginx安装 下载镜像并测试 1.docker pull nginx 2.docker images nginx 查看我们拉取到本地的nginx镜像IMAGE ID 3.首先测试下nginx镜像是否 ...
- .NET性能优化-推荐使用Collections.Pooled(补充)
简介 在上一篇.NET性能优化-推荐使用Collections.Pooled一文中,提到了使用Pooled类型的各种好处,但是在群里也有小伙伴讨论了很多,提出了很多使用上的疑问. 所以特此写了这篇文章 ...
- 2020.10.17【普及组】模拟赛C组 总结
总结 这次比赛 120 分,老师说上 200 是不容易的,但我觉得这不是我真的水平 改题情况 T1 题目大意:有 N 个小朋友,每个小朋友有 \(B_i\) 个朋友,问从中随机选 3 人使得 3 人关 ...
- generatorConfig.xml自动生成实体类,dao和xml
<?xml version="1.0" encoding="UTF-8"?><!DOCTYPE generatorConfiguration ...
- C语言学习之我见-malloc和free内存申请及释放函数
malloc函数负责向计算机申请确定大小的内存空间. free函数负责释放malloc的申请空间. (1)函数原型 void free(void *_Memory); void * malloc(si ...
- 跟着Vam一起学习Typescript(第一期)
一.安装环境与配置1.命令行安装 npm i -g typescript 2.快捷打开Vs Code编辑器 创建一个项目文件夹,在该文件夹下打开命令行工具,使用code .命令快速打开编辑器(如果计算 ...
- git stash 的一次惊心动魄的误删操作
git stash 的一次惊心动魄的误删操作 简介:行走在互联网最低端的小熊 问题--源起: 小熊和所有混迹在互联网中的开发一样,公司里面用git来管理项目,由于可能经常有几个问题要开发,要频繁在多分 ...