
利用QEMU+GDB搭建Linux内核调试环境
前言
对用户态进程,利用gdb调试代码是很方便的手段。而对于内核态的问题,可以利用crash等工具基于coredump文件进行调试。
其实我们也可以利用一些手段对Linux内核代码进行gdb调试,qemu就是一种。
qemu是一款完全软件模拟(Binary translation)的虚拟化软件,在虚拟化的实现中性能相对较差。但利用它在测试环境中gdb调试Linux内核代码,是熟悉Linux内核代码的一个好方法。
本文实验环境:
- ubuntu 20.04
- busybox-1.32.1
- Linux kernel 4.9.3
- QEMU
- GDB 10.1
编译内核源码
git clone git://git.kernel.org/pub/scm/linux/kernel/git/stable/linux.git

tar -xvzf linux-4.9.301.tar.gz

cd linux-4.9.301

make menuconfig
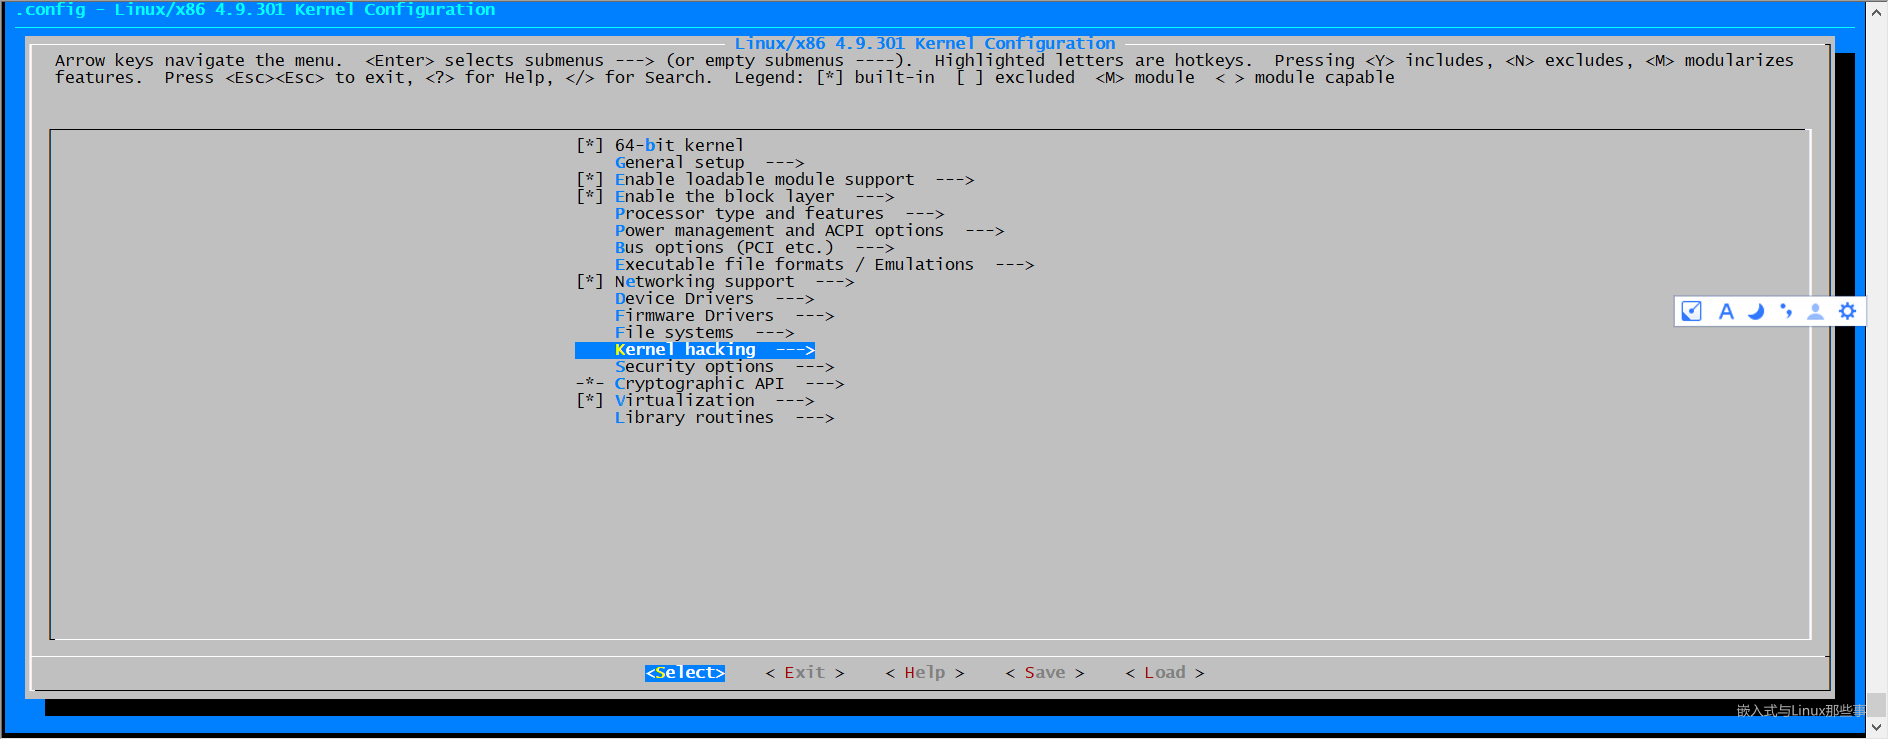
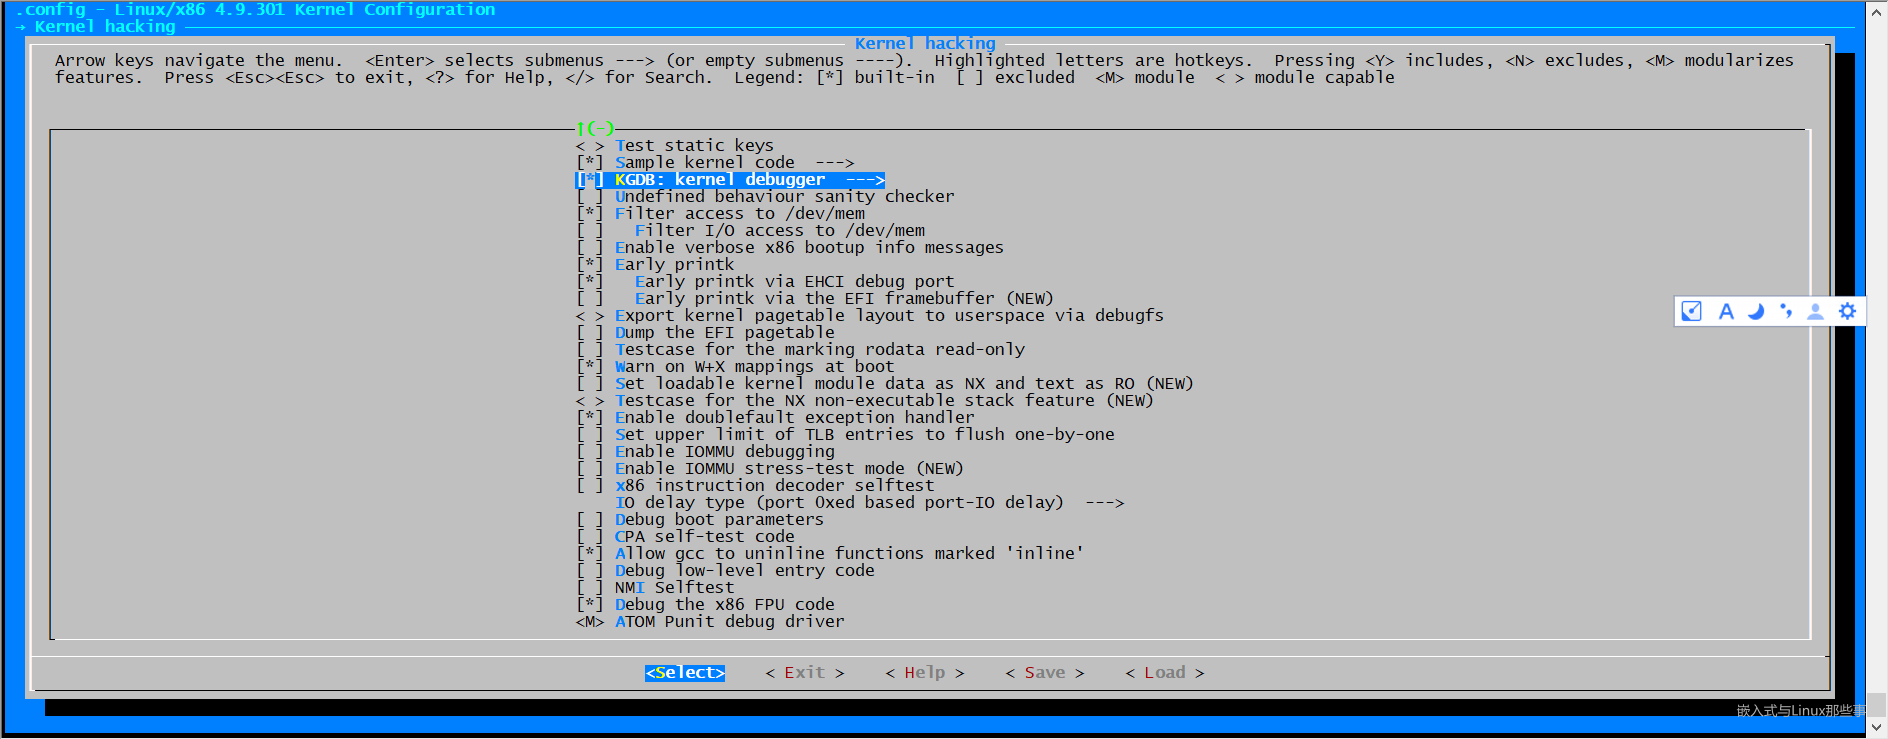
在内核编译选项中,开启如下"Compile the kernel with debug info"
Kernel hacking --->

  Compile-time checks and compiler options --->

    [ ] Compile the kernel with debug info
示意图如下,利用键盘选中debug选项,然后敲"Y"勾选:
以上配置完成后会在当前目录生成 .config 文件,我们可以使用 grep 进行验证:
grep CONFIG_DEBUG_INFO .config

CONFIG_DEBUG_INFO=y
编译内核
make bzImage -j4
编译完成后,会在当前目录下生成vmlinux,这个在 gdb 的时候需要加载,用于读取 symbol 符号信息,包含了所有调试信息,所以比较大。
压缩后的镜像文件为bzImage, 在arch/x86/boot/目录下。
➜  linux-4.9.301 ls -hl vmlinux

-rwxrwxr-x 1 ubuntu ubuntu 578M Apr 15 08:14 vmlinux

➜  linux-4.9.301 ls -hl ./arch/x86_64/boot/bzImage

lrwxrwxrwx 1 ubuntu ubuntu 22 Apr 15 08:15 ./arch/x86_64/boot/bzImage -> ../../x86/boot/bzImage

➜  linux-4.9.301 ls -hl ./arch/x86/boot/bzImage

-rw-rw-r-- 1 ubuntu ubuntu 9.3M Apr 15 08:15 ./arch/x86/boot/bzImage
几种linux内核文件的区别:
vmlinux 编译出来的最原始的内核文件,未压缩。
zImage 是vmlinux经过gzip压缩后的文件。
bzImage bz表示“big zImage”,不是用bzip2压缩的。两者的不同之处在于,zImage解压缩内核到低端内存(第一个640K)。
bzImage解压缩内核到高端内 存(1M以上)。如果内核比较小,那么采用zImage或bzImage都行,如果比较大应该用bzImage。
uImage U-boot专用的映像文件,它是在zImage之前加上一个长度为0x40的tag。
vmlinuz 是bzImage/zImage文件的拷贝或指向bzImage/zImage的链接。
initrd 是“initial ramdisk”的简写。一般被用来临时的引导硬件到实际内核vmlinuz能够接管并继续引导的状态。
编译busybox
Linux系统启动阶段,boot loader加载完内核文件vmlinuz后,内核紧接着需要挂载磁盘根文件系统,但如果此时内核没有相应驱动,无法识别磁盘,就需要先加载驱动。
而驱动又位于/lib/modules,得挂载根文件系统才能读取,这就陷入了一个两难境地,系统无法顺利启动。
于是有了initramfs根文件系统,其中包含必要的设备驱动和工具,bootloader加载initramfs到内存中,内核会将其挂载到根目录/,然后运行/init脚本,挂载真正的磁盘根文件系统。
这里借助BusyBox构建极简initramfs,提供基本的用户态可执行程序。
可以从busybox官网地址下载最新版本,或者直接使用wget下载我使用的版本。
wget https://busybox.net/downloads/busybox-1.32.1.tar.bz2

$ tar -xvf busybox-1.32.1.tar.bz2

$ cd busybox-1.32.1/

$ make menuconfig
在编译busybox之前,我们需要对其进行设置,执行make menuconfig,如下
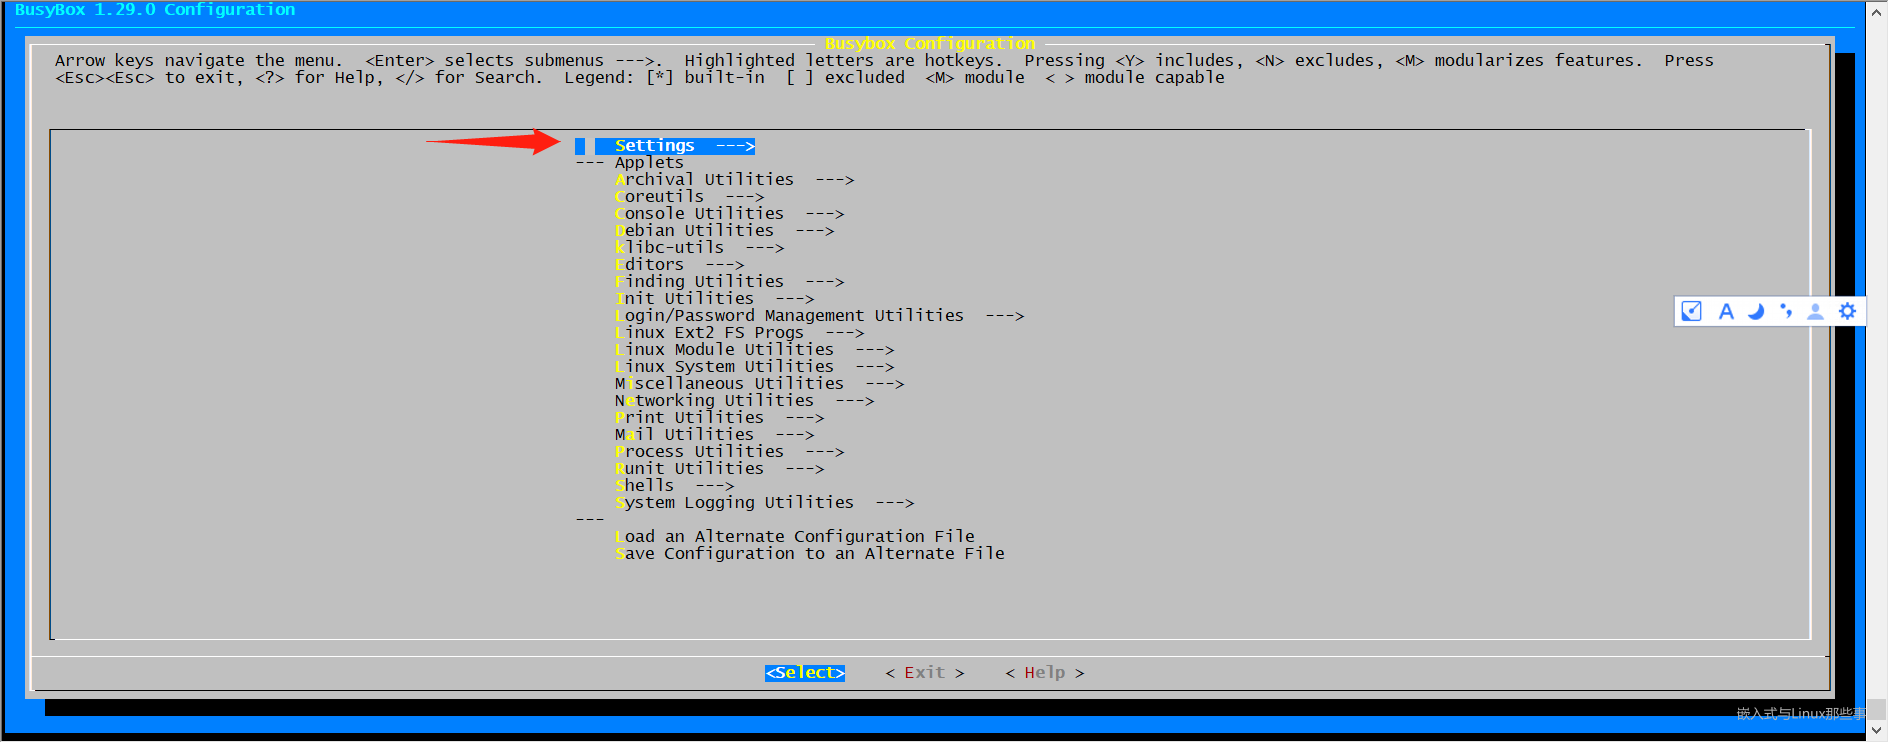
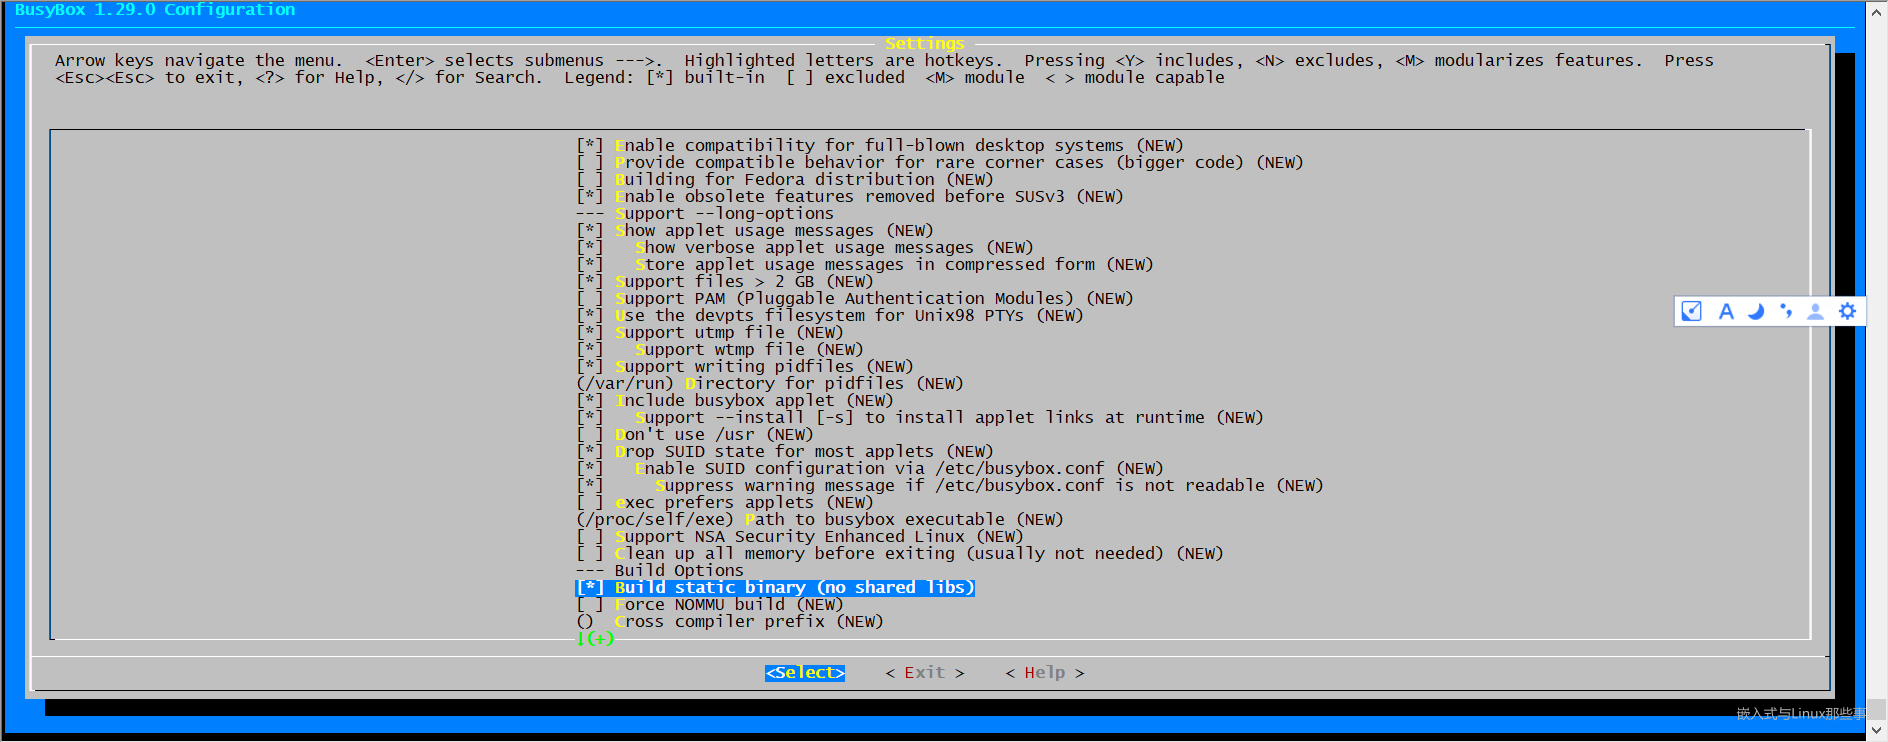
这里一定要选择静态编译,编译好的可执行文件busybox不依赖动态链接库,可以独立运行,方便构建initramfs。
之后选择Exit退出,到这里我们就可以编译busybox了,执行下面的命令
make -j 8

# 安装完成后生成的相关文件会在 _install 目录下

make && make install
构建initramfs根文件系统
[root@localhost temp]# ls

busybox-1.29.0  busybox-1.29.0.tar.bz2

[root@localhost temp]# mkdir initramfs

[root@localhost temp]# cd initramfs

[root@localhost initramfs]# cp ../busybox-1.32.1/_install/* -rf ./

[root@localhost initramfs]# mkdir dev proc sys

[root@localhost initramfs]# sudo cp -a /dev/{null,console,tty,tty1,tty2,tty3,tty4} dev/

[root@localhost initramfs]# rm -f linuxrc

[root@localhost initramfs]# vim init

[root@localhost initramfs]# chmod a+x init

[root@localhost initramfs]# ls

bin  dev  init  proc  sbin  sys  usr
其中init的内容如下
#!/bin/busybox sh

echo "{==DBG==} INIT SCRIPT"

mount -t proc none /proc

mount -t sysfs none /sys

echo -e "{==DBG==} Boot took $(cut -d' ' -f1 /proc/uptime) seconds"

exec /sbin/init
打包initramfs
find . -print0 | cpio --null -ov --format=newc | gzip -9 > ../initramfs.cpio.gz

[root@localhost initramfs]# ls ../

busybox-1.29.0  busybox-1.29.0.tar.bz2  initramfs  initramfs.cpio.gz
安装QEMU
apt install qemu qemu-utils qemu-kvm virt-manager libvirt-daemon-system libvirt-clients bridge-utils
安装GDB
wget https://ftp.gnu.org/gnu/gdb/gdb-10.1.tar.gz

tar -xzvf gdb-10.1.tar.gz

cd  gdb-10.1

./configure

# 必需要安装这两个库

sudo apt-get install texinfo

sudo apt-get install build-essential

make -j 8

sudo make install
QEMU启动调试内核
➜ linux-4.9.301 qemu-system-x86_64 -kernel ./arch/x86/boot/bzImage -initrd ../initramfs.cpio.gz -append "nokaslr console=ttyS0" -s -S -nographic
-kernel ./arch/x86/boot/bzImage:指定启用的内核镜像;-initrd ../initramfs.cpio.gz:指定启动的内存文件系统;-append "nokaslr console=ttyS0":附加参数,其中nokaslr参数必须添加进来,防止内核起始地址随机化,这样会导致 gdb 断点不能命中;-s:监听在 gdb 1234 端口;-S:表示启动后就挂起,等待 gdb 连接;-nographic:不启动图形界面,调试信息输出到终端与参数console=ttyS0组合使用;
在另一个窗口中,输入gdb,即可开启调试。
(gdb) target remote localhost:1234

Remote debugging using localhost:1234

warning: Can not parse XML target description; XML support was disabled at compile time

Remote 'g' packet reply is too long (expected 560 bytes, got 608 bytes): 0000000000000000000000000000000000000000000000006306000000000000000000000000000000000000000000000000000000000000000000000000000000000000000000000000000000000000000000000000000000000000000000000000000000000000000000000000000000000000000000000000000000000000f0ff0000000000000200000000f00000000000000000000000000000000000000000000000000000000000000000000000000000000000000000000010000060000000000000000000000000000000000000000000000000000000000000000000000000000000000000000000000000000000000000000000000000000000000000000000000000000000000000000000000000000000000000000000000000000000000000000000000000000000000000000000000000000000007f0300000000000000000000000000000000000000000000000000000000000000000000000000000000000000000000000000000000000000000000000000000000000000000000000000000000000000000000000000000000000000000000000000000000000000000000000000000000000000000000000000000000000000000000000000000000000000000000000000000000000000000000000000000000000000000000000000000000000000000000000000000000000000000000000000000000000000000000000000000000000000000000000000000000000000000000000000000000000000000000000000000000000000000000000000000000000000000000000000000000000000000000000000000000000000000000801f0000

(gdb) Remote debugging using localhost:1234

Undefined command: "Remote".  Try "help".

(gdb) warning: Can not parse XML target description; XML support was disabled at compile timeQuit
但是,在启动GDP调试时报错了,在查阅了诸多资料后,很多博客都给出了修复方法:源码重新安装gdb,并修改gdb/remote.c文件的一段代码。但是我尝试了,发现行不通。
出现该问题的原因是:编译 的是64 位模式的内核代码,但是运行是在 32 位保护模式下。64 位代码将无法在该环境中正常运行。
终于在stackflow上找到了修复方法:具体可以参考下面两篇文章。
https://wiki.osdev.org/QEMU_and_GDB_in_long_mode
文章中给出了三种修复方法,我这里只列出了一种,即修改GDB源码,重新编译安装。
--- gdb/remote.c  	2016-04-14 11:13:49.962628700 +0300

+++ gdb/remote.c	2016-04-14 11:15:38.257783400 +0300

@@ -7181,8 +7181,28 @@

   buf_len = strlen (rs->buf);

   /* Further sanity checks, with knowledge of the architecture.  */

+// HACKFIX for changing architectures for qemu. It's ugly. Don't use, unless you have to.

+  // Just a tiny modification of the patch of Matias Vara (http://forum.osdev.org/viewtopic.php?f=13&p=177644)

   if (buf_len > 2 * rsa->sizeof_g_packet)

-    error (_("Remote 'g' packet reply is too long: %s"), rs->buf);

+    {

+      warning (_("Assuming long-mode change. [Remote 'g' packet reply is too long: %s]"), rs->buf);

+      rsa->sizeof_g_packet = buf_len ;

+

+      for (i = 0; i < gdbarch_num_regs (gdbarch); i++)

+        {

+          if (rsa->regs[i].pnum == -1)

+            continue;

+

+          if (rsa->regs[i].offset >= rsa->sizeof_g_packet)

+            rsa->regs[i].in_g_packet = 0;

+          else

+            rsa->regs[i].in_g_packet = 1;

+        }

+

+      // HACKFIX: Make sure at least the lower half of EIP is set correctly, so the proper

+      // breakpoint is recognized (and triggered).

+      rsa->regs[8].offset = 16*8;

+    }

   /* Save the size of the packet sent to us by the target.  It is used

      as a heuristic when determining the max size of packets that the
cd gdb-10.1

./configure

make -j 8

sudo make install
接着就可以敲gdb 启动调试。
➜  linux-4.9.301 gdb

GNU gdb (GDB) 10.1

Copyright (C) 2020 Free Software Foundation, Inc.

License GPLv3+: GNU GPL version 3 or later <http://gnu.org/licenses/gpl.html>

This is free software: you are free to change and redistribute it.

There is NO WARRANTY, to the extent permitted by law.

Type "show copying" and "show warranty" for details.

This GDB was configured as "x86_64-pc-linux-gnu".

Type "show configuration" for configuration details.

For bug reporting instructions, please see:

<https://www.gnu.org/software/gdb/bugs/>.

Find the GDB manual and other documentation resources online at:

    <http://www.gnu.org/software/gdb/documentation/>.

For help, type "help".

Type "apropos word" to search for commands related to "word".

(gdb) file vmlinux

Reading symbols from vmlinux...

(gdb) target remote localhost:1234

Remote debugging using localhost:1234

warning: Can not parse XML target description; XML support was disabled at compile time

warning: Assuming long-mode change. [Remote 'g' packet reply is too long: PU]

0x000000000000fff0 in exception_stacks ()

(gdb) break start_kernel

Breakpoint 1 at 0xffffffff81fc6a95: file init/main.c, line 486.

(gdb) break  rest_init

Breakpoint 2 at 0xffffffff818aa1e1: file init/main.c, line 385.

(gdb) c

Continuing.

Breakpoint 1, start_kernel () at init/main.c:486

486             set_task_stack_end_magic(&init_task);

(gdb) c

Continuing.

Breakpoint 2, rest_init () at init/main.c:385

385     {

(gdb)
在start_kernel 和 rest_init 打了两个断点, 两个断点都成功命中了。
本文参考
https://www.shuzhiduo.com/A/kjdw2a2q5N/
https://cloud.tencent.com/developer/article/1793157
https://blog.csdn.net/alexanderwang7/article/details/113180447
https://blog.csdn.net/sjc2870/article/details/122017247
利用QEMU+GDB搭建Linux内核调试环境的更多相关文章
- 用Qemu模拟vexpress-a9 (一) --- 搭建Linux kernel调试环境【转】
转自:http://www.cnblogs.com/pengdonglin137/p/5023342.html#_label2 阅读目录(Content) 环境介绍: 下载Linux内核 安装arm的 ...
- 用Qemu模拟vexpress-a9 (一) --- 搭建Linux kernel调试环境
参考: http://blog.csdn.net/linyt/article/details/42504975 环境介绍: Win7 64 + Vmware 11 + ubuntu14.04 32 u ...
- linux内核调试指南
linux内核调试指南 一些前言 作者前言 知识从哪里来 为什么撰写本文档 为什么需要汇编级调试 ***第一部分:基础知识*** 总纲:内核世界的陷阱 源码阅读的陷阱 代码调试的陷阱 原理理解的陷阱 ...
- Linux Kernel - Debug Guide (Linux内核调试指南 )
http://blog.csdn.net/blizmax6/article/details/6747601 linux内核调试指南 一些前言 作者前言 知识从哪里来 为什么撰写本文档 为什么需要汇编级 ...
- Linux内核调试方法总结【转】
转自:http://my.oschina.net/fgq611/blog/113249 内核开发比用户空间开发更难的一个因素就是内核调试艰难.内核错误往往会导致系统宕机,很难保留出错时的现场.调试内核 ...
- 【转】Linux内核调试方法总结
目录[-] 一 调试前的准备 二 内核中的bug 三 内核调试配置选项 1 内核配置 2 调试原子操作 四 引发bug并打印信息 1 BUG()和BUG_ON() 2 dump_sta ...
- Linux内核调试方法总结
Linux内核调试方法总结 一 调试前的准备 二 内核中的bug 三 内核调试配置选项 1 内核配置 2 调试原子操作 四 引发bug并打印信息 1 BUG()和BUG_ON() 2 ...
- 用qemu+gdb tcp server+CDT调试linux内核启动-起步
用qemu+gdb tcp server+CDT调试linux内核启动-起步 说明: 环境信息与 用virtualbox+模拟串口+CDT调试linux内核 TCP IP协议栈-起步 提到的一样,并且 ...
- 《天书夜读:从汇编语言到windows内核编程》四 windows内核调试环境搭建
1) 基础篇是讲理论的,先跳过去,看不到代码运行的效果要去记代码是一个痛苦的事情.这里先跳入探索篇.其实今天的确也很痛苦,这作者对驱动开发的编译与调试环境介绍得太模糊了,我是各种尝试,对这个环境的搭建 ...
随机推荐
- 多数据源并且数据库类型不同的情况下PageHelper的使用
一.问题来源 最近开发一个项目需要依赖两个数据源,数据源类型分别为oracle和postgresql,代码中使用com.github.pagehelper分页插件进行分页,代码运行过程中postgre ...
- 深入理解Java虚拟机-JVM运行时数据区域
一.运行时数据区域 1.程序计数器 程序计数器( Program Counter Register) 是一块较小的内存空间, 它可以看作是当前线程所执行的字节码的行号指示器. Java虚拟机的多线程是 ...
- Shiro集成多个Realm,认证都不通过返回y configured realms. Please ensure that at least one realm can authenticate these tokens.
异常内容:Authentication token of type [class org.apache.shiro.authc.UsernamePasswordToken] could not be ...
- Effective Java —— 谨慎覆盖clone
本文参考 本篇文章参考自<Effective Java>第三版第十三条"Always override toString",在<阿里巴巴Java开发手册>中 ...
- jsp技术之隐藏域
隐藏域 hidden:隐藏域属性,不显示到页面上,但是会提交的表单项 注意:表单中增加了一个隐藏域,是用户的id.稍后修改联系人信息,提交表单时需要使用到 <!-- hidden:隐藏域,不显示 ...
- C语言之常量(知识点4)
一.常量(概念) ①用标识符代表常量 ②一般用大写字母表示 二.定义格式 #define 符号常量 常量 三.案例 #define PI 40; #define PRICE 30; 四.注意 ①其值在 ...
- python学习笔记(四)——面向对象编程
python 支持面向过程编程和面向对象编程. 传统面向过程编程,也叫函数式编程,通过我们的需求设计成一个一个的函数来完成,对一些小规模程序来说面向过程确实简单方便不少.而随着互联网的发展,对于一些大 ...
- simulink模块使用方式
逻辑模块 1.小于等于系列模块 Applies the selected relational operator to the inputs and outputs the result. The t ...
- STM32 之 HAL库(固件库)
1 STM32的三种开发方式 通常新手在入门STM32的时候,首先都要先选择一种要用的开发方式,不同的开发方式会导致你编程的架构是完全不一样的.一般大多数都会选用标准库和HAL库,而极少部分人会通过直 ...
- 一份你可以在 <head> 里设置的列表
A list of everything that could go in the <head> of your document github 原地址:https://github.co ...