
FreeMarker整合Spring 3(转)
开发环境:
System:Windows
WebBrowser:IE6+、Firefox3+
JavaEE Server:tomcat5.0.2.8、tomcat6
IDE:eclipse、MyEclipse 8
开发依赖库:
JavaEE5、Spring 3.0.0.M4、FreeMarker 2.3.16
Email:hoojo_@126.com
Blog:http://blog.csdn.net/IBM_hoojo
1、 新建WebProject,工程名称是SpringFreemarker;然后手动添加jar包,需要的jar包如下:
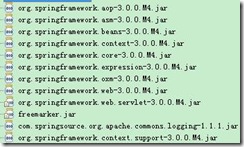
SpringFramework jar包下载地址:
FreeMarker library下载地址:
当然你也可以去官方下载
2、 在web.xml中添加如下配置:
<!-- 加载Spring容器配置 -->
<listener>
<listener-class>org.springframework.web.context.ContextLoaderListener</listener-class>
</listener>
<!-- 设置Spring容器加载配置文件路径 -->
<context-param>
<param-name>contextConfigLocation</param-name>
<param-value>classpath*:applicationContext-*.xml</param-value>
</context-param>
<servlet>
<servlet-name>dispatcher</servlet-name>
<servlet-class>org.springframework.web.servlet.DispatcherServlet</servlet-class>
<init-param>
<param-name>contextConfigLocation</param-name>
<param-value>/WEB-INF/dispatcher.xml</param-value>
</init-param>
<load-on-startup>1</load-on-startup>
</servlet>
<servlet-mapping>
<servlet-name>dispatcher</servlet-name>
<url-pattern>*.do</url-pattern>
</servlet-mapping>
上面分别是添加Spring的监听器、以及配置Spring的配置文件、还有SpringMVC的控制器;
3、 在WEB-INF中添加文件dispatcher.xml,和web.xml中的对应。内容如下:
<?xml version="1.0" encoding="UTF-8"?>
<beans xmlns="http://www.springframework.org/schema/beans"
xmlns:mvc="http://www.springframework.org/schema/mvc" xmlns:context="http://www.springframework.org/schema/context"
xmlns:util="http://www.springframework.org/schema/util" xmlns:xsi="http://www.w3.org/2001/XMLSchema-instance"
xsi:schemaLocation="http://www.springframework.org/schema/beans >
http://www.springframework.org/schema/beans/spring-beans-3.0.xsd
http://www.springframework.org/schema/mvc
http://www.springframework.org/schema/mvc/spring-mvc-3.0.xsd
http://www.springframework.org/schema/context
http://www.springframework.org/schema/context/spring-context-3.0.xsd
http://www.springframework.org/schema/util
http://www.springframework.org/schema/util/spring-util-3.0.xsd"
<context:component-scan base-package="com.hoo" />
<!-- annotation的方法映射适配器
<bean id="handlerAdapter" class="org.springframework.web.servlet.mvc.annotation.AnnotationMethodHandlerAdapter"/>
-->
<!-- annotation默认的方法映射适配器 -->
<bean id="handlerMapping" class="org.springframework.web.servlet.mvc.annotation.DefaultAnnotationHandlerMapping"/>
<bean class="org.springframework.web.servlet.view.InternalResourceViewResolver">
<property name="viewClass" value="org.springframework.web.servlet.view.JstlView"/>
</bean>
</beans>
上面是SpringMVC的基本配置
4、 在src中添加applicationContext-beans.xml,内容如下:
<?xml version="1.0" encoding="UTF-8"?>
<beans xmlns="http://www.springframework.org/schema/beans"
xmlns:xsi="http://www.w3.org/2001/XMLSchema-instance"
xmlns:aop="http://www.springframework.org/schema/aop"
xmlns:tx="http://www.springframework.org/schema/tx"
xmlns:util="http://www.springframework.org/schema/util"
xmlns:context="http://www.springframework.org/schema/context"
xsi:schemaLocation="http://www.springframework.org/schema/beans >
http://www.springframework.org/schema/beans/spring-beans-3.0.xsd
http://www.springframework.org/schema/aop
http://www.springframework.org/schema/aop/spring-aop-3.0.xsd
http://www.springframework.org/schema/tx
http://www.springframework.org/schema/tx/spring-tx-3.0.xsd
http://www.springframework.org/schema/util
http://www.springframework.org/schema/util/spring-util-3.0.xsd
http://www.springframework.org/schema/context
http://www.springframework.org/schema/context/spring-context-3.0.xsd"
</beans>
里面可以添加一些bean的配置
5、 在src目录添加freemarker.properties配置文件,这个文件是freemarker一些常用的转换,内容如下:
tag_syntax=auto_detect
template_update_delay=2
default_encoding=UTF-8
output_encoding=UTF-8
locale=zh_CN
date_format=yyyy-MM-dd
time_format=HH:mm:ss
datetime_format=yyyy-MM-dd HH:mm:ss
6、 在dispatcher.xml中添加freemarker的配置,配置如下:
<!-- 设置freeMarker的配置文件路径 -->
<bean id="freemarkerConfiguration" class="org.springframework.beans.factory.config.PropertiesFactoryBean">
<property name="location" value="classpath:freemarker.properties"/>
</bean>
<!-- 配置freeMarker的模板路径 -->
<bean id="freemarkerConfig" class="org.springframework.web.servlet.view.freemarker.FreeMarkerConfigurer">
<!--property name="freemarkerSettings" ref="freemarkerConfiguration"/-->
<property name="templateLoaderPath">
<value>/WEB-INF/ftl/</value>
</property>
<property name="freemarkerVariables">
<map>
<entry key="xml_escape" value-ref="fmXmlEscape" />
</map>
</property>
</bean>
<bean id="fmXmlEscape" class="freemarker.template.utility.XmlEscape"/>
<!-- 配置freeMarker视图解析器 -->
<bean id="viewResolver" class="org.springframework.web.servlet.view.freemarker.FreeMarkerViewResolver">
<property name="viewClass" value="org.springframework.web.servlet.view.freemarker.FreeMarkerView"/>
<property name="viewNames" value="*.ftl"/>
<property name="contentType" value="text/html; charset=utf-8"/>
<property name="cache" value="true" />
<property name="prefix" value="" />
<property name="suffix" value="" />
<property name="order" value="2"/>
</bean>
上面最关键的就是freeMarker的视图解析器viewResolver的配置,viewClass是使用哪个视图解析器,这里是类路径;其他的和jsp的视图解析器都很类似。
7、 下面在WEB-INF中添加2个ftl模板,在WEB-INF添加ftl,然后添加hello.ftl/hi.ftl,内容分别是:
hello.ftl
<html>
<body>
<h1>say hello ${name}</h1><br/>
${(1 == 1)?string("yes", "no")}
</body>
</html>
hi.ftl
<html>
<body>
<h1>say hello ${name}</h1><br/>
${(1 != 1)?string("yes", "no")}
</body>
</html>
8、 添加Controller控制器,代码如下:
package com.hoo.controller;
import org.springframework.stereotype.Controller;
import org.springframework.ui.ModelMap;
import org.springframework.web.bind.annotation.RequestMapping;
/**
* <b>function:</b> FreeMarker示例控制器
* @author hoojo
* @createDate 2011-3-3 下午04:50:10
* @file HelloWorldController.java
* @package com.hoo.controller
* @project SpringFreemarker
* @version 1.0
*/
@Controller
@RequestMapping("/freeMarker")
public class HelloWorldController {
@RequestMapping("/hello")
public String sayHello(ModelMap map) {
System.out.println("say Hello ……");
map.addAttribute("name", " World!");
return "/hello.ftl";
}
@RequestMapping("/hi")
public String sayHi(ModelMap map) {
System.out.println("say hi ……");
map.put("name", "jojo");
return "/hi.ftl";
}
@RequestMapping("/jsp")
public String jspRequest(ModelMap map) {
System.out.println("jspRequest ……");
map.put("name", "jsp");
return "/temp.jsp";
}
}
9、 添加index.jsp的测试链接或temp.jsp的内容:
index.jsp
<body>
<a href="freeMarker/hello.do">say hello</a><br/>
<a href="freeMarker/hi.do">say hi</a><br/>
<a href="freeMarker/jsp.do">jspRequest</a>
</body>
temp.jsp
<body>
<h3>${name }</h3>
</body>
如果运行无错误,并输出正确的结果就整合成功!~.~
http://www.cnblogs.com/hoojo/archive/2011/04/19/2020551.html
FreeMarker整合Spring 3(转)的更多相关文章
- spring源码分析之freemarker整合
FreeMarker是一款模板引擎: 即一种基于模板和要改变的数据, 并用来生成输出文本(HTML网页.电子邮件.配置文件.源代码等)的通用工具. 它不是面向最终用户的,而是一个Java类库,是一款程 ...
- 【FreeMarker】Spring MVC与FreeMarker整合(二)
前一篇介绍了FreeMarker的基本使用,本例介绍Spring MVC与FreeMarker整合 不熟悉项目搭建,可参考 [FreeMarker]FreeMarker快速入门(一) 整合 1.新建S ...
- SpringMVC+spring-security+sitemesh+hibernate+freemarker整合-转
http://www.oschina.net/code/snippet_170632_46774 代码分享 当前位置: 代码分享 » Java » Web编程 搜 索 SpringMVC+spr ...
- sonne_game网站开发03 spring-mvc+freemarker整合
今天的任务就是在spring+mybatis+springmvc的基础上,将freemarker整合进来. freemarker是什么? freemarker是一种模板引擎.它的目的是基于模板和数据, ...
- SpringMVC和Freemarker整合,带自定义标签的使用方法
SpringMVC和Freemarker整合,带自定义标签的使用方法. [参考来源:http://www.360doc.com/content/14/1225/14/1007797_435663342 ...
- springMVC与freemarker整合
准备好的环境:Maven工程整合好了ssm,即spring+springMVC+mybatis.接下来准备将springMVC与freemarker整合,以html文件为模板. 一,加入freemar ...
- spring-mvc+freemarker整合(sonne_game网站开发03)
今天的任务就是在spring+mybatis+springmvc的基础上,将freemarker整合进来. freemarker是什么? freemarker是一种模板引擎.它的目的是基于模板和数据, ...
- 【Java EE 学习 81】【CXF框架】【CXF整合Spring】
一.CXF简介 CXF是Apache公司下的项目,CXF=Celtix+Xfire:它支持soap1.1.soap1.2,而且能够和spring进行快速无缝整合. 另外jax-ws是Sun公司发布的一 ...
- Mybatis整合Spring
根据官方的说法,在ibatis3,也就是Mybatis3问世之前,Spring3的开发工作就已经完成了,所以Spring3中还是没有对Mybatis3的支持.因此由Mybatis社区自己开发了一个My ...
随机推荐
- nginx 301跳转到带www域名方法rewrite(转)
首先一.得在你的域名管理里面定义 test.com和www.test.com指向你的主机ip地址,我们可以使用nslookup命令测试:直接输入 nslookup test.com和nslookup ...
- java api例子网站
http://www.programcreek.com/java-api-examples/ http://www.apihome.cn/api/list/ http://www.docjar.com ...
- POJ 3286 How many 0's?
题目大意: 计算[m,n]之间全部数字有多少个零. 解题思路: 能够用[0,m)之间和[0,n]之间有多少个零然后作差. 规律是计算全部位置在到当前数时有多少个零. 以下是代码: #include ...
- ecshop后台权限增加
1.在后台“推荐管理”里添加“推荐人分成”.“会员分成”两个操作功能以及权限 index.php?act=menu incluedes/inc_priv.php:权限对照表.inc_m ...
- Redis 的性能幻想与残酷现实(转)
2011 年,当初选择 Redis 作为主要的内存数据存储,主要吸引我的是它提供多样的基础数据结构可以很方便的实现业务需求.另一方面又比较担心它的性能是否足以支撑,毕竟当时 Redis 还属于比较新的 ...
- iOS很重要的 block回调
刚刚进入ios开发行业,发现开发中要用到大量的block回调,由此可见它的重要性.学习它之前我也是网上找的资料,推荐这篇文章http://blog.csdn.net/mobanchengshuang/ ...
- [WPF]Binding的Converter和Validator
不拘一格用数据的Converter 上篇文已经说明,Binding就是数据源与目标之间的“关联”.大多数情况下,数据从Source到Target以及从Target返回Source都是“直来直去”的,但 ...
- ASP.Net 重写IHttpModule 来拦截 HttpApplication 实现HTML资源压缩和空白过滤
务实直接上代码: 1. 重写FilterModule.cs using System; using System.Collections.Generic; using System.Linq; usi ...
- python 调用图灵机器人api实现简单的人机交互
接入流程例如以下,须要先注冊开发人员帐号,之后会得到一个32位的key,保存下来,用于以后发送数据.http://www.tuling123.com/ 请求方式 演示样例: # -*- coding: ...
- C#读取excel等表格常用方法
0. 利用NPOI. 请查阅此插件的相关文档. 1.方法一:采用OleDB读取EXCEL文件: 把EXCEL文件当做一个数据源来进行数据的读取操作,实例如下: 1 2 3 4 5 6 7 8 9 10 ...