Jquery分页组件
最近工作不是很忙,所以就看看淘宝kissy分页组件源码,感觉代码也不怎么难 容易理解,所以就按照他们的思路自己重新理一遍,来加深自己对他们的理解,同时对他们的分页组件进行一些重构(因为他们分页是做好了,但是不能直接拿来用,所以就封装了下),所以就用jquery封装了一个。
配置参数如下:
影响分页组件信息展现的因素如下图所示:
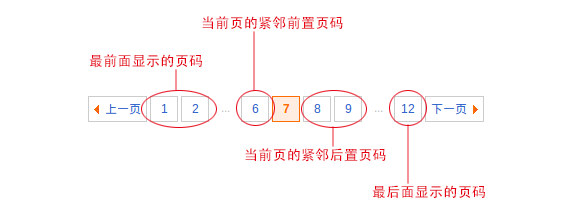
组件提供以下配置参数: totalPage,总页数,默认值为1 , currentPage,初始选中的页码,默认值为1 ,firstPagesCount,最前面的展现页数,默认值为2, preposePagesCount,当前页的紧邻前置页数,默认值为2 ,postposePagesCount,当前页的紧邻后置页数,默认值为1, lastPagesCount,最后面的展现页数,默认值为0 , render,是否自动渲染组件,默认值为true。
对外公开的方法:
render(): 渲染组件
show(): 显示组件
hide(): 隐藏组件
destory(): 销毁组件
页码显示及对应的HTML结构渲染问题:
一: 当前“选中的页”前面HTML结构渲染的方式如下:
判断当前选中的页码 如果小于或者等于 (最前面的展示页数 + 当前页的紧邻前置页数 +1)的话
if (currentPage <= firstPagesCount + preposePagesCount + 1) {
for(var i=1; i<currentPage; i++) {
pageHTML += self._renderActivePage(i);
}
}
这种情况下:对应的描述图如下:

对应的HTML结构代码如: 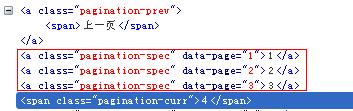
那么否则的话 // 对应图3
else {
for(var i=1; i<= firstPagesCount; i++) {
pageHTML += self._renderActivePage(i);
}
pageHTML += '<span class="pagination-break">...</span>';
for(var i = currentPage-preposePagesCount; i <= currentPage-1; i++) {
pageHTML += self._renderActivePage(i);
}
}
那么对应的描述图如这样的:
图3:

渲染HTML结构:

接着 就是当前选中的页 html结构
// 当前页的页码 html显示
pageHTML += '<span class="pagination-curr">' + currentPage + '</span>';
二: 当前页页码后面的html展示
如果当前页 大于或者等于 (总页数 - 最后面的展现页数 - 当前页的紧邻后置页数)的话 代码如下:
if (currentPage >= totalPage - lastPagesCount - postposePagesCount) {
offset = currentPage + 1;
for(var i=currentPage+1; i<=totalPage; i++) {
pageHTML += self._renderActivePage(i);
}
}
对应的图如下:

对应的HTML结构渲染如下:

否则的话:代码如下
else {
for(var i=currentPage+1; i<= currentPage+postposePagesCount; i++) {
pageHTML += self._renderActivePage(i);
}
pageHTML += '<span class="pagination-break">...</span>';
for(var i=totalPage-lastPagesCount+1; i<=totalPage; i++) {
pageHTML += self._renderActivePage(i);
}
}
对应图如下:

对应的HTML结构渲染如下:

最后判断下一页的显示方式 代码如下:
pageHTML += currentPage === totalPage ? '<span class="pagination-end"><span>下一页</span></span>' : '<a class="pagination-next"><span>下一页<span></a>';
Jquery所有的JS代码如下:
/**
* fileoverview Jquery分页组件
* @param {selector} 分页容器
* @param {cfg} object 默认配置
*/
var Pagination = (function(){
function Pagination(selector,cfg){
if(this instanceof Pagination) {
// 匹配传参数clickElem
if($.isPlainObject(selector)){
this.selector = selector;
}else if(/^\./.test(selector)){
this.selector = $(selector);
}else if(/^#/.test(selector)){
this.selector = $(selector);
}else if($('.'+selector)){
this.selector = $('.'+selector);
}else {
throw new Error('传递参数不符合!');
}
}else {
new Pagination(selector,cfg);
}
cfg = $.extend(Pagination.config,cfg || {});
this.config = cfg || {};
// 初始化时候 默认选中的页数
$.isFunction(this.config.callback) && this.config.callback(this.config.currentPage);
this._init();
}
Pagination.config = {
// 总页数
totalPage:1,
// 默认选中的页数
currentPage: 1,
//当前页最大紧邻前置页数(不包括最前面显示页数)
preposePagesCount: 2,
//当前页的最大紧邻后置页数
postposePagesCount: 1,
// 第一个"..."前显示的页数
firstPagesCount: 2,
// 第二个"..."后显示的页数
lastPagesCount: 0,
render: true,
callback: function(idx){}
};
Pagination.prototype = {
_init: function(){
var self = this;
if(self.config.render === true){
self.render();
}
},
/* 渲染 */
render: function(){
var self = this;
self._renderUI();
self._bindUI();
},
_renderUI: function(){
var self = this;
self._resetPagination();
},
// 处理点击元素
_bindUI: function(){
var self = this;
/*
* 注意jquery1.9 没有live这个方法 所以在jquery1.9 API上会报错 jquery1.9以上考虑用其他的绑定事件方法
*/
$('.pagination-spec').live('click',function(e){
var target = e.target,
toPage = $(target).attr('data-page') * 1;
self._switchToPage(toPage);
});
$('.pagination-prev').live('click',function(e){
var toPage = self.config.currentPage - 1;
self._switchToPage(toPage);
});
$('.pagination-next').live('click',function(e){
var toPage = self.config.currentPage + 1;
self._switchToPage(toPage);
});
},
_switchToPage: function(page){
var self = this;
self.config.currentPage = page;
self._resetPagination();
// 页面显示成功后 回调
$.isFunction(self.config.callback) && self.config.callback(self.config.currentPage);
},
/*
* 刷新分页
*/
_resetPagination: function(){
var self = this,
pageHTML = '',
totalPage = self.config.totalPage > 0 ? self.config.totalPage : 1,
currentPage = (self.config.currentPage <= totalPage) && (self.config.currentPage > 0) ? self.config.currentPage : 1,
preposePagesCount = self.config.preposePagesCount >=0 ? self.config.preposePagesCount : 2,
postposePagesCount = self.config.postposePagesCount >=0 ? self.config.postposePagesCount : 1,
firstPagesCount = self.config.firstPagesCount >=0 ? self.config.firstPagesCount : 2,
lastPagesCount = self.config.lastPagesCount >=0 ? self.config.lastPagesCount : 0,
offset;
// 当前页码显示
pageHTML += currentPage === 1 ? '<span class="pagination-start"><span>上一页</span></span>' :
'<a class="pagination-prev"><span>上一页</span></a>';
//当前页的 前面html结构显示问题
if (currentPage <= firstPagesCount + preposePagesCount + 1) {
for(var i=1; i<currentPage; i++) {
pageHTML += self._renderActivePage(i);
}
}else {
for(var i=1; i<= firstPagesCount; i++) {
pageHTML += self._renderActivePage(i);
}
pageHTML += '<span class="pagination-break">...</span>';
for(var i=currentPage-preposePagesCount; i<=currentPage-1; i++) {
pageHTML += self._renderActivePage(i);
}
}
// 当前页的页码 html显示
pageHTML += '<span class="pagination-curr">' + currentPage + '</span>';
// 当前页页码后面的html展示
if (currentPage >= totalPage - lastPagesCount - postposePagesCount) {
offset = currentPage + 1;
for(var i=currentPage+1; i<=totalPage; i++) {
pageHTML += self._renderActivePage(i);
}
} else {
for(var i=currentPage+1; i<= currentPage+postposePagesCount; i++) {
pageHTML += self._renderActivePage(i);
}
pageHTML += '<span class="pagination-break">...</span>';
for(var i=totalPage-lastPagesCount+1; i<=totalPage; i++) {
pageHTML += self._renderActivePage(i);
}
}
pageHTML += currentPage === totalPage ? '<span class="pagination-end"><span>下一页</span></span>' :
'<a class="pagination-next"><span>下一页<span></a>';
$(self.selector).html(pageHTML);
},
/**
* @ 渲染可点击的页码
* @param index {Number} 页码索引
*
*/
_renderActivePage: function(index) {
return '<a class="pagination-spec" data-page="' + index + '">' + index + '</a>';
},
show: function(){
var self = this;
$(self.selector).show();
},
hide: function(){
var self = this;
$(self.selector).hide();
},
// 销毁
destory: function(){
var self = this;
$(self.selector) = null;
// 销毁用live绑定的事情
$('.pagination-spec').die('click');
$('.pagination-prev').die('click');
$('.pagination-next').die('click');
}
};
return Pagination;
})();
HTML调用方式如下:
<div id = "Pagination"></div>
<div id="content"></div>
<script type="text/javascript">
var intPageSize = 8, //一页定义8条数据
intRowCount = 100; //记录总数
intPageCount = Math.ceil(intRowCount/intPageSize);
new Pagination('#Pagination',{
totalPage: intPageCount,
callback: function(idx){
console.log(idx);
}
});
</script>
其中一页显示多少条intPageSize 是用户自定义的,
记录总数intRowCount 是后台开发人员给的,
总共多少页 intPageCount 是我们要计算的。
初始化方式如上 通过实例化。
然后callback回调函数 把相对应的 每页显示多少条intPageSize
和 相对应的页码 idx ajax方式传参提交给开发人员
返回相应的信息 我们渲染出来 就ok!
css也放上来吧!如下
<style>
body {
font: 12px/1.5 tahoma,arial,宋体b8b\4f53;
}
.pagination-start,
.pagination-prev,
.pagination-next,
.pagination-end
{
width: 36px;
background: url(http://img04.taobaocdn.com/tps/i4/T1cP85XihuXXXXXXXX-13-101.png) no-repeat;
}
.pagination-start,
.pagination-prev,
.pagination-next,
.pagination-end,
.pagination-spec,
.pagination-curr,
.pagination-break
{
min-width: 16px;
_width: 16px;
border: 1px solid #ccc;
display: inline;
float: left;
height: 24px;
margin-right: 3px;
padding: 0 5px;
line-height: 24px;
text-align: center;
font-family: Tahoma,SimSun,Arial;
vertical-align: top;
white-space: nowrap;
overflow: hidden;
}
.pagination-start {
padding-left: 16px;
background-position: 5px 8px;
}
.pagination-prev {
padding-left: 16px;
background-position: 0 -12px;
}
.pagination-curr {
font-weight: 700;
color: #fd6d01;
background-color: #ffede1;
border: 1px solid #fd6d01;
}
.pagination-break {
color: #c0c0c0;
border: 0;
}
.pagination-next {
padding-right: 16px;
background-position: 42px -50px;
}
.pagination-end {
padding-right: 16px;
background-position: 47px -31px;
}
a {
color: #36c;
cursor: pointer;
}
a:hover {
border: 1px solid #fd6d01;
}
</style>
Jquery分页组件的更多相关文章
- jquery分页组件(每页显示多少条)
/** * 功能说明:jPager 分页插件 * 参数说明:pages:[] 分页的控件个数 @id:显示分页的div ID,@showSelectPage: 是否显示当前分页的条目过滤下拉框 * @ ...
- 基于jQuery封装的分页组件
前言: 由于项目需要实现分页效果,上jQuery插件库找了下,但是木有找到自己想要的效果,于是自己封装了个分页组件. 思路: 主要是初始化时基于原型建立的分页模板然后绑定动态事件并实现刷新DOM的分页 ...
- 雷林鹏分享:jQuery EasyUI 数据网格 - 添加分页组件
jQuery EasyUI 数据网格 - 添加分页组件 本实例演示如何从服务器端加载数据,如何添加分页组件(pagination)到数据网格(datagrid). 创建数据网格(DataGrid) 为 ...
- 第二百零九节,jQuery EasyUI,Pagination(分页)组件
jQuery EasyUI,Pagination(分页)组件 学习要点: 1.加载方式 2.属性列表 3.事件列表 4.方法列表 本节课重点了解 EasyUI 中 Pagination(分页)组件的使 ...
- 基于jQuery封装的分页组件(可自定义设置)
jQuery封装的分页组件 前几天做了一个vue的组件分页,而现在需求是jquery的分页,我就根据我自己的需求写了一个.在网上找了很久的基于jquery的分页封装,可是都不是我想要的结果,那么今天我 ...
- Web jquery表格组件 JQGrid 的使用 - 4.JQGrid参数、ColModel API、事件及方法
系列索引 Web jquery表格组件 JQGrid 的使用 - 从入门到精通 开篇及索引 Web jquery表格组件 JQGrid 的使用 - 4.JQGrid参数.ColModel API.事件 ...
- Web jquery表格组件 JQGrid 的使用 - 全部代码
系列索引 Web jquery表格组件 JQGrid 的使用 - 从入门到精通 开篇及索引 Web jquery表格组件 JQGrid 的使用 - 4.JQGrid参数.ColModel API.事件 ...
- 【jQuery 分页】jQuery分页功能的实现
自写的jQuery实现分页功能的分页组件: 功能效果如下: 分页组件就是上图中的三部分, 分别放在表格上部 和下部 . 其中, 1>>>页面的代码如下: product.jsp 其 ...
- javascript 分页组件
自己写的一个简单的分页组件,主要功能还有实现都在JS中,html页面中只用增加一个放置生成分页的DIV,并给定容器的id. html结构如下: <ul class="paginatio ...
随机推荐
- Java - TreeSet源码解析
Java提高篇(二八)------TreeSet 与HashSet是基于HashMap实现一样,TreeSet同样是基于TreeMap实现的.在<Java提高篇(二七)-----TreeMap& ...
- redis主从|哨兵|集群模式
关于redis主从.哨兵.集群的介绍网上很多,这里就不赘述了. 一.主从 通过持久化功能,Redis保证了即使在服务器重启的情况下也不会损失(或少量损失)数据,因为持久化会把内存中数据保存到硬盘上,重 ...
- LeetCode DB: Duplicate Emails
Write a SQL query to find all duplicate emails in a table named Person. +----+---------+ | Id | Emai ...
- (一)认识Sass和Compass
第一章 Sass和Compass让样式表重焕青春 // 内容概要// 开始学习Sass和动态样式表// 用Sass更高效地写样式表// Compass简介// 用Compass迎接工程实践中的样式挑战 ...
- JS 创建自定义对象的方式方法
一.概述 还记得刚开始做项目的时候,看到别人封装的js工具类百思不得其解,看来看去看不懂,深挖一下,其实就是自己没有耐下心去看,但是遇到问题不解决,总会遇到的,今天还是遇到了,就去找了找帖子,重新思考 ...
- 洛谷P4069 [SDOI2016]游戏(李超线段树)
题意 题目链接 Sol 这题细节好多啊qwq..稍不留神写出一个小bug就要调1h+.. 思路就不多说了,把询问区间拆成两段就是李超线段树板子题了. 关于dis的问题可以直接维护. // luogu- ...
- centos安装lamp
http://bbs.qcloud.com/thread-1316-1-1.html 启动MySQL http://www.cnblogs.com/starof/p/4680083.html 修改密码 ...
- IDEA项目搭建五——使用JRebel插件实现IDEA热部署
使用IDEA开发时修改了html或js或java代码都需要编译启动浪费了很多时间,所以可以借助热部署插件实现自动编码,每次修改完代码保存后就可以刷新页面看效果很方便,热部署工具有很多在此只推荐JReb ...
- 如何删除PeopleSoft Process Definition
PeopleSoft没有在页面提供删除Process Definition的快捷方式. 可以通过AD创建一个新的project加入这个process definition,在upgrade tab选择 ...
- AIDL安卓接口定义语言
Android Interface Definition Language简称AIDL翻译为 :安卓 接口 定义 语言 AIDL:进程间通信.Android ...