SpringBoot入门 (十四) Security安全控制
本文记录在SpringBoot使用SpringSecurity进行安全访问控制。
一 什么是Security
Spring Security是一个能够为基于Spring的企业应用系统提供声明式的安全访问控制解决方案的安全框架。它提供了一组可以在Spring应用上下文中配置的Bean,充分利用了Spring IoC,DI(控制反转Inversion of Control ,DI:Dependency Injection 依赖注入)和AOP(面向切面编程)功能,为应用系统提供声明式的安全访问控制功能,减少了为企业系统安全控制编写大量重复代码的工作。
目前在我们项目中使用的是RBAC基于角色的权限访问控制(Role-Based Access Control),用户与角色关联,角色与权限相关联,用户通过角色间接的得到权限。关系如下图
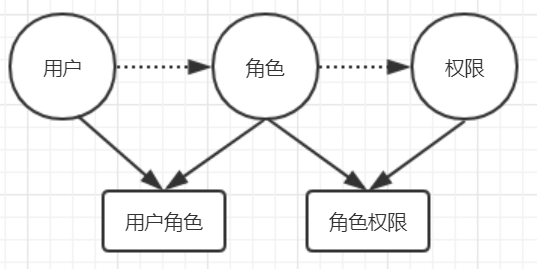
用户:权限的拥有者
角色:一些权限的集合
权限:操作的对象或资源
用户拥有某种角色,从而拥有了对资源的访问操作权限,在访问时SpringSecurity会对所有请求进行拦截,有权限的请求放行,否则拦截。
二 SpringBoot使用SpringSecurity
SpringBoot对SpringSecurity做了支持,要使用的话很方便,只需要引入相应的依赖(spring-boot-starter-security)就可以了。
示例代码主要完成以下功能:
1 系统的首页和登录页面及一些静态资源(CSS,JS),默认所有用户都可以访问;
2 除了第一步的,其他的所有资源路径访问均需要用户通过认证;
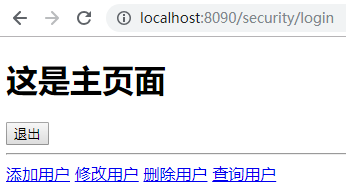
3 登录用户在页面只能看到拥有的角色所对应的权限(资源或操作);
修改pom.xml文件,添加依赖
<dependency>

            <groupId>org.springframework.boot</groupId>

            <artifactId>spring-boot-starter-security</artifactId>

        </dependency>

        <dependency>

            <groupId>org.springframework.boot</groupId>

            <artifactId>spring-boot-starter-thymeleaf</artifactId>

        </dependency>

        <dependency>

            <groupId>org.thymeleaf.extras</groupId>

            <artifactId>thymeleaf-extras-springsecurity4</artifactId>

        </dependency>

        <dependency>

            <groupId>org.springframework.boot</groupId>

            <artifactId>spring-boot-starter-web</artifactId>

        </dependency>
创建配置类,继承 WebSecurityConfigurerAdapter,重写一些配置方法
@Configuration

@EnableWebSecurity

public class SpringSecurityConfig extends WebSecurityConfigurerAdapter {

       @Override

    protected void configure(HttpSecurity http) throws Exception {

        http

                .authorizeRequests()

                    .antMatchers("/", "/static/**").permitAll()

                    .anyRequest().authenticated()

                .and().formLogin().loginPage("/login").permitAll()

                    .successForwardUrl("/main")

                    .failureUrl("/login")

                .and().logout()

                    .logoutUrl("/logout").permitAll()

               .logoutSuccessUrl("/login");

    }

}
@EnableWebSecurity 用来说明开启安全认证
configure(HttpSecurity http) 配置相关访问操作的策略
.antMatchers("/", "/static/**").permitAll() 说明项目根路径/ 及static路径下的静态资源可以被匿名访问
.anyRequest().authenticated() 说明除了可以被匿名访问的资源外,其他所有资源的访问都要经过认证
.formLogin() 说明使用用户自定义的登录,如果不配置的话,会使用SpringSecurity默认提供的登录页面,/login 资源可以被匿名访问,登录成功后访问/main,失败后访问/login
.logout() 退出功能,SpringSecurity默认对/logout做了监控
用户登录就是对当前用户的身份信息做认证,我们需要对相应的方法做重写
@Autowired

    public void configureGlobal(AuthenticationManagerBuilder auth) throws Exception {

        auth.userDetailsService(userDetailsService()).passwordEncoder(passwordEncoder());

    }
指定使用自定义的实现用户认证及授权的userDetailsService和密码的加密器
密码加密器
public BCryptPasswordEncoder passwordEncoder(){

        return new BCryptPasswordEncoder();

    }
认证与授权
@Bean

    @Override

    protected UserDetailsService userDetailsService() {

        return new UserDetailsService(){

            @Override

            public UserDetails loadUserByUsername(String username) throws UsernameNotFoundException {

                //此处模拟数据库查询用户

                User user = new User();

                user.setUserId(2);

                user.setUsername(username);

                user.setPassword("$2a$10$GS71hBKk0MaykCWZC/eo2e7Y0Z77zDNCYE06xxAmW37gl850E6I4G");

                user.setTelephone("13000000000");

                user.setEmail("13000000000@qq.com");

                if(user == null) throw new UsernameNotFoundException("User name:"+username+" not fount");

                SecurityUser securityUser= new SecurityUser(user);

                return securityUser;

            }

        };

    }
/**

     * 真正用于登录验证的安全用户(UserDetails)

     */

    class SecurityUser extends User implements UserDetails {

        /**

         * 用户权限

         */

        private Set<SimpleGrantedAuthority> permissions;

        public Set<SimpleGrantedAuthority> getPermissions() {

            return permissions;

        }

        public void setPermissions(Set<SimpleGrantedAuthority> permissions) {

            this.permissions = permissions;

        }

        public SecurityUser(User user){

            if(user != null){

                this.setUserId(user.getUserId());

                this.setUsername(user.getUsername());

                this.setPassword(user.getPassword());

                this.setEmail(user.getEmail());

                this.setTelephone(user.getTelephone());

                Set<SimpleGrantedAuthority> gasSet = (Set<SimpleGrantedAuthority>) getAuthorities();

                if(gasSet.size()>0){

                    this.setPermissions(gasSet);

                }

            }

        }

        /**

         * 获取用户权限

         * @return

         */

        @Override

        public Collection<? extends GrantedAuthority> getAuthorities() {

            //要返回的用户权限集合

            Set<GrantedAuthority> permsSet = new HashSet<GrantedAuthority>();

            //模拟数据库查询用户所拥有的角色对应的权限

            permsSet.add(new SimpleGrantedAuthority("/user/add"));

            permsSet.add(new SimpleGrantedAuthority("/user/edit"));

            permsSet.add(new SimpleGrantedAuthority("/user/delete"));

            permsSet.add(new SimpleGrantedAuthority("/user/list"));

            //区分不同用户拥有不同权限,admin用户加权限

            if (this.getUsername().equals("admin")) {

                permsSet.add(new SimpleGrantedAuthority("/role/list"));

                permsSet.add(new SimpleGrantedAuthority("/role/add"));

                permsSet.add(new SimpleGrantedAuthority("/role/edit"));

                permsSet.add(new SimpleGrantedAuthority("/role/delete"));

            }

            return permsSet;

        }

        @Override

        public boolean isAccountNonExpired() {

            return true;

        }

        @Override

        public boolean isAccountNonLocked() {

            return true;

        }

        @Override

        public boolean isCredentialsNonExpired() {

            return true;

        }

        @Override

        public boolean isEnabled() {

            return true;

        }

    }
控制器
@Controller

public class LoginController {

    /**

     * 访问根路径时跳转到index页面

     * @return

     */

    @GetMapping("/")

    public String root(){

        return "index";

    }

    /**

     * 跳转到登录页面

     * @return

     */

    @GetMapping("/login")

    public String login(){

        return "login";

    }

    /**

     * 登录成功后访问

     * @return

     */

    @PostMapping("/main")

    public String main(){

        return "main";

    }

}
index页面
<!DOCTYPE html>

<html xmlns:th="http://www.thymeleaf.org">

<head>

    <meta charset="UTF-8">

    <title>index</title>

</head>

<body>

this is index page<br/>

<a th:href="@{/user/login}">登录</a>

</body>

</html>
登录页面
<!DOCTYPE html>

<html xmlns:th="http://www.thymeleaf.org">

<head>

    <meta charset="UTF-8">

    <title>login</title>

</head>

<body>

this is login page

<form th:action="@{/login}" method="post">

    <input type="text" th:id="username" th:name="username" value="" >

    <input type="password" th:id="password" th:name="password" value="">

    <input type="submit" th:value="提交" >

</form>

</body>

</html>
main页面
<!DOCTYPE html>

<html xmlns:th="http://www.thymeleaf.org" xmlns:sec="http://www.thymeleaf.org/thymeleaf-extras-springsecurity4">

<head>

    <meta charset="UTF-8">

    <title>Title</title>

</head>

<body>

<h1 th:text="这是主页面">text</h1>

<form th:action="@{/logout}" method="post"><button th:type="submit" th:text="退出">text</button></form>

<hr/>

<th:block sec:authorize="hasAuthority('/user/add')">

    <a th:href="@{/user/add}">添加用户</a>

</th:block>

<th:block sec:authorize="hasAuthority('/user/edit')">

    <a th:href="@{/user/edit}">修改用户</a>

</th:block>

<th:block sec:authorize="hasAuthority('/user/delete')">

    <a th:href="@{/user/delete}">删除用户</a>

</th:block>

<th:block sec:authorize="hasAuthority('/user/list')">

    <a th:href="@{/user/list}">查询用户</a>

</th:block>

<th:block sec:authorize="hasAuthority('/role/add')">

        <a th:href="@{/role/add}">添加角色</a>

</th:block>

<th:block sec:authorize="hasAuthority('/role/delete')">

    <a th:href="@{/role/delete}">删除角色</a>

</th:block>

<th:block sec:authorize="hasAuthority('/role/edit')">

    <a th:href="@{/role/edit}">修改角色</a>

</th:block>

<th:block sec:authorize="hasAuthority('/role/list')">

    <a th:href="@{/role/list}">查询角色</a>

</th:block>

</body>

</html>
sec:authorize="hasAuthority('')" 说明当用户拥有此权限的时候,操作对用户可见,否则不可见
分别用user用户和admin登录后看到首页信息

SpringBoot入门 (十四) Security安全控制的更多相关文章
- SpringBoot入门(四)——自动配置
本文来自网易云社区 SpringBoot之所以能够快速构建项目,得益于它的2个新特性,一个是起步依赖前面已经介绍过,另外一个则是自动配置.起步依赖用于降低项目依赖的复杂度,自动配置负责减少人工配置的工 ...
- SpringBoot第二十四篇:应用监控之Admin
作者:追梦1819 原文:https://www.cnblogs.com/yanfei1819/p/11457867.html 版权声明:本文为博主原创文章,转载请附上博文链接! 引言 前一章(S ...
- Spring入门(十四):Spring MVC控制器的2种测试方法
作为一名研发人员,不管你愿不愿意对自己的代码进行测试,都得承认测试对于研发质量保证的重要性,这也就是为什么每个公司的技术部都需要质量控制部的原因,因为越早的发现代码的bug,成本越低,比如说,Dev环 ...
- SpringBoot | 第十四章:基于Docker的简单部署
前言 讲解了单元测试,本章节讲讲应用的部署吧.总体而言,在进行自动化部署时,基本都会用上Jenkins+Maven+Docker进行部署.本章节主要讲解使用Maven+Docker进行SpringBo ...
- [WebGL入门]十四,绘制多边形
注意:文章翻译http://wgld.org/.原作者杉本雅広(doxas),文章中假设有我的额外说明,我会加上[lufy:].另外,鄙人webgl研究还不够深入.一些专业词语,假设翻译有误,欢迎大家 ...
- SpringBoot笔记十四:消息队列
目录 什么是消息队列 消息队列的作用 异步通信 应用解耦 流量削峰 RabbitMQ RabbitMQ流程简介 RabbitMQ的三种模式 安装RabbitMQ RabbitMQ交换器路由和队列的创建 ...
- Android入门(十四)内容提供器-实现跨程序共享实例
原文链接:http://www.orlion.ga/661/ 打开SQLite博文中创建的 DatabaseDemo项目,首先将 MyDatabaseHelper中使用 Toast弹出创建数据库成功的 ...
- SpringBoot入门教程(四)MyBatis generator 注解方式和xml方式
MyBatis 是一款优秀的持久层框架,它支持定制化 SQL.存储过程以及高级映射.MyBatis 避免了几乎所有的 JDBC 代码和手动设置参数以及获取结果集.MyBatis 可以使用简单的 XML ...
- SpringBoot实战(十四)之整合KafKa
本人今天上午参考了不少博文,发现不少博文不是特别好,不是因为依赖冲突问题就是因为版本问题. 于是我结合相关的博文和案例,自己改写了下并参考了下,于是就有了这篇文章.希望能够给大家帮助,少走一些弯路. ...
随机推荐
- Mysql 分区(range,list,hash)转载
MySQL支持RANGE,LIST,HASH和KEY四种分区.其中,每个分区又都有一种特殊的类型.对于RANGE分区,有RANGE COLUMNS分区.对于LIST分区,有LIST COLUMNS分区 ...
- CentOS下下载软件,不安装的方法
今天来说下在CentOS下下载软件,不安装的方法: 方法一:通过yum自带一个工具:yumdownloader[root@web1 ~]# rpm -qa |grep yum-utils[root@ ...
- 获取物料分类excel公式
物料格式 大类|中类|小类|名称|....... =MID(D2,FIND("|",D2,FIND("|",D2)+1)+1,FIND("|&qu ...
- 分形之康托(Cantor)三分集
1883年,德国数学家康托(G.Cantor)提出了如今广为人知的三分康托集,或称康托尔集.三分康托集是很容易构造的,然而,它却显示出许多最典型的分形特征.它是从单位区间出发,再由这个区间不断地去掉部 ...
- StringBuffer 详解 (String系列之3)
本章介绍StringBuffer以及它的API的详细使用方法. 转载请注明出处:http://www.cnblogs.com/skywang12345/p/string03.html StringBu ...
- C# 不添加WEB引用调用WSDL接口
在项目中添加WEB引用耦合度较高,更新时要更新引用,所以我建议不添加WEB引用调用WSDL接口,废话不多说,直接上代码 例如WSDL地址为:http://XXX.XX.XXX.XXX:9115/WsP ...
- WPF 打印界面(控件)到A4纸
这次遇到一个需求,就是将整个界面打印在A4纸上. 需求清楚后,Bing一下关于打印,就找到一个类PrintDialog ,其中两个方法可能会用到: 特别是public void PrintVisual ...
- FWT学习笔记
FWT学习笔记 引入 一般的多项式乘法是这样子的: \(c_i=\sum_{i,j}a_j*b_k*[j+k==i]\) 但是如果我们将这个乘法式子里面的+号变换一下变成其他的运算符号呢? \(c_i ...
- Android Parcelable using Kotlin
Kotlin 有 extension 可以很方便的让类继承 Parcelable 接口. 项目中引入一个较新版本的 Kotlin 引入 Kotlin extensions classpath &quo ...
- re模块 模块
import re findall() 烦的奥 import re # 1. findall 查找所有结果,数据不是特别庞大 lst = re.findall('a','abcsdfasdfa') ...