Identity Server4学习系列四之用户名密码获得访问令牌
1、简介
Identity Server4支持用户名密码模式,允许调用客户端使用用户名密码来获得访问Api资源(遵循Auth 2.0协议)的Access Token,MS可能考虑兼容老的系统,实现了这个功能,但是不建议这么做.
2、实战一服务端配置
接着Identity Server4学习系列三的基础上,直接扩展里面的项目代码,让服务端同时支持密钥认证和用户名密码认证
第一步:扩展ThirdClients类,如下:
    /// <summary>

    /// 配置可以访问IdentityServer4 保护的Api资源模型的第三方客户端

    /// 配置客户端访问的密钥

    /// </summary>

    public class ThirdClients

    {

        public static IEnumerable<Client> GetClients()

        {

            return new List<Client>()

            {

                new Client()

                {

                    //客户端的唯一Id,客户端需要指定该ClientId才能访问

                     ClientId = $"client",

                    //no interactive user, use the clientid/secret for authentication

                    //使用客户端密钥进行认证

                    AllowedGrantTypes = GrantTypes.ClientCredentials,

                    // 认证密钥,客户端必须使用secret密钥才能成功访问

                    ClientSecrets =

                    {

                        //用Sha256对"secret"进行加密

                        new Secret("secret".Sha256())

                    },

                    // scopes that client has access to

                    //如果客户端的密钥认证成功,限定该密钥可以访问的Api范围

                    AllowedScopes = { "api1" }

                },

                //添加支持用户名密码模式访问的客户端类型

                new Client()

                {

                    ClientId = "userPwd.client",

                    AllowedGrantTypes = GrantTypes.ResourceOwnerPassword,

                    ClientSecrets =

                    {

                        new Secret("secret".Sha256())

                    },

                    AllowedScopes = { "api1" }

                }

            };

        }

        /// <summary>

        /// 配置可以访问IdentityServer4 保护的Api资源模型的第三方客户端

        /// 使用用户名密码模式

        /// </summary>

        /// <returns></returns>

        public static List<TestUser> GetUsers()

        {

            return new List<TestUser>()

            {

                new TestUser()

                {

                    SubjectId = "",

                    Username = "alice",

                    Password = "password"

                }

            };

        }

    }
第二步:注册TestUser到Identity Server4,修改StartUp文件如下:
    public class Startup

    {

        // This method gets called by the runtime. Use this method to add services to the container.

        // For more information on how to configure your application, visit https://go.microsoft.com/fwlink/?LinkID=398940

        public void ConfigureServices(IServiceCollection services)

        {

            //优雅的链式编程

            //注入Identity Server4服务到DI容器中

            services.AddIdentityServer()

           //注入临时签名凭据到DI容器,后期可用签名证书的密钥替换,用于生成零时密钥

           .AddDeveloperSigningCredential()

           //注入需要受Identity Server4保护的Api资源添注入到DI容器中 -内存级别

           .AddInMemoryApiResources(Apis.GetApiResources())

           //注入需要访问受Identity Server4保护的Api资源的客户端(密钥模式)注入到DI容器中 -内存级别

           .AddInMemoryClients(ThirdClients.GetClients())

           //注入需要访问受Identity Server4保护的Api资源的客户端(用户名密码访问模式)注入到DI容器中 -内存级别

           .AddTestUsers(ThirdClients.GetUsers());

            //注入基本的MVC服务

            services.AddMvcCore()

            //注入MVC的认证服务,对应控制器的Authorize特性

           .AddAuthorization()

           //注入MVC格式化程序,对应JsonResult等等的格式化操作,主要用于控制器返回值的格式化操作

           .AddJsonFormatters();

            //注入身份认证服务,设置Bearer为默认方案

            services.AddAuthentication("Bearer")

            //注入并配置Bearer为默认方案的基本参数

            .AddIdentityServerAuthentication(options =>

            {

                //设置令牌的发布者

                options.Authority = "http://localhost:5000";

                //设置Https

                options.RequireHttpsMetadata = false;

                //需要认证的api资源名称

                options.ApiName = "api1";

            });

        }

        // This method gets called by the runtime. Use this method to configure the HTTP request pipeline.

        public void Configure(IApplicationBuilder app, IHostingEnvironment env)

        {

            //如果当前时开发者模式

            if (env.IsDevelopment())

            {

                //从管道中捕获同步和异步System.Exception实例并生成HTML错误响应。

                app.UseDeveloperExceptionPage();

            }

            //将IdentityServer 4服务注入到管道模型中(对应上面的IdentityServer 4服务的配置)

            app.UseIdentityServer();

            //将认证服务通过Microsoft.AspNetCore.Authentication.AuthenticationMiddleware中间件

            //注入到管道模型中(对应上面认证服务的配置)

            app.UseAuthentication();

            //将mvc添加到Microsoft.AspNetCore.Builder.IApplicationBuilder请求执行中(对应上的MVC配置)

            app.UseMvc();

        }

    }
ok,到这一步,Identity Server4服务端配置完成!
3、实战一客户端发起调用
调用代码如下:
    class Program

    {

        static void Main(string[] args)

        {

            Request();

            Console.ReadKey();

        }

        async static void Request()

        {

            //请求Identity Server4服务

            var disco = await DiscoveryClient.GetAsync("http://localhost:5000");

            if (disco.IsError)

            {

                Console.WriteLine(disco.Error);

                return;

            }

            var tokenClient = new TokenClient(disco.TokenEndpoint, "userPwd.client", "secret");

            var tokenResponse = await tokenClient.RequestResourceOwnerPasswordAsync("alice", "password", "api1");

            if (tokenResponse.IsError)

            {

                Console.WriteLine(tokenResponse.Error);

                return;

            }

            //通过Identity Server4的认证过后,拿到AccessToken

            var client = new HttpClient();

            client.SetBearerToken(tokenResponse.AccessToken);

            var response = await client.GetAsync("http://localhost:5000/identity");

            if (!response.IsSuccessStatusCode)

            {

                Console.WriteLine(response.StatusCode);

            }

            else

            {

                //认证成功,输出Identity控制器的返回值

                var content = await response.Content.ReadAsStringAsync();

                Console.WriteLine(JArray.Parse(content));

            }

            Console.WriteLine(tokenResponse.Json);

            Console.WriteLine("\n\n");

        }

    }

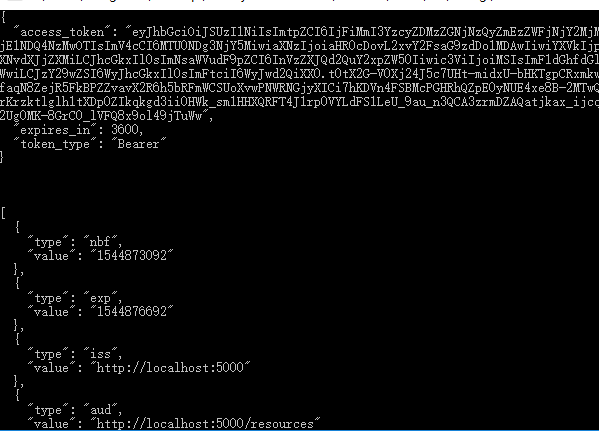
ok,使用用户名加密钥模式,访问Api成功拿到Api返回值,注意密钥任然需要给,因为这个密钥是用与给Token加密的,而用户名和密码无非是继续加一了一层认证,如果密钥认证成功,必须进行用户名和密码的认证,两者必须同时认证成功,才能成功的发起Api的调用.
用户名和密码必须和服务端给定的一致,否则客户端会报这个错:

无效的授权.
至此,用户名密码加密钥模式介绍完毕!
Identity Server4学习系列四之用户名密码获得访问令牌的更多相关文章
- Identity Server4学习系列三
1.简介 在Identity Server4学习系列一和Identity Server4学习系列二之令牌(Token)的概念的基础上,了解了Identity Server4的由来,以及令牌的相关知识, ...
- Identity Server4学习系列一
一.前言 今天开始学习Identity Server4,顺便了解下.Net Core,以便于完善技术栈,最主要的是要跟上.Net的发展潮流,顺便帮助各位整理下官方文档,加上一些我自己对他的理解. 这是 ...
- Identity Server4学习系列二之令牌(Token)的概念
1.简介 通过前文知道了Identity Server4的基本用途,现在必须了解一些实现它的基本细节. 2.关于服务端生成Token令牌 头部(Header): { “typ”: “JWT”, //t ...
- scrapy爬虫学习系列四:portia的学习入门
系列文章列表: scrapy爬虫学习系列一:scrapy爬虫环境的准备: http://www.cnblogs.com/zhaojiedi1992/p/zhaojiedi_python_00 ...
- DocX开源WORD操作组件的学习系列四
DocX学习系列 DocX开源WORD操作组件的学习系列一 : http://www.cnblogs.com/zhaojiedi1992/p/zhaojiedi_sharp_001_docx1.htm ...
- .net reactor 学习系列(四)---.net reactor应用场景
原文:.net reactor 学习系列(四)---.net reactor应用场景 前面已经学习了.net reactor一些基础知识,现在准备学习下实际的应用场景,只是简单的保护和 ...
- MVC3+EF4.1学习系列(四)----- ORM关系的处理
上篇文章 终于把基础的一些操作写完了 但是这些都是单表的处理 而EF做为一个ORM框架 就必须点说说对于关系的处理 处理好关系 才能灵活的运用EF 关于关系的处理 一般就是 一对一 一对多 ...
- Vue学习系列(四)——理解生命周期和钩子
前言 在上一篇中,我们对平时进行vue开发中遇到的常用指令进行归类说明讲解,大概已经学会了怎么去实现数据绑定,以及实现动态的实现数据展示功能,运用指令,可以更好更快的进行开发.而在这一篇中,我们将通过 ...
- WCF学习系列四--【WCF Interview Questions – Part 4 翻译系列】
WCF Interview Questions – Part 4 This WCF service tutorial is part-4 in series of WCF Interview Qu ...
随机推荐
- Oracle中根据当前时间和活动类型去数据库查询活动id
活动类型默认是1,代表邀请好友 select * from t_invite_activityinfo twhere sysdate >= t.begintime and sysdate< ...
- 第13章:MongoDB-聚合操作--初体验
①MongoDB 的聚合功能 MongoDB 的聚合功能,聚合操作主要用于对数据的批量处理,往往将记录按条件分组以后,然后再进行一系列操作,例如,求最大值.最小值.平均值,求和等操作. 聚合操作还能够 ...
- Ajax地域选择demo
index.jsp只用于转发到Servlet获得省份数据再转发到province.jsp index.jsp <%@ page language="java" content ...
- Linux服务器密钥安全登录
使用密钥登录的好处:1.省事,不用每次去敲用户名和密码:2.安全,密钥长度一般是1024位,比我们设的密码要长得多: 以下是为新用户jackson添加密钥登录的步骤. 1.添加用户,并添加到sudoe ...
- 线程之threading
多任务:操作系统同时运行多个任务 线程:一个程序运行起来之后一定有一个执行代码的东西,该东西即为线程 线程是操作系统调度执行的最小单位 * 并发:指的是任务数多余cpu核数,通过操作系统的各种任务 ...
- Leetcode--1. Two Sum(easy)
Given an array of integers, return indices of the two numbers such that they add up to a specific ta ...
- Ajax_Json
前台代码: <%@ Page Language="C#" AutoEventWireup="true" CodeBehind="AjaxJson ...
- Codeforces Round #265 (Div. 2) E. Substitutes in Number
http://codeforces.com/contest/465/problem/E 给定一个字符串,以及n个变换操作,将一个数字变成一个字符串,可能为空串,然后最后将字符串当成一个数,取模1e9+ ...
- java基础知识-逻辑运算符
/*首先申明:逻辑运算符的操作数都是布尔型表达式*/ /* 演示逻辑运算符 & :两个操作数都为真的时候结果为真 | :两个操作数只要有一个为真,结果就为真 && :短路与,左 ...
- [FMX]获取控件样式中的指定项目以便进行调节
[FMX]获取控件样式中的指定项目以便进行调节 2017-03-26 • C++ Builder.Delphi.教程 • 暂无评论 • swish •浏览 650 次 FMX 的样式丰富了我们的设计, ...
