Spring Boot 实际操作
2.springboot的很多默认编码方式都是utf-8,真是福利啊。
6.@Value注解注入@Value("#{}")和@Value("${}")的区别
9.yml配置
10.Spring Boot:如何优雅的使用 Mybatis
1.什么是spring boot
spring boot就是整合了很多优秀的框架,不用我们自己手动的去写一堆xml配置然后进行配置。
使用“习惯优于配置”(项目中存在大量的配置,此外还内置了一个习惯性的配置,让你无需手动进行配置)的理念让你的项目快速运行起来。
使 用Spring Boot很容易创建一个独立运行(运行jar,内嵌Servlet容器)
2.springboot的很多默认编码方式都是utf-8,真是福利啊。
3.spring boot如何启动和访问和MocMvc测试
启动:运行Application.java
application.java文件的包必须是项目下的父路径,其他类的包路径必须是其子路径(同一级目录也可启动服务),如:

访问:(
如下代码的访问地址为:http://localhost:8080/hhllow/getUList
@Controller

@RequestMapping(value="/hhllow")

public class UlevelController {

    @RequestMapping(value="getUList", method=RequestMethod.GET)

    public String getUlevelList() {

        ………………

        return "ulevel/ulevelList";

    }

}
测试 MockMvc
package com.my.sb.test;

import org.junit.Before;

import org.junit.Test;

import org.junit.runner.RunWith;

import org.springframework.http.MediaType;

import org.springframework.test.context.junit4.SpringRunner;

import org.springframework.test.web.servlet.MockMvc;

import org.springframework.test.web.servlet.request.MockMvcRequestBuilders;

import org.springframework.test.web.servlet.result.MockMvcResultHandlers;

import org.springframework.test.web.servlet.result.MockMvcResultMatchers;

import org.springframework.test.web.servlet.setup.MockMvcBuilders;

import com.my.sb.controller.UserController;

@RunWith(SpringRunner.class)

public class TestUserController {

    private  MockMvc mvc;

    @Before

    public void Setup() throws Exception{

        mvc = MockMvcBuilders.standaloneSetup(new UserController()).build();

    }

    @Test

    public void test() throws Exception{

        mvc.perform(MockMvcRequestBuilders.post("/user/test").accept(MediaType.APPLICATION_JSON)

        .contentType(MediaType.APPLICATION_JSON)

        .content("{\"userId\" : \"77\", \"userName\" : \"999\",\"password\" : \"567\"}"))

        .andExpect(MockMvcResultMatchers.status().isOk())

        .andDo(MockMvcResultHandlers.print())

        .andReturn();

    }

}
4.开发环境的调试热启动
热启动在正常开发项目中已经很常见了吧,虽然平时开发 web 项目过程中,改动项目启重启总是报错;但 Spring Boot 对调试支持很好,修改之后可以实时生效,需要添加以下的配置:
<dependencies>

    <dependency>

        <groupId>org.springframework.boot</groupId>

        <artifactId>spring-boot-devtools</artifactId>

        <optional>true</optional>

   </dependency>

</dependencies>

<build>

    <plugins>

        <plugin>

            <groupId>org.springframework.boot</groupId>

            <artifactId>spring-boot-maven-plugin</artifactId>

            <configuration>

                <fork>true</fork>

            </configuration>

        </plugin>

   </plugins>

</build>
该模块在完整的打包环境下运行的时候会被禁用。如果你使用java -jar启动应用或者用一个特定的classloader启动,它会认为这是一个“生产环境”。
配置文档配置项的调用(application.properties可放在resources,或者resources下的config文件夹里)
package com.my.study.controller;

import org.springframework.beans.factory.annotation.Value;

import org.springframework.boot.autoconfigure.SpringBootApplication;

import org.springframework.boot.context.properties.ConfigurationProperties;

import org.springframework.web.bind.annotation.RequestMapping;

import org.springframework.web.bind.annotation.RestController;

import com.my.study.model.Student;

@RestController

@SpringBootApplication

@RequestMapping("/user")

public class UserController {

    @Value("${test.stuName}")

    private String stuName;

    @Value("${test.stuSex}")

    private String stuSex;

    @RequestMapping("/test")

    public Object sayHello() {

        Student student = new Student();

        student.setStuName(stuName);

        student.setStuSex(stuSex);

        return student ;

    }

}
6.@Value注解注入@Value("#{}")和@Value("${}")的区别
String类型的@Value注入方式
String类型的直接可以使用
@Value("陈婉清")

 private String name;
非String类型的@Value注入方式报错类型
- 非
String类型的使用@Value时的错误1@Value(21)
private int id; - 非
String类型的使用@Value时的错误2@Value("2015202110032")
private int id;
@Value("#{}") SpEL表达式
@Value("#{}") 表示SpEl表达式通常用来获取bean的属性,或者调用bean的某个方法。当然还有可以表示常量
@Resource

    private DemoUser demoUser;

    @Value("${com.my.userName}")

    private String  str;

    @Value("#{2222}")

    private int id;

    @Value("#{2222}")

    private String name;

    @Value("#{demoUser.userName}")

    private String demoName;
@Value("${}") 可以获取对应属性文件中定义的属性值。
假如我有一个sys.properties文件 里面规定了一组值: web.view.prefix =/WEB-INF/views/
在springMvc.xml文件中引入下面的代码
<context:property-placeholder

ignore-unresolvable="true" location="classpath:sys.properties" />
这样就可以通过@Value("${web.view.prefix}")获取这个字符串,但是只能在springMvc.xml文件中扫描或者注册的bean中才能通过@Value("${web.view.prefix}")获取这个字符串,其他未在springMvc.xml扫描和定义的bean必须在相应的xml文件中引入上面代码才能使用@Value("${}”)表达式
再controller或者其他组件中通过下面代码即可获取“”/WEB-INF/views/“”这个字符串
@Value("${web.view.prefix}")

    private String prefix;
7.项目打包
SpringBoot项目打包
8.自动配置ConfigBean
有时候属性太多了,一个个绑定到属性字段上太累,官方提倡绑定一个对象的bean,这里我们建一个ConfigBean.java类,顶部需要使用注解@ConfigurationProperties(prefix = “test”)来指明使用哪个
注意:类中一定要有get set 方法,否则参数无法绑定
com.my.userId=88

com.my.userName=abc123

com.my.password=123oip

#config web defult parameters

web.port=808

web.url=https://www.baidu.com

web.webName=百度一下你就知道
package com.my.sb.domain;

import org.springframework.boot.context.properties.ConfigurationProperties;

@ConfigurationProperties(prefix="web")

public class ConfigBean {

    private String port;

    private String url;

    private String webName;

    /* (non-Javadoc)

     * @see java.lang.Object#toString()

     */

    @Override

    public String toString() {

        return "ConfigBean [port=" + port + ", url=" + url + ", webName=" + webName + "]";

    }

    /**

     * @return the port

     */

    public String getPort() {

        return port;

    }

    /**

     * @param port the port to set

     */

    public void setPort(String port) {

        this.port = port;

    }

    /**

     * @return the url

     */

    public String getUrl() {

        return url;

    }

    /**

     * @param url the url to set

     */

    public void setUrl(String url) {

        this.url = url;

    }

    /**

     * @return the webName

     */

    public String getWebName() {

        return webName;

    }

    /**

     * @param webName the webName to set

     */

    public void setWebName(String webName) {

        this.webName = webName;

    }

}
此时配置完还需要在spring Boot入口类加上@EnableConfigurationProperties并指明要加载哪个bean,如果不写RandomProperties.class,在bean类那边添加@Configuration或者@Component
package com.my.sb;

import org.springframework.boot.SpringApplication;

import org.springframework.boot.autoconfigure.SpringBootApplication;

import org.springframework.boot.builder.SpringApplicationBuilder;

import org.springframework.boot.context.properties.EnableConfigurationProperties;

import org.springframework.boot.web.servlet.support.SpringBootServletInitializer;

import com.my.sb.domain.ConfigBean;

@SpringBootApplication

@EnableConfigurationProperties(ConfigBean.class)

public class Application extends SpringBootServletInitializer {

    @Override

    protected SpringApplicationBuilder configure(SpringApplicationBuilder builder) {

        // TODO Auto-generated method stub

        return builder.sources(Application.class);

    }

    public static void main(String[] args) {

        SpringApplication.run(Application.class, args);

    }

}
在application.properties中的各个参数之间也可以直接引用来使用,就像下面的设置:
test.stuName = Joe

test.stuSex = gril

test.allInfo = stuName:${test.stuName} stuSex:${test.stuSex}
Map类型配置方法
#image

web.image[JPG]=.jpg

web.image[PNG]=.png

#office

web.office[CSV]=.csv

web.office[EXCEL]=.excel

#text

web.text[txt]=.txt

web.text[epub]=.epub
public  Map<String, String> image = new HashMap<>();

    public  Map<String, String> office = new HashMap<>();

    public  Map<String, String> text = new HashMap<>();
List类型配置:
web.servers[0]=127.0.0.1:8080

web.servers[1]=127.0.0.1:8081

web.servers[2]=127.0.0.1:8082
public List<String> servers = new ArrayList<>();
使用自定义新建的配置文件(可防止中文乱码,encoding="UTF-8",)
@RestController

@SpringBootApplication

@RequestMapping("/user")

@PropertySource(value = "classpath:config/config.properties",ignoreResourceNotFound=false,encoding="UTF-8",name="config.properties")

public class UserController {

}
1.Spring Boot 1.5之前读取配置文件使用ConfigurationProperties以及PropertySource注解很好用,
但是在使用1.5之后,你会发现ConfigurationProperties中location没用了,不能加载到指定的自定义文件了.

2.Spring Boot1.5之后默认加载application.properties或application.yml文件了,
如果使用自定义的文件运行jar或war时,指定--spring.config.location=xxxx.yml 就可以读取自定义的配置文件了
关于配置文件优先级
application.properties和application.yml文件可以放在一下四个位置:
- 外置,在相对于应用程序运行目录的/congfig子目录里。
- 外置,在应用程序运行的目录里
- 内置,在config包内
- 内置,在Classpath根目录
同样,这个列表按照优先级排序,也就是说,src/main/resources/config下application.properties覆盖src/main/resources下application.properties中相同的属性,
此外,如果你在相同优先级位置同时有application.properties和application.yml,那么application.yml里面的属性就会覆盖application.properties里的属性。
随机值配置
配置文件中${random} 可以用来生成各种不同类型的随机值,从而简化了代码生成的麻烦,例如 生成 int 值、long 值或者 string 字符串。
dudu.secret=${random.value}

dudu.number=${random.int}

dudu.bignumber=${random.long}

dudu.uuid=${random.uuid}

dudu.number.less.than.ten=${random.int(10)}

dudu.number.in.range=${random.int[1024,65536]}
外部配置-命令行参数配置(SpringApplication.setAddCommandLineProperties(false)禁用它。)
Spring Boot是基于jar包运行的,打成jar包的程序可以直接通过下面命令运行:
java -jar xx.jar
可以以下命令修改tomcat端口号:
java -jar xx.jar --server.port=9090
可以看出,命令行中连续的两个减号--就是对application.properties中的属性值进行赋值的标识。
所以java -jar xx.jar --server.port=9090等价于在application.properties中添加属性server.port=9090。
如果你怕命令行有风险,可以使用SpringApplication.setAddCommandLineProperties(false)禁用它。
实际上,Spring Boot应用程序有多种设置途径,Spring Boot能从多重属性源获得属性,包括如下几种:
- 根目录下的开发工具全局设置属性(当开发工具激活时为
~/.spring-boot-devtools.properties)。 - 测试中的@TestPropertySource注解。
- 测试中的@SpringBootTest#properties注解特性。
- 命令行参数
SPRING_APPLICATION_JSON中的属性(环境变量或系统属性中的内联JSON嵌入)。ServletConfig初始化参数。ServletContext初始化参数。- java:comp/env里的JNDI属性
- JVM系统属性
- 操作系统环境变量
- 随机生成的带random.* 前缀的属性(在设置其他属性时,可以应用他们,比如${random.long})
- 应用程序以外的application.properties或者appliaction.yml文件
- 打包在应用程序内的application.properties或者appliaction.yml文件
- 通过@PropertySource标注的属性源
- 默认属性(通过
SpringApplication.setDefaultProperties指定).
这里列表按组优先级排序,也就是说,任何在高优先级属性源里设置的属性都会覆盖低优先级的相同属性,列如我们上面提到的命令行属性就覆盖了application.properties的属性。
9.yml配置(.yml .ymal)
SpringBoot的.yml文件是一个非常简洁明了的配置文件,可看作.properties的精简版。一般来讲,我们通过@Value这个注解就可以直接获取到某个properties的值。如:有如下配置:
spring:

    datasource:

        druid:

            localhost:

                driverClassName: com.mysql.jdbc.Driver

                url: jdbc:mysql://localhost:3306/paas-dashboard?useUnicode=true&characterEncoding=utf8

                username: root

                password:123

             master:

                driverClassName: oracle.jdbc.OracleDriver

                url: jdbc:oracle:thin:@//172.21.0.73:1621/tthradb

                username: dbchnesbcfgcha

                password: dbchnesbcfgcha
一般来讲,直接通过@Value(spring.datasource.druid.localhost.driverClassName)直接获取到这个值了。
但是如果需要直接获取到localhost下面所有的配置呢?或者自己指定某一层下面所有的配置信息呢?
1.尽量使用idea等相对比较智能的开发工具(因为会自动加空格等智能操作)

2.绝对不能使用tab键来创建空格,如果下一行是一个子级别的属性名按回车后输入一个空格然后继续填写属性值。

3.文件的最后不能有空行(无内容的行),有的话通过delete键删除

4.注意每个:后边都要空一格(注意一定要用空格键来操作。切忌tab键)

5.每个级别的属性名要严格对齐

6.配置文件中间也不能有空行(无内容的行)
com:

  my:

    userId: ${random.int}

    userName: ${random.uuid}

    password: 123oip何以为家

    info: 1234566677888

#config web defult parameters

web:

  port: 8081config

  url: https://www.baidu.com1

  webName: 777771哈哈

#image

  image[JPG]: .jpg

  image[PNG]: .png

#office

  office[CSV]: .csv

  office[EXCEL]: .excel

#text

  text[txt]: .txt

  text[epub]: .epub

  servers[0]: 127.0.0.1:8080

  servers[1]: 127.0.0.1:8081

  servers[2]: 127.0.0.1:8082
加载方法和properties一样可以默认加载也可以自定义加载:
@Value("${com.my.userName}")

    private String  str;
10. Spring Boot:如何优雅的使用 Mybatis
详见:https://www.cnblogs.com/lukelook/p/11111024.html
Spring Boot:如何优雅的使用 Mybatis
11.Spring Boot:定时任务
Spring Boot:定时任务
12.spring-springmvc-mybatis整合
maven依赖
<?xml version="1.0" encoding="UTF-8"?>

<project xmlns="http://maven.apache.org/POM/4.0.0" xmlns:xsi="http://www.w3.org/2001/XMLSchema-instance"

         xsi:schemaLocation="http://maven.apache.org/POM/4.0.0 http://maven.apache.org/xsd/maven-4.0.0.xsd">

    <modelVersion>4.0.0</modelVersion>

    <groupId>com.chaoqi</groupId>

    <artifactId>springboot_demo2</artifactId>

    <version>0.0.1-SNAPSHOT</version>

    <packaging>jar</packaging>

    <name>springboot_demo2</name>

    <description>Demo project for Spring Boot</description>

    <parent>

        <groupId>org.springframework.boot</groupId>

        <artifactId>spring-boot-starter-parent</artifactId>

        <version>2.0.0.RELEASE</version>

        <relativePath/>

    </parent>

    <properties>

        <project.build.sourceEncoding>UTF-8</project.build.sourceEncoding>

        <project.reporting.outputEncoding>UTF-8</project.reporting.outputEncoding>

        <java.version>1.8</java.version>

    </properties>

    <dependencies>

        <dependency>

            <groupId>org.springframework.boot</groupId>

            <artifactId>spring-boot-starter-jdbc</artifactId>

        </dependency>

        <dependency>

            <groupId>org.springframework.boot</groupId>

            <artifactId>spring-boot-starter-web</artifactId>

        </dependency>

        <dependency>

            <groupId>org.mybatis.spring.boot</groupId>

            <artifactId>mybatis-spring-boot-starter</artifactId>

            <version>1.3.2</version>

        </dependency>

        <dependency>

            <groupId>mysql</groupId>

            <artifactId>mysql-connector-java</artifactId>

            <scope>runtime</scope>

        </dependency>

        <dependency>

            <groupId>org.springframework.boot</groupId>

            <artifactId>spring-boot-starter-test</artifactId>

            <scope>test</scope>

        </dependency>

        <!--添加jsp依赖 -->

        <dependency>

            <groupId>org.springframework.boot</groupId>

            <artifactId>spring-boot-starter-tomcat</artifactId>

        </dependency>

        <dependency>

            <groupId>org.apache.tomcat.embed</groupId>

            <artifactId>tomcat-embed-jasper</artifactId>

        </dependency>

    </dependencies>

    <build>

        <plugins>

            <plugin>

                <groupId>org.springframework.boot</groupId>

                <artifactId>spring-boot-maven-plugin</artifactId>

            </plugin>

        </plugins>

    </build>

</project>
springboot整合springmvc
因为在创建项目的时候我们选择了mybatis和jdbc所以在这里也要把他们两也给配置进去
编辑application.properties。添加如下配置即可:
# 页面默认前缀目录

spring.mvc.view.prefix=/WEB-INF/jsp/

# 响应页面默认后缀

spring.mvc.view.suffix=.jsp

#开发配置

spring.datasource.driverClassName = com.mysql.jdbc.Driver

spring.datasource.url = jdbc:mysql://localhost:3306/test?useUnicode=true&characterEncoding=utf-8

spring.datasource.username = root

spring.datasource.password = 123456

# mybatis接口文件位置

mybatis.mapper-locations: classpath:mapper/*.xml

mybatis.type-aliases-package: com.chaoqi.springboot_demo2.domain
或者添加到yml对应的接点处
spring:

       datasource:

                  url: jdbc:mysql://localhost:3306/monitor?useUnicode=true&characterEncoding=utf8&serverTimezone=GMT%2B8

                  username: root

                  password:

                  driver-class-name: com.mysql.cj.jdbc.Driver

       mvc:

           view:

                prefix: /WEB-INF/page/

                suffix: .jsp
然后就可以了,对~~就是这么简单,可以了。
13.修改默认端口
有时候我们可能需要启动不止一个SpringBoot,而SpringBoot默认的端口号是8080,所以这时候我们就需要修改SpringBoot的默认端口了。修改SpringBoot的默认端口有两种方式。下面就分别说一下这两种方式。
修改application.properties
第一种方式我们只需要在application.properties中加这样的一句话就可以了:server.port=8004。为什么这种方式可以实现修改SpringBoot的默认端口呢?因为在SpringBoot中有这样的一个类:ServerProperties。我们可以大致看一下这个类:
@ConfigurationProperties(prefix = "server", ignoreUnknownFields = true)

public class ServerProperties

        implements EmbeddedServletContainerCustomizer, EnvironmentAware, Ordered {

    /**

     * Server HTTP port.

     */

    private Integer port;
在这个类里有一个@ConfigurationProperties注解,这个注解会读取SpringBoot的默认配置文件application.properties的值注入到bean里。这里定义了一个server的前缀和一个port字段,所以在SpringBoot启动的时候会从application.properties读取到server.port的值。我们接着往下看一下
@Override

    public void customize(ConfigurableEmbeddedServletContainer container) {

        if (getPort() != null) {

            container.setPort(getPort());

        }
这里有一个customize的方法,这个方法里会给SpringBoot设置读取到的端口号。
实现EmbeddedServletContainerCustomizer
我们在上面看到了端口号是在customize这个方法中设置的,而这个方法是在EmbeddedServletContainerCustomizer这个接口中的,所以我们可以实现这个接口,来更改SpringBoot的默认端口号。具体代码如下:
@RestController

@EnableAutoConfiguration

@ComponentScan

public class FirstExample implements EmbeddedServletContainerCustomizer {

    @RequestMapping("/first.do")

    String home() {

        return "Hello World!世界你好!O(∩_∩)O哈哈~!!!我不是太很好!";

    }

    public static void main(String[] args) {

        SpringApplication.run(FirstExample.class, args);

    }

    @Override

    public void customize(ConfigurableEmbeddedServletContainer configurableEmbeddedServletContainer) {

        configurableEmbeddedServletContainer.setPort(8003);

    }

}
然后你在启动SpringBoot的时候,发现端口号被改成了8003.
使用命令行参数
如果你只是想在启动的时候修改一次端口号的话,可以用命令行参数来修改端口号。配置如下:java -jar 打包之后的SpringBoot.jar --server.port=8000
使用虚拟机参数
你同样也可以把修改端口号的配置放到JVM参数里。配置如下:-Dserver.port=8009。 这样启动的端口号就被修改为8009了。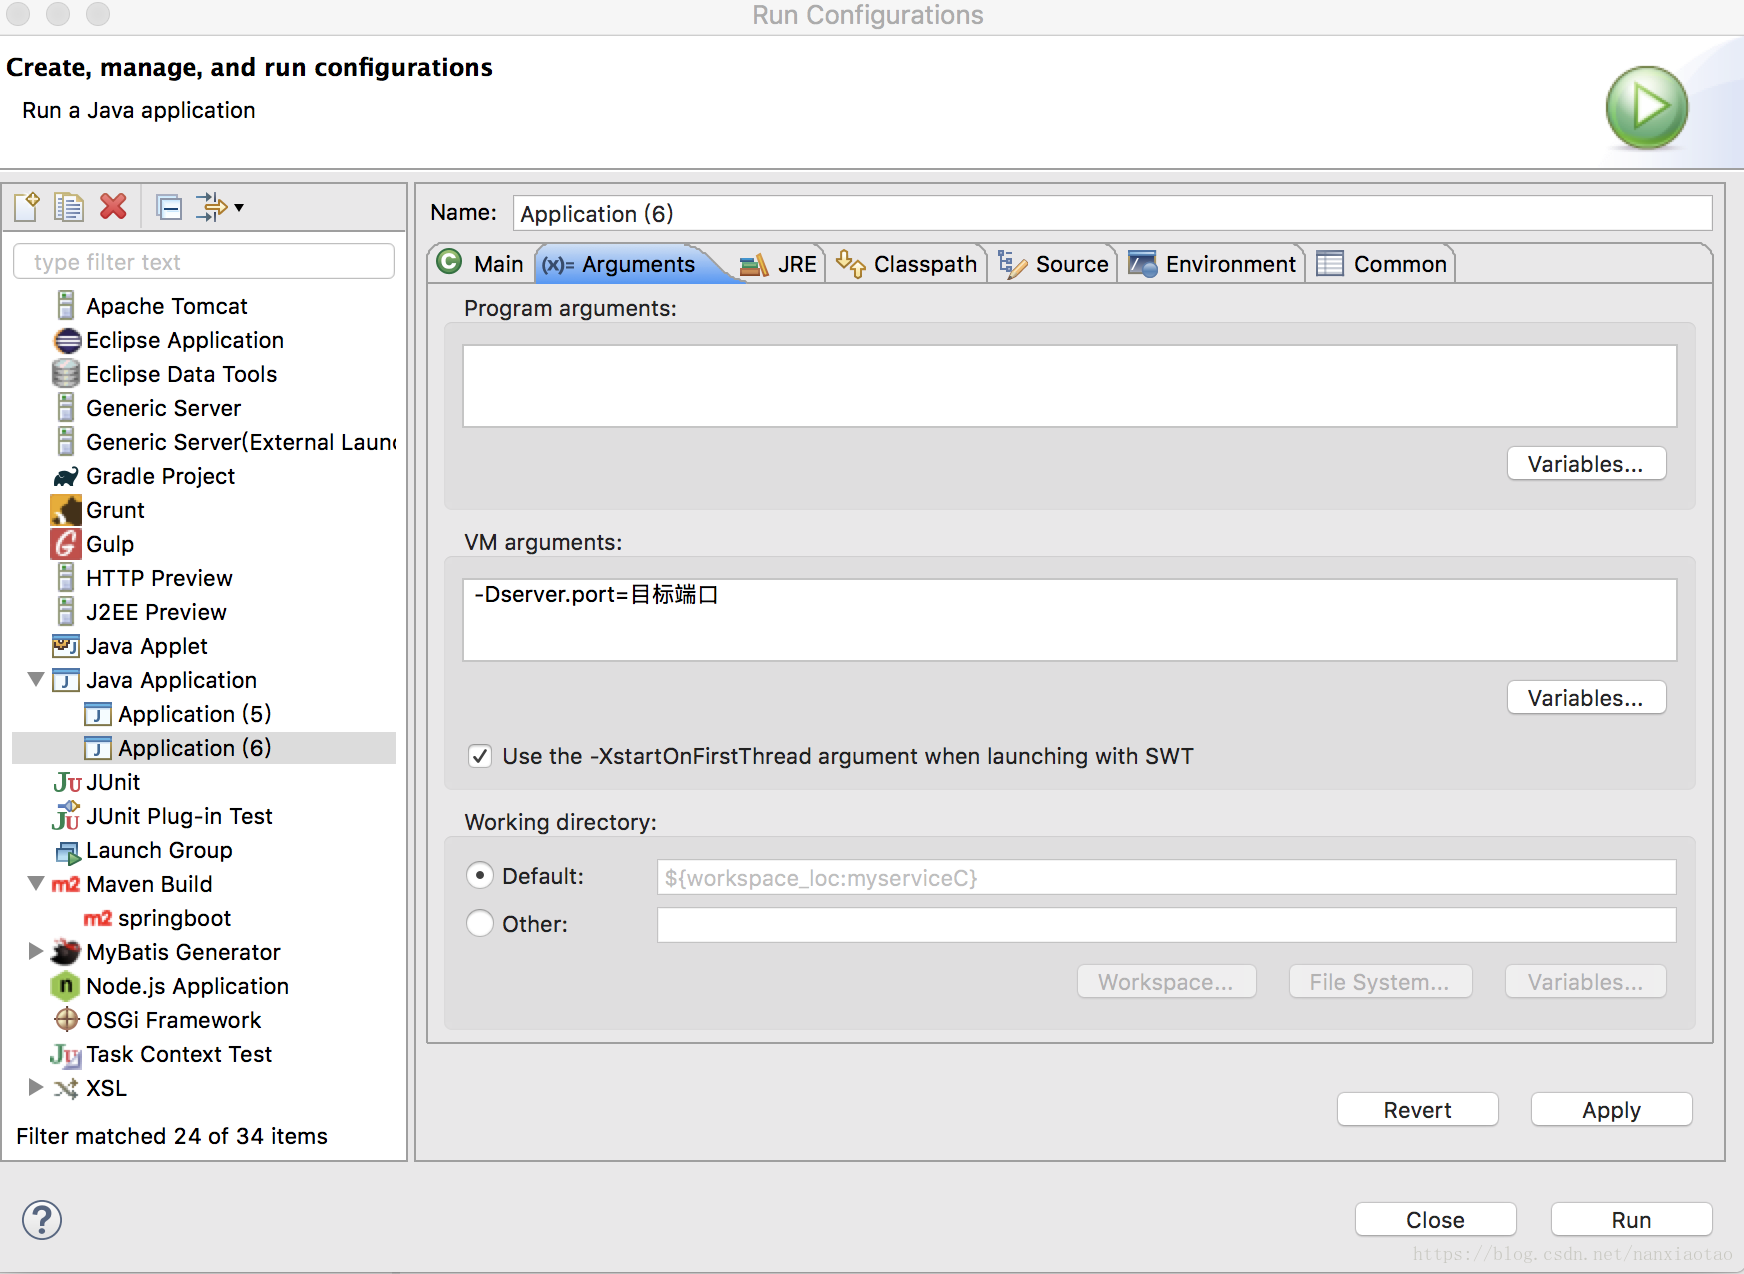
Spring Boot 实际操作的更多相关文章
- spring boot 入门操作(二)
spring boot入门操作 使用FastJson解析json数据 pom dependencies里添加fastjson依赖 <dependency> <groupId>c ...
- spring boot 入门操作(三)
spring boot入门操作 devtools热部署 pom dependencies里添加依赖 <dependency> <groupId>org.springframew ...
- spring boot数据库操作汇总
1 关于orm orm即object relational mapping,对象关系映射,即将数据库中的表映射成对象. 常用的orm有以下: mybatis spring jdbc template ...
- Spring Boot简单操作
目录 一.自定义异常页面 二.单元测试 三.多环境选择 四.读取主配置文件中的属性 五.读取List属性 一.自定义异常页面 对于404.405.500等异常状态,服务器会给出默认的异常页面,而这些 ...
- 整合spring boot时操作数据库时报错Caused by: java.lang.InstantiationException: tk.mybatis.mapper.provider.base.B
原文:https://blog.csdn.net/u__f_o/article/details/82756701 一般出现这种情况,应该是没有扫描到对应的mapper包,即在启动类下配置MapperS ...
- Spring Boot教程(四十二)LDAP来管理用户信息(2)
使用spring-data-ldap的基础用法,定义LDAP中属性与我们Java中定义实体的关系映射以及对应的Repository @Data @Entry(base = "ou=peopl ...
- 学习加密(四)spring boot 使用RSA+AES混合加密,前后端传递参数加解密
学习加密(四)spring boot 使用RSA+AES混合加密,前后端传递参数加解密 技术标签: RSA AES RSA AES 混合加密 整合 前言: 为了提高安全性采用了RS ...
- Spring Boot 整合 Redis 实现缓存操作
摘要: 原创出处 www.bysocket.com 「泥瓦匠BYSocket 」欢迎转载,保留摘要,谢谢! 『 产品没有价值,开发团队再优秀也无济于事 – <启示录> 』 本文提纲 ...
- Spring Boot实战之数据库操作
上篇文章中已经通过一个简单的HelloWorld程序讲解了Spring boot的基本原理和使用.本文主要讲解如何通过spring boot来访问数据库,本文会演示三种方式来访问数据库,第一种是Jdb ...
随机推荐
- Flask中session实现原理
前言 flask_session是flask框架实现session功能的一个插件,用来替代flask自带的session实现机制,flask默认的session信息保存在cookie中,不够安全和灵活 ...
- 小D课堂 - 新版本微服务springcloud+Docker教程_2_04微服务下电商项目基础模块设计
笔记 4.微服务下电商项目基础模块设计 简介:微服务下电商项目基础模块设计 分离几个模块,课程围绕这个基础项目进行学习 小而精的方式学习微服务 1.用户服务 ...
- 5、kubernetes资源清单定义入门
使用配置清单创建资源 定义pod时使用yaml格式 master ~]# kubectl get pod NAME READY STATUS RESTARTS AGE client / Error 1 ...
- 059. Spiral Matrix II
题目链接:https://leetcode.com/problems/spiral-matrix-ii/description/ Given a positive integer n, generat ...
- 不可不知的JavaScript - 闭包函数
闭包函数 什么是闭包函数? 闭包函数是一种函数的使用方式,最常见的如下: function fn1(){ function fn(){ } return fn; } 这种函数的嵌套方式就是闭包函数,这 ...
- selenium+java:获取列表中的值
selenium+java:获取列表中的值 (2011-08-23 17:14:48) 标签: 杂谈 分类: selenium 初步研究利用java+testNg框架下写selenium测试用例,今天 ...
- 【Linux开发】linux设备驱动归纳总结(四):4.单处理器下的竞态和并发
linux设备驱动归纳总结(四):4.单处理器下的竞态和并发 xxxxxxxxxxxxxxxxxxxxxxxxxxxxxxxxxxxxxxxxxxxxxxxxxxxxxxxxxxxxxxxxxxxxx ...
- Nginx的root和alias区别
1.root 下面举例说明: location /i/ { root /data/w3; } 请求 http://foofish.net/i/top.gif 这个地址时,那么在服务器里面对应的真正的资 ...
- Akka简介与Actor模型(一)
前言...... Akka是一个构建在JVM上,基于Actor模型的的并发框架,为构建伸缩性强,有弹性的响应式并发应用提高更好的平台.本文主要是个人对Akka的学习和应用中的一些理解. Actor模型 ...
- Object中有哪些方法及其作用
你知道Object中有哪些方法及其作用吗? 一.引言 二.Object方法详解 1.1.registerNatives() 1.2.getClass() 1.2.1.反射三种方式: 1.3.hashC ...