(十五)SpringBoot之使用Redis做缓存数据
一、添加Redis依赖
<?xml version="1.0" encoding="UTF-8"?>

<project xmlns="http://maven.apache.org/POM/4.0.0" xmlns:xsi="http://www.w3.org/2001/XMLSchema-instance"

    xsi:schemaLocation="http://maven.apache.org/POM/4.0.0 http://maven.apache.org/xsd/maven-4.0.0.xsd">

    <modelVersion>4.0.0</modelVersion>

    <groupId>com.shyroke.redis</groupId>

    <artifactId>springboot_redis</artifactId>

    <version>0.0.1-SNAPSHOT</version>

    <packaging>war</packaging>

    <name>springboot_redis</name>

    <description>Demo project for Spring Boot</description>

    <parent>

        <groupId>org.springframework.boot</groupId>

        <artifactId>spring-boot-starter-parent</artifactId>

        <version>1.4.7.RELEASE</version>

        <relativePath/> <!-- lookup parent from repository -->

    </parent>

    <properties>

        <project.build.sourceEncoding>UTF-8</project.build.sourceEncoding>

        <project.reporting.outputEncoding>UTF-8</project.reporting.outputEncoding>

        <java.version>1.8</java.version>

    </properties>

    <dependencies>

        <dependency>

            <groupId>org.springframework.boot</groupId>

            <artifactId>spring-boot-starter-cache</artifactId>

        </dependency>

        <dependency>

            <groupId>org.springframework.boot</groupId>

            <artifactId>spring-boot-starter-data-jpa</artifactId>

        </dependency>

        <dependency>

            <groupId>org.springframework.boot</groupId>

            <artifactId>spring-boot-starter-data-redis</artifactId>

        </dependency>

        <dependency>

            <groupId>org.springframework.boot</groupId>

            <artifactId>spring-boot-starter-web</artifactId>

        </dependency>

        <dependency>

            <groupId>org.springframework.boot</groupId>

            <artifactId>spring-boot-devtools</artifactId>

            <scope>runtime</scope>

        </dependency>

        <dependency>

            <groupId>mysql</groupId>

            <artifactId>mysql-connector-java</artifactId>

            <scope>runtime</scope>

        </dependency>

        <dependency>

            <groupId>org.springframework.boot</groupId>

            <artifactId>spring-boot-starter-tomcat</artifactId>

            <scope>provided</scope>

        </dependency>

        <dependency>

            <groupId>org.springframework.boot</groupId>

            <artifactId>spring-boot-starter-test</artifactId>

            <scope>test</scope>

        </dependency>

    </dependencies>

    <build>

        <plugins>

            <plugin>

                <groupId>org.springframework.boot</groupId>

                <artifactId>spring-boot-maven-plugin</artifactId>

            </plugin>

        </plugins>

    </build>

</project>
二、 application配置
server.port=8888

#数据库连接配置

spring.datasource.url=jdbc:mysql://localhost/db_boot?useUnicode=true&characterEncoding=utf-8

spring.datasource.username=root

spring.datasource.password=

spring.datasource.driver-class-name=com.mysql.jdbc.Driver

# JPA

spring.jpa.show-sql=true

spring.jpa.hibernate.ddl-auto= update

#redis

spring.cache.type=redis

spring.redis.host=localhost

spring.redis.port=6379

#spring.redis.password=

#spring.redis.database=0

#spring.redis.pool.max-active=8

#spring.redis.pool.max-idle=8

#spring.redis.pool.max-wait=-1

#spring.redis.pool.min-idle=0

#spring.redis.timeout=0
三、 redis缓存配置类
package com.shyroke.config;

import com.fasterxml.jackson.annotation.JsonAutoDetect;

import com.fasterxml.jackson.annotation.PropertyAccessor;

import com.fasterxml.jackson.databind.ObjectMapper;

import org.springframework.cache.CacheManager;

import org.springframework.cache.annotation.CachingConfigurerSupport;

import org.springframework.cache.annotation.EnableCaching;

import org.springframework.cache.interceptor.KeyGenerator;

import org.springframework.context.annotation.Bean;

import org.springframework.context.annotation.Configuration;

import org.springframework.data.redis.cache.RedisCacheManager;

import org.springframework.data.redis.connection.RedisConnectionFactory;

import org.springframework.data.redis.core.RedisTemplate;

import org.springframework.data.redis.core.StringRedisTemplate;

import org.springframework.data.redis.serializer.Jackson2JsonRedisSerializer;

import java.lang.reflect.Method;

@Configuration

public class RedisConfig extends CachingConfigurerSupport {

    /*

     * 定义缓存数据 key 生成策略的bean 包名+类名+方法名+所有参数

     */

     @Bean

     public KeyGenerator wiselyKeyGenerator(){

     return new KeyGenerator() {

     @Override

     public Object generate(Object target, Method method, Object... params) {

     StringBuilder sb = new StringBuilder();

     sb.append(target.getClass().getName());

     sb.append(method.getName());

     for (Object obj : params) {

     sb.append(obj.toString());

     }

     return sb.toString();

     }

     };

     }

    /*

     * 要启用spring缓存支持,需创建一个 CacheManager的 bean,CacheManager 接口有很多实现,这里Redis 的集成,用

     * RedisCacheManager这个实现类 Redis 不是应用的共享内存,它只是一个内存服务器,就像 MySql 似的,

     * 我们需要将应用连接到它并使用某种“语言”进行交互,因此我们还需要一个连接工厂以及一个 Spring 和 Redis 对话要用的

     * RedisTemplate, 这些都是 Redis 缓存所必需的配置,把它们都放在自定义的 CachingConfigurerSupport 中

     */

    @Bean

    public CacheManager cacheManager(@SuppressWarnings("rawtypes") RedisTemplate redisTemplate) {

        RedisCacheManager cacheManager = new RedisCacheManager(redisTemplate);

        // cacheManager.setDefaultExpiration(60);//设置缓存保留时间(seconds)

        return cacheManager;

    }

    // 1.项目启动时此方法先被注册成bean被spring管理,如果没有这个bean,则redis可视化工具中的中文内容(key或者value)都会以二进制存储,不易检查。

    @Bean

    public RedisTemplate<String, String> redisTemplate(RedisConnectionFactory factory) {

        StringRedisTemplate template = new StringRedisTemplate(factory);

        Jackson2JsonRedisSerializer jackson2JsonRedisSerializer = new Jackson2JsonRedisSerializer(Object.class);

        ObjectMapper om = new ObjectMapper();

        om.setVisibility(PropertyAccessor.ALL, JsonAutoDetect.Visibility.ANY);

        om.enableDefaultTyping(ObjectMapper.DefaultTyping.NON_FINAL);

        jackson2JsonRedisSerializer.setObjectMapper(om);

        template.setValueSerializer(jackson2JsonRedisSerializer);

        template.afterPropertiesSet();

        return template;

    }

}
四、在springboot启动类中添加缓存支持
@SpringBootApplication

@EnableCaching

public class SpringbootRedisApplication {

    public static void main(String[] args) {

        SpringApplication.run(SpringbootRedisApplication.class, args);

    }

}
五、编写控制类
package com.shyroke.controller;

import org.springframework.beans.factory.annotation.Autowired;

import org.springframework.stereotype.Controller;

import org.springframework.web.bind.annotation.RequestMapping;

import org.springframework.web.bind.annotation.ResponseBody;

import com.shyroke.bean.UserBean;

import com.shyroke.mapper.UserMapper;

import com.shyroke.service.UserServiceI;

import com.shyroke.util.DateUtil;

@Controller

@RequestMapping(value = "/")

public class IndexController {

    @Autowired

    private UserServiceI userService;

    @ResponseBody

    @RequestMapping(value = "/get")

    public UserBean get() {

        return userService.getUserById(1);

    }

    @ResponseBody

    @RequestMapping(value="/update")

    public UserBean update() {

        UserBean user=userService.getUserById(1);

        user.setCreateTime(DateUtil.getDataFormat());

        user.setUserName("test");

        return userService.update(user);

    }

    @ResponseBody

    @RequestMapping(value="/del")

    public String del() {

        return userService.del(1);

    }

}
六、Service层接口及其实现
package com.shyroke.service;

import com.shyroke.bean.UserBean;

public interface UserServiceI {

    UserBean getUserById(int i);

    UserBean update(UserBean user);

    String del(int id);

}
- 实现类
package com.shyroke.service.impl; import org.springframework.beans.factory.annotation.Autowired;
import org.springframework.cache.annotation.CacheConfig;
import org.springframework.cache.annotation.CacheEvict;
import org.springframework.cache.annotation.CachePut;
import org.springframework.cache.annotation.Cacheable;
import org.springframework.stereotype.Service; import com.shyroke.bean.UserBean;
import com.shyroke.mapper.UserMapper;
import com.shyroke.service.UserServiceI; @Service
@CacheConfig(cacheNames="users")
public class UserServiceImpl implements UserServiceI { @Autowired
private UserMapper userMapper; @Cacheable(key="'userCache'")
@Override
public UserBean getUserById(int i) {
System.out.println("执行这里,说明缓存中读取不到数据,直接读取数据库....");
return userMapper.findOne(i);
} @CachePut(key="'userCache'")
@Override
public UserBean update(UserBean user) {
System.out.println("执行这里,更新数据库,更新缓存....");
return userMapper.save(user);
} @CacheEvict(key="'userCache'")
@Override
public String del(int id) {
userMapper.delete(id);
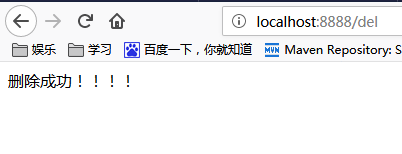
return "删除成功!!!!";
} }
- 注意:
- @CacheConfig(cacheNames="users") 注解指的是该类中的缓存的名称都是users
@CachePut(key=" 'userCache' ")中userCache要加‘’单引号,表示这是一个字符串。
@Cacheable能够根据方法的请求参数对其结果进行缓存(缓存的是方法的返回结果),一般用于insert()操作
- @CachePut(key="'userCache'")主要针对方法配置,能够根据方法的请求参数对其结果进行缓存,和 @Cacheable 不同的是,它每次都会触发真实方法的调用,一般用于update()操作
- @CacheEvict(key="'userCache'")主要针对方法配置,能够根据一定的条件对缓存进行清空,一般用于delete()操作
- 本例中的@Cacheable和@CachePut和@CacheEvict的key值必须都是同一个缓存的key,因为这样当update的时候缓存的时候,get方法的得到的才是最新数据,而当删除的时候@CacheEvict,也必须把该key的缓存删除。
七、编写mapper
package com.shyroke.mapper;

import org.springframework.data.jpa.repository.JpaRepository;

import org.springframework.stereotype.Repository;

import com.shyroke.bean.UserBean;

@Repository

public interface UserMapper extends JpaRepository<UserBean,Integer> {

}
八、实验结果
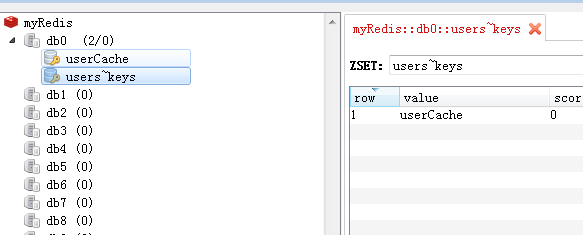
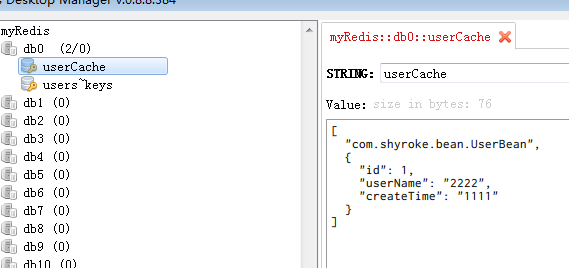
- 启动springboot会在数据库中根据bean的定义自动创建一个表数据。插入一条测试数据

- 如下访问http://localhost:8888/get ,获取结果,并生成一个缓存。

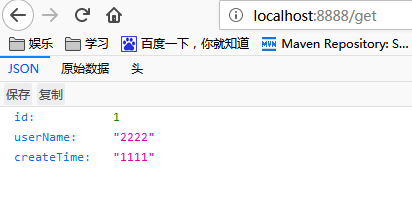
- 如下 访问 http://localhost:8888/update ,更新数据,更新缓存,


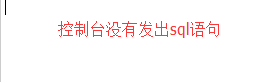
- 执行上一步更新缓存后,如下我们再访问http://localhost:8888/get,获取的是最新数据,且没有没有发出sql语句说明是从缓存中读取的数据。

- 如下访问http://localhost:8888/del,缓存被清空。
九、总结
要缓存的 Java 对象必须实现 Serializable 接口,因为 Spring 会将对象先序列化再存入 Redis,如果不实现 Serializable 的话将会遇到类似这种错误:nested exception is java.lang.IllegalArgumentException: DefaultSerializer requires a Serializable payload but received an object of type。。。
(十五)SpringBoot之使用Redis做缓存数据的更多相关文章
- SpringBoot之Mybatis操作中使用Redis做缓存
上一博客学习了SpringBoot集成Redis,今天这篇博客学习下Mybatis操作中使用Redis做缓存.这里其实主要学习几个注解:@CachePut.@Cacheable.@CacheEvict ...
- spring-boot集成mybatis,用redis做缓存
网上有很多例子了,执行源码起码有3个,都是各种各样的小问题. 现在做了个小demo,实现spring-boot 用redis做缓存的实例,简单记录下思路,分享下源码. 缓存的实现,分担了数据库的压力, ...
- springboot+redis实现缓存数据
在当前互联网环境下,缓存随处可见,利用缓存可以很好的提升系统性能,特别是对于查询操作,可以有效的减少数据库压力,Redis 是一个开源(BSD许可)的,内存中的数据结构存储系统,它可以用作数据库.缓存 ...
- springboot2.0+redis实现消息队列+redis做缓存+mysql
本博客仅供参考,本人实现没有问题. 1.环境 先安装redis.mysql 2.springboot2.0的项目搭建(请自行完成),本人是maven项目,因此只需配置,获取相应的jar包,配置贴出. ...
- spring+redis的集成,redis做缓存
1.前言 Redis是一个开源的使用ANSI C语言编写.支持网络.可基于内存亦可持久化的日志型.Key-Value数据库,并提供多种语言的API.我们都知道,在日常的应用中,数据库瓶颈是最容易出现的 ...
- python3.4学习笔记(二十五) Python 调用mysql redis实例代码
python3.4学习笔记(二十五) Python 调用mysql redis实例代码 #coding: utf-8 __author__ = 'zdz8207' #python2.7 import ...
- django使用redis做缓存
Django 使用 Redis 做缓存 django中应用redis:pip3 install django-redis - 配置 CACHES = { "default": { ...
- Spring Boot 2整合Redis做缓存
既然是要用Redis做缓存,自然少不了安装了.但是本文主要讲Spring Boot与Redis整合.安装教程请另行百度! 1.首先是我们的Redis配置类 package com.tyc; impor ...
- 如何用redis做缓存
redis缓存 在互联网应用中经常需要用redis来缓存热点数据. redis数据在内存,可以保证数据读取的高效,接近每秒数十万次的吞吐量 减少下层持久层数据库读取压力,像mongodb,每秒近千次读 ...
随机推荐
- 设计自用的golang日志模块
设计自用的golang日志模块 golang的原生日志模块不能满足需求,而开源的第三方包,也不完全够用.用户较多的logrus,却没有rotate功能,这已经是众所周知的.对于运维来说,当然是希望日志 ...
- patch工具的使用
1. 最简用法 patch -p1 < jello.patch
- angular 中数据循环 *ngFor
<!--The content below is only a placeholder and can be replaced.--> <div style="text-a ...
- 【集成模型】Boosting
0 - 思想 Bagging算法思想是减少预测方差(variance),Boosting算法思想是为了减少预测偏差(bias). Boosting算法思想是将“弱学习算法”提升为“强学习算法”.一般来 ...
- 使用Async-profiler 对程序性能优化实战
原文在简书上, https://www.jianshu.com/p/f8336b835978 1.背景 目前有一个kafka消费者工程,此工程会消费kafka中的消息,并通过fastjson解析该消息 ...
- python2.6.6升级python2.7.14
Centos 6.8系统镜像默认安装的 python 环境是 2.6.6,线上需求需要升级到 2.7.14 版本,网上找了相关资料,升级 python 版本比较容易,但 yum/pip 等命令的使用也 ...
- Ubuntu16.04下KeepAlived+Nginx 布署
前言 网上已经有很多相关文章,对各种概念介绍的比较清楚,也有各种详细的步骤,这里主要记录本要在ubuntu16.04下的布署过程,主要记录编译安装keepalived时遇到的坑及解决办 ...
- Leetcode之148. Sort List Medium
https://leetcode.com/problems/sort-list/ Sort a linked list in O(n log n) time using constant space ...
- 微信jsapi开发应用实例并记录下错误信息
虽然大家已经有实例,但还是要根据自己的项目更改 在这里需要注意的几点 也是常常报错的 1.页面必须是UTF8(已经json不认gbk,所以会提醒 -1调用支付JSAPI缺少参数APPID 这是编码引起 ...
- Spring 使用下列表
模型层需要提供数据选项,设置错误信息 关键代码 @NotEmpty(message = "请选择兴趣爱好") private String[] hobbies; 控制器层需要在显示 ...