Nginx中文文档-安装 Nginx
nginx可以使用各平台的默认包来安装,本文是介绍使用源码编译安装,包括具体的编译参数信息。
正式开始前,编译环境gcc g++ 开发库之类的需要提前装好,这里默认你已经装好。
ububtu平台编译环境可以使用以下指令
apt-get install build-essential

apt-get install libtool
centos平台编译环境使用如下指令
安装make:
yum -y install gcc automake autoconf libtool make
安装g++:
yum install gcc gcc-c++
下面正式开始
---------------------------------------------------------------------------
一般我们都需要先装pcre, zlib,前者为了重写rewrite,后者为了gzip压缩。
1.选定源码目录
可以是任何目录,本文选定的是/usr/local/src
cd /usr/local/src
2.安装PCRE库
首先去官网下载pcre的安装包
如果通过FTP的方式,下载地址为:ftp://ftp.csx.cam.ac.uk/pub/software/programming/pcre/
如果通过http的方式,下载地址为:http://sourceforge.net/projects/pcre/files/pcre/
目前最新的版本为8.32,linux对应的安装包名称为:pcre-8.32.tar.gz。
ftp://ftp.csx.cam.ac.uk/pub/software/programming/pcre/ 下载最新的 PCRE 源码包,使用下面命令下载编译和安装 PCRE 包:
 cd /usr/local/src

 wget ftp://ftp.csx.cam.ac.uk/pub/software/programming/pcre/pcre-8.37.tar.gz

 tar -zxvf pcre-8.37.tar.gz

 cd pcre-8.34

 ./configure

 make

 make install
3.安装zlib库
官网:http://zlib.net/
下载地址:http://prdownloads.sourceforge.net/libpng/zlib-1.2.8.tar.gz?download
http://zlib.net/zlib-1.2.8.tar.gz 下载最新的 zlib 源码包,使用下面命令下载编译和安装 zlib包:
 cd /usr/local/src

 wget http://zlib.net/zlib-1.2.8.tar.gz

 tar -zxvf zlib-1.2..tar.gz

 cd zlib-1.2.

 ./configure

 make

 make install
4.安装ssl(某些vps默认没装ssl)
 cd /usr/local/src

 wget https://www.openssl.org/source/openssl-1.0.1t.tar.gz

 tar -zxvf openssl-1.0.1t.tar.gz
5.安装nginx
下载地址:https://nginx.org/download/
Nginx 一般有两个版本,分别是稳定版和开发版,您可以根据您的目的来选择这两个版本的其中一个,下面是把 Nginx 安装到 /usr/local/nginx 目录下的详细步骤:
cd /usr/local/src

wget http://nginx.org/download/nginx-1.4.2.tar.gz

tar -zxvf nginx-1.4..tar.gz

cd nginx-1.4.

./configure --prefix=/usr/local/nginx \
--sbin-path=/usr/local/nginx/nginx \

--conf-path=/usr/local/nginx/nginx.conf \

--pid-path=/usr/local/nginx/nginx.pid \

--with-http_ssl_module \

--with-pcre=/usr/local/src/pcre-8.37 \

--with-zlib=/usr/local/src/zlib-1.2. \

--with-openssl=/usr/local/src/openssl-1.0.1t

make

make install
--with-pcre=/usr/src/pcre-8.34 指的是pcre-8.34 的源码路径。
--with-zlib=/usr/src/zlib-1.2.7 指的是zlib-1.2.7 的源码路径。
安装成功后 /usr/local/nginx 目录下如下
 fastcgi.conf            koi-win             nginx.conf.default

 fastcgi.conf.default    logs                scgi_params

 fastcgi_params          mime.types          scgi_params.default

 fastcgi_params.default  mime.types.default  uwsgi_params

 html                    nginx               uwsgi_params.default

 koi-utf                 nginx.conf          win-utf
6.启动
确保系统的 80 端口没被其他程序占用,运行/usr/local/nginx/nginx 命令来启动 Nginx,
netstat -ano|grep
如果查不到结果后执行,有结果则忽略此步骤(ubuntu下必须用sudo启动,不然只能在前台运行)
sudo /usr/local/nginx/nginx
打开浏览器访问此机器的 IP,如果浏览器出现 Welcome to nginx! 则表示 Nginx 已经安装并运行成功。

-----------------------------------------------------
到这里nginx就安装完成了,如果只是处理静态html就不用继续安装了
如果你需要处理php脚本的话,还需要安装php-fpm。
下面安装排错
附:可能遇到的错误和一些帮助信息
1.1编译pcre错误
 libtool: compile: unrecognized option `-DHAVE_CONFIG_H'

 libtool: compile: Try `libtool --help' for more information.

 make[]: *** [pcrecpp.lo] Error

 make[]: Leaving directory `/usr/local/src/pcre-8.34'

 make: *** [all] Error
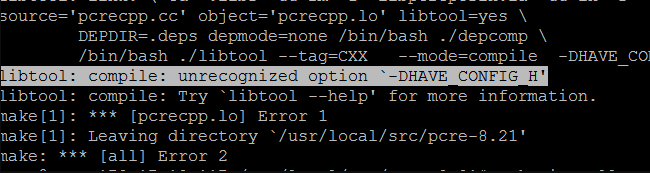
解决办法:安装g++,别忘了重新configure
 apt-get install g++

 apt-get install build-essential

 make clean

 ./configure

 make
1.2 make出错
 make: *** No rule to make target `build', needed by `default'.  Stop.

 ./configure: error: SSL modules require the OpenSSL library.

 You can either do not enable the modules, or install the OpenSSL library

 into the system, or build the OpenSSL library statically from the source

 with nginx by using --with-openssl=<path> option.
按照第4步的安装方法或
ubuntu下
apt-get install openssl

apt-get install libssl-dev
centos下
yum -y install openssl openssl-devel
2.nginx编译选项
make是用来编译的,它从Makefile中读取指令,然后编译。
make install是用来安装的,它也从Makefile中读取指令,安装到指定的位置。
configure命令是用来检测你的安装平台的目标特征的。它定义了系统的各个方面,包括nginx的被允许使用的连接处理的方法,比如它会检测你是不是有CC或GCC,并不是需要CC或GCC,它是个shell脚本,执行结束时,它会创建一个Makefile文件。nginx的configure命令支持以下参数:
--prefix=定义一个目录,存放服务器上的文件 ,也就是nginx的安装目录。默认使用path/usr/local/nginx。--sbin-path=设置nginx的可执行文件的路径,默认为pathprefix/sbin/nginx--conf-path=设置在nginx.conf配置文件的路径。nginx允许使用不同的配置文件启动,通过命令行中的-c选项。默认为pathprefix/conf/nginx.conf--pid-path=path 设置nginx.pid文件,将存储的主进程的进程号。安装完成后,可以随时改变的文件名 , 在nginx.conf配置文件中使用 PID指令。默认情况下,文件名 为prefix/logs/nginx.pid--error-log-path=设置主错误,警告,和诊断文件的名称。安装完成后,可以随时改变的文件名 ,在nginx.conf配置文件中 使用 的error_log指令。默认情况下,文件名 为pathprefix/logs/error.log--http-log-path=设置主请求的HTTP服务器的日志文件的名称。安装完成后,可以随时改变的文件名 ,在nginx.conf配置文件中 使用 的access_log指令。默认情况下,文件名 为pathprefix/logs/access.log--user=设置nginx工作进程的用户。安装完成后,可以随时更改的名称在nginx.conf配置文件中 使用的 user指令。默认的用户名是nobody。name--group=设置nginx工作进程的用户组。安装完成后,可以随时更改的名称在nginx.conf配置文件中 使用的 user指令。默认的为非特权用户。name--with-select_module--without-select_module 启用或禁用构建一个模块来允许服务器使用select()方法。该模块将自动建立,如果平台不支持的kqueue,epoll,rtsig或/dev/poll。--with-poll_module--without-poll_module启用或禁用构建一个模块来允许服务器使用poll()方法。该模块将自动建立,如果平台不支持的kqueue,epoll,rtsig或/dev/poll。--without-http_gzip_module— 不编译压缩的HTTP服务器的响应模块。编译并运行此模块需要zlib库。--without-http_rewrite_module不编译重写模块。编译并运行此模块需要PCRE库支持。--without-http_proxy_module— 不编译http_proxy模块。--with-http_ssl_module— 使用https协议模块。默认情况下,该模块没有被构建。建立并运行此模块的OpenSSL库是必需的。--with-pcre=— 设置PCRE库的源码路径。PCRE库的源码(版本4.4 - 8.30)需要从PCRE网站下载并解压。其余的工作是Nginx的./ configure和make来完成。正则表达式使用在location指令和 ngx_http_rewrite_module 模块中。path--with-pcre-jit—编译PCRE包含“just-in-time compilation”(1.1.12中, pcre_jit指令)。--with-zlib=—设置的zlib库的源码路径。要下载从 zlib(版本1.1.3 - 1.2.5)的并解压。其余的工作是Nginx的./ configure和make完成。ngx_http_gzip_module模块需要使用zlib 。path--with-cc-opt=— 设置额外的参数将被添加到CFLAGS变量。例如,当你在FreeBSD上使用PCRE库时需要使用:parameters--with-cc-opt="-I /usr/local/include。.如需要需要增加select()支持的文件数量:--with-cc-opt="-D FD_SETSIZE=2048".--with-ld-opt=—设置附加的参数,将用于在链接期间。例如,当在FreeBSD下使用该系统的PCRE库,应指定:parameters--with-ld-opt="-L /usr/local/lib".
典型实例(下面为了展示需要写在多行,执行时内容需要在同一行)
 ./configure

     --sbin-path=/usr/local/nginx/nginx

     --conf-path=/usr/local/nginx/nginx.conf

     --pid-path=/usr/local/nginx/nginx.pid

     --with-http_ssl_module

     --with-pcre=../pcre-4.4

     --with-zlib=../zlib-1.1.
转载:http://www.nginx.cn/install
最后补充:
启动nginx
关闭防火墙
setenforce

systemctl stop firewalld

systemctl disable firewalld

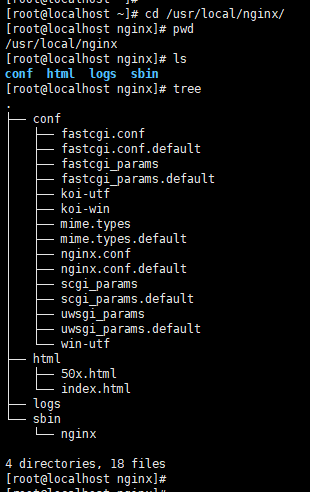
进入到安装目录/usr/local/nginx,查看目录结构
cd /usr/local/nginx

pwd

ls
启动Nginx
/usr/local/nginx/sbin/nginx
查看Nginx进程是否启动
ps aux | grep nginx

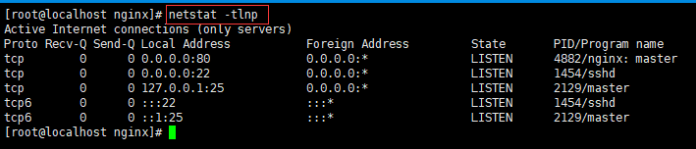
查看Nginx占用的端口号
netstat -tlnp
使用本地主机访问虚拟机上的Nginx服务器
停止nginx
停止Nginx的三种方式
# . 立即停止Nginx服务

/usr/local/nginx/sbin/nginx -s stop

# .完成当前任务后停止

/usr/local/nginx/sbin/nginx -s quit

# .杀死Nginx进程

killall nginx
把nginx命令添加到环境变量
使用软连接将nginx链接到/usr/local/sbin
ln -s /usr/local/nginx/sbin/nginx /usr/local/sbin

ll /usr/local/sbin/ | grep "nginx"

显示当前环境变量PATH
echo $PATH
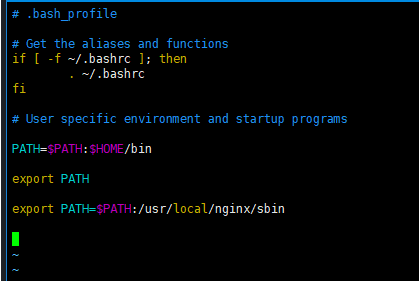
编辑.bash_profile文件
vim ~/.bash_profile
在.bash_profile文件末尾加入以下内容
export PATH=$PATH:/usr/local/nginx/sbin
引用.bash_profile文件
source ~/.bash_profile
使用nginx命令
# 启动nginx

nginx

# 停止nginx

nginx -s quit
把nginx命令添加到系统服务
创建并编辑文件/root/service-nginx.sh
#!/bin/sh

#

# filename: service-nginx.sh

#

# nginx - this script starts and stops the nginx daemon

#

# chkconfig:   -

# description:  NGINX is an HTTP(S) server, HTTP(S) reverse \

#               proxy and IMAP/POP3 proxy server

# processname: nginx

# config:      /etc/nginx/nginx.conf

# config:      /etc/sysconfig/nginx

# pidfile:     /var/run/nginx.pid

# Source function library.

. /etc/rc.d/init.d/functions

# Source networking configuration.

. /etc/sysconfig/network

# Check that networking is up.

[ "$NETWORKING" = "no" ] && exit

#nginx="/usr/sbin/nginx"

nginx="/usr/local/sbin/nginx"

prog=$(basename $nginx)

#NGINX_CONF_FILE="/etc/nginx/nginx.conf"

NGINX_CONF_FILE="/usr/local/nginx/conf/nginx.conf"

[ -f /etc/sysconfig/nginx ] && . /etc/sysconfig/nginx

lockfile=/var/lock/subsys/nginx

make_dirs() {

   # make required directories

   user=`$nginx -V >& | grep "configure arguments:.*--user=" | sed 's/[^*]*--user=\([^ ]*\).*/\1/g' -`

   if [ -n "$user" ]; then

      if [ -z "`grep $user /etc/passwd`" ]; then

         useradd -M -s /bin/nologin $user

      fi

      options=`$nginx -V >& | grep 'configure arguments:'`

      for opt in $options; do

          if [ `echo $opt | grep '.*-temp-path'` ]; then

              value=`echo $opt | cut -d "=" -f `

              if [ ! -d "$value" ]; then

                  # echo "creating" $value

                  mkdir -p $value && chown -R $user $value

              fi

          fi

       done

    fi

}

start() {

    [ -x $nginx ] || exit

    [ -f $NGINX_CONF_FILE ] || exit

    make_dirs

    echo -n $"Starting $prog: "

    daemon $nginx -c $NGINX_CONF_FILE

    retval=$?

    echo

    [ $retval -eq  ] && touch $lockfile

    return $retval

}

stop() {

    echo -n $"Stopping $prog: "

    killproc $prog -QUIT

    retval=$?

    echo

    [ $retval -eq  ] && rm -f $lockfile

    return $retval

}

restart() {

    configtest || return $?

    stop

    sleep

    start

}

reload() {

    configtest || return $?

    echo -n $"Reloading $prog: "

    killproc $nginx -HUP

    RETVAL=$?

    echo

}

force_reload() {

    restart

}

configtest() {

  $nginx -t -c $NGINX_CONF_FILE

}

rh_status() {

    status $prog

}

rh_status_q() {

    rh_status >/dev/null >&

}

case "$1" in

    start)

        rh_status_q && exit

        $

        ;;

    stop)

        rh_status_q || exit

        $

        ;;

    restart|configtest)

        $

        ;;

    reload)

        rh_status_q || exit

        $

        ;;

    force-reload)

        force_reload

        ;;

    status)

        rh_status

        ;;

    condrestart|try-restart)

        rh_status_q || exit

            ;;

    *)

        echo $"Usage: $0 {start|stop|status|restart|condrestart|try-restart|reload|force-reload|configtest}"

        exit

esac

# END
用/root/service-nginx.sh替换/etc/init.d/nginx
mv /root/service-nginx.sh /etc/init.d/nginx
赋予可执行限权
chmod /etc/init.d/nginx
执行
systemctl start nginx
源码方式安装nginx,自动化安装脚本
#!/bin/bash

# installation configuration

NGINX_VERSION=1.12.

NGINX_SRC_PATH=/root

NGINX_BIN_PATH=/usr/local/nginx

# disable firewall

systemctl stop firewalld

setenforce

# installation dependence

yum install -y pcre-devel zlib-devel openssl-devel wget gcc

# download nginx source package

cd ${NGINX_SRC_PATH}

wget http://nginx.org/download/nginx-${NGINX_VERSION}.tar.gz

# unzip source package

tar -xzvf nginx-${NGINX_VERSION}.tar.gz

cd ./nginx-${NGINX_VERSION}

# install nginx

./configure --prefix=${NGINX_BIN_PATH} --with-http_ssl_module

make & make install

# start nginx service

cd ${NGINX_BIN_PATH}/sbin

./nginx

# END
Nginx中文文档-安装 Nginx的更多相关文章
- nginx中文文档
http://www.nginx.cn/doc/ LNMP :https://lnmp.org/faq/lnmp-vhost-add-howto.html 配置详解 配置详解2
- Symfony4中文文档: 安装和设置Symfony框架
安装和设置Symfony框架 要创建新的Symfony应用程序, 首先确保使用的是PHP7.1 或更高版本并且已经安装Componser. 如果未安装, 请首先在系统上全局安装Componser. 如 ...
- 1、pytest中文文档--安装和入门
目录 安装和入门 安装pytest 创建你的第一个测试用例 执行多个测试用例 检查代码是否触发一个指定的异常 在一个类中组织多个测试用例 申请一个唯一的临时目录用于功能测试 安装和入门 Python版 ...
- spring boot 中文文档地址
spring boot 中文文档地址 http://oopsguy.com/documents/springboot-docs/1.5.4/index.html Spring Boot 参考指 ...
- 【scikit-learn 0.19 中文文档 】安装 scikit-learn | ApacheCN
中文文档: http://sklearn.apachecn.org/cn/0.19.0/tutorial/basic/tutorial.html 英文文档: http://sklearn.apache ...
- Keras官方中文文档:Keras安装和配置指南(Windows)
这里需要说明一下,笔者不建议在Windows环境下进行深度学习的研究,一方面是因为Windows所对应的框架搭建的依赖过多,社区设定不完全:另一方面,Linux系统下对显卡支持.内存释放以及存储空间调 ...
- <亲测>CentOS7中使用yum安装Nginx的方法
CentOS7中使用yum安装Nginx的方法 最近无意间发现Nginx官方提供了Yum源.因此写个文章记录下. 1.添加源 默认情况Centos7中无Nginx的源,最近发现Nginx官网提供了 ...
- debian8上安装pyspider - pyspider中文文档 - pyspider中文网
debian8上安装pyspider - pyspider中文文档 - pyspider中文网 #apt-get install python python-dev python-distribu ...
- VMware虚拟机中的CentOS7安装Nginx后本机无法访问的解决办法
VMware虚拟机中的CentOS7安装Nginx后本机无法访问的解决办法 在linux上安装nginx 请参考:Linux Centos7 安装 nginx 在虚拟机centos7上安装nginx之 ...
随机推荐
- Linux之Vim的使用
所有的 Unix Like 系统都会内建 vi 文书编辑器,其他的文书编辑器则不一定会存在. 但是目前我们使用比较多的是 vim 编辑器. vim 具有程序编辑的能力,可以主动的以字体颜色辨别语法的正 ...
- 初始化springbean
public class SMSMessageHandler implements InitializingBean { @Overridepublic void afterPropertiesSet ...
- DHCP服务——服务端 和 客户端 配置
转载注明出处:https://www.cnblogs.com/kelamoyujuzhen/p/9520341.html 实验环境 rhel-server-6.4-x86_64-dvd(ED2000 ...
- git daemon 安装和使用
git daemon 安装和使用 系统:Cent OS 8 安装 git 和 git daemon(不同系统有不同的安装命令) yum install -y git yum install -y gi ...
- Eigen
Eigen: https://eigen.tuxfamily.org/dox/GettingStarted.html
- MySQL远程连接不上的解决方法
这篇文章主要为大家详细介绍了MySQL远程连接不上的解决方法,具有一定的参考价值,感兴趣的小伙伴们可以参考一下 之前遇到过MySQL本地可以连接但是远程连不上的问题,没有记录,今天在云上新申请的服 ...
- Vue全家桶之——Vuex
Vuex 是什么? Vuex 是一个专为 Vue.js 应用程序开发的状态管理模式.它采用集中式存储管理应用的所有组件的状态,并以相应的规则保证状态以一种可预测的方式发生变化.Vuex 也集成到 Vu ...
- c++ 构造函数执行顺序
开辟内存空间. 按照成员变量声明的顺序开始构造成员变量. 如果成员变量在初始化列表中, 就会执行该变量类型的拷贝构造函数. 如果成员变量没有在初始化列表中, 就会执行该变量类型的缺省构造函数. 进入函 ...
- Linux(centos 7) 安装nginx
在安装nginx之前需要安装依赖的包 一. gcc 安装安装 nginx 需要先将官网下载的源码进行编译,编译依赖 gcc 环境,如果没有 gcc 环境,则需要安装: yum install gcc- ...
- 题解 [51nod1225]余数之和
题解 [51nod1225]余数之和 题面 解析 首先可以发现,\(a\)%\(b\)\(=a-b*\lfloor a/b \rfloor\). 而对于一段连续的\(b\)来说\(\lfloor a/ ...