Python+requests重定向和追踪
Python+requests重定向和追踪
一、什么是重定向
重定向就是网络请求被重新定个方向转到了其它位置
二、为什么要做重定向
网页重定向的情况一般有:网站调整(如网页目录结构变化)、网页地址改变、网页扩展名(.php、.html、.asp)的改变、当一个网站注册了多个域名的时候。这些情况下都需要进行网页的重定向。不做重定向的话就容易出现404错误(如访问网上提供的网页url经常报404错误,就是有可能url地址改变了但没有做重定向导致的。)
三、Python+requests重定向操作
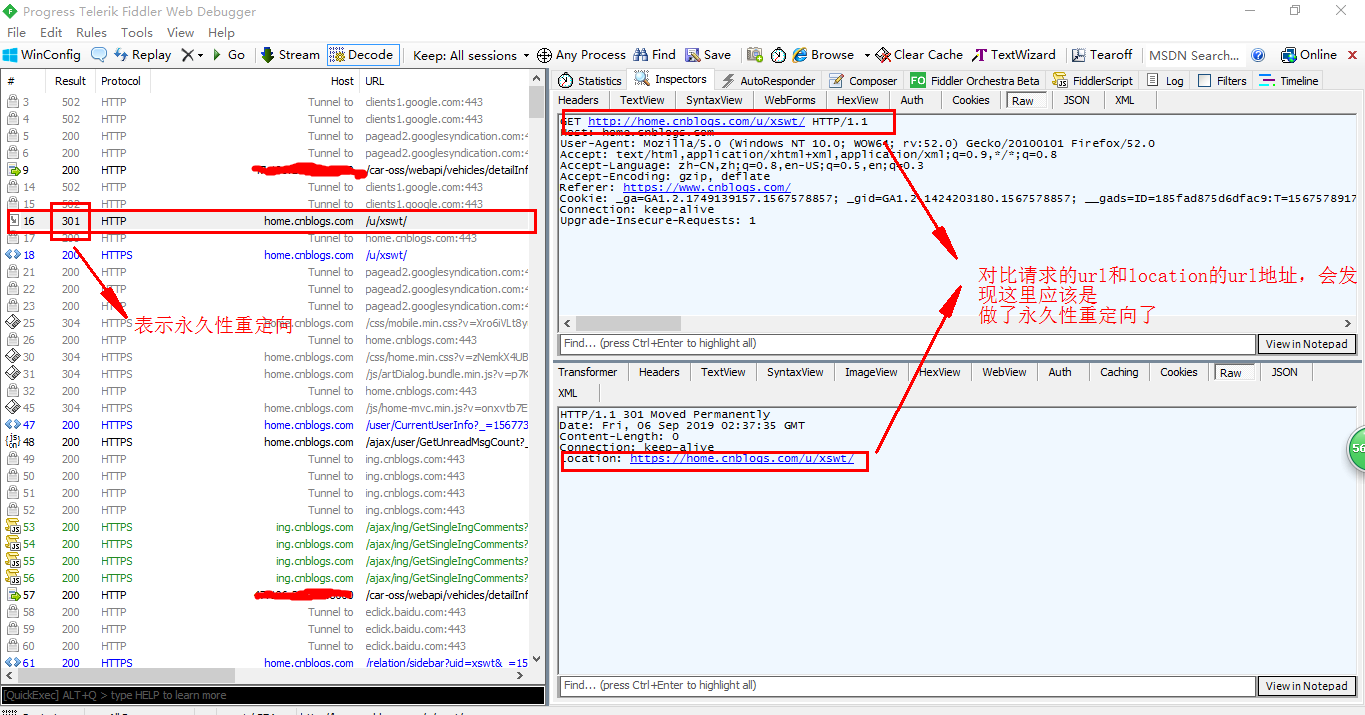
1、重定向分:301 redirect---》永久性重定向、302 redirect---》暂时性重定向,比如下图的302永久性重定向
2、追踪重定向
import requests

url = 'http://home.cnblogs.com/u/xswt/'

r = requests.get(url,params=None,headers={'Content-Type':'application/json'})

print(r.history)#history追踪页面重定向历史
运行结果:
[<Response [301]>, <Response [302]>, <Response [302]>, <Response [302]>]

#可以看到该请求做了多次重定向
3、Python+requests获取重定向的url地址:
import requests

url = 'http://home.cnblogs.com/u/xswt/'

r = requests.get(url,headers={"Content-Type":"application/json"})

reditList = r.history#可以看出获取的是一个地址序列

print(f'获取重定向的历史记录:{reditList}')

print(f'获取第一次重定向的headers头部信息:{reditList[0].headers}')

print(f'获取重定向最终的url:{reditList[len(reditList)-1].headers["location"]}')
运行结果:
获取重定向的历史记录:[<Response [301]>, <Response [302]>, <Response [302]>, <Response [302]>]

获取第一次重定向的headers头部信息:{'Date': 'Fri, 06 Sep 2019 06:53:05 GMT', 'Content-Length': '', 'Connection': 'keep-alive', 'Location': 'https://home.cnblogs.com/u/xswt/'}

获取重定向最终的url:https://account.cnblogs.com/signin?returnUrl=http%3a%2f%2fhome.cnblogs.com%2fu%2fxswt%2f
4、Python+requests重启和禁止重定向
'''

禁止重定向(all_redirects=False)

'''

import requests

url = 'http://home.cnblogs.com/u/xswt/'

r = requests.get(url,headers={"Content-Type":"application/json"},allow_redirects=False)

print(r.status_code)

print(r.text)
运行结果:
301
'''

重启重定向

'''

import requests

url = 'http://home.cnblogs.com/u/xswt/'

r = requests.get(url,headers={"Content-Type":"application/json"},allow_redirects=True)

print(r.status_code)

print(r.text)
运行结果
200

<!DOCTYPE html><html lang=zh><head><meta charset=utf-8><meta http-equiv=X-UA-Compatible content="IE=EDGE"><meta name=viewport content="width=device-width, initial-scale=1, shrink-to-fit=no"><title>用户登录 - 博客园</title><link rel="shortcut icon" href=//common.cnblogs.com/favicon.ico type=image/x-icon><script src="/assets/account/signin-iconfont.js?v=01OkrFmCBcVIQNTQ6W3Q8sMKdVgWbmPjCL6jUR8-WG0"></script><link rel=stylesheet href="/assets/commons.bundle.css?v=Oz63dDHd7T_Cfz5h2Sq0d3vui_UXH--HRn9V4awJQzk"><link rel=stylesheet href="/assets/shared/_card.css?v=IL3_1zWqtnCRPXGhVd5DWxlqIbzUxrVAMDMRBgNJqr0"><link rel=stylesheet href="/assets/account/signin.css?v=OQC4pMzU7K-SBw0eOIhORW9tPgMtc8t_KMFfauwhOe4"><script>window.captcha={captchaType:'Geetest'};</script><body><!--[if IE]><div class=unsupported-browser>该页面不支持 Internet Explorer 浏览器,建议使用 <a href="https://www.google.cn/intl/zh-CN/chrome/">Google Chrome</a>, <a href="https://www.mozilla.org/zh-CN/firefox/">Firefox</a> 或 <a href="https://www.microsoftedgeinsider.com/zh-CN/">Microsoft Edge</a></div><![endif]--><div class=center-container><div class="center-body card h-sm-100"><div class=card-body><div class="login-top text-center"><span class=login-title>博客园用户登录</span> <a href="https://www.cnblogs.com/"> <svg class=login-sign><use xlink:href=#icon-login-sign></use></svg> </a><div class=login-info>代码改变世界</div></div><form id=loginForm method=post onsubmit="return false" action="/signin?returnurl=http%3A%2F%2Fhome.cnblogs.com%2Fu%2Fxswt%2F"><div class=form-group><input tabindex=1 class=form-control placeholder=登录用户名 autofocus type=text data-val=true data-val-required=请输入登录用户名 id=LoginName name=LoginName> <span class="invalid-feedback field-validation-valid" data-valmsg-for=LoginName data-valmsg-replace=true></span> <a href=//passport.cnblogs.com/GetUsername.aspx class=txt-forget-sign>忘记登录用户名</a></div><div class=form-group><input tabindex=2 class=form-control placeholder=密码 type=password data-val=true data-val-required=请输入密码

 id=Password name=Password> <span class="invalid-feedback field-validation-valid" data-valmsg-for=Password data-valmsg-replace=true></span> <a class=txt-forget-sign href=/resetpassword>忘记密码</a></div><div class="form-check form-remember"><input tabindex=3 type=checkbox id=IsRemember name=IsRemember value=true> <label class=label-remember for=IsRemember>记住我</label></div><button tabindex=4 id=submitBtn type=submit class="btn-login btn btn-primary btn-sm ladda-button px-4" data-style=slide-down> <span class=ladda-label>登录</span> </button><div class=login-footer><div class=ajax-error-box><div class="ajax-error mb-2"></div></div><span>没有帐户,<a href=/signup>立即注册</a></span></div><input name=__RequestVerificationToken type=hidden value=CfDJ8BQYbW6Qx5RFuF4UTI7QvU0JhTrWuqHSETm-ZBHqozMUxn_xVSGIuIjhJup5YFxpPklNDOD4T8n4eWmtuKVsaDDIYZfq53CJV9nH8hmpuWAnu9T-D8XnbDP7ouAqv6uHIjB_jLDh33Ncimy9Z6h8yec></form><input type=hidden id=PublicKey name=PublicKey value=MIGfMA0GCSqGSIb3DQEBAQUAA4GNADCBiQKBgQCp0wHYbg/NOPO3nzMD3dndwS0MccuMeXCHgVlGOoYyFwLdS24Im2e7YyhB0wrUsyYf0/nhzCzBK8ZC9eCWqd0aHbdgOQT6CuFQBMjbyGYvlVYU2ZP7kG9Ft6YV6oc9ambuO7nPZh+bvXH0zDKfi02prknrScAKC0XhadTHT3Al0QIDAQAB></div></div></div><script src="/assets/commons.bundle.js?v=hoU0LpMUGe-JXAnP-fFZtpXo0z2NRIKd7lcM9-aTiyw"></script><script src="/assets/shared/_withoutnav.js?v=y4G8garzujN3d6jIVIcqucumyuGzj_F89wPux5sCv80"></script><script src="/assets/account/signin.js?v=ZN5IPajeQxzfOVgdZ7bt4ZCCvcPFYWL-4fLGYVaP1Jk"></script>
Python+requests重定向和追踪的更多相关文章
- Python requests快速上手
Python requests快速上手 这里参考官方文档,在ide中写了一遍,加深一下印象,定义的函数只是为了方便区分不同的请求方式 #-*-coding:utf-8-*- # Time:2017/1 ...
- Python+Requests接口测试教程(1):Fiddler抓包工具
本书涵盖内容:fiddler.http协议.json.requests+unittest+报告.bs4.数据相关(mysql/oracle/logging)等内容.刚买须知:本书是针对零基础入门接口测 ...
- Python——Requests库的开发者接口
本文介绍 Python Requests 库的开发者接口,主要内容包括: 目录 一.主要接口 1. requests.request() 2. requests.head().get().post() ...
- Python requests介绍之接口介绍
Python requests介绍 引用官网介绍 Requests 唯一的一个非转基因的 Python HTTP 库,人类可以安全享用. Requests 允许你发送纯天然,植物饲养的 HTTP/1. ...
- Python Requests 小技巧总结
关于 Python Requests ,在使用中,总结了一些小技巧把,分享下. 1:保持请求之间的Cookies,我们可以这样做. import requests self.session = req ...
- Python:requests库、BeautifulSoup4库的基本使用(实现简单的网络爬虫)
Python:requests库.BeautifulSoup4库的基本使用(实现简单的网络爬虫) 一.requests库的基本使用 requests是python语言编写的简单易用的HTTP库,使用起 ...
- 基于Python Requests的数据驱动的HTTP接口测试
发表于:2017-8-30 11:56 作者:顾翔 来源:51Testing软件测试网原创 http://www.51testing.com/html/69/n-3720769-2.html ...
- Python requests模拟登录
Python requests模拟登录 #!/usr/bin/env python # encoding: UTF-8 import json import requests # 跟urllib,ur ...
- 大概看了一天python request源码。写下python requests库发送 get,post请求大概过程。
python requests库发送请求时,比如get请求,大概过程. 一.发起get请求过程:调用requests.get(url,**kwargs)-->request('get', url ...
随机推荐
- vue 内容增加滚动条自动定位至底部
this.$nextTick(() => { document.body.scrollTop = document.body.scrollHeight; console.log(document ...
- 将.mat文件中的数据转换成图片
%% 如何将.mat文件中的数据转换成图片 clc;clear all; addpath F_data/MAT;load('D:\face.mat') for i=1:q img=uint8(re ...
- 微信小程序之简单记账本开发记录(三)
昨天已经编辑了主界面,在wxml文件中设置好跳转链接之后,就可以进行下一步的开发了 在pages中建立一个新的页面文件夹作为之后的支出页面 编辑后台,今天先搭建大致界面
- electron之环境安装、启动程序
1.安装node.js 2.安装淘宝镜像 npm install -g cnpm --registry=https://registry.npm.taobao.org 3.安装全局electron n ...
- 如果你的电脑想升级并且支持m.2接口
便宜啊,赶紧入手. 文章来源:刘俊涛的博客 欢迎关注,有问题一起学习欢迎留言.评论
- hadoop查看文件大小
hadoop fs -du /yj/input/ 列出input下所有文件的大小,以B为单位 #!/bin/sh #echo "hadoop fs -du /" hadoop fs ...
- SQL-W3School-高级:SQL FOREIGN KEY 约束
ylbtech-SQL-W3School-高级:SQL FOREIGN KEY 约束 1.返回顶部 1. SQL FOREIGN KEY 约束 一个表中的 FOREIGN KEY 指向另一个表中的 P ...
- 使用Eclipse对SpringBoot项目如何进行打包部署
1,打包概要介绍: 自己做了个小demo,突然想练一下如何打包发布,期间出现了两个错误,第一个是加载不到主类,第二个是加载不到jsp文件,一会会把这两个问题一一陈述,以及解决方法. 1.1,先检查po ...
- ES6深入浅出-1 新版变量声明:let 和 const-1.视频 概述
es7语法比较少,只占了一点点 ES 6 新特性一览:https://frankfang.github.io/es-6-tutorials/ 我用了两个月的时间才理解 let https://zh ...
- iOS实现图片无限轮播之使用第三方库SDCycleScrollView(转)
下载链接:github不断更新地址:https://github.com/gsdios/SDCycleScrollView #import "ViewController.h" # ...