利用IDEA构建springboot应用-构建好SpringBoot + SSM 框架
一. 创建项目
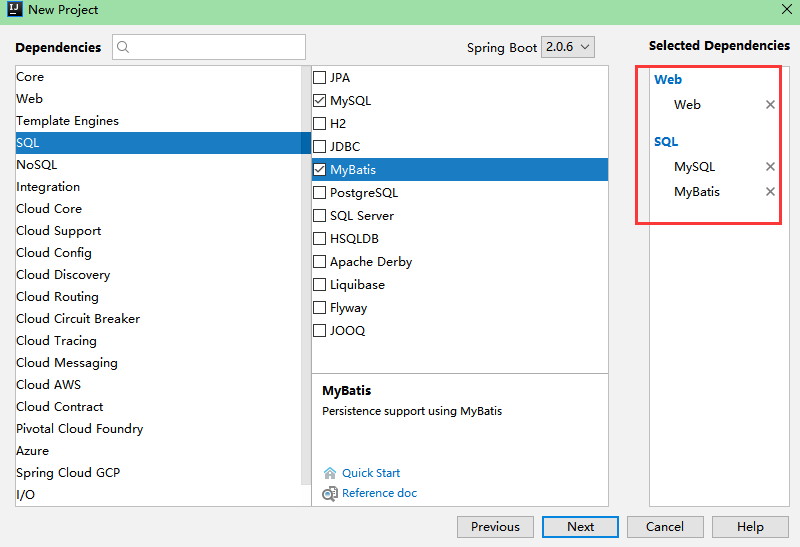
选择 Spring Initiallizr

添加最基本的几个依赖 Web,MySQL,MyBatis,其他需求可以后续再添加 ; 数据库选择了 MySQL
二. 配置数据源
数据源中存储了所有建立数据库连接的信息
1. 配置 IDEA 数据源
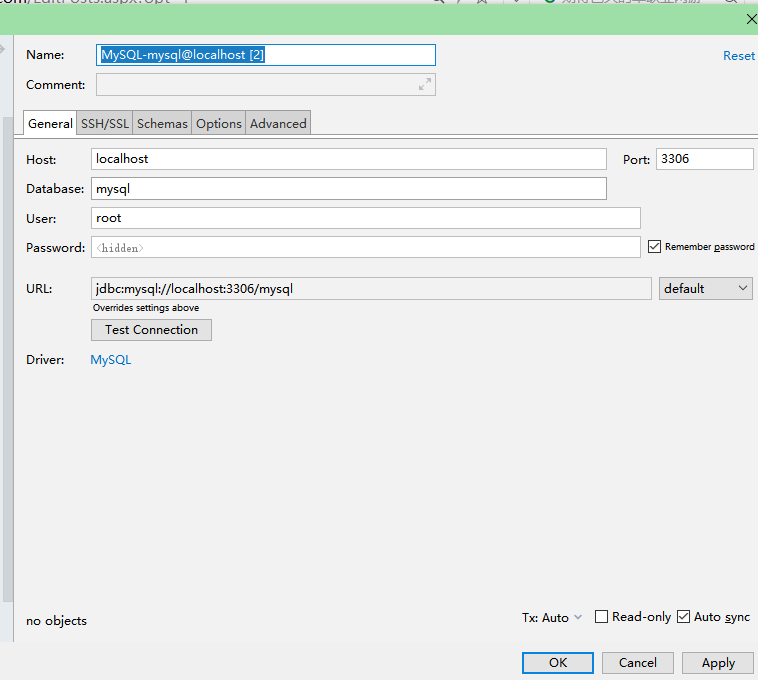
输入地址,端口,用户名,密码等等完成设置
2. 配置 spring 数据源
application.properties 文件添加:
spring.datasource.url = jdbc:mysql://localhost:3306/mysql?characterEncoding=utf8&allowMultiQueries=true&useSSL=false

spring.datasource.username = root

spring.datasource.password = password

spring.datasource.driver-class-name = com.mysql.jdbc.Driver
url : 数据源 url ,格式为
jdbc:mysql://Host(主机名或 IP 地址):Post(端口)/Database(数据库名称),其中 allowMultiQueries = true : 允许多条 sql 同时执行(分号分隔);useSSL : 是否进行 SSL 连接,根据实际情况选择username : 用户名
password : 密码
driver-class-name : 驱动名,不同的数据库有不同的 Drivername,如 oracle 数据库的
oracle.jdbc.driver.OracleDriver,MySQL 数据库为com.mysql.jdbc.Driver
三. Spring 注解
使用 @Controller / @RestController 注解标注一个控制器,表明这个类是作为控制器的角色而存在的
使用 @Service 注解标注一个业务层类
使用 @Repository 注解标注一个持久层 mapper 接口
使用 @Component 注解标注其他组件
使用 @Configuration 注解标注配置类
四. MyBatis
整个项目的构建最主要的部分就是 springboot 和 mybatis 的整合,而springboot 也提供了十分方便的方式。
1. xml 文件
声明为映射文件
namespace : 指该映射文件对应的映射接口 ; 一般来说,一个 XML 映射配置文件对应一个命名空间,而这个命名空间又对应一个接口
<?xml version="1.0" encoding="UTF-8" ?>

<!DOCTYPE mapper PUBLIC "-//mybatis.org//DTD Mapper 3.0//EN" "http://mybatis.org/dtd/mybatis-3-mapper.dtd">

<mapper namespace="com.example.ssm.dao.MyMapper">

</mapper>
2. application.properties
Mybatis 配置,指定了 mybatis 基础配置文件和实体类映射文件的地址
# Mybatis 配置,指定了 mybatis 基础配置文件和实体类映射文件的地址

mybatis.mapperLocations=classpath:mapper/**/*.xml

mybatis.typeAliasesPackage=com.example.ssm.model
配置 typeAliasesPackage 可以使得com.example.ssm.model包内的实体类可以在映射文件中使用别名,如:
<select id="getUser" parameterType="int" resultType="User">

</select>
如没有配置 typeAliasesPackage ,则需要 resultType="com.swit.model.User"
如果要对 MyBatis 通过 xml 文件进行另外的配置,则添加文件路径:
mybatis.config-locations=classpath:mybatis/mybatis-config.xml
3. 添加对 mapper 类的扫描
以下两种方法二选其一
(1)可以选择在启动类添加 @MapperScan
value 为 mapper 类所在的包(注意这里是包的路径,而不是类的路径!)
@MapperScan(value = "com.swit.dao")
另外, @MapperScan 注解面向的是接口类,只要是加了注解的接口类都需要进行通过该注解来扫描
(2)可以在每个 mapper 类上添加 @mapper 注解
@Mapper

@Repository

public interface MyMapper {

}
到目前为止,你已经完成了你的项目的构建,下面我还会介绍些别的东西。
五. 其他要注意的点
1. @SpringBootApplication
这个注解位于启动类
@SpringBootApplication 等价于以默认属性使用 @Configuration , @EnableAutoConfiguration 和 @ComponentScan, 所以启动类无需再添加这三个注解
@Configuration :标注一个类为配置类。
@EnableAutoConfiguration :开启自动配置。
@ComponentScan :自动收集所有的 Spring 组件
2. 部署服务器
如果你想把自己的 SpringBoot 项目部署到阿里云,腾讯云等服务器,那么你还需要加点东西。
1. 如果需要通过打包的方式在web容器中进行部署,则需要继承 SpringBootServletInitializer 覆盖configure(SpringApplicationBuilder)方法
public class SpringbootApplication extends SpringBootServletInitializer {

   public static void main(String[] args) {

       SpringApplication.run(SpringbootApplication.class, args);

   }

   @Override

   protected SpringApplicationBuilder configure(SpringApplicationBuilder builder) {

       // 注意这里要指向原先用main方法执行的Application启动类

       return builder.sources(SpringbootApplication.class);

   }

}
2.pom 文件添加打包插件
<build>

       <!--打包后的项目名,url 前缀-->

   <finalName>projectName</finalName>

   <plugins>

     <plugin>

       <groupId>org.springframework.boot</groupId>

       <artifactId>spring-boot-maven-plugin</artifactId>

     </plugin>

     <plugin>

       <groupId>org.apache.maven.plugins</groupId>

       <artifactId>maven-compiler-plugin</artifactId>

       <version>3.1</version>

       <configuration>

         <!--设置编译时使用的 JDK 版本-->

         <source>1.8</source>

         <!--设置运行时使用的 JDK 版本-->

         <target>1.8</target>

         <!--设置为 true 则跳过测试-->

         <skip>true</skip>

       </configuration>

     </plugin>

   </plugins>

 </build>
3. 你很有可能还需要做个跨域处理
@Component

public class CorsFilter implements Filter {

   /**

    * json web token 在请求头的名字

    */

   private String tokenHeader = "X_Auth_Token";

   @Override

   public void doFilter(ServletRequest req, ServletResponse res, FilterChain chain) throws IOException, ServletException {

       HttpServletResponse response = (HttpServletResponse) res;

       HttpServletRequest request = (HttpServletRequest) req;

       String token = request.getHeader("X_Auth_Token");

       System.out.println(token + "token");

       String Origin = request.getHeader("Origin");

       System.out.println("Origin:" + Origin);

       System.out.println("tokenHeader:" + this.tokenHeader);

       Logger logger = Logger.getLogger(this.getClass());

       logger.info("Origin:  " + Origin);

       response.setHeader("Access-Control-Allow-Origin", Origin);

       response.setHeader("Access-Control-Allow-Methods", "POST, GET, PUT, OPTIONS, DELETE");

       response.setHeader("Access-Control-Max-Age", "3600");

       response.setHeader("Access-Control-Allow-Headers", "Origin, X-Requested-With, Content-Type, Accept, " + this.tokenHeader);

       response.setHeader("Access-Control-Allow-Credentials", "true");

       chain.doFilter(req, res);

   }

   @Override

   public void init(FilterConfig filterConfig) {

   }

   @Override

   public void destroy() {

   }

}
六. 整合其他组件
1. redis
redis 也是我们项目中经常用到的 NoSQL,经常用来做做缓存什么的。
依赖
<dependency>

   <groupId>org.springframework.boot</groupId>

   <artifactId>spring-boot-starter-data-redis</artifactId>

</dependency>
application.properties
# Redis数据库索引(默认为0)

spring.redis.database=0

# Redis服务器地址

spring.redis.host=127.0.0.1

# Redis服务器连接端口

spring.redis.port=6379

# Redis服务器连接密码(默认为空)

spring.redis.password=123456

# 连接池最大连接数(使用负值表示没有限制)

spring.redis.pool.max-active=15

# 连接池最大阻塞等待时间(使用负值表示没有限制)

spring.redis.pool.max-wait=-1

# 连接池中的最大空闲连接

spring.redis.pool.max-idle=15

# 连接池中的最小空闲连接

spring.redis.pool.min-idle=0

# 连接超时时间(毫秒)

spring.redis.timeout=0
2. Druid 数据源
针对监控而生的 DB 连接池
依赖
<dependency>

      <groupId>com.alibaba</groupId>

      <artifactId>druid</artifactId>

      <version>1.0.20</version>

</dependency>
application.properties
spring.datasource.type=com.alibaba.druid.pool.DruidDataSource

spring.datasource.filters=stat

spring.datasource.maxActive=20

spring.datasource.initialSize=5

spring.datasource.maxWait=60000

spring.datasource.minIdle=1

spring.datasource.timeBetweenEvictionRunsMillis=60000

spring.datasource.minEvictableIdleTimeMillis=300000

spring.datasource.validationQuery=select 'x'

spring.datasource.testWhileIdle=true

spring.datasource.testOnBorrow=false

spring.datasource.testOnReturn=false

spring.datasource.poolPreparedStatements=true

spring.datasource.maxOpenPreparedStatements=20
利用IDEA构建springboot应用-构建好SpringBoot + SSM 框架的更多相关文章
- 利用Jenkins实现jdk11+Maven构建springboot项目
目录 原理图 前期准备 Jdk11安装 Jenkins安装 Maven安装 Jenkins的设置 插件安装 变量配置 搭建项目 1.通用配置 2.源码管理 3.构建触发 4.Maven的构建选项 5. ...
- Java SpringBoot 项目构建 Docker 镜像调优实践
PS:已经在生产实践中验证,解决在生产环境下,网速带宽小,每次推拉镜像影响线上服务问题,按本文方式构建镜像,除了第一次拉取.推送.构建镜像慢,第二.三-次都是几百K大小传输,速度非常快,构建.打包.推 ...
- Springboot & Mybatis 构建restful 服务五
Springboot & Mybatis 构建restful 服务五 1 前置条件 成功执行完Springboot & Mybatis 构建restful 服务四 2 restful ...
- Springboot & Mybatis 构建restful 服务四
Springboot & Mybatis 构建restful 服务四 1 前置条件 成功执行完Springboot & Mybatis 构建restful 服务三 2 restful ...
- Springboot & Mybatis 构建restful 服务三
Springboot & Mybatis 构建restful 服务三 1 前置条件 成功执行完Springboot & Mybatis 构建restful 服务二 2 restful ...
- Springboot & Mybatis 构建restful 服务二
Springboot & Mybatis 构建restful 服务二 1 前置条件 成功执行完Springboot & Mybatis 构建restful 服务一 2 restful ...
- Springboot & Mybatis 构建restful 服务
Springboot & Mybatis 构建restful 服务一 1 前置条件 jdk测试:java -version maven测试:命令行之行mvn -v eclipse及maven插 ...
- 带你十分钟快速构建好 SpringBoot + SSM 框架
目前最主流的 java web 框架应该是 SSM,而 SSM 框架由于更轻便与灵活目前受到了许多人的青睐.而 SpringBoot 的轻量化,简化项目配置, 没有 XML 配置要求等优点现在也得到了 ...
- 教你构建好 SpringBoot + SSM 框架
来源:Howie_Y https://juejin.im/post/5b53f677f265da0f8f203914 目前最主流的 java web 框架应该是 SSM,而 SSM 框架由于更轻便与灵 ...
- 教你十分钟构建好 SpringBoot + SSM 框架
目前最主流的 java web 框架应该是 SSM,而 SSM 框架由于更轻便与灵活目前受到了许多人的青睐.而 SpringBoot 的轻量化,简化项目配置, 没有 XML 配置要求等优点现在也得到了 ...
随机推荐
- 20190813「Night」-Blind
夜场. 先说说题面,周,任,飞? 好像是个巨巨巨巨巨巨佬. 郭神?同上. 好像题解包里都有. %%%出题人liu_runda. liu_runda是谁? 凭实力在NOI2017退役的辣鸡蒟蒻. 郭神是 ...
- laravel-admin 自定义导出excel功能,并导出图片
https://www.jianshu.com/p/91975f66427d 最近用laravel-admin在做一个小项目,其中用到了excel导出功能. 但是laravel-admin自带的导出功 ...
- SpringCloud微服务实战一:Spring Cloud Eureka 服务发现与注册中心(高可用实列为两个注册中心)
微服务架构: 微服务架构的核心思想是,一个应用是由多个小的.相互独立的.微服务组成,这些服务运行在自己的进程中,开发和发布都没有依赖.不同服务通过一些轻量级交互机制来通信,例如 RPC.HTTP 等, ...
- Linux下读写UART串口的代码
Linux下读写UART串口的代码,从IBM Developer network上拿来的东西,操作比較的复杂,就直接跳过了,好在代码能用,记录一下- 两个实用的函数- //////////////// ...
- Python 数据文件操作——写出数据
- python 内置操作函数
- Hdu 1156
题目链接 Brownie Points II Time Limit: 20000/10000 MS (Java/Others) Memory Limit: 65536/32768 K (Java ...
- js判断类型为数字的方法实现总汇——原生js判断isNumber()
方法一[推荐]: 最容易想到的是用typeof来判断是否是number类型 ,但是如果为NaN会被认为也是number类型,因此我们需要使用isNaN来排除NaN的情况. function isNum ...
- AOP Aspect 统一日志、异常处理、数据格式 【转】
package com.gsww.chis.aop; import java.util.Arrays; import com.google.common.base.Throwables; import ...
- 全面系统Python3入门+进阶课程
全面系统Python3入门+进阶课程 整个课程都看完了,这个课程的分享可以往下看,下面有链接,之前做java开发也做了一些年头,也分享下自己看这个视频的感受,单论单个知识点课程本身没问题,大家看的时候 ...