Tsung压力测试:Openfire
环境准备
安装Tsung、安装openfire、安装Spark
要对openfire进行压力测试,因此我们主要讲解如何利用jabber_register.xml在openfire上面注册用户,以及利用jabber.xml模拟用户登录openfire上线、离开、会话操作的压力测试
一、注册用户
1、执行以下命令进入到安装目录下的examples目录:
[root@localhost ~]# cd /usr/local/tsung/share/doc/tsung/examples/

[root@localhost examples]# ll

total 64

-rw-r--r--. 1 root root 3834 Mar  7 03:09 fs-nfs.xml

-rw-r--r--. 1 root root 6391 Mar  7 03:09 http_distributed.xml

-rw-r--r--. 1 root root 2609 Mar  7 03:09 http_setdynvars.xml

-rw-r--r--. 1 root root 2215 Mar  7 03:09 http_simple.xml

-rw-r--r--. 1 root root 3140 Mar  7 03:09 jabber_muc.xml

-rw-r--r--. 1 root root 1727 Mar  7 03:09 jabber_privacy.xml

-rw-r--r--. 1 root root 1332 Mar  7 03:09 jabber_register.xml

-rw-r--r--. 1 root root 2762 Mar  7 03:09 jabber_roster.xml

-rw-r--r--. 1 root root 4225 Mar  7 03:09 jabber.xml

-rw-r--r--. 1 root root 2506 Mar  7 03:09 ldap.xml

-rw-r--r--. 1 root root 1148 Mar  7 03:09 mysql.xml

-rw-r--r--. 1 root root 1833 Mar  7 03:09 pgsql.xml

-rw-r--r--. 1 root root 1211 Mar  7 03:09 thinks2.xml

-rw-r--r--. 1 root root 1221 Mar  7 03:09 thinks.xml
2、修改jabber_register.xml文件

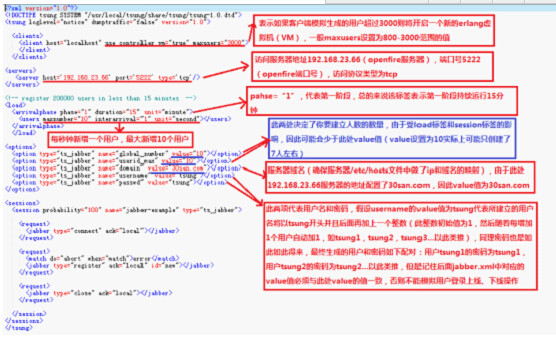
3、将修改后的jabber_register.xml放到/usr/local/tsung目录下
再进入tsung的bin目录下,找到tsung执行的shell脚本文件
[root@localhost examples]# cp jabber_register.xml /usr/local/tsung

[root@localhost examples]# cd /usr/local/tsung/bin

[root@localhost bin]#
4、执行tsung脚本以驱动执行我们修改好的jabber_register.xml脚本,实现向openfire添加用户
[root@localhost bin]#  ./tsung -f   /usr/local/tsung/jabber_register.xml start

Starting Tsung

"Log directory is: /root/.tsung/log/20150311-2253"
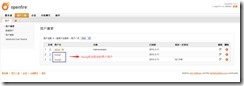
5、查看openfire
二、登陆用户模拟发送消息
利用jabber.xml模拟用户登录openfire后执行上线、离开、忙碌、下线、发送消息等操作
1、修改jabber.xml文件(存储路径/usr/local/tsung/share/doc/tsung/examples/)
a. 模拟用户上线、下线、发送消息的操作时jabber.xml配置如下:
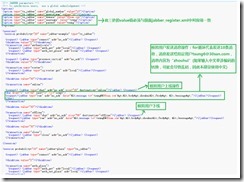
- 模拟上线与发消息脚本:
<transaction name="online"><request><jabber type="chat" ack="no_ack" size="16" destination="online"></jabber></request><request><jabber type="raw" ack="no_ack" data="<message to='admin@myopenfire'><body>zhouhui</body> </message>"></jabber></request></transaction>
- 模拟下线脚本:
<thinktime value="30"></thinktime><transaction name="offline"><request><jabber type="chat" ack="no_ack" size="56" destination="offline"></jabber></request><request><jabber type="raw" ack="no_ack" data="<message to='admin@myopenfire'><body>zhouhui</body> </message>"></jabber></request></transaction>
b.模拟用户含有可聊天、离开、忙碌状态时jabber.xml配置如下:
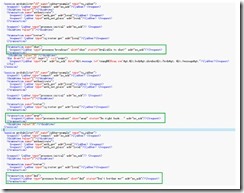
- 模拟空闲,可聊天状态脚本:
<transaction name="chat"><request><jabber type="presence:broadcast" show="chat" status="Avaliable to chat!" ack="no_ack"/></request></transaction>
- 模拟离开状态脚本:
<transaction name="away"><request><jabber type="presence:broadcast" show="away" status="Be right back ..." ack="no_ack"/></request></transaction>
- 模拟请勿打扰状态脚本:
<transaction name="dnd"><request><jabber type="presence:broadcast" show="dnd" status="Don't bother me!" ack="no_ack"/></request></transaction>
2、将修改后的jabber.xml放到/usr/local/tsung目录下
[root@localhost examples]# cp jabber.xml /usr/local/tsung

[root@localhost examples]# cd /usr/local/tsung/bin

[root@localhost bin]#
3、 执行jabber.xml模拟用户上线、下线、发送消息等操作
[root@localhost bin]#  ./tsung -f   /usr/local/tsung/jabber.xml start

Starting Tsung

"Log directory is: /root/.tsung/log/20150311-2331"
4、查看用户状态(登录openfire查看或者登录spark查看)
若要查看是否成功发送消息则要使用spark聊天工具(可以去openfire官网下载)
1)登录openfire查看:
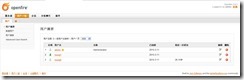
2)登录spark聊天工具查看
若使用spark查看其他人员状态时,必须人员双方相互注册为好友才能看到对方的状态变化,若仅验证消息接收,则无需注册好友
如:查看好友状态

三、生成报表
启动Tsung后,Tsung会输出log的存放路径
Starting Tsung

"Log directory is: /root/.tsung/log/20150311-2256"
1、等待测试完毕,进入log目录(只有输出了log日志才会自动log目录,默认路径:/root/.tsung/log)
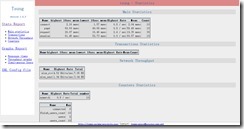
生成统计图表
[root@localhost bin]# cd /root/.tsung/log/-

[root@localhost -]#  /usr/local/tsung/lib/tsung/bin/tsung_stats.pl

creating subdirectory data

creating subdirectory gnuplot_scripts

creating subdirectory images

warn, last interval () not equal to the first, use the first one ()

No data for Event

No data for Async

No data for Errors
注意:一定要先进入log目录,才能生成统计图表。
2、查看统计图表
使用xftp工具,将/root/.tsung/log/20150311-2256目录下的统计图表文件report.html下载到本地的Windows操作系统上进行查看。
用IE或firefox等浏览器打开产生的html文件,就能查看本次测试的结果(参数含义见后面说明):
四、遇到的问题
1、 配置文件如果有问题或者运行中间强行关闭的情况下,有时会出现进程未关闭的情况,下次运行会出错,使用下面的命令看是否有未杀死的进程。
[root@localhost bin]# ps aux | grep erlang

root       0.0  0.0      ?        S    Mar10   : /usr/local/erlang/lib/erlang/erts-5.8./bin/epmd -daemon

root       0.0  0.0     pts/    S+   :   : grep erlang
http://172.16.34.11:9090/index.jsp
域名:Testopenfire.cn
http://172.16.34.15:9090/index.jsp
域名:testopenfire.cn
openfire:登录名:admin 密码:123456
数据库url jdbc:mysql://127.0.0.1:3306/openfire?
数据库登录名 root 密码123456
Tsung压力测试:Openfire的更多相关文章
- tsung -- 压力测试利器
Tsung 是一个压力测试工具,可以测试包括HTTP, WebDAV, PostgreSQL, MySQL, LDAP, and XMPP/Jabber等服务器.针对 HTTP 测试,Tsung 支持 ...
- tsung压力测试——tcp测试tsung.xml配置模版说明
<?xml version="1.0"?> <!DOCTYPE tsung SYSTEM "/usr/local/share/tsung/tsung-1 ...
- tsung压力测试——安装
在安装之前确保安装了以下工具: erlang 必须要有安装java环境,要不然不成功 yum install gcc yum install gcc-c++ yum install libtool y ...
- Tsung压力测试工具安装使用
工具安装 1)unixODBC ./configure; make; make install 或者yum安装 2)ncurses-devel ./configure; make; make inst ...
- tsung压力测试——Tsung测试统计报告说明【转】
1.主要统计信息 Tsung统计数据是平均每十秒重置一次,所以这里的响应时间(连接.请求.页面.会话)是指每十秒的平均响应时间: connect: 表示 每个连接持续时间: Hightest 10se ...
- tsung压力测试环境部署详细步骤(内附安装包)
操作系统: Redhat 6.3.Redhat6.5 .centos7.4(这些版本已验证过) tsung版本: tsung-1.6.0 下载地址: 链接: https://pan.baidu.com ...
- tsung 对 openfire 压力测试
tsung 对 openfire 压力测试 1. 参考 http://blog.csdn.net/foxisme2/article/details/7521139 http://blog.csdn ...
- LINUX 安装tsung 对OPENFIRE 进行压力测试
参考资料: http://www.centoscn.com/image-text/install/2014/0818/3503.html http://my.oschina.net/jieluck ...
- Tsung测试openfire服务器
环境准备 安装Tsung.安装openfire.安装Spark Tsung使用 要对openfire进行压力测试,因此我们主要讲解如何利用jabber_register.xml在openfire上面注 ...
随机推荐
- 修改http请求文件为本地文件的一种方法:hook InternetReadFile 和 HttpOpenRequest
今天没事的时候学了一下easyhook来hook本进程API,确实很简单就能hook.然后想到这个问题:替换webbrowser请求的文件为本地文件.有什么用就不说了,都懂.因为没有用API写过htt ...
- Bitcoin 涉及到的数据结构和算法分析
Bitcoin 2008 年中本聪提出 Bitcoin 的概念. 2009 年项目上线. 所有 coin 由 mining 产生,一共 2100 万枚.通过调整 difficulty, 确保每隔10m ...
- Linux学习笔记 -- 文件包含
简述 简单来讲,shell 中的文件包含指的是在一个文件中引用另外一个文件.通过这种方式,我们可以将一些公用的代码封装为一个独立的文件,并在需要的时候引用它即可. 语法 . filename # 注意 ...
- Spark-1.5.2安装--Standalone和Yarn
Spark Standalone 1.下载scala-2.10.6包解压到指定目录,添加环境变量 #SCALA VARIABLES START export SCALA_HOME=/usr/local ...
- 【洛谷】P2880 [USACO07JAN]平衡的阵容Balanced Lineup(st表)
题目背景 题目描述: 每天,农夫 John 的N(1 <= N <= 50,000)头牛总是按同一序列排队. 有一天, John 决定让一些牛们玩一场飞盘比赛. 他准备找一群在对列中为置连 ...
- C和指针 第三章--数据
简要概述: <C和指针>第三章对数据进行了描述. 其中主要讲解了---变量的三个属性:作用域.链接属性和存储类型. 这三个属性决定了该变量在“什么地方可以使用”以及“该变量的值能够保持多久 ...
- nginx的下载和安装
安装 下载必要组件 nginx下载地址 http://nginx.org/en/download.html pcre库下载地址,nginx需要[解析正则] http://sourceforge.ne ...
- linux中find工具
find 由于find具有强大的功能,所以它的选项也很多,其中大部分选项都值得我们花时间来了解一下.即使系统中含有网络文件系统( NFS),find命令在该文件系统中同样有效,只要你具有相应的权限. ...
- ecshop if多条件语句写法
smarty中的if语句和php中的if语句一样,if必须与/if成对出现.可以使用else和elseif子句. 可以使用条件修饰词:eq.ne.neq.gt.lte.le.gte.ge.is eve ...
- 【Django】uWSGI和Gunicorn【转】
因为nginx等优秀的开源项目,有不少本来不是做服务器的同学也可以写很多服务器端的程序了.但是在聊天中会发现,大家虽然写了不少代码,但是对wsgi是什么,gunicorn是什么,反向代理又是什么并不了 ...