python学习14-模块
引入模块的方式:
1. import 模块
2. from xxx import 模块
一、collections 模块
1.Counter()
counter是一个计数器,主要用来计数,计算一个字符串中每个字符出现的次数
from collections import Counter
s = "我要从南走到北,还要从北走到南"
ret = Counter(s)
print("__iter__" in dir(ret))
for item in ret:
print(item,ret[item])
counter

1 from collections import Counter

2 s = "我要从南走到北,还要从北走到南"

3

4 ret  = Counter(s)

5 print("__iter__" in dir(ret))

6

7 for item in ret:

8     print(item,ret[item])
#补充
栈:先进后出
队列:先进先出
由于python没有给出Stack模块. 我们可以自己动写个粗略版本来模拟栈的工作过程(注意, 此版本有严重的并发问题)
#栈 先进后出
class StackFullErro(Exception):
pass
class StackEmptyErro(Exception):
pass
class Stack:
def __init__(self,size):
self.size = size
self.lst = []
self.index = 0
def push(self,item):
if self.index == self.size:
raise StackFullErro("the Stack is full")
self.lst.insert(self.index,item)
self.index +=1
def pop(self):
if self.index == 0:
raise StackEmptyErro('the stack is empty')
self.index -= 1
item = self.lst.pop(self.index)
return item
s = Stack(4)
s.push('1')
s.push('2')
s.push('3')
s.push('4')
# s.push('5')
# s.push('6')
print(s.pop())
print(s.pop())
print(s.pop())
print(s.pop())
# print(s.pop())
结果:
4
3
2
1
栈
 1 #栈 先进后出

 2 class StackFullErro(Exception):

 3     pass

 4

 5 class StackEmptyErro(Exception):

 6     pass

 7

 8 class Stack:

 9     def __init__(self,size):

10         self.size = size

11         self.lst = []

12         self.index = 0

13

14     def push(self,item):

15         if self.index == self.size:

16             raise StackFullErro("the Stack is full")

17         self.lst.insert(self.index,item)

18         self.index +=1

19

20     def pop(self):

21         if self.index == 0:

22             raise StackEmptyErro('the stack is empty')

23         self.index -= 1

24         item = self.lst.pop(self.index)

25         return item

26

27 s = Stack(4)

28 s.push('1')

29 s.push('2')

30 s.push('3')

31 s.push('4')

32 # s.push('5')

33 # s.push('6')

34 print(s.pop())

35 print(s.pop())

36 print(s.pop())

37 print(s.pop())

38 # print(s.pop())

39

40 结果:

41 4

42 3

43 2

44 1
对于队列,python提供了queue模块
import queue #队列模块
q = queue.Queue()
q.put('李')
q.put('嘉')
q.put('家')
q.put('欣')
print(q.get())
print(q.get())
print(q.get())
print(q.get()) #最后一个
# print(q.get()) #拿完了,再拿程序就会阻塞
print('拿完了')
print(dir(queue))
#双向对列
q2 = queue.deque() #创建对象
q2.append("李") #在右边添加
q2.appendleft("嘉") #在左边添加
# print(q2.pop()) #从右边拿
# print(q2.pop())
print(q2.popleft()) #从左边拿
print(q2.popleft())
queue模块
 1 import queue  #队列模块

 2

 3 q = queue.Queue()

 4 q.put('李')

 5 q.put('嘉')

 6 q.put('家')

 7 q.put('欣')

 8

 9 print(q.get())

10 print(q.get())

11 print(q.get())

12 print(q.get()) #最后一个

13 # print(q.get())  #拿完了,再拿程序就会阻塞

14 print('拿完了')

15 print(dir(queue))

16

17 #双向对列

18 q2 = queue.deque()  #创建对象

19 q2.append("李")  #在右边添加

20 q2.appendleft("嘉")  #在左边添加

21

22 # print(q2.pop())  #从右边拿

23 # print(q2.pop())

24

25 print(q2.popleft())  #从左边拿

26 print(q2.popleft())
2、deque()
创建双向队列
from collections import deque

q = deque()  #创建双向队列对象

q.append("盖伦")

q.append('皇子')

q.append('赵信')

q.appendleft('德玛西亚之力')

q.appendleft('嘉文')

q.appendleft('德邦总管')

#  德邦 嘉文 德玛 盖伦 皇子 赵信

# print(q.pop())

# print(q.pop())

# print(q.pop())

print(q.popleft())

print(q.popleft())

print(q.popleft())

print(q.popleft())
collections里的deque
from collections import deque
q = deque() #创建双向队列对象 q.append("盖伦")
q.append('皇子')
q.append('赵信')
q.appendleft('德玛西亚之力')
q.appendleft('嘉文')
q.appendleft('德邦总管')
# 德邦 嘉文 德玛 盖伦 皇子 赵信 # print(q.pop())
# print(q.pop())
# print(q.pop())
print(q.popleft())
print(q.popleft())
print(q.popleft())
print(q.popleft())
3、namedtuple
命名元组,就是给元组内的元素进行命名
from collections import namedtuple
point = namedtuple("点",['x','y','z']) #相当于写了一个类
# print(namedtuple.__doc__) #Returns a new subclass of tuple with named fields.
p = point(5,2,1) #相当于创建对象
print(p.x) #5
print(p.y) #2
print(p.z) #1
print(p) #点(x=5, y=2, z=1) 给元组中每个元素命名了
namedtuple
 1 from collections import namedtuple

 2

 3 point = namedtuple("点",['x','y','z'])  #相当于写了一个类

 4 # print(namedtuple.__doc__)  #Returns a new subclass of tuple with named fields.

 5 p = point(5,2,1)  #相当于创建对象

 6

 7 print(p.x)  #5

 8 print(p.y)  #2

 9 print(p.z)  #1

10 print(p)  #点(x=5, y=2, z=1)   给元组中每个元素命名了
4、OrderedDict
排序字典,按我们存储的顺序给字典排序
1 dic = {'a':'娃哈哈', 'b':'薯条', 'c':'胡辣汤'}   #无序的

2 print(dic)

3

4 from collections import OrderedDict

5 od = OrderedDict({'a':'娃哈哈', 'b':'薯条', 'c':'胡辣汤'})  #排序的

6 print(od)
1 dic = {'a':'娃哈哈', 'b':'薯条', 'c':'胡辣汤'}   #无序的

2 print(dic)

3

4 from collections import OrderedDict

5 od = OrderedDict({'a':'娃哈哈', 'b':'薯条', 'c':'胡辣汤'})  #排序的

6 print(od)
5、defaultdict
默认值字典,查找key时,如果key不存在会返回一个默认值
from collections import defaultdict
lst = [11,22,33,44,55,66,77,88,99]
d = defaultdict(list) #当查找的key不存在时返回一个[],并将key添加到d中,所以参数必须是可调用的
#这相当于给每个key都有一个默认值[]
for el in lst:
if el <66:
d["key1"].append(el) #key1 不存在,将key1添加到字典d中,并且默认值时[],然后再往列表中添加元素
else:
d["key2"].append(el)
print(d)
def fun():
return "胡辣汤"
d2 = defaultdict(fun) #参数要callable
print(d2["key1"])
默认值字典
 1 from collections import defaultdict

 2

 3 lst = [11,22,33,44,55,66,77,88,99]

 4

 5 d = defaultdict(list)  #当查找的key不存在时返回一个[],并将key添加到d中,所以参数必须是可调用的

 6                        #这相当于给每个key都有一个默认值[]

 7

 8 for el in lst:

 9     if el <66:

10         d["key1"].append(el)  #key1 不存在,将key1添加到字典d中,并且默认值时[],然后再往列表中添加元素

11     else:

12         d["key2"].append(el)

13

14 print(d)

15

16 def fun():

17     return  "胡辣汤"

18 d2 = defaultdict(fun)   #参数要callable

19 print(d2["key1"])
二、time模块
日期格式化的标准:(记到秒就行,其他看看)
%y 两位数的年份表示(00-99)
%Y 四位数的年份表示(000-9999)
%m 月份(01-12)
%d 月内中的一天(0-31)
%H 24小时制小时数(0-23)
%I 12小时制小时数(01-12)
%M 分钟数(00=59)
%S 秒(00-59)
%a 本地简化星期名称
%A 本地完整星期名称
%b 本地简化的月份名称
%B 本地完整的月份名称
%c 本地相应的日期表示和时间表示
%j 年内的一天(001-366)
%p 本地A.M.或P.M.的等价符
%U 一年中的星期数(00-53)星期天为星期的开始
%w 星期(0-6),星期天为星期的开始
%W ⼀年中的星期数(00-53)星期一为星期的开始
%x 本地相应的日期表示
%X 本地相应的时间表示
%Z 当前时区的名称
%% %号本身
time模块的方法:
时间戳 = time.time() 看当前的时间戳
格式化时间 = time.strftime(格式) 把时间戳转为格式化形式
结构化时间 = time.localtime(时间戳) 将时间戳按当地时间结构化
结构化时间 = time.gmtime(时间戳) 将时间戳按格林尼治时间结构化
结构化时间 = time.strptime(s,格式) 把格式化时间转为结构化形式
时间戳 = time.mktime(结构化) 把结构化时间转为时间戳
#将时间戳格式化为当地时间
1 import time

2

3 t = time.localtime(1888888)  #时间戳转为当地结构化时间

4 # print(t)

5 str_time = time.strftime("%Y-%m-%d %H:%M:%S",t)

6 print(str_time)
1 import time

2

3 t = time.localtime(1888888)  #时间戳转为当地结构化时间

4 # print(t)

5 str_time = time.strftime("%Y-%m-%d %H:%M:%S",t)

6 print(str_time)
#将格式化时间转化为时间戳
1 s = time.strftime("%Y-%m-%d %H:%M:%S")  #按这种格式产生一个格式化时间

2 #print(s)

3 jiegou_time = time.strptime(s, "%Y-%m-%d %H:%M:%S") #按对应格式解构

4 #print(jiegou_time)

5 ss = time.mktime(jiegou_time)   #将结构化时间转为时间戳

6 print(ss)
1 s = time.strftime("%Y-%m-%d %H:%M:%S")  #按这种格式产生一个格式化时间

2 #print(s)

3 jiegou_time = time.strptime(s, "%Y-%m-%d %H:%M:%S") #按对应格式解构

4 #print(jiegou_time)

5 ss = time.mktime(jiegou_time)   #将结构化时间转为时间戳

6 print(ss)
#计算时间差
方式一:
import time
str1 ="2018-11-14 12:24:00"
str2 = "2018-11-14 14:58:03"
def diff_time(str1,str2): #传入格式化时间
time_stamp1 = time.mktime(time.strptime(str1,"%Y-%m-%d %H:%M:%S")) #对应时间戳
time_stamp2 = time.mktime(time.strptime(str2,"%Y-%m-%d %H:%M:%S"))
cha =abs(time_stamp2 - time_stamp1)
shi, n = divmod(cha, 3600)
fen, miao = divmod(n, 60)
print("%s时:%s分:%s秒"%(int(shi), int(fen), int(miao)))
diff_time(str1,str2)
 1 import time

 2

 3 str1 ="2018-11-14 12:24:00"

 4 str2 = "2018-11-14 14:58:03"

 5

 6 def diff_time(str1,str2):  #传入格式化时间

 7

 8     time_stamp1 = time.mktime(time.strptime(str1,"%Y-%m-%d %H:%M:%S"))  #对应时间戳

 9     time_stamp2 = time.mktime(time.strptime(str2,"%Y-%m-%d %H:%M:%S"))

10     cha =abs(time_stamp2 - time_stamp1)

11     shi, n = divmod(cha, 3600)

12     fen, miao = divmod(n, 60)

13     print("%s时:%s分:%s秒"%(int(shi), int(fen), int(miao)))

14

15 diff_time(str1,str2)
方式二:
import time
str1 ="2018-11-14 12:24:00"
str2 = "2018-11-14 14:58:03"
g1 = time.strptime(str1,"%Y-%m-%d %H:%M:%S")
chuo1 = time.mktime(g1) #转成对应时间戳
g2 = time.strptime(str2,"%Y-%m-%d %H:%M:%S")
chuo2 = time.mktime(g2)
cha = abs(chuo2-chuo1) #时间戳之差,秒
s = time.gmtime(cha) #将差转为结构化时间
# print(s)
#减去起点时间
year = s.tm_year - 1970
month = s.tm_mon -1
day = s.tm_mday - 1
hour = s.tm_hour - 0
min = s.tm_min -0
second = s.tm_sec -0
print("%s-%s-%s %s:%s:%s" %(year,month,day,hour,min,second))
 1 import time

 2 str1 ="2018-11-14 12:24:00"

 3 str2 = "2018-11-14 14:58:03"

 4

 5 g1 = time.strptime(str1,"%Y-%m-%d %H:%M:%S")

 6 chuo1 = time.mktime(g1)   #转成对应时间戳

 7

 8 g2 = time.strptime(str2,"%Y-%m-%d %H:%M:%S")

 9 chuo2 = time.mktime(g2)

10

11 cha = abs(chuo2-chuo1)  #时间戳之差,秒

12 s = time.gmtime(cha)   #将差转为结构化时间

13 # print(s)

14 #减去起点时间

15 year = s.tm_year - 1970

16 month = s.tm_mon -1

17 day = s.tm_mday - 1

18 hour = s.tm_hour - 0

19 min = s.tm_min -0

20 second = s.tm_sec -0

21

22 print("%s-%s-%s %s:%s:%s" %(year,month,day,hour,min,second))
三、random模块
产生随机数
import random
print(random.random()) # 0-1小数 (0, 1)
print(random.uniform(3, 10)) # 3-10小数(3,10)
print(random.randint(1, 10)) # 1-10整数 [1, 10]
print(random.randrange(1, 10, 2)) # 1-10奇数 [1,10)
print(random.choice([1, '周杰伦', ["盖伦", "胡辣汤"]])) # 从列表中随机选一个
print(random.sample([1, '23', [4, 5]], k)) # 列表元素随机选k个
lst = [1, 2, 3, 4, 5, 6, 7, 8]
random.shuffle(lst) # 随机打乱顺序
print(lst)
四、os模块
os.makedirs('dirname1/dirname2') 可生成多层递归目录
os.removedirs('dirname1') 若目录为空,则删除,并递归到上一级目录,如若也为空,则删 除,依此类推
os.mkdir('dirname') 生成单级目录;相当于shell中mkdir dirname
os.rmdir('dirname') 删除单级空目录,若目录不为空则无法删除,报错;相当于shell中 rmdir dirname
os.listdir('dirname') 列出指定目录下的所有文件和子目录,包括隐藏文件,并以列表形式 打印
os.remove() 删除一个文件
os.rename("oldname","newname") 重命名文件/目录
os.stat('path/filename') 获取文件/目录信息
os.system("bash command") 运行shell命令,直接显示
os.popen("bash command).read() 运行shell命令,获取执行结果
os.getcwd() 获取当前工作目录,即当前python脚本工作的目录路径
os.chdir("dirname") 改变当前脚本工作目录;相当于shell下cd
#os.path
os.path.abspath(path) 返回path规范化的绝对路径
os.path.split(path) 将path分割成目录和文件名二元组返回
os.path.dirname(path) 返回path的目录。其实就是os.path.split(path)的第一个元素
os.path.basename(path) 返回path最后的文件名。如果path以/或 \ 结尾,那么就会返回空值。 即os.path.split(path)的第二个元素
os.path.exists(path) 如果path存在,返回True;如果path不存在,返回False
os.path.isabs(path) 如果path是绝对路径,返回True
os.path.isfile(path) 如果path是一个存在的文件,返回True。否则返回False
os.path.isdir(path) 如果path是一个存在的目录,则返回True。否则返回False
os.path.join(path1[, path2[, ...]]) 将多个路径组合后返回,第一个绝对路径之前的参数 将被忽略
os.path.getatime(path) 返回path所指向的文件或者目录的最后访问时间
os.path.getmtime(path) 返回path所指向的文件或者目录的最后修改时间
os.path.getsize(path) 返回path的大小
# 特殊属性:
os.sep 输出操作系统特定的路径分隔符,win下为"\\",Linux下为"/"
os.linesep 输出当前平台使用的行终止符,win下为"\r\n",Linux下为"\n"
os.pathsep 输出用于分割文件路径的字符串 win下为;,Linux下为:
os.name 输出字符串指示当前使用平台。win->'nt' ; Linux->'posix'
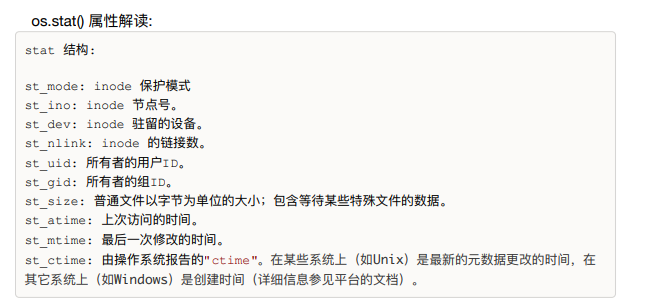
#os.stat的属性:
五、sys模块
所有和python解释器相关的都在sys模块.
sys.argv 命令行参数List,第一个元素是程序本身路径
sys.exit(n) 退出程序,正常退出时exit(0),错误退出sys.exit(1)
sys.version 获取Python解释程序的版本信息
sys.path 返回模块的搜索路径,初始化时使用PYTHONPATH环境变量的值
sys.platform 返回操作系统平台名称
python学习14-模块的更多相关文章
- Python学习--Selenium模块
1. Python学习--Selenium模块介绍(1) 2.Python学习--Selenium模块学习(2) 其他: 1. Python学习--打码平台
- Python学习--Selenium模块学习(2)
Selenium的基本操作 获取浏览器驱动寻找方式 1. 通过手动指定浏览器驱动路径2. 通过 `$PATH`环境变量找寻浏览器驱动 可参考Python学习--Selenium模块简单介绍(1) 控制 ...
- Python学习---重点模块的学习【all】
time [时间模块] import time # print(help(time)) # time模块的帮助 print(time.time()) # 时间戳 print(time.cloc ...
- Python学习之模块进程函数详解
今天在看<Beginning Linux Programming>中的进程相关部分,讲到Linux几个进程相关的系统函数: system , exec , fork ,wait . Pyt ...
- python学习——常用模块
在学习常用模块时我们应该知道模块和包是什么,关于模块和包会单独写一篇随笔,下面先来了解有关在python中的几个常用模块. 一.什么是模块 常见的场景:一个模块就是一个包含了python定义和声明的文 ...
- Python学习之模块基础
模块就是程序 编写以下简单代码 print('hello python') 并将py文件保存在c盘的python(假设新建)文件下,通过pycharm的Terminal 或者windom命令窗口调出p ...
- 【Python】Python学习----第一模块笔记
1.python是什么? python是动态解释型的强类型定义语言. python官方版本的解释器是CPython.该解释器使用C语言开发. 当前主要使用3.x版本的python. 2.第一个pyth ...
- python学习之模块导入,操作邮件,redis
python基础学习06 模块导入 导入模块的顺序 1.先从当前目录下找 2.当前目录下找不到,再从环境变量中找,如果在同时在当前目录和环境变量中建立相同的py文件,优先使用当前目录下的 导入模块的实 ...
- Python学习——struct模块的pack、unpack示例
he struct module includes functions for converting between strings of bytes and native Python data t ...
- python学习day15 模块(重点)
模块(重点) python2,与py3的区别 py2:range() 在内存中立即把所有的值都创建,xrange() 不会再内存中立即创建,而是在循环时边环边创建. py3:range() 不会再内存 ...
随机推荐
- Ubuntu下安装配置ScrumWorks
1) 安装JDK6 Ubuntu默认的是OpenJDK,而ScrumWorks不支持使用OpenJDK哦,一次必须装个Oracle的JDK6 2) 下载安装Mysql5 http://dev.my ...
- VS2012用正则表达式统计行数
使用正则表达式: b*[^:b#/]+.*$
- windows7配置git 免密码登录git服务器
1.在桌面右击“Git Bash Here ” 2.输入:cd ~/.ssh/ 3.输入你的git服务器的用户 git config --global user.name "xx" ...
- Firefox 43无法安装xpi的问题
Firefox 43无法安装xpi的问题 说明:Firefox 42将默认禁止安装未签名扩展 强制禁用这个首选项(高级用户): 你可以在 Firefox 配置编辑页面 (about:config ...
- ZooKeeper-3.4.10分布式安装指南
目录 目录 1 1. 前言 1 2. 约定 1 3. 安装步骤 2 3.1. 配置/etc/hosts 2 3.2. 设置myid 2 3.3. 修改conf/zoo.cfg 2 3.4. 修改/bi ...
- 通过面试题学习零散知识:Java面试题整理
一.如何看待面试题 对于喜欢学习的开发者来说,我们抛开工作和生活的时间,剩余的时间并不多,如果都用于学习的话,也不可能学的下所有感兴趣的技术点,精力也跟不上,我是深感如是.而面试题一般都是零碎的知识 ...
- 【小梅哥FPGA进阶教程】串口发送图片数据到SRAM在TFT屏上显示
十五.串口发送图片数据到SRAM在TFT屏上显示 之前分享过rom存储图片数据在TFT屏上显示,该方法只能显示小点的图片,如果想显示TFT屏幕大小的图片上述方法rom内存大小不够.小梅哥给了个方案,利 ...
- Linux删除(清空)正在运行的应用日志文件内容
在测试环境定位问题时,如果发现日志文件内容太多或太大,有时需要删除该日志,如Tomcat,Nginx日志.以前每次都是先rm -rf ***.log,然后重启应用.直到后来发现了以下命令,原来可以不用 ...
- java学习(五)java类继承
1.制作一个工具类的文档 javadoc -d 目录 -author -version arrayTool.java 实例: class arrayDemo { public static voi ...
- Android-ListView-(BaseAdapter初步)
在Android中就提供了专门列表显示条目的控件,ListView控件,ListView控件不是一次性加载全部数据,他是只加载用户在屏幕看得到的数据,当用户滑动的过程中在去加载新的数据,同时会自动销毁 ...