
简单机器学习人脸识别工具face-recognition python小试,一行代码实现人脸识别
环境要求:
环境搭建:
1. 安装 Ubuntu17.10 > 安装步骤在这里
2. 安装 Python2.7.14 (Ubuntu17.10 默认Python版本为2.7.14)
3. 安装 git 、cmake 、 python-pip
# 安装 git

$ sudo apt-get install -y git

# 安装 cmake

$ sudo apt-get install -y cmake

# 安装 python-pip

$ sudo apt-get install -y python-pip
4. 安装编译dlib
安装face_recognition这个之前需要先安装编译dlib
# 编译dlib前先安装 boost

$ sudo apt-get install libboost-all-dev

# 开始编译dlib

# 克隆dlib源代码

$ git clone https://github.com/davisking/dlib.git

$ cd dlib

$ mkdir build

$ cd build

$ cmake .. -DDLIB_USE_CUDA=0 -DUSE_AVX_INSTRUCTIONS=1

$ cmake --build .(注意中间有个空格)

$ cd ..

$ python setup.py install --yes USE_AVX_INSTRUCTIONS --no DLIB_USE_CUDA
5. 安装 face_recognition
# 安装 face_recognition

$ pip install face_recognition

# 安装face_recognition过程中会自动安装 numpy、scipy 等
环境搭建完成后,在终端输入 face_recognition 命令查看是否成功
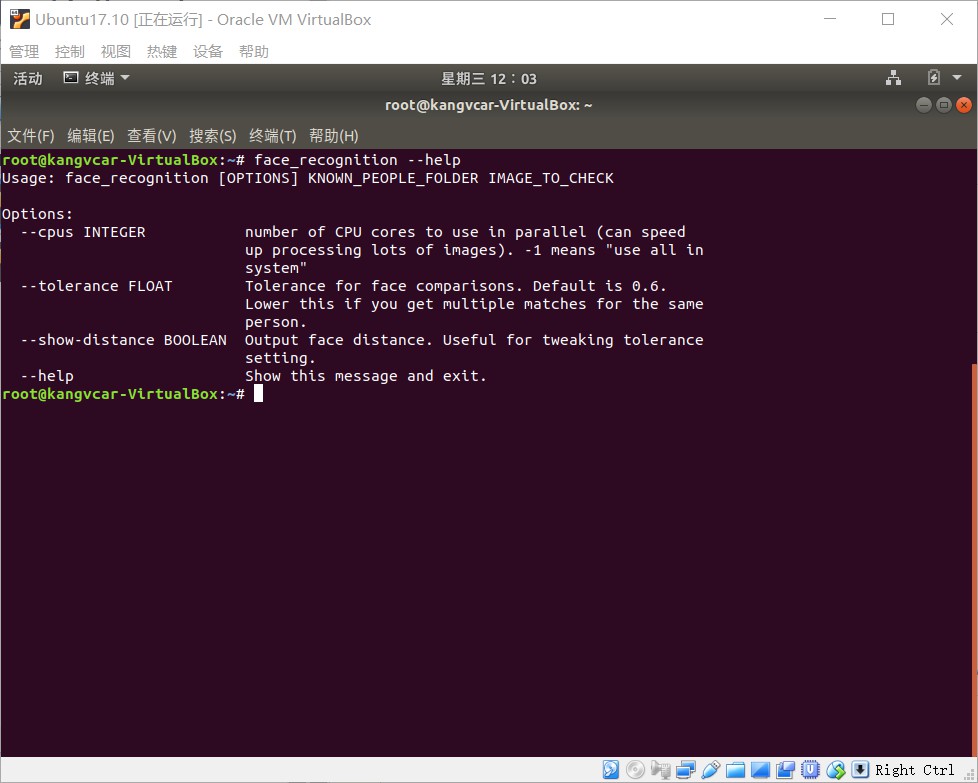
实现人脸识别:
示例一(1行代码实现人脸识别):
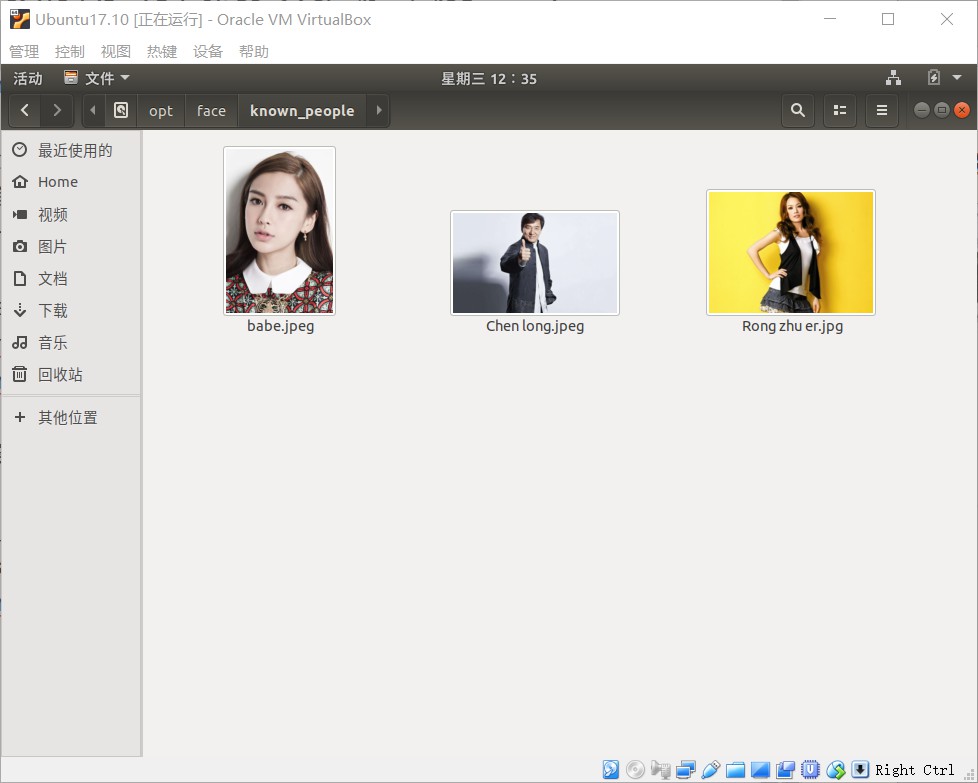
1. 首先你需要提供一个文件夹,里面是所有你希望系统认识的人的图片。其中每个人一张图片,图片以人的名字命名:
known_people文件夹下有babe、成龙、容祖儿的照片
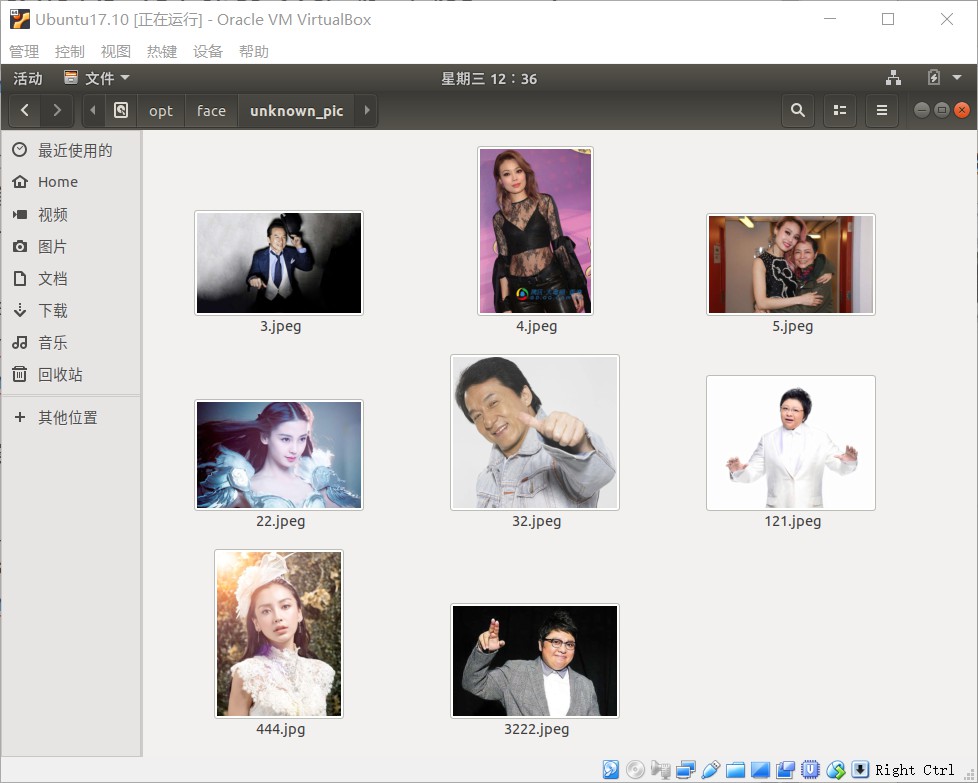
2. 接下来,你需要准备另一个文件夹,里面是你要识别的图片:
unknown_pic文件夹下是要识别的图片,其中韩红是机器不认识的
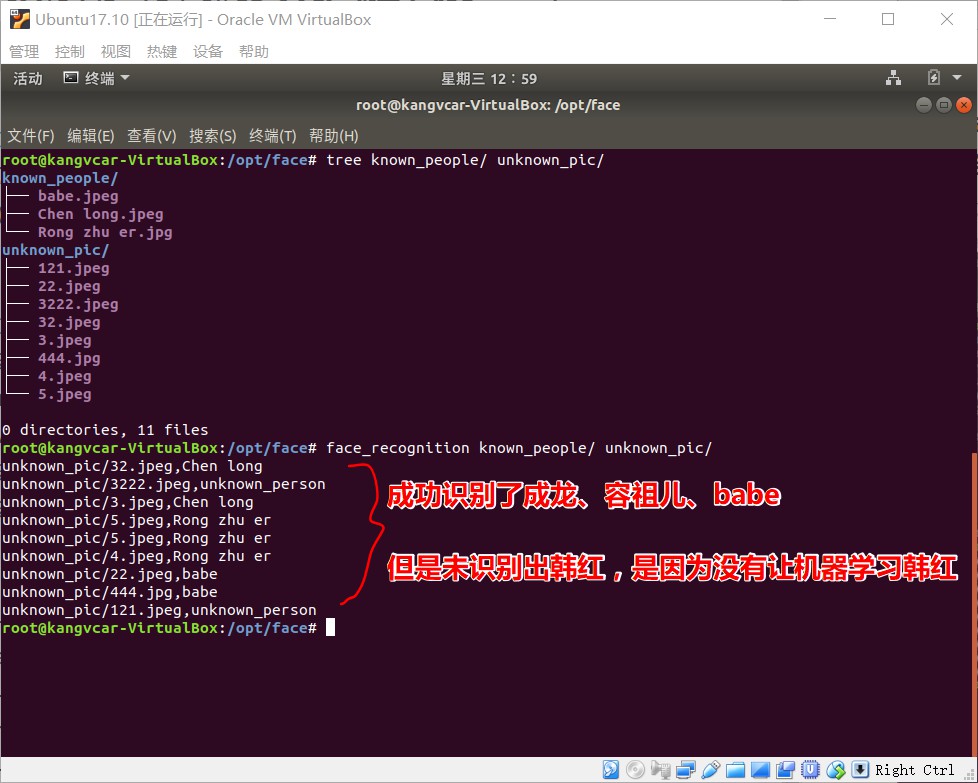
3. 然后你就可以运行face_recognition命令了,把刚刚准备的两个文件夹作为参数传入,命令就会返回需要识别的图片中都出现了谁:
识别成功!!!
示例二(识别图片中的所有人脸并显示出来):
# filename : find_faces_in_picture.py

# -*- coding: utf-8 -*-

# 导入pil模块 ,可用命令安装 apt-get install python-Imaging

from PIL import Image

# 导入face_recogntion模块,可用命令安装 pip install face_recognition

import face_recognition

# 将jpg文件加载到numpy 数组中

image = face_recognition.load_image_file("/opt/face/unknown_pic/all_star.jpg")

# 使用默认的给予HOG模型查找图像中所有人脸

# 这个方法已经相当准确了,但还是不如CNN模型那么准确,因为没有使用GPU加速

# 另请参见: find_faces_in_picture_cnn.py

face_locations = face_recognition.face_locations(image)

# 使用CNN模型

# face_locations = face_recognition.face_locations(image, number_of_times_to_upsample=0, model="cnn")

# 打印:我从图片中找到了 多少 张人脸

print("I found {} face(s) in this photograph.".format(len(face_locations)))

# 循环找到的所有人脸

for face_location in face_locations:

        # 打印每张脸的位置信息

        top, right, bottom, left = face_location

        print("A face is located at pixel location Top: {}, Left: {}, Bottom: {}, Right: {}".format(top, left, bottom, right))

        # 指定人脸的位置信息,然后显示人脸图片

        face_image = image[top:bottom, left:right]

        pil_image = Image.fromarray(face_image)

        pil_image.show()
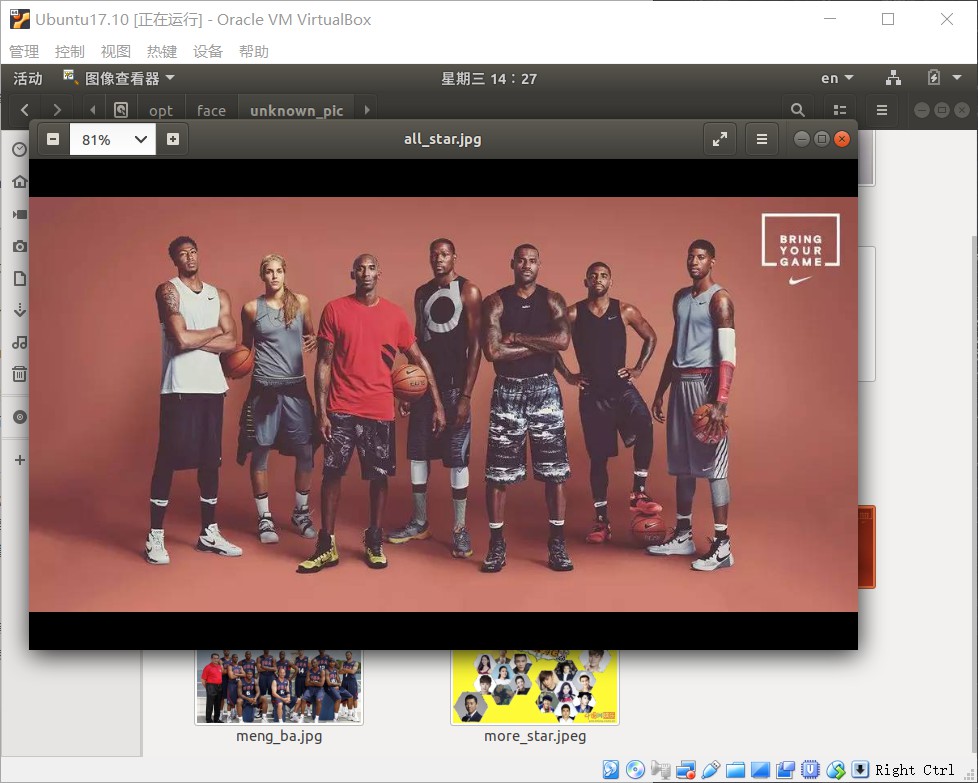
如下图为用于识别的图片
# 执行python文件

$ python find_faces_in_picture.py
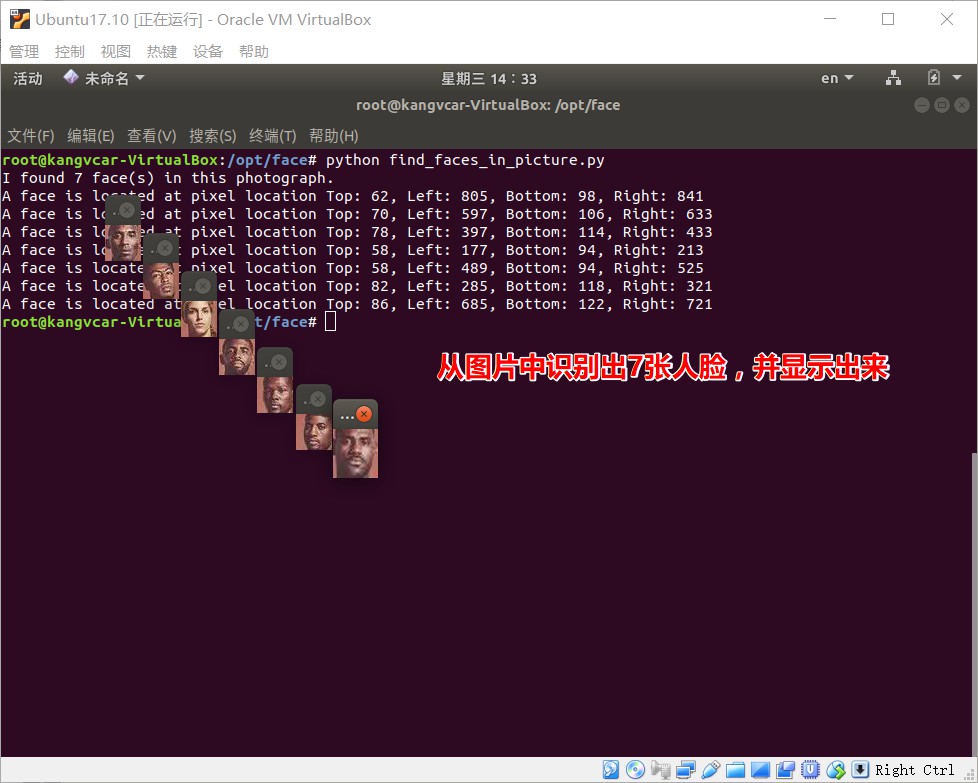
从图片中识别出7张人脸,并显示出来,如下图
示例三(自动识别人脸特征):
# filename : find_facial_features_in_picture.py

# -*- coding: utf-8 -*-

# 导入pil模块 ,可用命令安装 apt-get install python-Imaging

from PIL import Image, ImageDraw

# 导入face_recogntion模块,可用命令安装 pip install face_recognition

import face_recognition

# 将jpg文件加载到numpy 数组中

image = face_recognition.load_image_file("biden.jpg")

#查找图像中所有面部的所有面部特征

face_landmarks_list = face_recognition.face_landmarks(image)

print("I found {} face(s) in this photograph.".format(len(face_landmarks_list)))

for face_landmarks in face_landmarks_list:

   #打印此图像中每个面部特征的位置

    facial_features = [

        'chin',

        'left_eyebrow',

        'right_eyebrow',

        'nose_bridge',

        'nose_tip',

        'left_eye',

        'right_eye',

        'top_lip',

        'bottom_lip'

    ]

    for facial_feature in facial_features:

        print("The {} in this face has the following points: {}".format(facial_feature, face_landmarks[facial_feature]))

   #让我们在图像中描绘出每个人脸特征!

    pil_image = Image.fromarray(image)

    d = ImageDraw.Draw(pil_image)

    for facial_feature in facial_features:

        d.line(face_landmarks[facial_feature], width=5)

    pil_image.show()
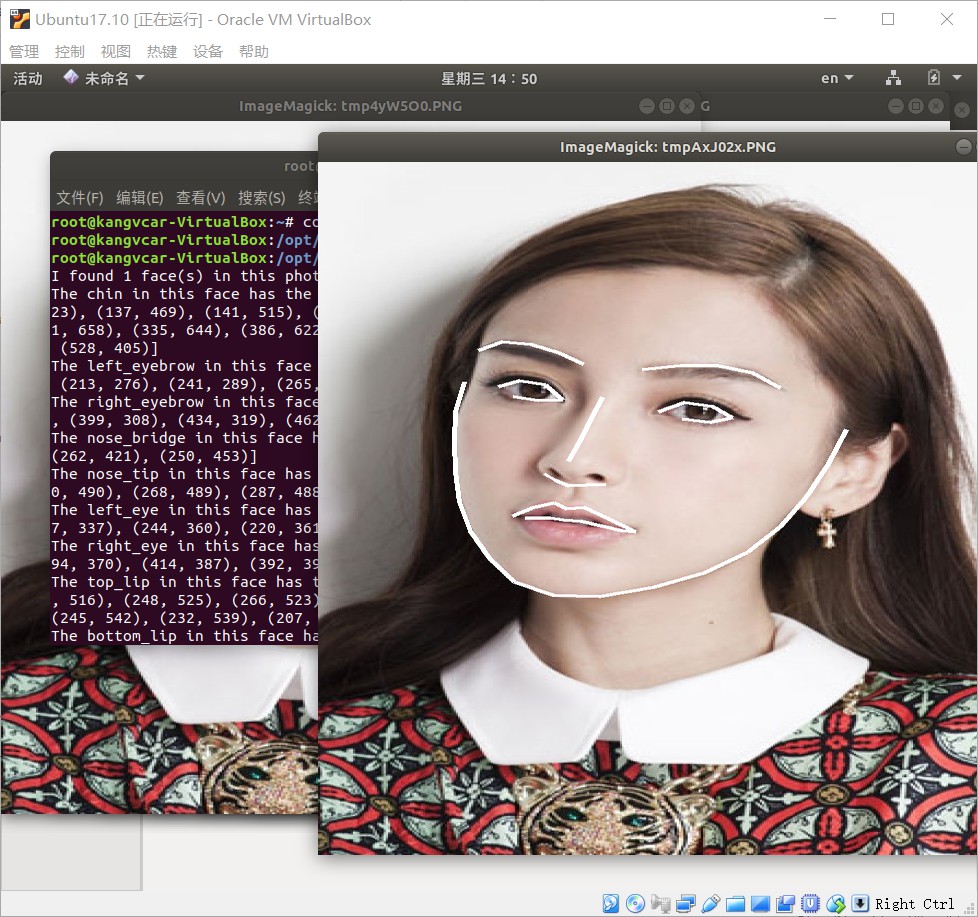
自动识别出人脸特征(轮廓)
示例四(识别人脸鉴定是哪个人):
# filename : recognize_faces_in_pictures.py

# -*- conding: utf-8 -*-

# 导入face_recogntion模块,可用命令安装 pip install face_recognition

import face_recognition

#将jpg文件加载到numpy数组中

babe_image = face_recognition.load_image_file("/opt/face/known_people/babe.jpeg")

Rong_zhu_er_image = face_recognition.load_image_file("/opt/face/known_people/Rong zhu er.jpg")

unknown_image = face_recognition.load_image_file("/opt/face/unknown_pic/babe2.jpg")

#获取每个图像文件中每个面部的面部编码

#由于每个图像中可能有多个面,所以返回一个编码列表。

#但是由于我知道每个图像只有一个脸,我只关心每个图像中的第一个编码,所以我取索引0。

babe_face_encoding = face_recognition.face_encodings(babe_image)[0]

Rong_zhu_er_face_encoding = face_recognition.face_encodings(Rong_zhu_er_image)[0]

unknown_face_encoding = face_recognition.face_encodings(unknown_image)[0]

known_faces = [

    babe_face_encoding,

    Rong_zhu_er_face_encoding

]

#结果是True/false的数组,未知面孔known_faces阵列中的任何人相匹配的结果

results = face_recognition.compare_faces(known_faces, unknown_face_encoding)

print("这个未知面孔是 Babe 吗? {}".format(results[0]))

print("这个未知面孔是 容祖儿 吗? {}".format(results[1]))

print("这个未知面孔是 我们从未见过的新面孔吗? {}".format(not True in results))
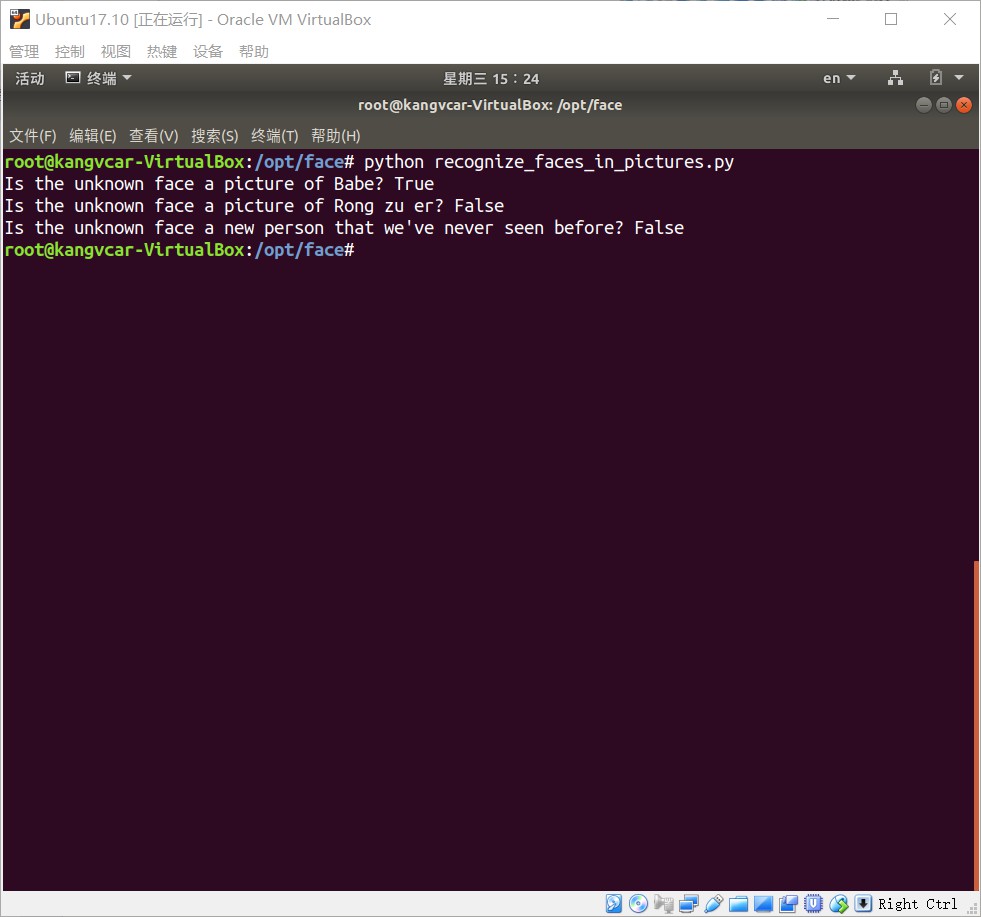
显示结果下如图
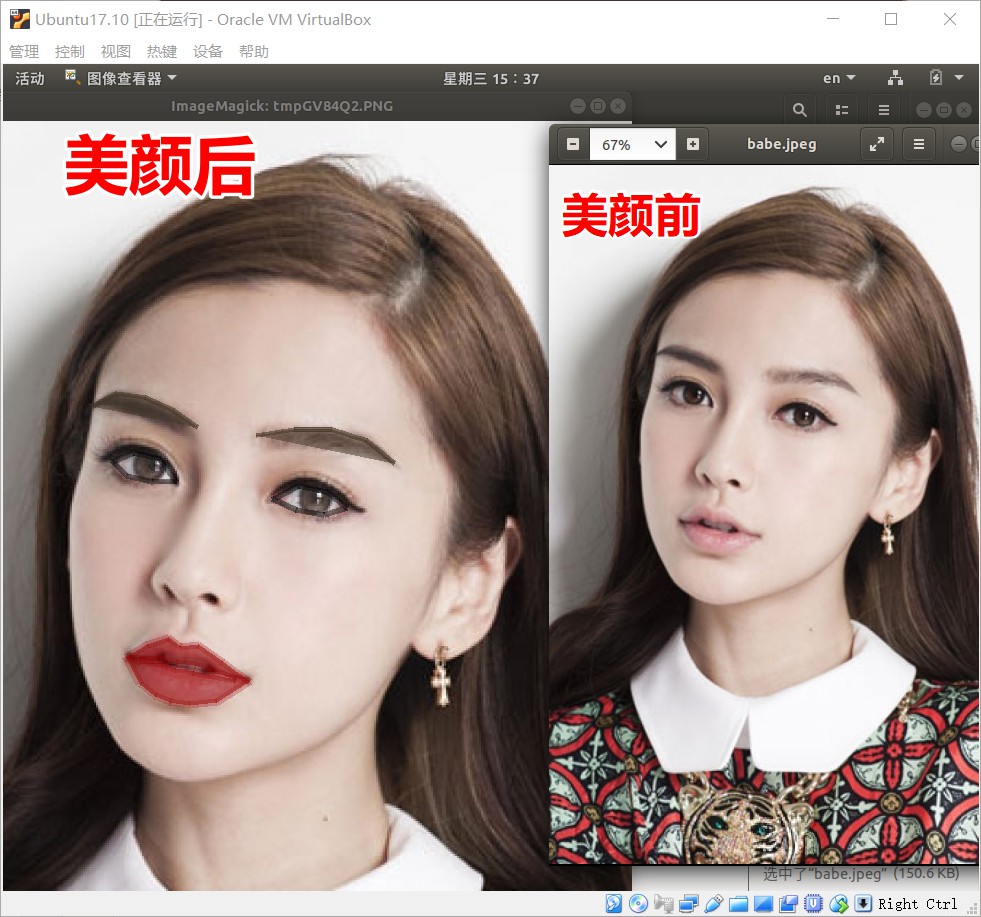
示例五(识别人脸特征并美颜):
# filename : digital_makeup.py

# -*- coding: utf-8 -*-

# 导入pil模块 ,可用命令安装 apt-get install python-Imaging

from PIL import Image, ImageDraw

# 导入face_recogntion模块,可用命令安装 pip install face_recognition

import face_recognition

#将jpg文件加载到numpy数组中

image = face_recognition.load_image_file("biden.jpg")

#查找图像中所有面部的所有面部特征

face_landmarks_list = face_recognition.face_landmarks(image)

for face_landmarks in face_landmarks_list:

    pil_image = Image.fromarray(image)

    d = ImageDraw.Draw(pil_image, 'RGBA')

    #让眉毛变成了一场噩梦

    d.polygon(face_landmarks['left_eyebrow'], fill=(68, 54, 39, 128))

    d.polygon(face_landmarks['right_eyebrow'], fill=(68, 54, 39, 128))

    d.line(face_landmarks['left_eyebrow'], fill=(68, 54, 39, 150), width=5)

    d.line(face_landmarks['right_eyebrow'], fill=(68, 54, 39, 150), width=5)

    #光泽的嘴唇

    d.polygon(face_landmarks['top_lip'], fill=(150, 0, 0, 128))

    d.polygon(face_landmarks['bottom_lip'], fill=(150, 0, 0, 128))

    d.line(face_landmarks['top_lip'], fill=(150, 0, 0, 64), width=8)

    d.line(face_landmarks['bottom_lip'], fill=(150, 0, 0, 64), width=8)

    #闪耀眼睛

    d.polygon(face_landmarks['left_eye'], fill=(255, 255, 255, 30))

    d.polygon(face_landmarks['right_eye'], fill=(255, 255, 255, 30))

    #涂一些眼线

    d.line(face_landmarks['left_eye'] + [face_landmarks['left_eye'][0]], fill=(0, 0, 0, 110), width=6)

    d.line(face_landmarks['right_eye'] + [face_landmarks['right_eye'][0]], fill=(0, 0, 0, 110), width=6)

    pil_image.show()
美颜前后对比如下图
简单机器学习人脸识别工具face-recognition python小试,一行代码实现人脸识别的更多相关文章
- Python人脸识别最佳教材典范,40行代码搭建人脸识别系统!
Face Id是一款高端的人脸解锁软件,官方称:"在一百万张脸中识别出你的脸."百度.谷歌.腾讯等各大企业都花费数亿来鞭策人工智能的崛起,而实际的人脸识别技术是否有那么神奇? 绿帽 ...
- 10 种机器学习算法的要点(附 Python 和 R 代码)
本文由 伯乐在线 - Agatha 翻译,唐尤华 校稿.未经许可,禁止转载!英文出处:SUNIL RAY.欢迎加入翻译组. 前言 谷歌董事长施密特曾说过:虽然谷歌的无人驾驶汽车和机器人受到了许多媒体关 ...
- python的__slots__节约内存的魔法;检查python每一行代码内存占用情况的工具
在Python中,每个类都有实例属性.默认情况下Python用一个字典来保存一个对象的实例属性.这非常有用,因为它允许我们在运行时去设置任意的新属性. 然而,对于有着已知属性的小类来说,它可能是个瓶颈 ...
- python:一行代码实现局域网共享文件
其实就是使用python内置的一个模块http server 在python2中是下面这样的 python -m SimpleHTTPServer 80 解释下上面的参数,-m表示让python使用一 ...
- python实战===一行代码就能搞定的事情!
打印9*9乘法表: >>> print( '\n'.join([' '.join(['%s*%s=%-2s' % (y,x,x*y) for y in range(1,x+1)]) ...
- Python之一行代码将网址URL转换成动态彩色二维码
先在 pycharm 安装 myqr.或者,Python3 必装,然后命令行 pip install myqr 也可. 将我的微信公众号网址:http://weixin.qq.com/r/hRMQC ...
- python截图+百度ocr(图片识别)+ 百度翻译
一直想用python做一个截图并自动翻译的工具,恰好最近有时间就在网上找了资料,根据资料以及自己的理解做了一个简单的截图翻译工具.整理一下并把代码放在github给大家参考.界面用python自带的G ...
- gotoscan:CMS指纹识别工具
gotoscan 前言 项目地址 https://github.com/newbe3three/gotoscan 结合自己学习到的Go相关知识,通过实现这个简易的CMS指纹识别工具来锻炼一下自己写代码 ...
- 【Python成长之路】装逼的一行代码:快速共享文件【华为云分享】
[写在前面] 有时候会与同事共享文件,正常人的操作是鼠标右键,点击共享.其实有个装逼的方法,用python的一行代码快速实现基于http服务的共享方式. [效果如下] [示例代码] 在cmd窗口进入想 ...
随机推荐
- spring 添加controller返回值绑定
@EnableWebMvc @Configuration public class Config { @Autowired private RequestMappingHandlerAdapter h ...
- 浅谈桶排思想及[USACO08DEC]Patting Heads 题解
一.桶排思想 1.通过构建n个空桶再将待排各个元素分配到每个桶.而此时有可能每个桶的元素数量不一样,可能会出现这样的情况:有的桶没有放任何元素,有的桶只有一个元素,有的桶不止一个元素可能会是2+: 2 ...
- Django之kindeditor
1.什么是kindeditor? KindEditor是一套开源的HTML可视化编辑器,主要用于让用户在网站上获得所见即所得编辑效果,兼容IE.Firefox.Chrome.Safari.Opera等 ...
- 在wamp下增加多版本的PHP(PHP5.3,PHP5.4,PHP5.5)支持
1.安装WAMPServer 根据自己的操作系统选择相应的WAMP版本,我这里选择WAMPSERVER-32 BITS & PHP 5.5-2.5, 双击安装,选择安装目录即可,超级简单.根据 ...
- GO-指针与函数
一.指针类型 1.普通类型,变量存的就是值,也叫值类型.指针类型存的是地址 2.获取变量的地址,用&,比如:var a int, 获取a的地址 &a 3.指针类型,变量存的是一个地址, ...
- mysql开启GTID跳过错误的方法【转】
1.数据库版本 MySQL> select version() -> ;+-------------------------------------------+| version( ...
- caffe Python API 之SoftmaxWithLoss
net.loss = caffe.layers.SoftmaxWithLoss(net.fc3, net.label) 输出: layer { name: "loss" type: ...
- java网络编程三次握手四次挥手
第一次握手:client设置syn=1,随机产生一个序列号seq=x,将数据包发送到server.client进入syn_send状态, 等待server确认. 第二次握手:server查看clien ...
- HDU 1358 Period(KMP计算周期)
题目链接:http://acm.hdu.edu.cn/showproblem.php?pid=1358 题目大意:给你一串字符串,判断字符串的前缀是否由某些字符串多次重复而构成. 也就是,从第1个字母 ...
- 父元素的mousedown事件上父元素的mousedown事件上的offsetX和offsetY错误的offsetX和offsetY错误
https://stackoverflow.com/questions/35360704/wrong-offsetx-and-offsety-on-mousedown-event-of-parent- ...