【java多线程】队列系统之LinkedBlockingDeque源码
1、简介
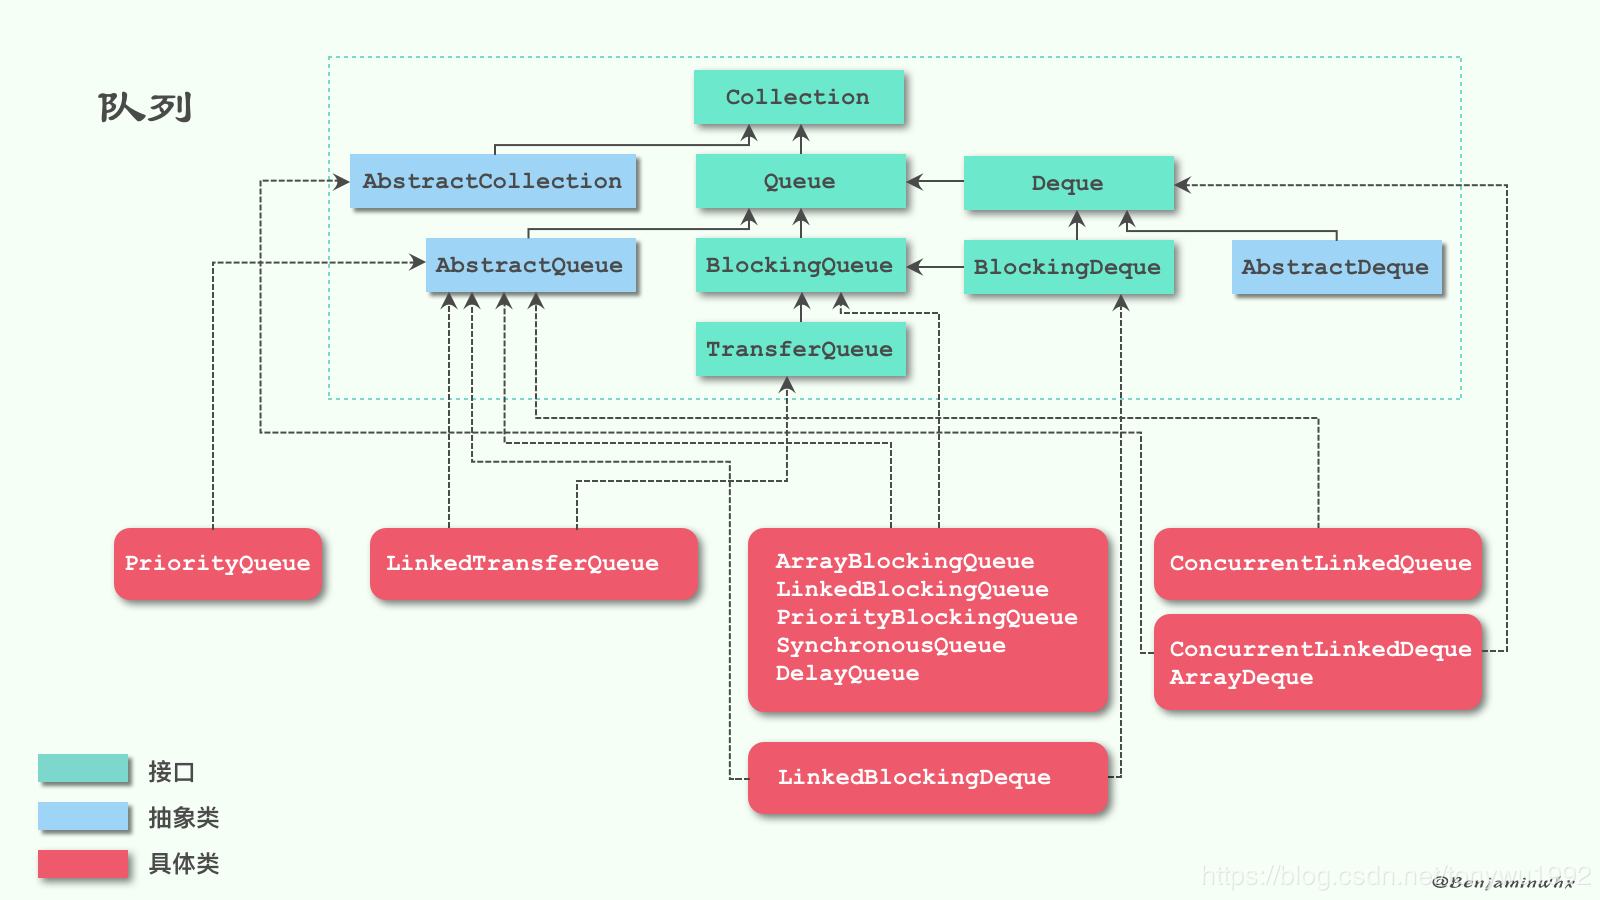
上一篇我们介绍了 LinkedBlockingDeque 的兄弟篇 LinkedBlockingQueue 。听名字也知道一个实现了 Queue 接口,一个实现了 Deque 接口,由于 Deque 接口又继承于 Queue ,所以 LinkedBlockingDeque 自然就有 LinkedBlockingQueue 的所有方法,并且还提供了双端队列的一些其他方法,不清除队列相关类的继承关系的童鞋,请移步看我之前的文章:说说队列Queue,下面的这张图就是该文章中的。
2、源码分析
2.1、属性
/**

 * 节点类,维护了前一个元素和后一个元素,用来存储数据

 */

static final class Node<E> {

    E item;

    Node<E> prev;

    Node<E> next;

    Node(E x) {

        item = x;

    }

}

/**

 * 阻塞队列的第一个元素的节点

 */

transient Node<E> first;

/**

 * 阻塞队列的尾节点

 */

transient Node<E> last;

/** 当前阻塞队列中的元素个数 */

private transient int count;

/** 阻塞队列的大小,默认为Integer.MAX_VALUE */

private final int capacity;

/** 所有访问元素时使用的锁 */

final ReentrantLock lock = new ReentrantLock();

/** 等待take的条件对象 */

private final Condition notEmpty = lock.newCondition();

/** 等待put的条件对象 */

private final Condition notFull = lock.newCondition();
由这些属性,我们可以和 LinkedBlockingQueue 进行对比。
首先是Node节点类,不同于 LinkedBlockingQueue 的单向链表,LinkedBlockingDeque 维护的是一个双向链表。
再来看count,这里是用int来进行修饰,而 LinkedBlockingQueue 确实用的AtomicInteger来修饰,这里这么做是因为 LinkedBlockingDeque 内部的每一个操作都共用一把锁,故能保证可见性。而 LinkedBlockingQueue 中维护了两把锁,在添加和移除元素的时候并不能保证双方能够看见count的修改,所以使用CAS来维护可见性。
2.2、构造函数
public LinkedBlockingDeque() {

    this(Integer.MAX_VALUE);

}

public LinkedBlockingDeque(int capacity) {

    if (capacity <= 0) throw new IllegalArgumentException();

    this.capacity = capacity;

}

public LinkedBlockingDeque(Collection<? extends E> c) {

    this(Integer.MAX_VALUE);

    final ReentrantLock lock = this.lock;

    lock.lock();

    try {

        for (E e : c) {

            if (e == null)

                throw new NullPointerException();

            if (!linkLast(new Node<E>(e)))

                throw new IllegalStateException("Deque full");

        }

    } finally {

        lock.unlock();

    }

}
构造函数几乎和 LinkedBlockingQueue 一样,不过少了一句 last = head = new Node<E>(null) 。因为这里不存在head节点了,而用first来代替。并且添加元素的方法也进行了重写来适应 Deque 的方法。
2.3、方法
LinkedBlockingQueue中有的方法该类中都会出现,无外乎多了队列的两端操作。这里为了方便,我会放在一起来进行说明。
2.3.1、入队方法
LinkedBlockingDeque提供了多种入队操作的实现来满足不同情况下的需求,入队操作有如下几种:
- add(E e)、addFirst(E e)、addLast(E e)
- offer(E e)、offerFirst(E e)、offerLast(E e)
- offer(E e, long timeout, TimeUnit unit)、offerFirst(E e, long timeout, TimeUnit unit)、offerLast(E e, long timeout, TimeUnit unit)
- put(E e)、putFirst(E e)、putLast(E e)
add相关的方法
public boolean add(E e) {

    addLast(e);

    return true;

}

public void addFirst(E e) {

    if (!offerFirst(e))

        throw new IllegalStateException("Deque full");

}

public void addLast(E e) {

    if (!offerLast(e))

        throw new IllegalStateException("Deque full");

}
add调用的其实是addLast方法,而addFirst和addLast都调用的offer的相关方法,这里直接看offer的方法。
offer相关的方法
public boolean offer(E e) {

    return offerLast(e);

}

public boolean offerFirst(E e) {

    if (e == null) throw new NullPointerException();

    Node<E> node = new Node<E>(e);

    final ReentrantLock lock = this.lock;

    lock.lock();

    try {

        return linkFirst(node);

    } finally {

        lock.unlock();

    }

}

public boolean offerLast(E e) {

    if (e == null) throw new NullPointerException();

    Node<E> node = new Node<E>(e);

    final ReentrantLock lock = this.lock;

    lock.lock();

    try {

        return linkLast(node);

    } finally {

        lock.unlock();

    }

}
很明显,加锁以后调用linkFirst和linkLast这两个方法。
private boolean linkFirst(Node<E> node) {

    if (count >= capacity)

        return false;

    Node<E> f = first;

    node.next = f;

    first = node;

    // 插入第一个元素的时候才需要把last指向该元素,后面所有的操作只需要把f.prev指向node

    if (last == null)

        last = node;

    else

        f.prev = node;

    ++count;

    notEmpty.signal();

    return true;

}

private boolean linkLast(Node<E> node) {

    if (count >= capacity)

        return false;

    Node<E> l = last;

    node.prev = l;

    last = node;

    if (first == null)

        first = node;

    else

        l.next = node;

    ++count;

    notEmpty.signal();

    return true;

}
下面给出两张图,都是队列为空的情况下,调用linkFirst和linkLast依次放入元素A和元素B的图:

offer的超时方法这里就不放出了,原理和 LinkedBlockingQueue 一样,利用了Condition的awaitNanos进行超时等待,并在外面用while循环控制等待时的中断问题。
put相关的方法
public void put(E e) throws InterruptedException {

    putLast(e);

}

public void putFirst(E e) throws InterruptedException {

    if (e == null) throw new NullPointerException();

    Node<E> node = new Node<E>(e);

    final ReentrantLock lock = this.lock;

    lock.lock();

    try {

        // 阻塞等待linkFirst成功

        while (!linkFirst(node))

            notFull.await();

    } finally {

        lock.unlock();

    }

}

public void putLast(E e) throws InterruptedException {

    if (e == null) throw new NullPointerException();

    Node<E> node = new Node<E>(e);

    final ReentrantLock lock = this.lock;

    lock.lock();

    try {

        // 阻塞等待linkLast成功

        while (!linkLast(node))

            notFull.await();

    } finally {

        lock.unlock();

    }

}
lock加锁后一直阻塞等待,直到元素插入到队列中。
2.3.2、出队方法
入队列的方法说完后,我们来说说出队列的方法。LinkedBlockingDeque提供了多种出队操作的实现来满足不同情况下的需求,如下:
- remove()、removeFirst()、removeLast()
- poll()、pollFirst()、pollLast()
- take()、takeFirst()、takeLast()
- poll(long timeout, TimeUnit unit)、pollFirst(long timeout, TimeUnit unit)、pollLast(long timeout, TimeUnit unit)
remove相关的方法
public E remove() {

    return removeFirst();

}

public E removeFirst() {

    E x = pollFirst();

    if (x == null) throw new NoSuchElementException();

    return x;

}

public E removeLast() {

    E x = pollLast();

    if (x == null) throw new NoSuchElementException();

    return x;

}
remove方法调用了poll的相关方法。
poll相关的方法
public E poll() {

    return pollFirst();

}

public E pollFirst() {

    final ReentrantLock lock = this.lock;

    lock.lock();

    try {

        return unlinkFirst();

    } finally {

        lock.unlock();

    }

}

public E pollLast() {

    final ReentrantLock lock = this.lock;

    lock.lock();

    try {

        return unlinkLast();

    } finally {

        lock.unlock();

    }

}
poll方法用lock加锁后分别调用了unlinkFirst和unlinkLast方法
private E unlinkFirst() {

    Node<E> f = first;

    if (f == null)

        return null;

    Node<E> n = f.next;

    E item = f.item;

    f.item = null;

    f.next = f; // help GC

    // first指向下一个节点

    first = n;

    if (n == null)

        last = null;

    else

        n.prev = null;

    --count;

    notFull.signal();

    return item;

}

private E unlinkLast() {

    Node<E> l = last;

    if (l == null)

        return null;

    Node<E> p = l.prev;

    E item = l.item;

    l.item = null;

    l.prev = l; // help GC

    // last指向下一个节点

    last = p;

    if (p == null)

        first = null;

    else

        p.next = null;

    --count;

    notFull.signal();

    return item;

}
poll的超时方法也是利用了Condition的awaitNanos来做超时等待。这里就不做过多说明了。
take相关的方法
public E take() throws InterruptedException {

    return takeFirst();

}

public E takeFirst() throws InterruptedException {

    final ReentrantLock lock = this.lock;

    lock.lock();

    try {

        E x;

        while ( (x = unlinkFirst()) == null)

            notEmpty.await();

        return x;

    } finally {

        lock.unlock();

    }

}

public E takeLast() throws InterruptedException {

    final ReentrantLock lock = this.lock;

    lock.lock();

    try {

        E x;

        while ( (x = unlinkLast()) == null)

            notEmpty.await();

        return x;

    } finally {

        lock.unlock();

    }

}
还是一个套路,lock加锁,while循环重试移除,await阻塞等待。
2.3.3、获取元素方法
获取元素的方法有element和peek两种方法。
public E element() {

    return getFirst();

}

public E peek() {

    return peekFirst();

}

public E getFirst() {

    E x = peekFirst();

    if (x == null) throw new NoSuchElementException();

    return x;

}

public E getLast() {

    E x = peekLast();

    if (x == null) throw new NoSuchElementException();

    return x;

}

public E peekFirst() {

    final ReentrantLock lock = this.lock;

    lock.lock();

    try {

        return (first == null) ? null : first.item;

    } finally {

        lock.unlock();

    }

}

public E peekLast() {

    final ReentrantLock lock = this.lock;

    lock.lock();

    try {

        return (last == null) ? null : last.item;

    } finally {

        lock.unlock();

    }

}
获取元素前加锁,防止并发问题导致数据不一致。利用first和last节点直接可以获得元素。
2.3.4、删除元素方法
public boolean remove(Object o) {

    return removeFirstOccurrence(o);

}

public boolean removeFirstOccurrence(Object o) {

    if (o == null) return false;

    final ReentrantLock lock = this.lock;

    lock.lock();

    try {

        // 从first向后开始遍历比较,找到元素后调用unlink移除

        for (Node<E> p = first; p != null; p = p.next) {

            if (o.equals(p.item)) {

                unlink(p);

                return true;

            }

        }

        return false;

    } finally {

        lock.unlock();

    }

}

public boolean removeLastOccurrence(Object o) {

    if (o == null) return false;

    final ReentrantLock lock = this.lock;

    lock.lock();

    try {

         // 从last向前开始遍历比较,找到元素后调用unlink移除

        for (Node<E> p = last; p != null; p = p.prev) {

            if (o.equals(p.item)) {

                unlink(p);

                return true;

            }

        }

        return false;

    } finally {

        lock.unlock();

    }

}

void unlink(Node<E> x) {

    Node<E> p = x.prev;

    Node<E> n = x.next;

    if (p == null) {

        unlinkFirst();

    } else if (n == null) {

        unlinkLast();

    } else {

        p.next = n;

        n.prev = p;

        x.item = null;

        // Don't mess with x's links.  They may still be in use by

        // an iterator.

        --count;

        notFull.signal();

    }

}
删除元素是从头/尾向两边进行遍历比较,故时间复杂度为O(n),最后调用unlink把要移除元素的prev和next进行关联,把要移除的元素从链中脱离,等待下次GC回收。
3、总结
LinkedBlockingDeque和LinkedBlockingQueue的相同点在于:
- 基于链表
- 容量可选,不设置的话,就是Int的最大值
和LinkedBlockingQueue的不同点在于:
- 双端链表和单链表
- 不存在头节点
- 一把锁+两个条件
【java多线程】队列系统之LinkedBlockingDeque源码的更多相关文章
- Java并发包源码学习系列:阻塞队列实现之LinkedBlockingDeque源码解析
目录 LinkedBlockingDeque概述 类图结构及重要字段 linkFirst linkLast unlinkFirst unlinkLast unlink 总结 参考阅读 系列传送门: J ...
- 【java多线程】队列系统之LinkedBlockingQueue源码
转载:https://blog.csdn.net/tonywu1992/article/details/83419448 http://benjaminwhx.com/archives/ 1.简介 上 ...
- 【java多线程】队列系统之ArrayBlockingQueue源码
1.简介 ArrayBlockingQueue,顾名思义:基于数组的阻塞队列.数组是要指定长度的,所以使用ArrayBlockingQueue时必须指定长度,也就是它是一个有界队列. 它实现了Bloc ...
- lesson2:java阻塞队列的demo及源码分析
本文向大家展示了java阻塞队列的使用场景.源码分析及特定场景下的使用方式.java的阻塞队列是jdk1.5之后在并发包中提供的一组队列,主要的使用场景是在需要使用生产者消费者模式时,用户不必再通过多 ...
- Java多线程学习之线程池源码详解
0.使用线程池的必要性 在生产环境中,如果为每个任务分配一个线程,会造成许多问题: 线程生命周期的开销非常高.线程的创建和销毁都要付出代价.比如,线程的创建需要时间,延迟处理请求.如果请求的到达率非常 ...
- 【java多线程】队列系统之DelayQueue源码
一.延迟队列 延迟队列,底层依赖了优先级队列PriorityBlockingQueue 二.延迟队列案例 (1)延迟队列的任务 public class DelayTask implements De ...
- 【java多线程】队列系统之PriorityBlockingQueue源码
一.二叉堆 如题,二叉堆是一种基础数据结构 事实上支持的操作也是挺有限的(相对于其他数据结构而言),也就插入,查询,删除这一类 对了这篇文章中讲到的堆都是二叉堆,而不是斜堆,左偏树,斐波那契堆什么的 ...
- Java在线考试系统(含源码)
本文demo下载和视频教学观看地址:http://www.wisdomdd.cn/Wisdom/resource/articleDetail.htm?resourceId=1076 本实例介绍了在线考 ...
- 点菜网---Java开源生鲜电商平台-系统架构图(源码可下载)
点菜网---Java开源生鲜电商平台-系统架构图(源码可下载) 1.点菜网-生鲜电商平台的价值与定位. 生鲜电商平台是一家致力于打造全国餐饮行业智能化.便利化.平台化与透明化服务的创新型移动互联网平台 ...
随机推荐
- 解决 Command "python setup.py egg_info" failed with error code 1 问题
参考: "pip install unroll": "python setup.py egg_info" failed with error code 1 解决 ...
- Java核心技术梳理-泛型
一.引言 在学习集合的时候我们会发现一个问题,将一个对象丢到集合中后,集合并不记住对象的类型,统统都当做Object处理,这样我们取出来再使用时就得强制转换类型,导致代码臃肿,而且加入集合时都是以Ob ...
- layui框架
layui框架 Fly社区/分享一个layui风格的grid.greegrid
- js Array.prototype.reduce()
例子: , , , ]; const reducer = (accumulator, currentValue) => accumulator + currentValue; // 1 + 2 ...
- JVM(二)之GC(转)
一.为什么需要垃圾回收 如果不进行垃圾回收,内存迟早都会被消耗空,因为我们在不断的分配内存空间而不进行回收.除非内存无限大,我们可以任性的分配而不回收,但是事实并非如此.所以,垃圾回收是必须的. 二. ...
- js日期的格式化
我们看控制台打印的关于Date这个类 我们这里可以看到内置方法没有类似format这种方法,所以需要自己定义. 内置的方法: var myDate = new Date();myDate.getYea ...
- Bupt归队赛, gunfight
只需要关心是否开枪,上个人和当前这个人的位置关系,转移可以前缀和优化 为了不重复,始终认为第一个就是1,最后答案乘以n #include<bits/stdc++.h> using name ...
- 一个二维码如何自动识别是安卓(Android)还是苹果(IOS)
思考问题: 通常,我们开发一个APP,有Android版本.IOS版本. 但是只有一个二维码?怎么办呢? 怎么让IOS用户扫描二维码下载IOS版本,Android用户扫描二维码下载到Android版本 ...
- 【sparkSQL】SparkSession的认识
https://www.cnblogs.com/zzhangyuhang/p/9039695.html https://www.jianshu.com/p/dea6a78b9dff 在Spark1.6 ...
- 201621123075 Week03-面向对象入门
1.本周学习总结 初学面向对象,会学习到很多碎片化的概念与知识.尝试学会使用思维导图将这些碎片化的概念.知识点组织起来.请使用工具画出本周学习到的知识点及知识点之间的联系.步骤如下: 1.1 写出你认 ...