Android学习:AlertDialog对话框
AlertDialog可以生成各种内容的对话框,它生成的对话框包含4个区域:
图标区,标题区,内容区,按钮区
<?xml version="1.0" encoding="utf-8"?>

<android.support.constraint.ConstraintLayout xmlns:android="http://schemas.android.com/apk/res/android"

    xmlns:app="http://schemas.android.com/apk/res-auto"

    xmlns:tools="http://schemas.android.com/tools"

    android:layout_width="match_parent"

    android:layout_height="match_parent"

    tools:context="allegro.alertdialog.MainActivity"

    tools:layout_editor_absoluteY="81dp"

    tools:layout_editor_absoluteX="0dp">

    <!-- 显示一个普通的文本编辑框组件 -->

    <EditText

        android:id="@+id/show"

        android:layout_width="0dp"

        android:layout_height="wrap_content"

        android:layout_marginEnd="8dp"

        android:layout_marginStart="8dp"

        android:editable="false"

        android:layout_marginRight="8dp"

        app:layout_constraintRight_toRightOf="parent"

        android:layout_marginLeft="8dp"

        app:layout_constraintLeft_toLeftOf="parent"

        app:layout_constraintTop_toTopOf="parent"

        android:layout_marginTop="8dp"

        tools:layout_constraintRight_creator="1"

        tools:layout_constraintLeft_creator="1" />

    <!-- 定义一个普通的按钮组件 -->

    <Button

        android:layout_width="88dp"

        android:layout_height="wrap_content"

        android:text="简单对话框"

        android:onClick="simple"

        android:id="@+id/button"

        android:layout_marginEnd="26dp"

        app:layout_constraintRight_toLeftOf="@+id/button2"

        tools:layout_constraintTop_creator="1"

        tools:layout_constraintRight_creator="1"

        tools:layout_constraintBottom_creator="1"

        app:layout_constraintBottom_toTopOf="@+id/button2"

        app:layout_constraintTop_toTopOf="@+id/button2" />

    <!-- 定义一个普通的按钮组件 -->

    <Button

        android:layout_width="88dp"

        android:layout_height="wrap_content"

        android:text="简单列表项对话框"

        android:onClick="simpleList"

        android:id="@+id/button4"

        android:layout_marginStart="16dp"

        tools:layout_constraintTop_creator="1"

        android:layout_marginTop="52dp"

        app:layout_constraintTop_toBottomOf="@+id/button3"

        tools:layout_constraintLeft_creator="1"

        app:layout_constraintLeft_toLeftOf="@+id/button3" />

    <!-- 定义一个普通的按钮组件 -->

    <Button

        android:layout_width="88dp"

        android:layout_height="wrap_content"

        android:text="单选列表项对话框"

        android:onClick="singleChoice"

        android:layout_marginEnd="36dp"

        tools:layout_constraintRight_creator="1"

        tools:layout_constraintBottom_creator="1"

        app:layout_constraintBottom_toBottomOf="parent"

        app:layout_constraintRight_toRightOf="parent"

        android:layout_marginBottom="191dp" />

    <!-- 定义一个普通的按钮组件 -->

    <Button

        android:layout_width="88dp"

        android:layout_height="wrap_content"

        android:text="多选列表项对话框"

        android:onClick="multiChoice"

        tools:layout_constraintTop_creator="1"

        tools:layout_constraintRight_creator="1"

        tools:layout_constraintBottom_creator="1"

        app:layout_constraintBottom_toTopOf="@+id/button2"

        android:layout_marginEnd="16dp"

        app:layout_constraintRight_toRightOf="parent"

        app:layout_constraintTop_toTopOf="@+id/button2" />

    <!-- 定义一个普通的按钮组件 -->

    <Button

        android:layout_width="88dp"

        android:layout_height="wrap_content"

        android:text="自定义列表项对话框"

        android:onClick="customList"

        android:id="@+id/button2"

        android:layout_marginStart="6dp"

        tools:layout_constraintBottom_creator="1"

        app:layout_constraintBottom_toTopOf="@+id/button3"

        tools:layout_constraintLeft_creator="1"

        android:layout_marginBottom="9dp"

        app:layout_constraintLeft_toRightOf="@+id/button3" />

    <!-- 定义一个普通的按钮组件 -->

    <Button

        android:layout_width="88dp"

        android:layout_height="wrap_content"

        android:text="自定义View对话框"

        android:onClick="customView"

        android:id="@+id/button3"

        android:layout_marginStart="78dp"

        tools:layout_constraintTop_creator="1"

        android:layout_marginTop="186dp"

        tools:layout_constraintLeft_creator="1"

        app:layout_constraintLeft_toLeftOf="parent"

        app:layout_constraintTop_toTopOf="parent" />

</android.support.constraint.ConstraintLayout>
package allegro.alertdialog; import android.content.DialogInterface;
import android.support.v7.app.AlertDialog;
import android.support.v7.app.AppCompatActivity;
import android.os.Bundle;
import android.view.View;
import android.widget.ArrayAdapter;
import android.widget.TableLayout;
import android.widget.TextView; public class MainActivity extends AppCompatActivity {
TextView show;
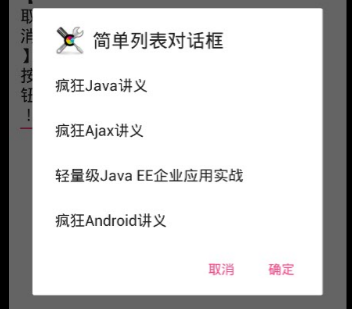
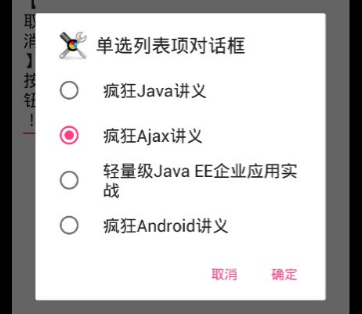
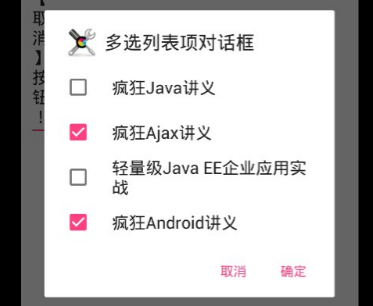
String[] items = new String[] {
"疯狂Java讲义", "疯狂Ajax讲义",
"轻量级Java EE企业应用实战",
"疯狂Android讲义" };
@Override
protected void onCreate(Bundle savedInstanceState) {
super.onCreate(savedInstanceState);
setContentView(R.layout.activity_main);
show = (TextView) findViewById(R.id.show);
} public void simple(View source)
{
AlertDialog.Builder builder = new AlertDialog.Builder(this)
// 设置对话框标题
.setTitle("简单对话框")
// 设置图标
.setIcon(R.drawable.tools)
.setMessage("对话框的测试内容\n第二行内容");
// 为AlertDialog.Builder添加“确定”按钮
setPositiveButton(builder);
// 为AlertDialog.Builder添加“取消”按钮
setNegativeButton(builder)
.create()
.show();
} public void simpleList(View source)
{
AlertDialog.Builder builder = new AlertDialog.Builder(this)
// 设置对话框标题
.setTitle("简单列表对话框")
// 设置图标
.setIcon(R.drawable.tools)
// 设置简单的列表项内容
.setItems(items, new DialogInterface.OnClickListener()
{
@Override
public void onClick(DialogInterface dialog, int which)
{
show.setText("你选中了《" + items[which] + "》");
}
});
// 为AlertDialog.Builder添加“确定”按钮
setPositiveButton(builder);
// 为AlertDialog.Builder添加“取消”按钮
setNegativeButton(builder)
.create()
.show();
} public void singleChoice(View source)
{
AlertDialog.Builder builder = new AlertDialog.Builder(this)
// 设置对话框标题
.setTitle("单选列表项对话框")
// 设置图标
.setIcon(R.drawable.tools)
// 设置单选列表项,默认选中第二项(索引为1)
.setSingleChoiceItems(items, 1, new DialogInterface.OnClickListener()
{
@Override
public void onClick(DialogInterface dialog, int which)
{
show.setText("你选中了《" + items[which] + "》");
}
});
// 为AlertDialog.Builder添加“确定”按钮
setPositiveButton(builder);
// 为AlertDialog.Builder添加“取消”按钮
setNegativeButton(builder)
.create()
.show();
} public void multiChoice(View source)
{
AlertDialog.Builder builder = new AlertDialog.Builder(this)
// 设置对话框标题
.setTitle("多选列表项对话框")
// 设置图标
.setIcon(R.drawable.tools)
// 设置多选列表项,设置勾选第2项、第4项
.setMultiChoiceItems(items
, new boolean[]{false , true ,false ,true}, null);
// 为AlertDialog.Builder添加“确定”按钮
setPositiveButton(builder);
// 为AlertDialog.Builder添加“取消”按钮
setNegativeButton(builder)
.create()
.show();
} public void customList(View source)
{
AlertDialog.Builder builder = new AlertDialog.Builder(this)
// 设置对话框标题
.setTitle("自定义列表项对话框")
// 设置图标
.setIcon(R.drawable.tools)
// 设置自定义列表项
.setAdapter(new ArrayAdapter<String>(this
, R.layout.array_item
, items), null);
// 为AlertDialog.Builder添加“确定”按钮
setPositiveButton(builder);
// 为AlertDialog.Builder添加“取消”按钮
setNegativeButton(builder)
.create()
.show();
} public void customView(View source)
{
// 装载app\src\main\res\layout\login.xml界面布局文件
TableLayout loginForm = (TableLayout)getLayoutInflater()
.inflate( R.layout.login, null);
new AlertDialog.Builder(this)
// 设置对话框的图标
.setIcon(R.drawable.tools)
// 设置对话框的标题
.setTitle("自定义View对话框")
// 设置对话框显示的View对象
.setView(loginForm)
// 为对话框设置一个“确定”按钮
.setPositiveButton("登录", new DialogInterface.OnClickListener() {
@Override
public void onClick(DialogInterface dialog,
int which) {
// 此处可执行登录处理
}
})
// 为对话框设置一个“取消”按钮
.setNegativeButton("取消", new DialogInterface.OnClickListener()
{
@Override
public void onClick(DialogInterface dialog,
int which)
{
// 取消登录,不做任何事情
}
})
// 创建并显示对话框
.create()
.show();
} private AlertDialog.Builder setPositiveButton(
AlertDialog.Builder builder)
{
// 调用setPositiveButton方法添加“确定”按钮
return builder.setPositiveButton("确定", new DialogInterface.OnClickListener()
{
@Override
public void onClick(DialogInterface dialog, int which)
{
show.setText("单击了【确定】按钮!");
}
});
}
private AlertDialog.Builder setNegativeButton(
AlertDialog.Builder builder)
{
// 调用setNegativeButton方法添加“取消”按钮
return builder.setNegativeButton("取消", new DialogInterface.OnClickListener()
{
@Override
public void onClick(DialogInterface dialog, int which)
{
show.setText("单击了【取消】按钮!");
}
});
} }


Android学习:AlertDialog对话框的更多相关文章
- android学习笔记 对话框合集
package com.zhangbz.dialog; import android.app.Activity; import android.app.AlertDialog; import andr ...
- Android:AlertDialog对话框
1.简单的ALertDialog: Dialog alertDialog = new AlertDialog.Builder(this) .setTitle("标题") .setM ...
- 【Android】Android中AlertDialog对话框的使用实例
package com.ceac.deng; import android.R.string; import android.support.v7.app.ActionBarActivity; imp ...
- Android学习-各种对话框
在android的编程中,对话框的用处是非常多的,然而,有时对对话框的需求也是不一样的,那么现在,就总结对话框的种类,以及事件的处理形势. 1.简单的对话框 public void showDialo ...
- Android在 Alertdialog对话框中点击消失?
在开发的时候遇到一个问题.就是一触摸对话框边缘外部,对话框会自己主动消失.这个问题非常纠结啊,查找了一下发现从Android 4.0開始.AlertDialog有了变化.就是在触摸对话框边缘外部.对话 ...
- android学习九 对话框碎片
1.android的对话框是异步的,对话框创建后马上执行下面的代码.好处: a.通过实现对话框的回调方法反馈用户与对话框的交互. b.能够在代码中清楚对话框. 2.碎片对话框基 ...
- android 的AlertDialog对话框
private int selectedFruitIndex = 0; private void showMsg2() {// Dialog alertDialog = new AlertDial ...
- android入门 — AlertDialog对话框
常见的对话框主要分为消息提示对话框.确认对话框.列表对话框.单选对话框.多选对话框和自定义对话框. 对话框可以阻碍当前的UI线程,常用于退出确认等方面. 在这里主要的步骤可以总结为: 1.创建Aler ...
- Android中AlertDialog对话框禁止按[返回键]或[搜索键]
alertDialog.setOnKeyListener(new DialogInterface.OnKeyListener() { @Override public boolean onKey(Di ...
- 11.Android之常用对话框AlertDialog学习
(1)首先我们写个简单的AlertDialog对话框,要创建一个AlertDialog,就要用到AlertDialog.Builder中的create()方法,然后创建对话框可以设置对话框的属性,比如 ...
随机推荐
- centos安装谷歌浏览器
第一步: 切换到root权限 su root 或者 sudo -i 第二步: 下载新的软件源: 进入到 cd /etc/yum.repos.d 然后 wget http://people.centos ...
- 【搜索】传感器 @upcexam6023
时间限制: 1 Sec 内存限制: 128 MB 题目描述 SR最近新买了一款电子桌游 这个玩具内部是M个围成一圈的传感器.每个传感器都有开和关两种工作状态,分别用1和0表示.显然,从不同的位置触发沿 ...
- openstack 之~horizon部署
第一:部署horizon环境: 安装部署memcache 安装软件包 yum install memcached python-memcached 启动memcache并且设置开机自启动 system ...
- Win10注册表无法保存对权限所作的更改拒绝访问
在对系统的安全控制得越来越多的情况下,要对注册表的关键数据进行修改是件挺麻烦的事,时不时会弹出无法保存对xxxxxx权限所作的更改,拒绝访问,操作产生错误,操作出现错误的提示,这时怎么办呢?这里就最近 ...
- python测试开发django-57.xadmin选项二级联动
前言 当我们选择项目分类的时候,一个项目下关联多个模块,同时有这两个选项框的时候,需要实现选中一个项目,模块里面自动删除出该项目下的模块,如下图这种 解决基本思路: 1.写个jqeury脚本监听cha ...
- SharePoint 配置PowerShell任务计划
前言 最近,有这么个需求,需要定时为SharePoint更新内容,所以,就想到了PowerShell命令和任务计划(Windows自带的功能,英文叫Task Schedule,在开始菜单里就能找到), ...
- centos7下使用mysql离线安装包安装mysql5.7
服务器环境: centos7 x64 需要安装mysql5.7+ 一.卸载CentOS7系统自带mariadb # 查看系统自带的Mariadb [root@CDH-141 ~]# rpm -qa|g ...
- Pilosa文档翻译(一)导言、安装
目录 导言 安装 安装在MacOS 使用HomeBrew 下载二进制文件 从源码构建 使用Docker 安装在Linux 下载二进制文件 从源码构建 使用Docker 接下来是什么? 导言 原文地址 ...
- 关于Discuz! X系列UC_Server 本地文件包含漏洞
最近又发现discuz论坛被挂马了,决定好好研究一下discuz的漏洞,技术债始终要还是要还的 一.问题发现 快要睡觉的时候,突然收到一封邮件,发现服务器上的文件被篡改了,立即登录服务器,清空恶意文件 ...
- Python AES_ECB_PKCS5加密代码
https://blog.csdn.net/u010978840/article/details/79035463 ****************************************** ...