
简单登录案例(SharedPreferences存储账户信息)&联网请求图片并下载到SD卡(文件外部存储)
新人刚学习Android两周,写一个随笔算是对两周学习成果的巩固,不足之处欢迎各位建议和完善。
这次写的是一个简单登录案例,大概功能如下:
注册的账户信息用SharedPreferences存储;
登录成功后跳转到成功页面,在成功页面联网请求图片并写入到外部存储;
然后读出显示在成功页面;
注册xml代码:
 <?xml version="1.0" encoding="utf-8"?>

 <manifest xmlns:android="http://schemas.android.com/apk/res/android"

     package="com.qf.login"

     android:versionCode="1"

     android:versionName="1.0" >

     <uses-sdk

         android:minSdkVersion="14"

         android:targetSdkVersion="21" />

     <!--联网权限  -->

     <uses-permission android:name="android.permission.INTERNET"/>

     <!--在SD卡中创建与删除文件权限  -->

     <uses-permission android:name="android.permission.MOUNT_UNMOUNT_FILESYSTEMS"/>

     <!--向SD卡写入数据权限  -->

     <uses-permission android:name="android.permission.WRITE_EXTERNAL_STORAGE"/>

     <application

         android:allowBackup="true"

         android:icon="@drawable/ic_launcher"

         android:label="@string/app_name"

         android:theme="@style/AppTheme" >

         <activity

             android:name=".MainActivity"

             android:label="@string/app_name" >

             <intent-filter>

                 <action android:name="android.intent.action.MAIN" />

                 <category android:name="android.intent.category.LAUNCHER" />

             </intent-filter>

         </activity>

         <activity

             android:name=".Register"

             ></activity>

         <activity

             android:name=".SuccessLogin"

             ></activity>

     </application>

 </manifest>
MainActivity:
 <LinearLayout xmlns:android="http://schemas.android.com/apk/res/android"

     xmlns:tools="http://schemas.android.com/tools"

     android:layout_width="match_parent"

     android:layout_height="match_parent"

     android:orientation="vertical" >

     <LinearLayout

         android:layout_width="match_parent"

         android:layout_height="wrap_content"

         android:orientation="horizontal"

         android:paddingTop="50dp" >

         <TextView

             android:layout_width="0dp"

             android:layout_height="wrap_content"

             android:layout_weight="1"

             android:gravity="center_horizontal"

             android:text="账号" />

         <EditText

             android:id="@+id/et1"

             android:layout_width="0dp"

             android:layout_height="wrap_content"

             android:layout_marginRight="5dp"

             android:layout_weight="4"

             android:background="@drawable/app_pref_bg" />

     </LinearLayout>

     <LinearLayout

         android:layout_width="match_parent"

         android:layout_height="wrap_content"

         android:layout_marginTop="10dp"

         android:orientation="horizontal" >

         <TextView

             android:layout_width="0dp"

             android:layout_height="wrap_content"

             android:layout_weight="1"

             android:gravity="center_horizontal"

             android:text="密码" />

         <EditText

             android:id="@+id/et2"

             android:layout_width="0dp"

             android:layout_height="wrap_content"

             android:layout_marginRight="5dp"

             android:layout_weight="4"

             android:background="@drawable/app_pref_bg"

             android:inputType="textPassword" />

     </LinearLayout>

     <LinearLayout

         android:layout_width="match_parent"

         android:layout_height="wrap_content"

         android:layout_marginTop="10dp"

         android:orientation="horizontal">

         <Button

             android:id="@+id/btn1"

             android:layout_width="70dp"

             android:layout_height="45dp"

             android:layout_marginLeft="90dp"

             android:text="登录"

             android:gravity="center"

             />

          <Button

             android:id="@+id/btn2"

             android:layout_width="70dp"

             android:layout_height="45dp"

             android:layout_marginLeft="20dp"

             android:text="注册"

             android:gravity="center"

             />

     </LinearLayout>

 </LinearLayout>
注册布局xml:
<?xml version="1.0" encoding="utf-8"?>

<LinearLayout xmlns:android="http://schemas.android.com/apk/res/android"

    android:layout_width="match_parent"

    android:layout_height="match_parent"

    android:orientation="vertical" >

    <LinearLayout

        android:layout_width="match_parent"

        android:layout_height="wrap_content"

        android:orientation="horizontal"

        android:paddingTop="50dp" >

        <TextView

            android:layout_width="0dp"

            android:layout_height="wrap_content"

            android:layout_weight="1"

            android:gravity="center_horizontal"

            android:text="账号" />

        <EditText

            android:id="@+id/et1"

            android:layout_width="0dp"

            android:layout_height="wrap_content"

            android:layout_marginRight="5dp"

            android:layout_weight="4"

            android:background="@drawable/app_pref_bg" />

    </LinearLayout>

    <LinearLayout

        android:layout_width="match_parent"

        android:layout_height="wrap_content"

        android:layout_marginTop="10dp"

        android:orientation="horizontal" >

        <TextView

            android:layout_width="0dp"

            android:layout_height="wrap_content"

            android:layout_weight="1"

            android:gravity="center_horizontal"

            android:text="密码" />

        <EditText

            android:id="@+id/et2"

            android:layout_width="0dp"

            android:layout_height="wrap_content"

            android:layout_marginRight="5dp"

            android:layout_weight="4"

            android:background="@drawable/app_pref_bg"

            android:inputType="textPassword" />

    </LinearLayout>

    <LinearLayout

        android:layout_width="match_parent"

        android:layout_height="wrap_content"

        android:layout_marginTop="10dp"

        android:orientation="horizontal" >

        <Button

            android:id="@+id/btn1"

            android:layout_width="70dp"

            android:layout_height="45dp"

            android:layout_marginLeft="110dp"

            android:gravity="center"

            android:text="注册" />

    </LinearLayout>

</LinearLayout>
登录成功布局xml:
<?xml version="1.0" encoding="utf-8"?>

<LinearLayout xmlns:android="http://schemas.android.com/apk/res/android"

    android:id="@+id/ll"

    android:layout_width="match_parent"

    android:layout_height="match_parent"

    android:background="#CEDDED"

    android:orientation="vertical" >

    <TextView

        android:id="@+id/tv"

        android:layout_width="match_parent"

        android:layout_height="100dp"

        android:background="#1285F0"

        android:textSize="20sp"

        android:gravity="center"

        />

    <Button

        android:id="@+id/btn"

        android:layout_width="150dp"

        android:layout_height="50dp"

        android:text="点击获取图片"

        android:background="@drawable/btn1"

        android:textSize="20sp"

        android:gravity="center"

        android:layout_gravity="center_horizontal"

        android:layout_marginTop="10dp"

        />

    <ImageView

        android:id="@+id/iv"

        android:layout_width="wrap_content"

        android:layout_height="wrap_content"

        android:layout_gravity="center_horizontal"

        android:layout_marginTop="10dp"

        />

</LinearLayout>
登录主页面JAVA代码:
 package com.qf.login;

 import android.app.Activity;

 import android.content.Context;

 import android.content.Intent;

 import android.content.SharedPreferences;

 import android.os.Bundle;

 import android.text.TextUtils;

 import android.view.View;

 import android.view.View.OnClickListener;

 import android.widget.Button;

 import android.widget.EditText;

 import android.widget.Toast;

 public class MainActivity extends Activity implements OnClickListener {

     private EditText et1;

     private EditText et2;

     @Override

     protected void onCreate(Bundle savedInstanceState) {

         super.onCreate(savedInstanceState);

         setContentView(R.layout.activity_main);

           et1 = (EditText) findViewById(R.id.et1);

           et2 = (EditText) findViewById(R.id.et2);

         Button btn1 = (Button) findViewById(R.id.btn1);

         Button btn2 = (Button) findViewById(R.id.btn2);

         btn1.setOnClickListener(this);

         btn2.setOnClickListener(this);

     }

     public void login() {

         //获得输入的账户信息

         String username = et1.getText().toString().trim();

         String password = et2.getText().toString().trim();

         //获得SharPreferences中存储的账户信息

         SharedPreferences sp=getSharedPreferences("userinfo", Context.MODE_PRIVATE);

         // d.判断用户名密码

         if (TextUtils.isEmpty(username) || TextUtils.isEmpty(password)) {

             Toast.makeText(MainActivity.this, "用户名密码不能为空", Toast.LENGTH_SHORT)

                     .show();

             return;

         }else if(username.equals(sp.getString("user", ""))&&password.equals(sp.getString("password", ""))){

             //跳转到登录成功页面

             Intent intent=new Intent(MainActivity.this,SuccessLogin.class);

             startActivity(intent);

         }else if(!username.equals(sp.getString("user", ""))){

             Toast.makeText(MainActivity.this, "用户名不存在!请注册", Toast.LENGTH_SHORT).show();

         }

         else{

             Toast.makeText(MainActivity.this, "密码错误", Toast.LENGTH_SHORT).show();

         }

     }

     @Override

     public void onClick(View v) {

         switch (v.getId()) {

         case R.id.btn1:

             login();

             break;

         case R.id.btn2:

             Intent intent = new Intent(MainActivity.this, Register.class);

             startActivity(intent);

             break;

         default:

             break;

         }

     }

 }
注册页面JAVA代码:
 package com.qf.login;

 import android.app.Activity;

 import android.content.Context;

 import android.content.Intent;

 import android.content.SharedPreferences;

 import android.content.SharedPreferences.Editor;

 import android.os.Bundle;

 import android.view.View;

 import android.view.View.OnClickListener;

 import android.widget.Button;

 import android.widget.EditText;

 import android.widget.Toast;

 public class Register extends Activity{

     @Override

     protected void onCreate(Bundle savedInstanceState) {

         // TODO Auto-generated method stub

         super.onCreate(savedInstanceState);

         setContentView(R.layout.register);

         final EditText et1=(EditText) findViewById(R.id.et1);

         final EditText et2=(EditText) findViewById(R.id.et2);

         Button btn=(Button) findViewById(R.id.btn1);

         btn.setOnClickListener(new OnClickListener() {

             @Override

             public void onClick(View v) {

                 //获得主页面传过来的intent

                 Intent intent=getIntent();

                 //获得输入的账户信息

                 String username=et1.getText().toString().trim();

                 String password=et2.getText().toString().trim();

                 //SharPreferences存储账户信息

                 SharedPreferences sp=getSharedPreferences("userinfo", Context.MODE_PRIVATE);

                 Editor editor=sp.edit();

                 editor.putString("user", username);

                 editor.putString("password", password);

                 editor.commit();

                 Toast.makeText(Register.this, "注册成功", Toast.LENGTH_SHORT).show();

                 //跳回到登录页面

                 finish();

             }

         });

     }

 }
登录成功页面JAVA代码:
package com.qf.login;

import java.io.File;

import java.io.FileInputStream;

import java.io.FileNotFoundException;

import java.io.FileOutputStream;

import android.app.Activity;

import android.content.Context;

import android.content.Intent;

import android.content.SharedPreferences;

import android.graphics.Bitmap;

import android.graphics.Bitmap.CompressFormat;

import android.graphics.BitmapFactory;

import android.os.Bundle;

import android.os.Environment;

import android.util.Log;

import android.view.View;

import android.view.View.OnClickListener;

import android.widget.Button;

import android.widget.ImageView;

import android.widget.TextView;

public class SuccessLogin extends Activity {

    Bitmap bmp;

    ImageView iv;

    String str_url = "http://pic1.cxtuku.com/00/09/47/b36872529f7c.jpg";

    @Override

    protected void onCreate(Bundle savedInstanceState) {

        // TODO Auto-generated method stub

        super.onCreate(savedInstanceState);

        setContentView(R.layout.success);

        // 获得intent对象

        Intent intent = getIntent();

        //获得存储在SharPreferences的账户信息

        SharedPreferences sp = getSharedPreferences("userinfo",

                Context.MODE_PRIVATE);

        iv = (ImageView) findViewById(R.id.iv);

        TextView tv = (TextView) findViewById(R.id.tv);

        tv.setText("欢迎" + sp.getString("user", "") + "登录" + "\n" + "您的密码是:"

                + sp.getString("password", ""));

        Button btn = (Button) findViewById(R.id.btn);

        //监听点击事件,联网请求异步加载图片

        btn.setOnClickListener(new OnClickListener() {

            @Override

            public void onClick(View v) {

                //开启异步线程

                MyBitmapTask task = new MyBitmapTask();

                task.execute(str_url);

                task.setMyInterface(new MyInterface() {

                    @Override

                    public void getImageBitmap(Bitmap bmp) {

                        // TODO Auto-generated method stub

                        //写入到外部存储(SD卡)

                        writeToOutStoragePublic(bmp);

                        //从SD卡中读出图片并显示在屏幕

                        readFromOutStoragePublic();

                    }

                });

            }

        });

    }

    private void writeToOutStoragePublic(Bitmap bmp) {

        if (Environment.getExternalStorageState().equals(

                Environment.MEDIA_MOUNTED)) {

            File filepath = Environment

                    .getExternalStoragePublicDirectory(Environment.DIRECTORY_PICTURES);

            File file = new File(filepath, "dahai.jpg");

            try {

                FileOutputStream fos = new FileOutputStream(file);

                bmp.compress(CompressFormat.JPEG, 60, fos);

            } catch (Exception e) {

                // TODO Auto-generated catch block

                e.printStackTrace();

            }

        }

    }

    private void readFromOutStoragePublic() {

        if (Environment.getExternalStorageState().equals(

                Environment.MEDIA_MOUNTED)) {

            File filepath = Environment

                    .getExternalStoragePublicDirectory(Environment.DIRECTORY_PICTURES);

            File file = new File(filepath, "dahai.jpg");

            try {

                FileInputStream fis = new FileInputStream(file);

                bmp = BitmapFactory.decodeStream(fis);

                iv.setImageBitmap(bmp);

            } catch (Exception e) {

                // TODO Auto-generated catch block

                e.printStackTrace();

            }

        }

    }

}
自定义联网请求工具类代码:
 package com.qf.login;

 import java.io.InputStream;

 import java.net.HttpURLConnection;

 import java.net.URL;

 import android.graphics.Bitmap;

 import android.graphics.BitmapFactory;

 public class HttpUtils {

     public static Bitmap downloadImage(String str_url) {

         Bitmap bmp = null;

         try {

             URL url = new URL(str_url);

             HttpURLConnection conn = (HttpURLConnection) url.openConnection();

             InputStream is = conn.getInputStream();

             bmp = BitmapFactory.decodeStream(is);

         } catch (Exception e) {

             // TODO Auto-generated catch block

             e.printStackTrace();

         }

         return bmp;

     };

 }
自定义接口传值:
 package com.qf.login;

 import android.graphics.Bitmap;

 public interface MyInterface {

     void getImageBitmap(Bitmap bmp);

 }
自定义Task类加载图片:
 package com.qf.login;

 import android.graphics.Bitmap;

 import android.os.AsyncTask;

 public class MyBitmapTask extends AsyncTask<String, Void, Bitmap> {

     MyInterface myInterface;

     public void setMyInterface(MyInterface myInterface) {

         this.myInterface = myInterface;

     }

     @Override

     protected Bitmap doInBackground(String... params) {

         //加载图片

         Bitmap bmp=HttpUtils.downloadImage(params[0]);

         return bmp;

     }

     @Override

     protected void onPostExecute(Bitmap result) {

         // TODO Auto-generated method stub

         super.onPostExecute(result);

         //调用接口实现的方法

         myInterface.getImageBitmap(result);

     }

 }
运行结果展示:
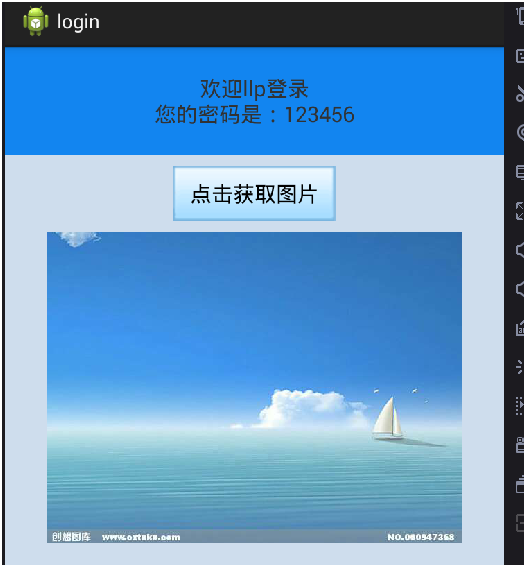
代码中若有不足欢迎留言建议!谢谢
简单登录案例(SharedPreferences存储账户信息)&联网请求图片并下载到SD卡(文件外部存储)的更多相关文章
- Android开发——遍历读写U盘、SD卡等外部存储
1.首先需要得到挂载在手机上的有哪些盘符 String[] result = null; StorageManager storageManager = (StorageManager)getSyst ...
- 【Android平台安全方案】の #00-请不要在外部存储(SD卡)加密存储的敏感信息
本文翻译自https://www.securecoding.cert.org/confluence/display/java/DRD00-J.+Do+not+store+sensitive+infor ...
- 用 Flask 来写个轻博客 (19) — 以 Bcrypt 密文存储账户信息与实现用户登陆表单
目录 目录 前文列表 修改 User Model Flask Bcrypt 将 Bcrypt 应用到 User Model 中 创建登陆表单 前文列表 用 Flask 来写个轻博客 (1) - 创建项 ...
- 【Android】14.0 第14章 内部存储与外部SD卡存储—本章示例主界面
分类:C#.Android.VS2015: 创建日期:2016-02-27 一.简介 Android使用的文件系统是基于Linux的文件系统,在Android应用程序中,开发人员既可以建立和访问程序自 ...
- php 微信登录 公众号 获取用户信息 微信网页授权
php 微信登录 公众号 获取用户信息 微信网页授权 先自己建立两个文件: index.php 和 getUserInfo.php index.php <?php //scope=snsap ...
- android中的文件操作详解以及内部存储和外部存储(转载)
原文链接:http://m.blog.csdn.net/article/details?id=17725989 摘要 其实安卓文件的操作和java在pc环境下的操作并无二致,之所以需要单独讲解是因为安 ...
- 【转】 android中的文件操作详解以及内部存储和外部存储
摘要 其实安卓文件的操作和Java在pc环境下的操作并无二致,之所以需要单独讲解是因为安卓系统提供了不同于pc的访问文件系统根路径的api,同时对一个应用的私有文件做了统一的管理.根据我的经验,初学者 ...
- 彻底了解android中的内部存储与外部存储
我们先来考虑这样一个问题: 打开手机设置,选择应用管理,选择任意一个App,然后你会看到两个按钮,一个是清除缓存,另一个是清除数据,那么当我们点击清除缓存的时候清除的是哪里的数据?当我们点击清除数据的 ...
- [IT新应用]存储入门-文件级存储及块级别存储的选择
http://www.techrepublic.com/blog/the-enterprise-cloud/block-level-storage-vs-file-level-storage-a-co ...
随机推荐
- Is the Information Reliable?(差分约束)
Description The galaxy war between the Empire Draco and the Commonwealth of Zibu broke out 3 years a ...
- 代码演示C#中string和StingBuilder内存中的区别
关于 string和StringBuilder的区别参考MSDN.本文用程序演示它们在内存中的区别,及其因此其行为不同. //Demo string memory model namespace C ...
- ELK安装配置及nginx日志分析
一.ELK简介1.组成ELK是Elasticsearch.Logstash.Kibana三个开源软件的组合.在实时数据检索和分析场合,三者通常是配合使用,而且又都先后归于 Elastic.co 公司名 ...
- (转载)puremvc框架之proxy
(转载)http://www.cnblogs.com/yjmyzz/archive/2010/08/01/1789769.html 上一篇 puremvc框架之Command 里,已经学习了如何利用C ...
- [LeetCode] 3. Longest Substring Without Repeating Characters 解题思路
Given a string, find the length of the longest substring without repeating characters. For example, ...
- 一步一步制作yaffs/yaffs2根文件系统(七)---真挚地道歉以及纠正前边出现的错误!
接上一节http://blog.csdn.net/mybelief321/article/details/10040939 说实话,我当时写这个系列的博文的时候,感觉对BusyBox算是有点了解,直到 ...
- indexOf()不区分大小写用法
str.toLowerCase().indexOf(str.toLowerCase())>=0; 对字符串进行统一小写转换. indexOf()查找到返回索引值大于=0; 未找到,返回-1; i ...
- Oracle ROWNUM用法和分页查询总结(转)
[转载] Oracle的分页查询语句基本上可以按照本文给出的格式来进行套用. Oracle分页查询格式(一):http://yangtingkun.itpub.net/post/468/100278 ...
- String+,StringBuilder,String.format运行效率比较
实现String字符串相加的方法有很多,常见的有直接相加,StringBuilder.append和String.format,这三者的运行效率是有差异的,String是final类型的,每次相加都会 ...
- Linux后门入侵检测工具,附bash漏洞解决方法[转载]
转自:http://blog.jobbole.com/77663/ 官网 ClamAV杀毒软件介绍 ClamAV是一个在命令行下查毒软件,因为它不将杀毒作为主要功能,默认只能查出您计算机内的病毒,但是 ...