Selenium (3) —— Selenium IDE + Firefox录制登录脚本(101 Tutorial)
Selenium (3) —— Selenium IDE + Firefox录制登录脚本(101 Tutorial)
selenium IDE版本: 2.9.1
firefox版本: 39.0.3
参考来源:
Understanding Selenium IDE vs Selenium RC
Selenium IDE Tutorial – Part 1
主要内容
Selenium IDE 是一个为进行Selenium测试的集成开发环境工具。Selenium测试可以用HTML table编写,也可以用其他语言来编写,比如C#,PHP,Perl,Python。IDE可以为我们录制,编辑和调试测试。目前IDE以addon的形式只支持Firefox。
安装
可以到以下地址安装
http://selenium-ide.openqa.org/download.jsp
https://addons.mozilla.org/en-US/firefox/addon/2079
安装完毕后需要重启firefox,注意当前最新的IDE 2.9.1与Firefox 40+不太兼容,建议使用40以下的版本,我这里使用的是39.0.3

录制
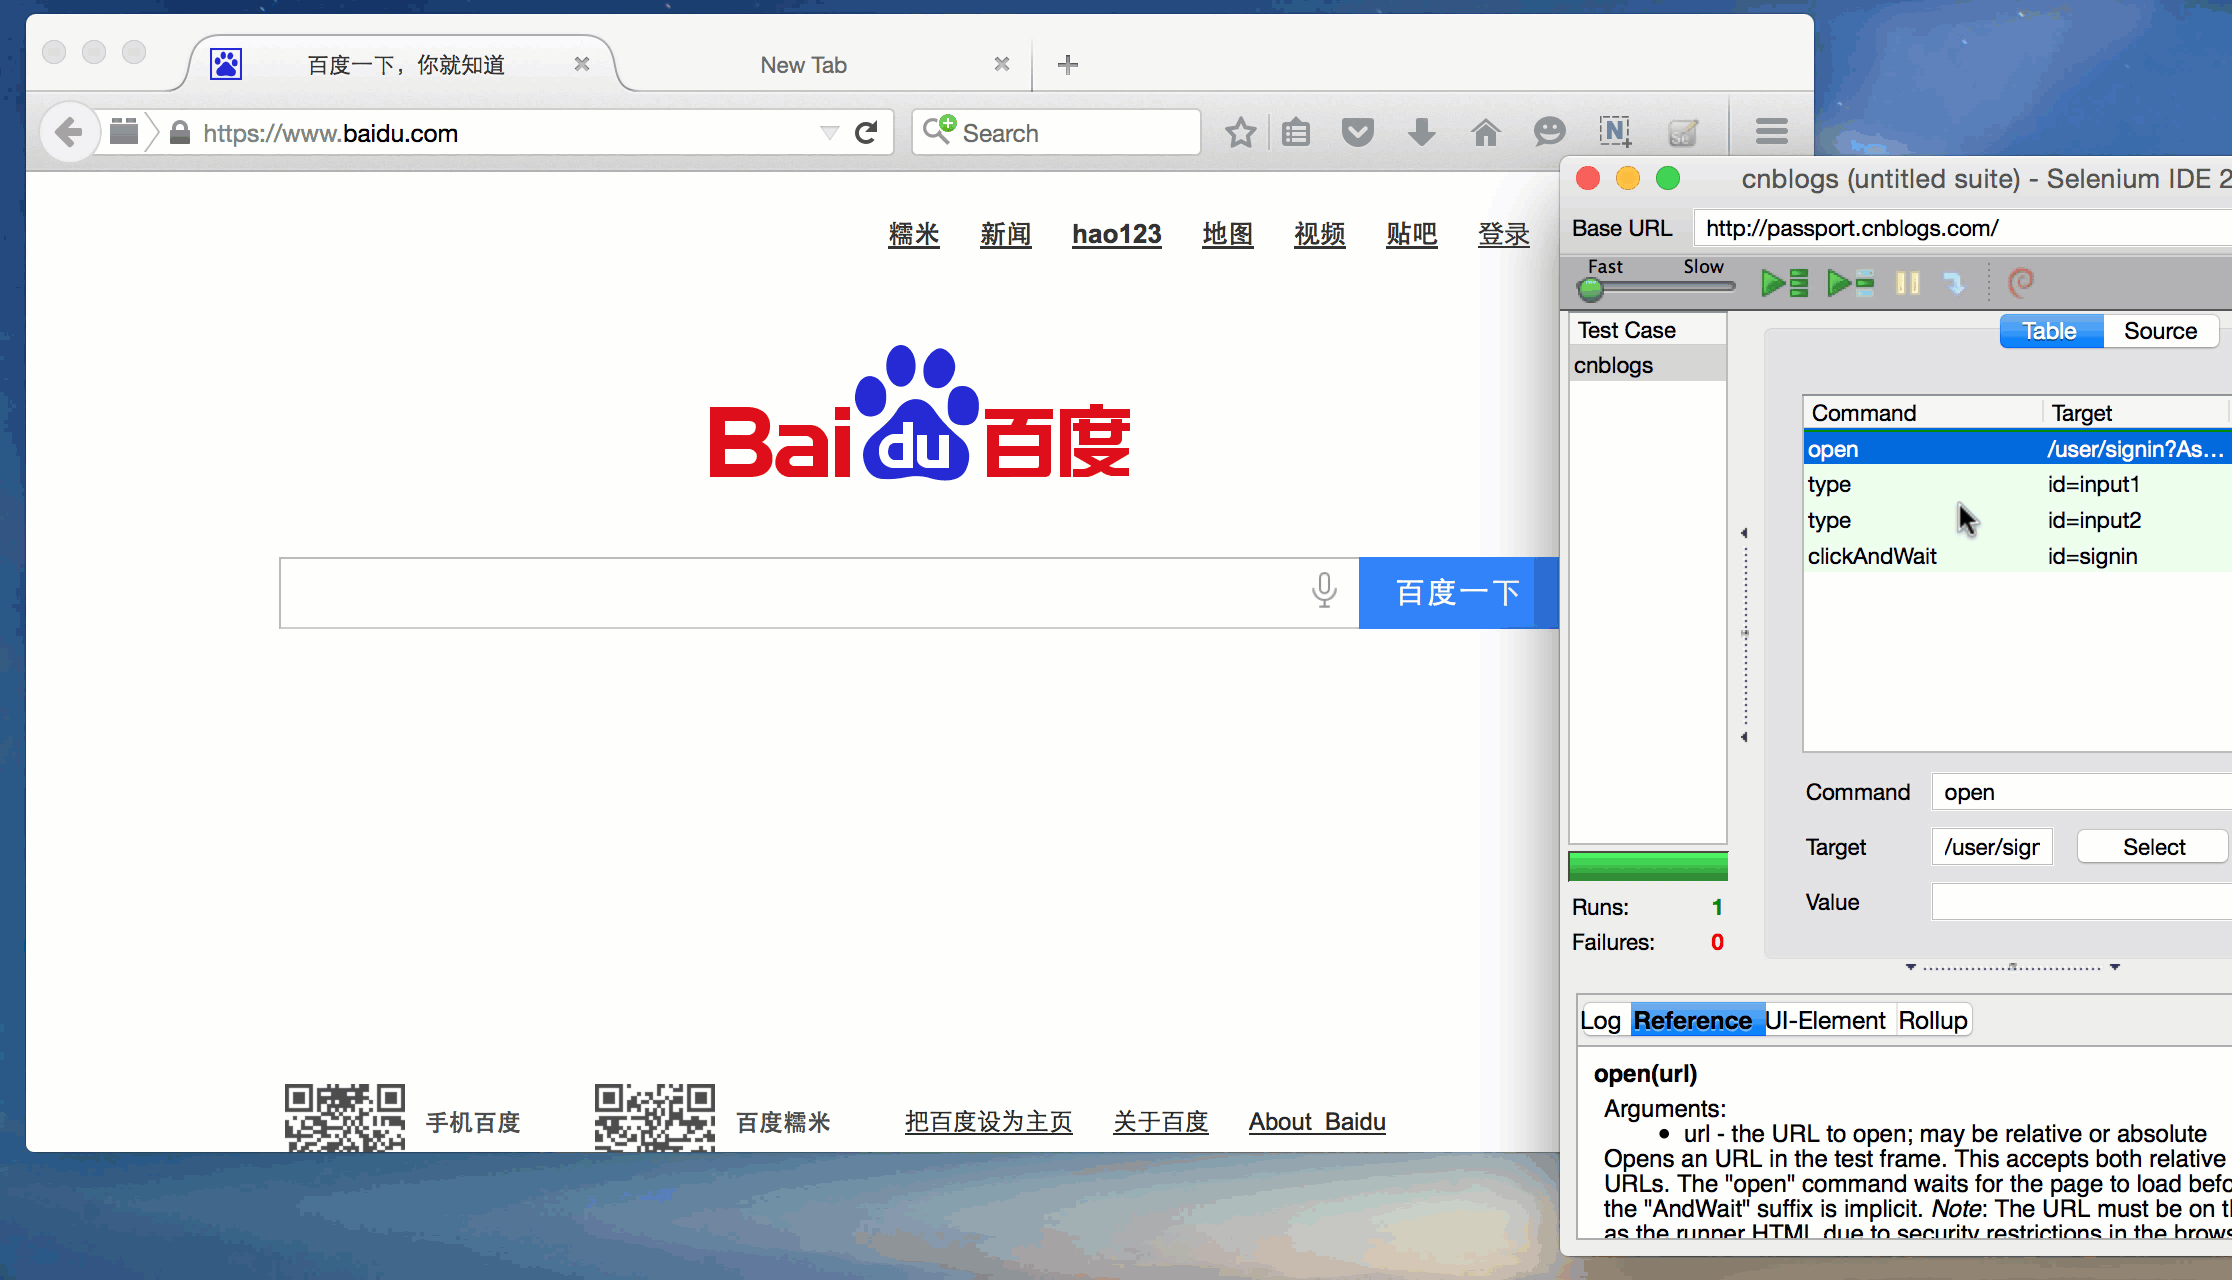
以登录cnblogs为例
IDE启动时,默认状态下是正在录制的

如果没有处于录制状态,需要点击右上角的红色按钮
我们在浏览器上一次进行以下操作
- 输入URL地址http://passport.cnblogs.com/user/signin,并访问
- 输入用户名、密码
- 点击登录

HTML table格式
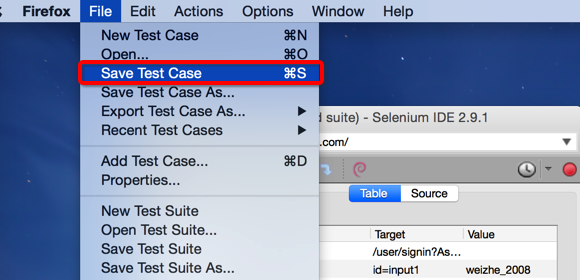
保存测试文件
查看录制文件
  	<?xml version="1.0" encoding="UTF-8"?>

  	<!DOCTYPE html PUBLIC "-//W3C//DTD XHTML 1.0 Strict//EN" "http://www.w3.org/TR/xhtml1/DTD/xhtml1-strict.dtd">

  	<html xmlns="http://www.w3.org/1999/xhtml" xml:lang="en" lang="en">

  	<head profile="http://selenium-ide.openqa.org/profiles/test-case">

  	<meta http-equiv="Content-Type" content="text/html; charset=UTF-8" />

  	<link rel="selenium.base" href="http://passport.cnblogs.com/" />

  	<title>cnblogs</title>

  	</head>

  	<body>

  	<table cellpadding="1" cellspacing="1" border="1">

  	<thead>

  	<tr><td rowspan="1" colspan="3">cnblogs</td></tr>

  	</thead><tbody>

  	<tr>

  		<td>open</td>

  		<td>/user/signin?AspxAutoDetectCookieSupport=1</td>

  		<td></td>

  	</tr>

  	<tr>

  		<td>type</td>

  		<td>id=input1</td>

  		<td>weizhe_2008</td>

  	</tr>

  	<tr>

  		<td>type</td>

  		<td>id=input2</td>

  		<td>********</td>

  	</tr>

  	<tr>

  		<td>clickAndWait</td>

  		<td>id=signin</td>

  		<td></td>

  	</tr>

  	</tbody></table>

  	</body>

  	</html>
导出其他格式(Java,Ruby)
同样在文件菜单下,我们可以选择导出java或其他语言(File-> Export Test Case As...)

Java(Java / TestNG / WebDriver)
  package com.example.tests;

  import java.util.regex.Pattern;

  import java.util.concurrent.TimeUnit;

  import org.testng.annotations.*;

  import static org.testng.Assert.*;

  import org.openqa.selenium.*;

  import org.openqa.selenium.firefox.FirefoxDriver;

  import org.openqa.selenium.support.ui.Select;

  public class Cnblogs {

    private WebDriver driver;

    private String baseUrl;

    private boolean acceptNextAlert = true;

    private StringBuffer verificationErrors = new StringBuffer();

    @BeforeClass(alwaysRun = true)

    public void setUp() throws Exception {

      driver = new FirefoxDriver();

      baseUrl = "http://passport.cnblogs.com/";

      driver.manage().timeouts().implicitlyWait(30, TimeUnit.SECONDS);

    }

    @Test

    public void testCnblogs() throws Exception {

      driver.get(baseUrl + "/user/signin?AspxAutoDetectCookieSupport=1");

      driver.findElement(By.id("input1")).clear();

      driver.findElement(By.id("input1")).sendKeys("weizhe_2008");

      driver.findElement(By.id("input2")).clear();

      driver.findElement(By.id("input2")).sendKeys("********");

      driver.findElement(By.id("signin")).click();

    }

    @AfterClass(alwaysRun = true)

    public void tearDown() throws Exception {

      driver.quit();

      String verificationErrorString = verificationErrors.toString();

      if (!"".equals(verificationErrorString)) {

        fail(verificationErrorString);

      }

    }

    private boolean isElementPresent(By by) {

      try {

        driver.findElement(by);

        return true;

      } catch (NoSuchElementException e) {

        return false;

      }

    }

    private boolean isAlertPresent() {

      try {

        driver.switchTo().alert();

        return true;

      } catch (NoAlertPresentException e) {

        return false;

      }

    }

    private String closeAlertAndGetItsText() {

      try {

        Alert alert = driver.switchTo().alert();

        String alertText = alert.getText();

        if (acceptNextAlert) {

          alert.accept();

        } else {

          alert.dismiss();

        }

        return alertText;

      } finally {

        acceptNextAlert = true;

      }

    }

  }
Ruby(Ruby / RSpec / WebDriver)
  	require "json"

      require "selenium-webdriver"

      require "rspec"

      include RSpec::Expectations

      describe "Cnblogs" do

        before(:each) do

          @driver = Selenium::WebDriver.for :firefox

          @base_url = "http://passport.cnblogs.com/"

          @accept_next_alert = true

          @driver.manage.timeouts.implicit_wait = 30

          @verification_errors = []

        end

        after(:each) do

          @driver.quit

          @verification_errors.should == []

        end

        it "test_cnblogs" do

          @driver.get(@base_url + "/user/signin?AspxAutoDetectCookieSupport=1")

          @driver.find_element(:id, "input1").clear

          @driver.find_element(:id, "input1").send_keys "weizhe_2008"

          @driver.find_element(:id, "input2").clear

          @driver.find_element(:id, "input2").send_keys "********"

          @driver.find_element(:id, "signin").click

        end

        def element_present?(how, what)

          ${receiver}.find_element(how, what)

          true

        rescue Selenium::WebDriver::Error::NoSuchElementError

          false

        end

        def alert_present?()

          ${receiver}.switch_to.alert

          true

        rescue Selenium::WebDriver::Error::NoAlertPresentError

          false

        end

        def verify(&blk)

          yield

        rescue ExpectationNotMetError => ex

          @verification_errors << ex

        end

        def close_alert_and_get_its_text(how, what)

          alert = ${receiver}.switch_to().alert()

          alert_text = alert.text

          if (@accept_next_alert) then

            alert.accept()

          else

            alert.dismiss()

          end

          alert_text

        ensure

          @accept_next_alert = true

        end

      end
回放
点击Selenium IDE菜单栏上的绿色按钮

执行结果
结束
Selenium (3) —— Selenium IDE + Firefox录制登录脚本(101 Tutorial)的更多相关文章
- Selenium IDE脚本录制步骤简介
录制脚本步骤: 1.打开Selenium IDE,输入需要录制脚本的地址,然后启动Firefox,输入selenium IDE需录制的地址,根据实际需求,做相关操作: 2.录制过程中,会发现做的相关操 ...
- Selenium (4) —— Selenium是什么? WebDriver是什么?做什么?(101 Tutorial)
Selenium (4) -- Selenium是什么? WebDriver是什么?做什么?(101 Tutorial) selenium版本: v2.48.0 (Standalone Seleniu ...
- Selenium (2) —— Selenium WebDriver + Grid2(101 Tutorial)
Selenium (2) -- Selenium WebDriver + Grid2(101 Tutorial) jvm版本: 1.8.0_65 selenium版本: v2.48.0 (Standa ...
- Selenium (1) —— Selenium安装与测试(101 Tutorial)
Selenium (1) -- Selenium安装与测试(101 Tutorial) jvm版本: 1.8.0_65 selenium版本: v2.48.0 (Standalone Selenium ...
- Selenium+python+shell+crontab+firefox
最近在尝试一个自动打卡的脚本,发现了几个问题,特此记录一下. 环境: Ubuntu 12.04.4 LTS selenium 2.43.0 firefox 32.0.3 1 本来机器上selenium ...
- 【selenium】- selenium简介
本文由小编根据慕课网视频亲自整理,转载请注明出处和作者. 1. Selenium的来历 2. Selenium家庭成员 Selenium RC: Selenium 1 Selenium Webdriv ...
- JMeter (3) —— JMeter录制脚本并压力测试用户登陆场景以CAS SSO为例(101 Tutorial)
JMeter (3) -- JMeter录制脚本并压力测试用户登陆场景以CAS SSO为例(101 Tutorial) 主要内容 JMeter录制脚本并进行压力测试用户登陆场景,并以CAS SSO单点 ...
- selenium - 查看selenium版本信息
1. pip list 2. pip show selenium 3. cmd>>python >>> import selenium>>> help( ...
- Selenium(一)---Selenium的安装和使用
一.前言 最近在帮一个老师爬取网页内容,发现网页是动态加载的,为了拿到全部的网页数据,这里使用到了Selenium.Selenium 是一个用于Web应用程序测试的工具,它可以模拟真实浏览器,支持多种 ...
随机推荐
- 学习笔记之 curl 命令用法详解
[前言] 本文翻译和整理自 Linux-2.6.32 中和 curl 相关的 Manual Page 描述文档. 文档目的仅在提醒读者所遗忘的知识点,故在整理时削弱了阅读流畅性,适用于对 cu ...
- linux中WDCP的日志彻底删除技巧
apache或nginx都有开关默认日志,一个是正常访问日志,一个是错误的日志,目录在 /www/wdlinux/nginx-1.0.15/logs /www/wdlinux/httpd-2.2.22 ...
- nginx Server names
通配符名称 正則表達式名称 混合名称 优化 兼容性 server名称定义使用的server_name指令和决定哪个server块用于一个给定的请求. 參见"怎样Nginx处理一个请求&quo ...
- [转]Maven - 环境配置
Maven 是一个基于 Java 的工具,所以要做的第一件事情就是安装 JDK. 系统要求 项目 要求 JDK Maven 3.3 要求 JDK 1.7 或以上Maven 3.2 要求 JDK 1.6 ...
- mac 利用 sshpass 自动登录
mac 利用 sshpass + 配置文件 实现自动登录 使用方式 https://github.com/vipzhicheng/go 参见此项目 其实原理也就是 脚本 读取配置文件 匹配 参数或 ...
- pip安装包时遇到的Bug
[背景] 今天打包人生中的第一个package到PyPi,在linux上执行pip3 install mysqltools-python安装一点问题都没有,打脸的是在自己的MAC上 居然安装不上 pi ...
- mysql在插入或更新的时候对一个字段赋递增值
在我们有一个需求是更新某个表里面的某个字段,让这个字段变成一个递增的值,或者插入某个表中使得某些字段的值是递增的.下面我们来看看具体的操作: 更改表字段为递增 首先设置一个变量,初始值为任意数值,这里 ...
- jQuery CSS()方法改变CSS样式实例解析
转自:http://www.jbxue.com/article/24588.html 分享一个jQuery入门实例:使用CSS()方法改变现有的CSS样式表,css()方法在使用上具有多样性.其中有一 ...
- Java常考面试题(一)
序言 我是一只乱飞乱撞的菜鸟,写的文章目前是以记录自己学习,和方便以后查看,期待日后不久能通过自己的努力,获得一点小小的成功,然后写出我的学习经验总结性文章来. ---WH 一.什么是虚拟机?为什么J ...
- 【Unity】9.3 粒子系统生成器详解
分类:Unity.C#.VS2015 创建日期:2016-05-02 一.简介 上一节已经介绍过了在Unity 5.x中两种创建粒子效果的方式(方式1.方式2). 这一节我们主要学习第2种方式的基本概 ...