本篇基于上一篇搭建的服务器端环境,具体介绍Android真机上传数据到tomcat服务器的交互过程
场景:Android客户端上传用户名和密码到tomcat服务端,tomcat服务器自动接收Android客户端上传的数据,并打印出结果
一、tomcat服务器端实现
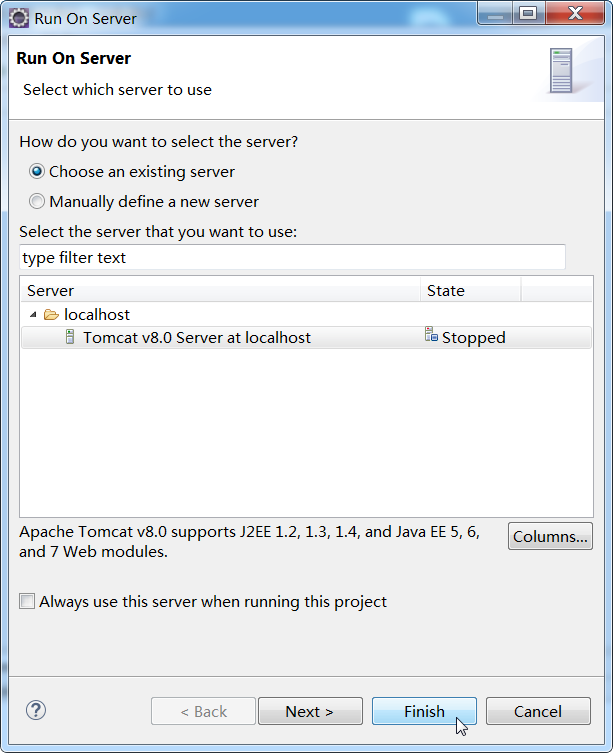
1.首先启动tomcat服务器
直接点击“finish”即可,启动后效果如下:
2. 编写servlet实现:ServletDemo1.java
package com.servlet.demo;
import java.io.IOException;
import java.io.PrintWriter;
import javax.servlet.ServletException;
import javax.servlet.annotation.WebServlet;
import javax.servlet.http.HttpServlet;
import javax.servlet.http.HttpServletRequest;
import javax.servlet.http.HttpServletResponse;
/**
* Servlet implementation class ServletDemo1
*/
@WebServlet(asyncSupported = true, urlPatterns = { "/ServletDemo1" })
public class ServletDemo1 extends HttpServlet {
private static final long serialVersionUID = 1L;
private static Log Log = LogFactory.getLog(ServletDemo1.class);
/**
* The doGet method of the servlet. <br>
*
* This method is called when a form has its tag value method equals to get.
*
* @param request
* the request send by the client to the server
* @param response
* the response send by the server to the client
* @throws ServletException
* if an error occurred
* @throws IOException
* if an error occurred
*/
public void doGet(HttpServletRequest request, HttpServletResponse response) throws ServletException, IOException {
response.setContentType("text/html");
PrintWriter out = response.getWriter();
out.println("<!DOCTYPE HTML PUBLIC \"-//W3C//DTD HTML 4.01 Transitional//EN\">");
out.println("<HTML>");
out.println(" <HEAD><TITLE>A Servlet</TITLE></HEAD>");
out.println(" <BODY>");
out.print(" This is ");
out.print(this.getClass());
out.println(", using the GET method");
out.println(" </BODY>");
out.println("</HTML>");
out.flush();
out.close();
// 获取请求的数据,并向控制台输出
String username = request.getParameter("username");
String password = request.getParameter("password");
System.out.println("-----> doGet username:" + username + " password:" + password);
}
/**
* The doPost method of the servlet. <br>
*
* This method is called when a form has its tag value method equals to
* post.
*
* @param request
* the request send by the client to the server
* @param response
* the response send by the server to the client
* @throws ServletException
* if an error occurred
* @throws IOException
* if an error occurred
*/
public void doPost(HttpServletRequest request, HttpServletResponse response) throws ServletException, IOException {
response.setContentType("text/html");
PrintWriter out = response.getWriter();
out.println("<!DOCTYPE HTML PUBLIC \"-//W3C//DTD HTML 4.01 Transitional//EN\">");
out.println("<HTML>");
out.println(" <HEAD><TITLE>A Servlet</TITLE></HEAD>");
out.println(" <BODY>");
out.print(" This is ");
out.print(this.getClass());
out.println(", using the POST method");
out.println(" </BODY>");
out.println("</HTML>");
out.flush();
out.close();
// 获取请求的数据,并向控制台输出
String username = request.getParameter("username");
String password = request.getParameter("password");
System.out.println("-----> doPost username:" + username + " password:" + password);
}
}
3.运行Servlet
运行成功:
二、Android客户端实现
1. 主页 MainActivity
package com.example.client;
import android.app.Activity;
import android.os.Bundle;
import android.view.View;
import android.widget.Button;
import android.widget.EditText;
public class MainActivity extends Activity {
private EditText username;
private EditText password;
private Button signup;
@Override
protected void onCreate(Bundle savedInstanceState) {
super.onCreate(savedInstanceState);
setContentView(R.layout.activity_main);
username = (EditText) findViewById(R.id.account);
password = (EditText) findViewById(R.id.password);
signup = (Button) findViewById(R.id.btnSign);
signup.setOnClickListener(new View.OnClickListener() {
@Override
public void onClick(View v) {
onLogin();
}
});
}
// 发起HTTP请求
public void onLogin() {
new HttpTread(url, username.getText().toString(), password.getText().toString()).start();
}
}
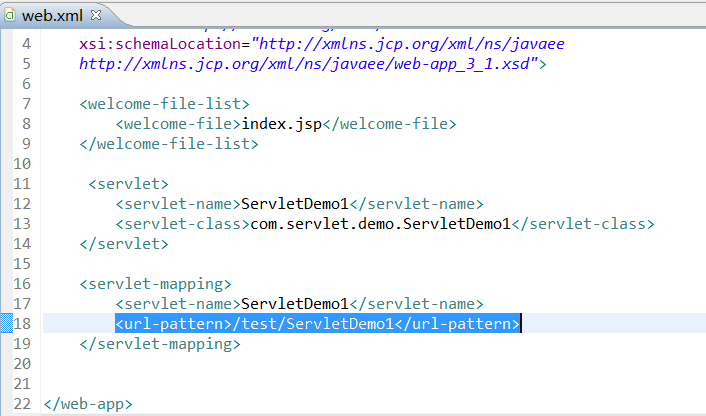
说明:
2. First:是web工程名
3. test/ServletDemo1:是如下高亮部分映射的名称
2. 线程HttpTread
package com.example.client;
import java.io.BufferedReader;
import java.io.IOException;
import java.io.InputStreamReader;
public class HttpTread extends Thread {
String url;
String username;
String password;
public HttpTread(String url, String username, String password) {
this.url = url;
this.username = username;
this.password = password;
}
private void send() throws IOException {
// 将username和password传给Tomcat服务器
url = url + "?username=" + username + "&password=" + password;
try {
URL httpUrl = new URL(url);
// 获取网络连接
HttpURLConnection conn = (HttpURLConnection) httpUrl.openConnection();
// 设置请求方法为GET方法
conn.setRequestMethod("GET"); // 或 "POST"
// 设置访问超时时间
conn.setReadTimeout(5000);
BufferedReader reader = new BufferedReader(new InputStreamReader(conn.getInputStream()));
String str;
StringBuffer sb = new StringBuffer();
// 读取服务器返回的信息
while ((str = reader.readLine()) != null) {
sb.append(str);
}
// 把服务端返回的数据打印出来
System.out.println("HttpTreadResult:" + sb.toString());
} catch (MalformedURLException e) {
}
}
@Override
public void run() {
super.run();
try {
send();
} catch (IOException e) {
e.printStackTrace();
}
}
}
3. AndroidManifest.xml
<?xml version="1.0" encoding="utf-8"?>
package="com.example.client"
android:versionCode="1"
android:versionName="1.0" >
<uses-sdk
android:minSdkVersion="25"
android:targetSdkVersion="25" />
<uses-permission android:name="android.permission.INTERNET" />
<application
android:allowBackup="true"
android:icon="@drawable/ic_launcher"
android:label="@string/app_name"
android:theme="@style/AppTheme" >
<activity
android:name=".MainActivity"
android:label="@string/app_name" >
<intent-filter>
<action android:name="android.intent.action.MAIN" />
<category android:name="android.intent.category.LAUNCHER" />
</intent-filter>
</activity>
</application>
</manifest>
说明:
需要声明权限:<uses-permission android:name="android.permission.INTERNET" />
编码结束。
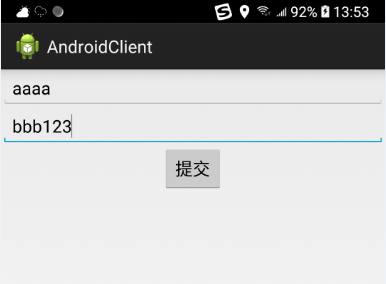
4. Android 客户端主页面:
填写用户名和密码,例如:用户名:aaaa 密码:bbb123
点击“提交”按钮。切换到Eclipse中,可以看到Tomcat自动打印出所提交的数据:
完成。
- Android 本地tomcat服务器接收处理手机上传的数据之环境搭建
上一篇:Android 使用tomcat搭建HTTP文件下载服务器 本篇文章 环境:win7 + jdk1.7 + tomcat v8.0.53 工具: 1.Eclipse Eclips ...
- 利用exif.js解决ios或Android手机上传竖拍照片旋转90度问题
html5+canvas进行移动端手机照片上传时,发现ios手机上传竖拍照片会逆时针旋转90度,横拍照片无此问题:Android手机没这个问题. 因此解决这个问题的思路是:获取到照片拍摄的方向角,对非 ...
- (2)MyEclipse怎么关联本地Tomcat服务器
1,在MyEclipse中点击服务器按钮: 2,选择“Configure Server” 3,在弹出面板中选择 [Servers]-[Tomcat]-[对应版本的服务器] 5,看上图,先选择Enabl ...
- 利用exif.js解决ios手机上传竖拍照片旋转90度问题
html5+canvas进行移动端手机照片上传时,发现ios手机上传竖拍照片会逆时针旋转90度,横拍照片无此问题:Android手机没这个问题. 因此解决这个问题的思路是:获取到照片拍摄的方向角,对非 ...
- 转 Android网络编程之使用HttpClient批量上传文件 MultipartEntityBuilder
请尊重他人的劳动成果,转载请注明出处:Android网络编程之使用HttpClient批量上传文件 http://www.tuicool.com/articles/Y7reYb 我曾在<Andr ...
- 解决ios手机上传竖拍照片旋转90度问题
html5+canvas进行移动端手机照片上传时,发现ios手机上传竖拍照片会逆时针旋转90度,横拍照片无此问题:Android手机没这个问题. 因此解决这个问题的思路是:获取到照片拍摄的方向角,对非 ...
- 利用exif.js解决手机上传竖拍照片旋转90\180\270度问题
原文:https://blog.csdn.net/linlzk/article/details/48652635/ html5+canvas进行移动端手机照片上传时,发现ios手机上传竖拍照片会逆时针 ...
- android中的文件(图片)上传
android中的文件(图片)上传其实没什么复杂的,主要是对 multipart/form-data 协议要有所了解. 关于 multipart/form-data 协议,在 RFC文档中有详细的描述 ...
- 学习Git的一点心得以及如何把本地修改、删除的代码上传到github中
一:学习Github的资料如下:https://git.oschina.net/progit/ 这是一个学习Git的中文网站,如果诸位能够静下心来阅读,不要求阅读太多,只需要阅读前三章,就可以掌握Gi ...
随机推荐
- PLSQL Developer删除奇葩表出现异常ORA-00942: 表或试图不存在
简单描述一下问题:发现数据库里有两个名称相同的表,不同的是PLSQL Developer里一个表名显示是大写,而另一个表名显示是小写 一般情况下,无论建表语句是大写,还是小写,因Oracle是区分大小 ...
- Saltstack配置管理(2)
1.SaltStack批量安装zabbix_agent端. vim /etc/salt/states/init/zabbix_agnet.sls zabbix_install.conf: pkg.in ...
- python程序的输入输出(acm的几个小程序)
1, A+B Problem : http://acm.sdut.edu.cn/sdutoj/problem.php?action=showproblem&problemid=1000 #! ...
- 磁盘格式化/磁盘挂载/手动增加swap空间
4.5/4.6 磁盘格式化 4.7/4.8 磁盘挂载 4.9 手动增加swap空间 磁盘格式化 查看centos7支持的文件系统格式 cat /etc/filesystem,centos7默认的文件 ...
- 两个大数组foreach,找出相同的key数量,所用的时间对比
<?php function microtime_float() { list($usec, $sec) = explode(" ", microtime()); retur ...
- Kafka配置说明
Broker Configs Property Default Description broker.id 每个broker都可以用一个唯一的非负整数id进行标识:这个id可以作为broker的 ...
- winform下 PictureBox 显示网络图片
Image pic = new Image.FromStream(WebRequest.Create("http://x.com/x.jpg").GetResponse().Get ...
- node.js和socket.io实现im
im——Instant Messaging 即时通讯 基本技术原理 (1)通过IM服务器登陆或注销 (2)用户A通过列表找到B,用户B获得消息并与之交谈 (3)通过IM服务器指引建立与B单独的通讯通道 ...
- Blender 建模
1.多图层切换 Blender也有图层的概念,我们在一个图层上建立了一个模型,可以在另外一个图层新建一个独立的模型.界面底部包含了Layer切换按钮.如下图所示: 当前我们正在操作第一个图层,如果想在 ...
- 如果你的eclipse在每次run或debug时都莫名其妙的做一件事
新项目,使用Ant打war包.结果写完了Ant以后,包是打好了,却使eclipse以后每次run或debug时都莫名其妙地自动先执行这个Ant, 让人十分苦恼. 其实,是你的eclipse设置出了问题 ...


.png)
.png)

.png)
.png)


.png)
.png)

.png)
.png)
