Spring入门(十四):Spring MVC控制器的2种测试方法
作为一名研发人员,不管你愿不愿意对自己的代码进行测试,都得承认测试对于研发质量保证的重要性,这也就是为什么每个公司的技术部都需要质量控制部的原因,因为越早的发现代码的bug,成本越低,比如说,Dev环境发现bug的成本要低于QA环境,QA环境发现bug的成本要低于Prod环境,Prod环境发现bug的成本最高,这也是每个研发人员最不愿意遇到但永远避不掉的现实。
虽然不能完全避免,但我们可以对自己的代码进行充分的测试,降低bug出现的几率。
所以, 本篇博客我们主要讲解下Spring MVC控制器的3种测试方法:
- 部署项目后测试
- 借助JUnit和Spring Test框架测试
- 借助SwaggerUI接口文档测试
1. 部署项目后测试
在前2篇博客中,我们采取的就是这种测试方式,即将项目打成war包,部署到Tomcat中,运行项目后, 借助浏览器或者Postman等工具对控制器进行测试。
如果是get请求,可以使用浏览器或者Postman测试。
如果是post、put、delete等请求,可以使用Postman进行测试。
有兴趣的同学,可以看下之前的2篇博客:
2. 借助Junit和Spring Test框架测试
上面的方法虽然可以进行测试,但每次都打包、部署、运行项目、测试,显然很不方便,不过强大的Spring通过Spring Test框架对集成测试提供了支持,接下来我们讲解具体的使用方法。
因为我们的Spring项目是通过maven管理的,所以它的项目结构有以下4个目录:
- src/main/java:项目代码
- src/main/resources:项目资源
- src/test/java:测试代码
- src/test/resources:测试资源(该目录默认没有生成,有需要的可以自己新建)
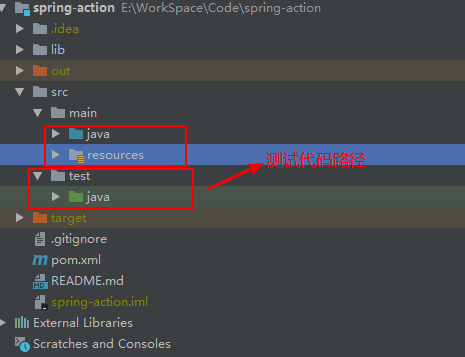
也就是说,我们可以将我们的测试代码放在src/test/java目录下,不过截止目前,我们还并未在该目录添加任何测试代码。
2.1 添加依赖
在添加测试代码前,我们需要在pom.xml中添加如下依赖:
<dependency>
    <groupId>org.springframework</groupId>
    <artifactId>spring-test</artifactId>
    <version>4.3.18.RELEASE</version>
    <scope>test</scope>
</dependency>
<dependency>
    <groupId>junit</groupId>
    <artifactId>junit</artifactId>
    <version>4.12</version>
    <scope>test</scope>
</dependency>也许有的同学会好奇,为啥本次添加的依赖增加了<scope>test</scope>, 它有啥作用呢?
带着这个疑问,我们编译下项目,发现原本编译正常的代码竟然编译报错了:

报错信息提示程序包org.junit不存在,可我们明明添加了该依赖啊,这是为什么呢,会不会和<scope>test</scope>有关呢?
恭喜你,猜对了,确实和<scope>test</scope>有关,如果你此时将该项移除,项目编译就不报错了(不过建议不要移除)。
这是因为,我们在之前添加测试代码时,都是放在src/main/java目录下的,现在依赖包增加了<scope>test</scope>,说明这些包的存活周期是在test周期,所以我们可以把之前的测试代码移到src/test/java目录下,如下所示:

再次编译项目,发现编译通过。
2.2 添加控制器
添加控制器前,新建DemoService如下所示:
package chapter05.service;

import org.springframework.stereotype.Service;

@Service
public class DemoService {
    public String saySomething() {
        return "hello";
    }
}
注意事项:该类添加了@Service注解。
然后,新建控制器NormalController,它里面的方法返回jsp视图:
package chapter05.controller;

import chapter05.service.DemoService;
import org.springframework.beans.factory.annotation.Autowired;
import org.springframework.stereotype.Controller;
import org.springframework.ui.Model;
import org.springframework.web.bind.annotation.RequestMapping;

@Controller
public class NormalController {
    @Autowired
    private DemoService demoService;

    @RequestMapping("/normal")
    public String testPage(Model model) {
        model.addAttribute("msg", demoService.saySomething());
        return "page";
    }
}
接着新建控制器MyRestController,它里面的方法直接返回信息:
package chapter05.controller;

import chapter05.service.DemoService;
import org.springframework.beans.factory.annotation.Autowired;
import org.springframework.web.bind.annotation.RequestMapping;
import org.springframework.web.bind.annotation.RestController;

@RestController
public class MyRestController {
    @Autowired
    private DemoService demoService;

    @RequestMapping(value = "/testRest", produces = "text/plain;charset=UTF-8")
    public String testRest() {
        return demoService.saySomething();
    }
}
2.3 添加测试代码
在src/test/java下新建包chapter05,然后在其下面新建测试类TestControllerIntegrationTests如下所示:
package chapter05;

import chapter05.config.MyMvcConfig;
import chapter05.service.DemoService;
import org.junit.Before;
import org.junit.runner.RunWith;
import org.springframework.beans.factory.annotation.Autowired;
import org.springframework.test.context.ContextConfiguration;
import org.springframework.test.context.junit4.SpringJUnit4ClassRunner;
import org.springframework.test.context.web.WebAppConfiguration;
import org.springframework.test.web.servlet.MockMvc;
import org.springframework.test.web.servlet.setup.MockMvcBuilders;
import org.springframework.web.context.WebApplicationContext;

@RunWith(SpringJUnit4ClassRunner.class)
@ContextConfiguration(classes = {MyMvcConfig.class})
@WebAppConfiguration("src/main/resources")
public class TestControllerIntegrationTests {
    private MockMvc mockMvc;

    @Autowired
    private DemoService demoService;

    @Autowired
    private WebApplicationContext webApplicationContext;

    @Before
    public void setup() {
        this.mockMvc = MockMvcBuilders.webAppContextSetup(this.webApplicationContext).build();
    }
}
代码讲解:
@RunWith(SpringJUnit4ClassRunner.class)用于在JUnit环境下提供Spring Test框架的功能。
@ContextConfiguration(classes = {MyMvcConfig.class})用来加载配置ApplicationContext,其中classes属性用来加载配置类,MyMvcConfig配置类的代码如下所示:
package chapter05.config;

import org.springframework.context.annotation.Bean;
import org.springframework.context.annotation.ComponentScan;
import org.springframework.context.annotation.Configuration;
import org.springframework.web.servlet.config.annotation.EnableWebMvc;
import org.springframework.web.servlet.view.InternalResourceViewResolver;
import org.springframework.web.servlet.view.JstlView;

/**
 * Spring MVC配置
 */
@Configuration
@EnableWebMvc
@ComponentScan("chapter05")
public class MyMvcConfig {
    /**
     * 视图解析器配置
     *
     * @return
     */
    @Bean
    public InternalResourceViewResolver viewResolver() {
        InternalResourceViewResolver viewResolver = new InternalResourceViewResolver();

        viewResolver.setPrefix("/WEB-INF/classes/views/");
        viewResolver.setSuffix(".jsp");
        viewResolver.setViewClass(JstlView.class);

        return viewResolver;
    }
}
@WebAppConfiguration("src/main/resources") 用来声明加载的ApplicationContext是一个WebApplicationContext,它的属性指定的是Web资源的位置,默认为src/main/webapp,这里我们修改成
src/main/resources。
MockMvc用来模拟Mvc对象,它在添加了@Before注解的setup()中,通过this.mockMvc = MockMvcBuilders.webAppContextSetup(this.webApplicationContext).build();进行初始化赋值。
然后往测试类中添加如下测试代码:
@Test
public void testNormalController() throws Exception {
    mockMvc.perform(get("/normal"))
            .andExpect(status().isOk())
            .andExpect(view().name("page"))
            .andExpect(forwardedUrl("/WEB-INF/classes/views/page.jsp"))
            .andExpect(model().attribute("msg", demoService.saySomething()));
}
代码解释:
perform(get("/normal"))用来模拟向/normal发起get请求,
andExpect(status().isOk())预期返回的状态码为200,
andExpect(view().name("page"))预期视图的逻辑名称为page,
andExpect(forwardedUrl("/WEB-INF/classes/views/page.jsp"))预期视图的真正路径是/WEB-INF/classes/views/page.jsp",
andExpect(model().attribute("msg", demoService.saySomething()))预期Model里有一个msg属性,它的值是demoService.saySomething()的返回值hello。
执行该测试方法,测试通过:

最后往测试类中添加如下测试代码:
@Test
public void testRestController() throws Exception {
    mockMvc.perform(get("/testRest"))
            .andExpect(status().isOk())
            .andExpect(content().contentType("text/plain;charset=UTF-8"))
            .andExpect(content().string(demoService.saySomething()));
}
代码解释:
perform(get("/testRest"))用来模拟向/testRest发起get请求,
andExpect(status().isOk())预期返回的状态码为200,
andExpect(content().contentType("text/plain;charset=UTF-8"))预期返回值的媒体类型为text/plain;charset=UTF-8,
andExpect(content().string(demoService.saySomething()))预期返回值的内容为demoService.saySomething()的返回值hello。
执行该测试方法,测试通过:

3. 源码及参考
源码地址:https://github.com/zwwhnly/spring-action.git,欢迎下载。
Craig Walls 《Spring实战(第4版)》
汪云飞《Java EE开发的颠覆者:Spring Boot实战》
4. 最后
欢迎扫码关注微信公众号:「申城异乡人」,定期分享Java技术干货,让我们一起进步。

Spring入门(十四):Spring MVC控制器的2种测试方法的更多相关文章
- Spring学习十四----------Spring AOP实例
© 版权声明:本文为博主原创文章,转载请注明出处 实例 1.项目结构 2.pom.xml <project xmlns="http://maven.apache.org/POM/4.0 ...
- Spring学习(十四)----- Spring Auto Scanning Components —— 自动扫描组件
一. Spring Auto Scanning Components —— 自动扫描组件 1. Declares Components Manually——手动配置componen ...
- Spring 学习十四 Spring security安全
Spring security: 我用过的安全机制: oauth2, filter, secured方法保护 9.2 保护web请求: 9.2.1 代理Servlet过滤器: Delegat ...
- Spring入门(十):Spring AOP使用讲解
1. 什么是AOP? AOP是Aspect Oriented Programming的缩写,意思是:面向切面编程,它是通过预编译方式和运行期动态代理实现程序功能的统一维护的一种技术. 可以认为AOP是 ...
- Spring Boot(十四):spring boot整合shiro-登录认证和权限管理
Spring Boot(十四):spring boot整合shiro-登录认证和权限管理 使用Spring Boot集成Apache Shiro.安全应该是互联网公司的一道生命线,几乎任何的公司都会涉 ...
- Spring入门(十二):Spring MVC使用讲解
1. Spring MVC介绍 提到MVC,参与过Web应用程序开发的同学都很熟悉,它是展现层(也可以理解成直接展现给用户的那一层)开发的一种架构模式,M全称是Model,指的是数据模型,V全称是Vi ...
- Spring入门(四)— 整合Struts和Hibernate
一.Spring整合Struts 1. 初步整合 只要在项目里面体现spring和 strut即可,不做任何的优化. struts 环境搭建 创建action public class UserAct ...
- Spring Boot2 系列教程(二十四)Spring Boot 整合 Jpa
Spring Boot 中的数据持久化方案前面给大伙介绍了两种了,一个是 JdbcTemplate,还有一个 MyBatis,JdbcTemplate 配置简单,使用也简单,但是功能也非常有限,MyB ...
- Spring Cloud(十四):Ribbon实现客户端负载均衡及其实现原理介绍
年后到现在一直很忙,都没什么时间记录东西了,其实之前工作中积累了很多知识点,一直都堆在备忘录里,只是因为近几个月经历了一些事情,没有太多的经历来写了,但是一些重要的东西,我还是希望能坚持记录下来.正好 ...
随机推荐
- Spring Boot 默认指标从哪来?
了解有关 Spring Boot 默认指标及其来源的更多信息. 您是否注意到 Spring Boot 和 Micrometer 为您的应用生成的所有默认指标? 如果没有 - 您可以将 actuator ...
- Linux相关安装文档
一.JDK环境安装 1.查看linux上是否存在已安装好的JDK (1)java -version openjdk version "1.8.0_181"OpenJDK Runti ...
- Unity之与Web的交互
一.下载,安装,配置,启动Apache 1.进入官网下载Apache 2.解压到根目录 3.记事本打开如下配置文件 4.安装apache 5.出现错误:(该错误是由于端口被占用引起的) 6.修改配置文 ...
- hdfs运行机制
hdfs:分布式文件系统 hdfs有着文件系统共同的特征: 1.有目录结构,顶层目录是: / 2.系统中存放的就是文件 3.系统可以提供对文件的:创建.删除.修改.查看.移动等功能 hdfs跟普通的 ...
- JSP学习笔记(3)——JSTL 标签库
JSP Standard Tag Lib,名为JSP标准标签库,设计的目的主要用来方便我们将数据输出,而不是使用JSP中的语法<% %> <%= %> <%! %> ...
- mysql安装-yum方式
1.环境 查看当前系统环境,使用的是 centos release 6.5 (Final). 2.检查当前系统是否已经安装过mysql rpm -qa | grep mysql 3.如果有,那么删除已 ...
- 转载 江南一点雨 一键部署docker
一键部署 Spring Boot 到远程 Docker 容器,就是这么秀! 不知道各位小伙伴在生产环境都是怎么部署 Spring Boot 的,打成 jar 直接一键运行?打成 war 扔到 To ...
- P1251 餐巾计划问题 费用流
https://www.luogu.org/problemnew/show/P1251 题意 有一家酒店,酒店每天需要ri张桌布,桌布可以现买,p元.可以通过快洗店,等m天,f元.可以通过慢洗店,等n ...
- 2019年牛客多校第一场 B题 Integration 数学
题目链接 传送门 思路 首先我们对\(\int_{0}^{\infty}\frac{1}{\prod\limits_{i=1}^{n}(a_i^2+x^2)}dx\)进行裂项相消: \[ \begin ...
- Python数据库小程序
源代码: # dict1 是 字典 , 用来对应相应元素的下标,我们将文件转成列表,对应的也就是文件的下标,通过下标来找文件元素 dict1 = {'sort':0 , 'name':1 ,'age' ...