HandyEditor 富文本编辑器整合到python flask项目中
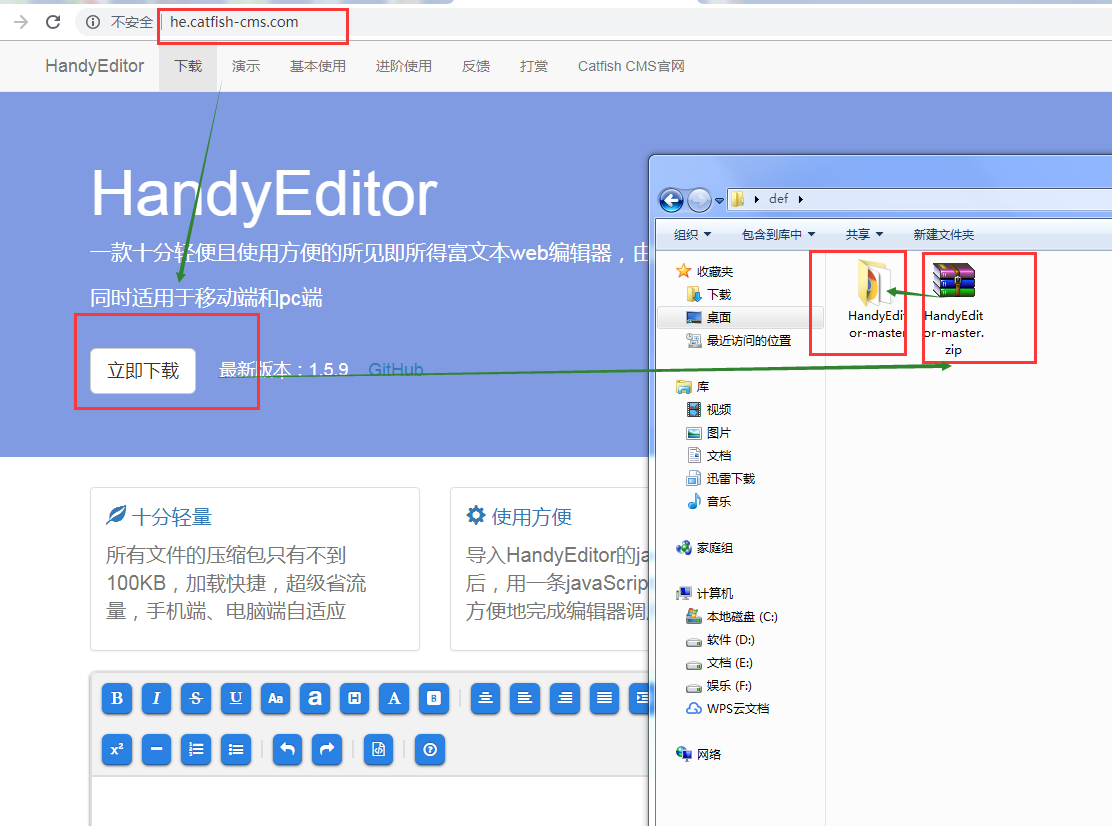
1.下载HandyEditor,地址http://he.catfish-cms.com/
2.解压后的文件名HandyEditor-master改为HandyEditor,文件夹里的文件如下
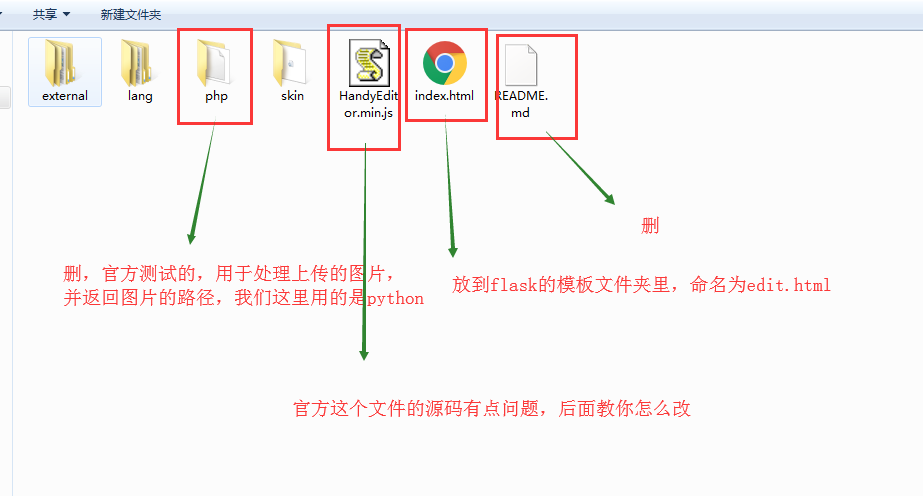
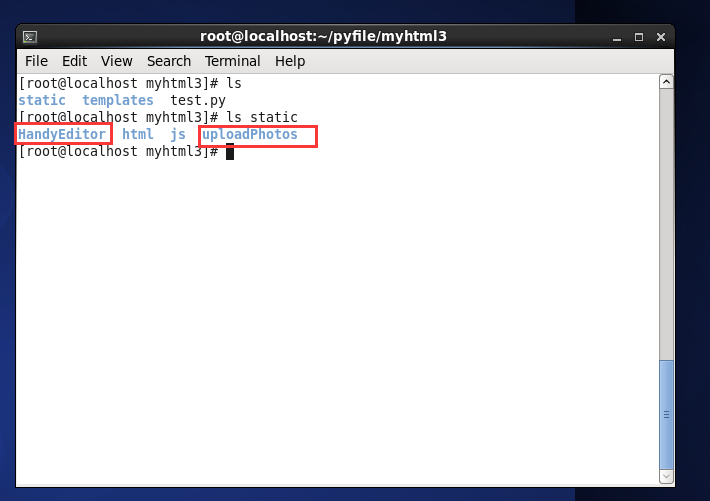
3.将HandyEditor文件夹放到项目的static文件夹里,并在static里新建一个文件夹命名uploadPhotos,用于放上传的图片
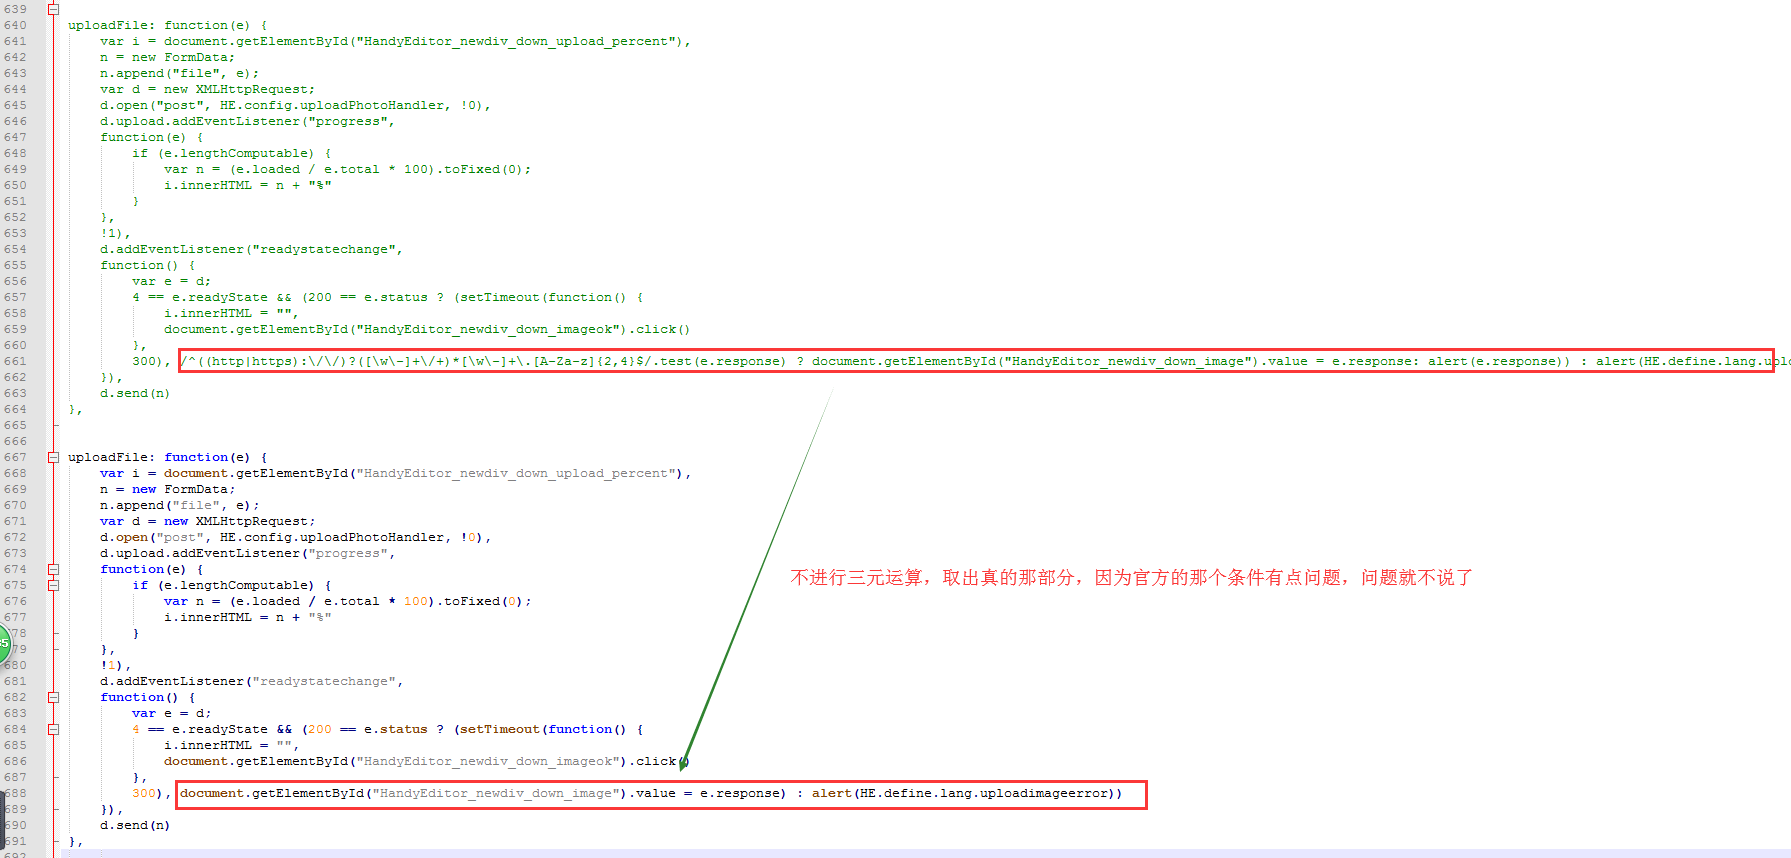
4.修改有问题的HandyEditor.min.js,打开文件可以看到js代码没有格式化,先到http://tool.oschina.net/codeformat/ 进行格式化
5.我的flask入口文件是test.py
 from flask import Flask

 from flask import request

 from flask import render_template

 from werkzeug import secure_filename

 import time

 UPLOAD_FOLDER = '/static/uploadPhotos/'

 ALLOWED_EXTENSIONS = set(['png', 'jpg', 'jpeg', 'gif'])

 app = Flask(__name__)

 def allowed_file(filename):

     return '.' in filename and \

 filename.rsplit('.', 1)[1] in ALLOWED_EXTENSIONS

 @app.route('/')

 def index():

     return 'hello world'

 @app.route('/edit/')

 def edit():

     return render_template('edit.html')

 @app.route('/uploadPhoto/',methods=['POST'])

 def uploadPhoto():

     '''

         the photo which I upload name 'file'

     '''

     if hasattr(request,'files') and 'file' in request.files:

         file = request.files['file']

         if file and allowed_file(file.filename):

             filename = secure_filename(file.filename)

             dotPos = filename.rindex('.')

             filename = str(int(time.time()))+'.'+filename[dotPos+1:]

             file.save(app.root_path+UPLOAD_FOLDER + filename)

             return UPLOAD_FOLDER + filename

         else:

             return 'your file uploaded had ploblem'

     else:

         return 'file which name \'file\' not exists'

 if __name__ == '__main__':

     app.run(host='0.0.0.0',debug=True)
代码解析:
编辑器页面在路由 /edit/
处理post过来的图片在路由 /uploadPhoto/
6.模板文件edit.html
<!DOCTYPE html>
<html lang="zh-CN">
<head>
<meta charset="utf-8">
<meta http-equiv="X-UA-Compatible" content="IE=edge">
<meta name="viewport" content="width=device-width, initial-scale=1">
<title>HandyEditor</title>
<style type="text/css">
small{font-size: 14px;color: #aaa;}
pre{padding: 5px;background-color: #eee;}
.textcenter{text-align: center;}
</style>
</head>
<body>
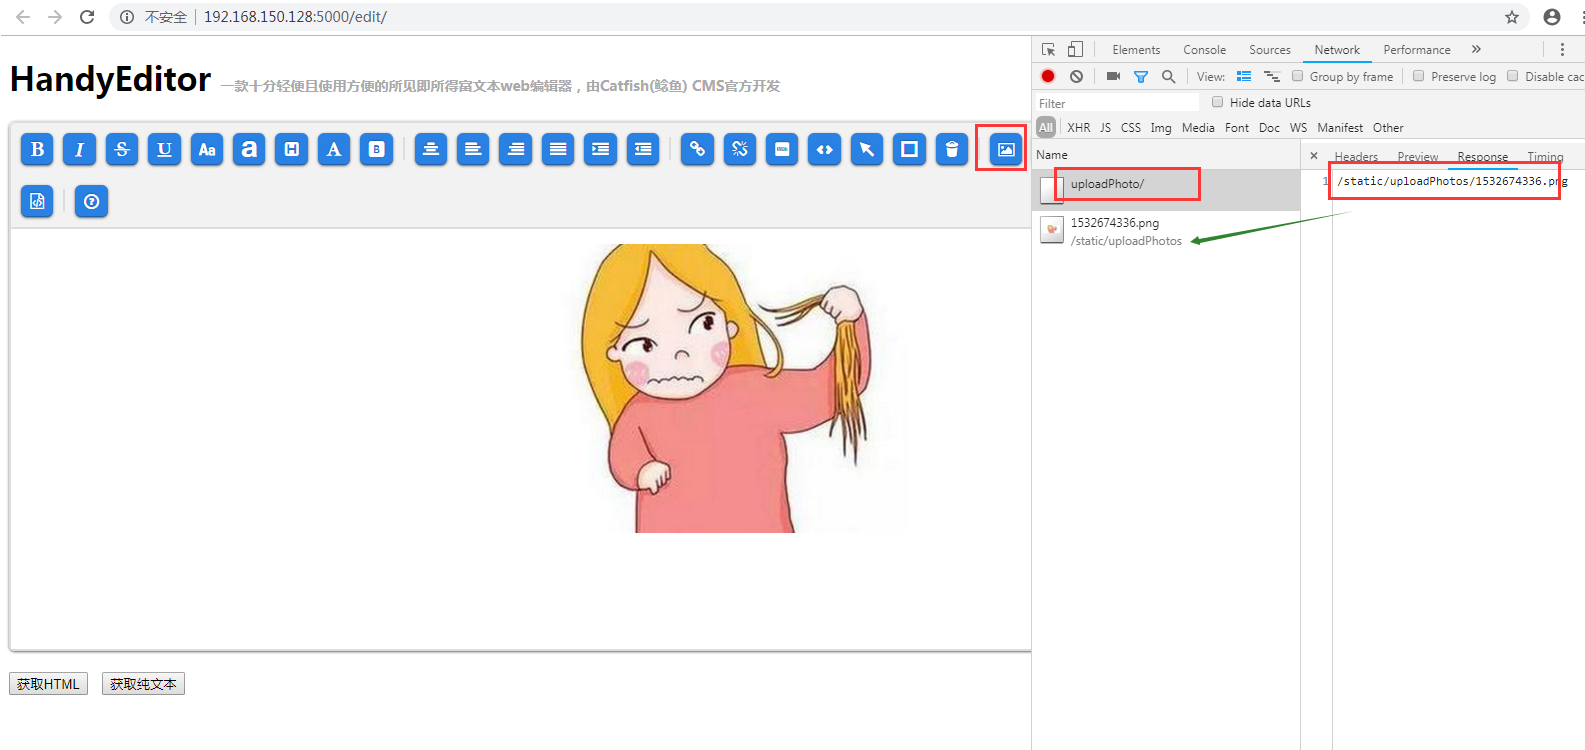
<h1>HandyEditor <small>一款十分轻便且使用方便的所见即所得富文本web编辑器,由Catfish(鲶鱼) CMS官方开发</small></h1> <textarea id="editor" name="editor" rows="5" style="display: none;"></textarea>
<br>
<button onclick="getHtml()">获取HTML</button>
<button onclick="getText()">获取纯文本</button>
<br><br>
<script src="/static/HandyEditor/HandyEditor.min.js"></script>
<script type="text/javascript">
var he = HE.getEditor('editor',{
width : '1400px',
height : '400px',
autoHeight : true,
autoFloat : false,
topOffset : 0,
uploadPhoto : true,
uploadPhotoHandler : '/uploadPhoto/',
uploadPhotoSize : 0,
uploadPhotoType : 'gif,png,jpg,jpeg',
uploadPhotoSizeError : '不能上传大于××KB的图片',
uploadPhotoTypeError : '只能上传gif,png,jpg,jpeg格式的图片',
lang : 'zh-jian',
skin : 'HandyEditor',
externalSkin : '',
item : ['bold','italic','strike','underline','fontSize','fontName','paragraph','color','backColor','|','center','left','right','full','indent','outdent','|','link','unlink','textBlock','code','selectAll','removeFormat','trash','|','image','expression','subscript','superscript','horizontal','orderedList','unorderedList','|','undo','redo','|','html','|','about'] }); function getHtml(){
alert(he.getHtml());
}
function getText(){
alert(he.getText());
}
</script>
</body>
</html>
注意:上传图片需要uploadPhoto : true,因为在HandyEditor.min.js配置是!1
还有处理上传的图片所在的路由,uploadPhotoHandler : '/uploadPhoto/'
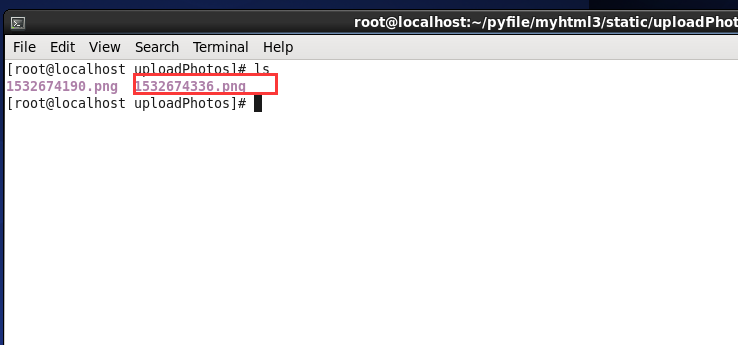
7.进行测试
附:
富文本编辑器上传图片用的是ajax文件异步上传,new FormData(),以后有时间再写一篇关于这个的文章
HandyEditor 富文本编辑器整合到python flask项目中的更多相关文章
- Vue CLI 3+tinymce 5富文本编辑器整合
基于Vue CLI 3脚手架搭建的项目整合tinymce 5富文本编辑器,vue cli 2版本及tinymce 4版本参考:https://blog.csdn.net/liub37/article/ ...
- 「newbee-mall新蜂商城开源啦」 页面优化,最新版 wangEditor 富文本编辑器整合案例
大家比较关心的新蜂商城 Vue3 版本目前已经开发了大部分内容,相信很快就能够开源出来让大家尝鲜了,先让大家看看当前的开发进度: 开源仓库地址为 https://github.com/newbee-l ...
- 15、Vue CLI 3+tinymce 5富文本编辑器整合
富文本编辑器里大佬们都说tinymce NB! 插件安装 inymce官方提供了一个vue的组件tinymce-vue 如果有注册或购买过服务的话,直接通过组件配置api-key直接使用,懒的注册或者 ...
- 百度富文本编辑器整合fastdfs文件服务器上传
技术:springboot+maven+ueditor 概述 百度富文本整合fastdfs文件服务器上传 详细 代码下载:http://www.demodashi.com/demo/15008.h ...
- tinymce富文本编辑器整合到django
第一步:定义表存图片路径 models.py class AdminIMG(models.Model): filename = models.CharField(max_length=200, ...
- 一款纯HTML+CSS+JS富文本编辑器-handyeditor
官网:http://he.catfish-cms.com/ 修改版本(修改一些BUG和图片上传服务器 点击下载: handyeditor富文本编辑器.zip): 图片上传接口上传类型: Content ...
- 14flask 渲染富文本编辑器
转载一个flask 渲染富文本编辑器: https://blog.csdn.net/qq_32198277/article/details/53355249 这里会产生一个问题: 通过富文本编辑器的数 ...
- 浅谈layer.open的弹出层中的富文本编辑器为何不起作用!
很多童鞋都喜欢用贤心的layui框架.是的,我也喜欢用,方便,简单.但是呢,有时候项目中的需求会不一样,导致我们用的时候,显示效果可能会不一样,好吧.这样的话,个别遇到的问题总是解决不好,但是呢还是那 ...
- bbs项目富文本编辑器实现上传文件到media目录
media目录是在project的settings中设置的,static目录是django自己使用的静态文件的上传目录,media目录是用户自定义上传文件的目录 # Django用户上传的文件都放在m ...
随机推荐
- w7 python35 输出中文乱码解决
1.乱码纷争在python自带的控制台正常 但是cmd就跪了,用的vs code也是同样问题,不想以前学习python27那么单纯,前面加个#UTF就可以了 网上寻求解决办法 import io,sy ...
- CDlinux系统破解无线wifi
CDlinux是破解无线wifi信号的很好用的系统.它就像一个PE,不过它是基于Linux内核的微型系统.里面的破解工具很齐全,既有传统的抓包工具,也有最新的PIN码破解软件,而且针对windows用 ...
- Shell脚本-自动化部署WEB
#! /bin/ ] then echo "#### 参数有误,\$1:构建号必填" exit fi cd /root/workspace/xinya_erp/xinya_web ...
- 【ASP.NET MVC系列】浅谈jqGrid 在ASP.NET MVC中增删改查
ASP.NET MVC系列文章 [01]浅谈Google Chrome浏览器(理论篇) [02]浅谈Google Chrome浏览器(操作篇)(上) [03]浅谈Google Chrome浏览器(操作 ...
- java基础系列--volatile关键字
原创作品,可以转载,但是请标注出处地址:http://www.cnblogs.com/V1haoge/p/7833881.html 1.volatile简述 据说,volatile是java语言中最轻 ...
- UnicodeDecodeError: 'ascii' codec can't decode byte
这个问题遇到过很多次了,但是每次都没记住,用完就忘了,这次记录下. 通过关键词谷歌一下: 解决方案: # encoding=utf8 import sys reload(sys) sys.setdef ...
- OJ:自己实现一个简单的 priority_queue
Description 补足程序,使得下面程序输出结果是: 1.8 2.4 3.8 4.9 8.8 #include <iostream> #include <algorithm&g ...
- IIS发布网站 报错500.19 错误解决过程记录
首先先报上我的环境 WindowsServer 2012 IIS 8.5 网站是FrameWork 4.0 发布网站后浏览,报错信息如下: 解决过程记录如下: 1.看到这个问题首先想到的是权限问题,设 ...
- WPF 水平进度条
WPF设计界面过程中,有时需要设计一种可以手动滑动修改并实时显示的进度条 进度条,效果如下: 颜色.图标.节点什么的,都可以重新替换. 前端XAML代码: <UserControl x:Clas ...
- c# nginx 配置
listen ; #端口 server_name localhost; #域名可以有多个 用空格隔开 #charset koi8-r; #access_log logs/host.access.log ...