Spring源码解析-Web容器启动过程
Web容器启动过程,主要讲解Servlet和Spring容器结合的内容。
流程图如下:
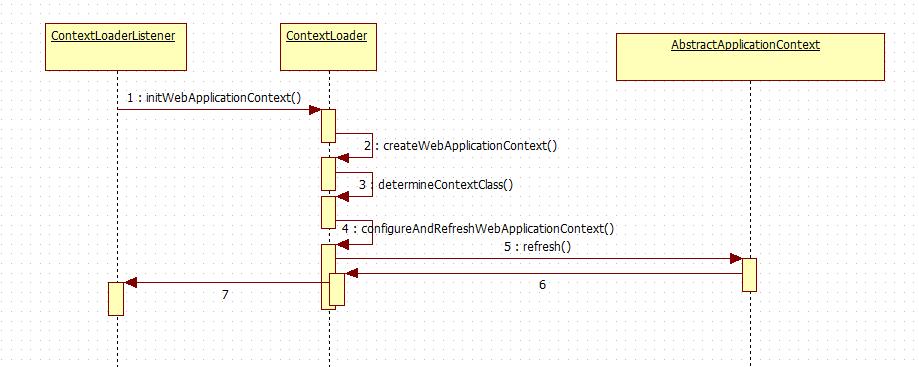
Web容器启动的Root Context是有ContextLoaderListener,一般使用spring,都会在web.xml中配置这个监听器。
<listener>

        <listener-class>org.springframework.web.context.ContextLoaderListener</listener-class>

    </listener>
下面就从这里入手,看看它是如何启动spring容器。
public class ContextLoaderListener extends ContextLoader implements ServletContextListener {

    public ContextLoaderListener(WebApplicationContext context) {

        super(context);

    }

    /**

     * Initialize the root web application context.

     */

    @Override

    public void contextInitialized(ServletContextEvent event) {

        initWebApplicationContext(event.getServletContext());

    }

    /**

     * Close the root web application context.

     */

    @Override

    public void contextDestroyed(ServletContextEvent event) {

        closeWebApplicationContext(event.getServletContext());

        ContextCleanupListener.cleanupAttributes(event.getServletContext());

    }

}
这个类继承了ContextLoader,同时实现了ServletContextListener,从注释上可以看出,web应用会调用contextInitalized方法进行初始化。
先看一下ServletContextListener.
public interface ServletContextListener extends EventListener {

    void contextInitialized(ServletContextEvent var1);

    void contextDestroyed(ServletContextEvent var1);

}
从名字可以看出,一个是初始化方法,另一个是销毁是调用的方法。
回到上面而initWebApplicationContext方法,通过createWebApplicationContext方法获取WebApplicationContext,调用determineContextClass方法如下:
/**

     * Return the WebApplicationContext implementation class to use, either the

     * default XmlWebApplicationContext or a custom context class if specified.

     * @param servletContext current servlet context

     * @return the WebApplicationContext implementation class to use

     * @see #CONTEXT_CLASS_PARAM

     * @see org.springframework.web.context.support.XmlWebApplicationContext

     */

    protected Class<?> determineContextClass(ServletContext servletContext) {

        String contextClassName = servletContext.getInitParameter(CONTEXT_CLASS_PARAM);

        if (contextClassName != null) {

            try {

                return ClassUtils.forName(contextClassName, ClassUtils.getDefaultClassLoader());

            }

            catch (ClassNotFoundException ex) {

                throw new ApplicationContextException(

                        "Failed to load custom context class [" + contextClassName + "]", ex);

            }

        }

        else {

            contextClassName = defaultStrategies.getProperty(WebApplicationContext.class.getName());

            try {

                return ClassUtils.forName(contextClassName, ContextLoader.class.getClassLoader());

            }

            catch (ClassNotFoundException ex) {

                throw new ApplicationContextException(

                        "Failed to load default context class [" + contextClassName + "]", ex);

            }

        }

    }
从注释上可以看出返回的是XmlWebApplicationContext。
回到initWebApplicationContext方法中,有一段
if (this.context instanceof ConfigurableWebApplicationContext) {

                ConfigurableWebApplicationContext cwac = (ConfigurableWebApplicationContext) this.context;

                if (!cwac.isActive()) {

                    // The context has not yet been refreshed -> provide services such as

                    // setting the parent context, setting the application context id, etc

                    if (cwac.getParent() == null) {

                        // The context instance was injected without an explicit parent ->

                        // determine parent for root web application context, if any.

                        ApplicationContext parent = loadParentContext(servletContext);

                        cwac.setParent(parent);

                    }

                    configureAndRefreshWebApplicationContext(cwac, servletContext);

                }

            }
会调用configureAndRefreshWebApplication方法,感觉是配置和刷新,进入方法。
protected void configureAndRefreshWebApplicationContext(ConfigurableWebApplicationContext wac, ServletContext sc) {

        if (ObjectUtils.identityToString(wac).equals(wac.getId())) {

            // The application context id is still set to its original default value

            // -> assign a more useful id based on available information

            String idParam = sc.getInitParameter(CONTEXT_ID_PARAM);

            if (idParam != null) {

                wac.setId(idParam);

            }

            else {

                // Generate default id...

                wac.setId(ConfigurableWebApplicationContext.APPLICATION_CONTEXT_ID_PREFIX +

                        ObjectUtils.getDisplayString(sc.getContextPath()));

            }

        }

        wac.setServletContext(sc);
        //获取配置的参数信息

        String configLocationParam = sc.getInitParameter(CONFIG_LOCATION_PARAM);

        if (configLocationParam != null) {

            wac.setConfigLocation(configLocationParam);

        }

        // The wac environment's #initPropertySources will be called in any case when the context

        // is refreshed; do it eagerly here to ensure servlet property sources are in place for

        // use in any post-processing or initialization that occurs below prior to #refresh

        ConfigurableEnvironment env = wac.getEnvironment();

        if (env instanceof ConfigurableWebEnvironment) {

            ((ConfigurableWebEnvironment) env).initPropertySources(sc, null);

        }

        customizeContext(sc, wac);
       //刷新上下文-->AbsreactApplicationContext.refresh()

        wac.refresh();

    }
至此,通过wac.refresh()启动Spring容器。
Spring源码解析-Web容器启动过程的更多相关文章
- spring源码:web容器启动(li)
web项目中可以集成spring的ApplicationContext进行bean的管理,这样使用起来bean更加便捷,能够利用到很多spring的特性.我们比较常用的web容器有jetty,tomc ...
- spring源码:web容器启动
web项目中可以集成spring的ApplicationContext进行bean的管理,这样使用起来bean更加便捷,能够利用到很多spring的特性.我们比较常用的web容器有jetty,tomc ...
- Fabric1.4源码解析: 链码容器启动过程
想写点东西记录一下最近看的一些Fabric源码,本文使用的是fabric1.4的版本,所以对于其他版本的fabric,内容可能会有所不同. 本文想针对Fabric中链码容器的启动过程进行源码的解析.这 ...
- Spring源码解析 – AnnotationConfigApplicationContext容器创建过程
Spring在BeanFactory基础上提供了一些列具体容器的实现,其中AnnotationConfigApplicationContext是一个用来管理注解bean的容器,从AnnotationC ...
- Spring源码解析-ioc容器的设计
Spring源码解析-ioc容器的设计 1 IoC容器系列的设计:BeanFactory和ApplicatioContext 在Spring容器中,主要分为两个主要的容器系列,一个是实现BeanFac ...
- Spring源码-IOC部分-容器初始化过程【2】
实验环境:spring-framework-5.0.2.jdk8.gradle4.3.1 Spring源码-IOC部分-容器简介[1] Spring源码-IOC部分-容器初始化过程[2] Spring ...
- 【Spring源码解析】—— 结合SpringMVC过程理解IOC容器初始化
关于IOC容器的初始化,结合之前SpringMVC的demo,对其过程进行一个相对详细的梳理,主要分为几个部分: 一.IOC的初始化过程,结合代码和debug过程重点说明 1. 为什么要debug? ...
- Spring源码解析-IOC容器的实现-ApplicationContext
上面我们已经知道了IOC的建立的基本步骤了,我们就可以用编码的方式和IOC容器进行建立过程了.其实Spring已经为我们提供了很多实现,想必上面的简单扩展,如XMLBeanFacroty等.我们一般是 ...
- Spring源码解析-IOC容器的实现
1.IOC容器是什么? IOC(Inversion of Control)控制反转:本来是由应用程序管理的对象之间的依赖关系,现在交给了容器管理,这就叫控制反转,即交给了IOC容器,Spring的IO ...
随机推荐
- TPO-10 C2 Return a literature book
TPO-10 C2 Return a literature book 第 1 段 1.Listen to a conversation between a student and an employe ...
- CMD Markdown basic & Math Cheatsheet
CMD Markdown basic & Math Cheatsheet I am using CMD Markdown both at work and for study.You can ...
- Fluent Python: Classmethod vs Staticmethod
Fluent Python一书9.4节比较了 Classmethod 和 Staticmethod 两个装饰器的区别: 给出的结论是一个非常有用(Classmethod), 一个不太有用(Static ...
- 在线求助man page
一.举例——输入“man date” 图1 图2 图3 二.man之概述 用于:命令的使用说明 用法:man 命令 man page:执行“man 命令”后,出现的屏幕界面 补:man是manual( ...
- MFC最基本动作(如创建窗口,点击取消等)函数的执行顺序
一.MFC应用程序中处理消息的顺序: 1.AfxWndProc() 该函数负责接收消息,找到消息所属的CWnd对象,然后调用AfxCallWndProc2.AfxCallWndProc() ...
- iOS-UILabel加线
NSAttributedString *attrStr =[[NSAttributedString alloc]initWithString:[NSString stringWithFormat:], ...
- OSG配置捷径,VS2013+WIN10
在自己电脑上用CMAKE已经编译好了,上传到百度云里面了. 环境是WIN10+VS2013. 链接:http://pan.baidu.com/s/1hrO7GFE 密码:fwkw 解压之后放在C盘或者 ...
- ZOJ 2072 K-Recursive Survival
https://vjudge.net/contest/67836#problem/K n people numbered 1 to n around a circle, we eliminate ev ...
- 检测固定IP的端口是否开放批出
因为运维工作经常需要telnet某个IP的端口是否正常,因此有了下文 .BAT内容如下: @echo off for /f %%i in ('type ip.txt') do ( echo %%i t ...
- (转)Elasticsearch .net client NEST使用说明 2.x
Elasticsearch.Net与NEST是Elasticsearch为C#提供的一套客户端驱动,方便C#调用Elasticsearch服务接口.Elasticsearch.Net是较基层的对Ela ...