
Django工程读取mongodb并使用分页器
pycharm开发django工程(二)
项目需求:
1. 从mongodb中读取数据,并显示到网页中
2. 在网页显示的每一页加入分页符
首先使用pycharm的企业版新建一个django的虚拟工程(参考我的上一个博客),这是初始的显示效果
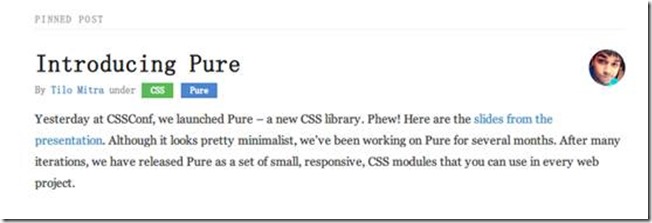
这是原始的html文件,css文件在本文的最后,至于图片就随意照一张改名就行
{% load static %}
<html lang="en">
<head>
<meta charset="utf-8">
<meta name="viewport" content="width=device-width, initial-scale=1.0">
<meta name="description" content="A layout example that shows off a blog page with a list of posts.">
<title>Blog – Layout Examples – Pure</title>
<link rel="stylesheet" href="http://yui.yahooapis.com/pure/0.6.0/pure-min.css' %}">
<link rel="stylesheet" href="http://yui.yahooapis.com/pure/0.6.0/grids-responsive-old-ie-min.css' %}">
<link rel="stylesheet" href="http://yui.yahooapis.com/pure/0.6.0/grids-responsive-min.css' %}">
<link rel="stylesheet" href="{% static 'css/layouts/blog-old-ie.css' %}">
<link rel="stylesheet" href="{% static 'css/layouts/blog.css' %}">
</head>
<body>
<div class="content pure-u-1 pure-u-md-3-4">
<div>
<!-- A wrapper for all the blog posts -->
<div class="posts">
<h1 class="content-subhead">Pinned Post</h1>
<!-- A single blog post -->
<section class="post">
<header class="post-header">
<img class="post-avatar" alt="Tilo Mitra's avatar" height="48" width="48"
src="{% static 'img/common/tilo-avatar.png' %}">
<h2 class="post-title">Introducing Pure</h2>
<p class="post-meta">
By <a href="#" class="post-author">Tilo Mitra</a> under <a
class="post-category post-category-design" href="#">CSS</a> <a
class="post-category post-category-pure" href="#">Pure</a>
</p>
</header>
<div class="post-description">
<p>
Yesterday at CSSConf, we launched Pure – a new CSS library. Phew! Here are the <a
href="https://speakerdeck.com/tilomitra/pure-bliss">slides from the presentation</a>.
Although it looks pretty minimalist, we’ve been working on Pure for several months. After many
iterations, we have released Pure as a set of small, responsive, CSS modules that you can use in
every web project.
</p>
</div>
</section>
</div>
</div>
</div>
</body>
</html>
首先要安装mongoengine
pip3 install mongoengine
然后在settings.py文件中定义mongodb的连接(要连接的mongodb数据库名为test,使用到的是test数据库里的一张名为sample的表)
from mongoengine import connect

connect('test', host='127.0.0.1', port=27017)
在models.py文件中定义读取的数据库字段
from django.db import models

from mongoengine import *

connect('test', host='127.0.0.1', port=27017) # 指明要连接的数据库

class ArtiInfo(Document):

    title = StringField()

    url = StringField()

    price = StringField()

    pub_date = StringField()

    look = StringField()

    area = ListField(StringField()) # 定义列表类型

    cates = ListField(StringField())

    meta = { 'collection': 'sample'} # 指明连接数据库的哪张表

for i in ArtiInfo.objects[:10]: # 测试是否连接成功

    print(i.title)
在这里可以直接运行models.py文件,看是否能读出数据库里的内容,注意要把数据库中的字段全部定义出来
修改views.py文件,定义要传递到html文件中的内容
from django.shortcuts import render

from myblog.models import ArtiInfo

def index(request):

    article = ArtiInfo.objects[:10] #只显示前10个内容

    context = {

        'ArtiInfo':article

    }

    return render(request, 'index.html', context) # 传递context参数
修改index.html文件,在文件中循环显示从数据库中读取的数据
{% load static %}
<html lang="en">
<head>
<meta charset="utf-8">
<meta name="viewport" content="width=device-width, initial-scale=1.0">
<meta name="description" content="A layout example that shows off a blog page with a list of posts.">
<title>Blog – Layout Examples – Pure</title>
<link rel="stylesheet" href="http://yui.yahooapis.com/pure/0.6.0/pure-min.css' %}">
<link rel="stylesheet" href="http://yui.yahooapis.com/pure/0.6.0/grids-responsive-old-ie-min.css' %}">
<link rel="stylesheet" href="http://yui.yahooapis.com/pure/0.6.0/grids-responsive-min.css' %}">
<link rel="stylesheet" href="{% static 'css/layouts/blog-old-ie.css' %}">
<link rel="stylesheet" href="{% static 'css/layouts/blog.css' %}">
</head>
<body>
<div class="content pure-u-1 pure-u-md-3-4">
<div>
<!-- A wrapper for all the blog posts -->
<div class="posts">
<h1 class="content-subhead">Pinned Post</h1>
{% for item in ArtiInfo %}
<!-- A single blog post -->
<section class="post">
<header class="post-header">
<img class="post-avatar" alt="Tilo Mitra's avatar" height="48" width="48"
src="{% static 'img/common/tilo-avatar.png' %}">
<h3 class="post-title">{{ item.title }}</h3>
<p class="post-meta">
By <a href="#" class="post-author">{{ item.pub_date }}</a>
{% for each in item.cates %}
<a class="post-category post-category-design" href="#">{{ each }}</a>
{% endfor %}
</p>
</header>
<div class="post-description">
<p>
{{ item.url }}
</p>
</div>
</section>
{% endfor %}
</div>
</div>
</div>
</body>
</html>
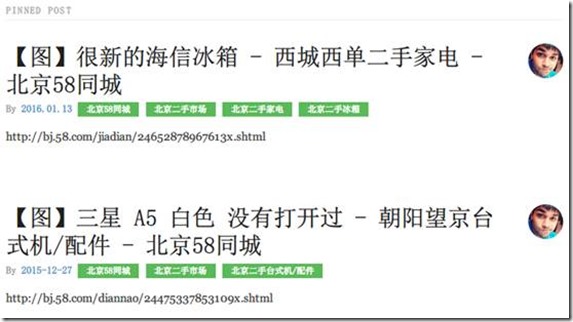
这是从数据库里读取的效果
添加分页器
在上面的views.py文件中添加分页器
from django.shortcuts import render

from myblog.models import ArtiInfo

from django.core.paginator import Paginator

def index(request):

    limit = 1 #限制每一页显示的条目数量

    article = ArtiInfo.objects

    paginator = Paginator(article, limit)

    page_num = request.GET.get('page', 1) #从url中获取页码参数

    loaded = paginator.page(page_num)

    context = {

        'ArtiInfo':loaded

    }

    return render(request, 'index.html', context)
在Index.html文件的末尾处添加分页器
{% load static %}
<html lang="en">
<head>
<meta charset="utf-8">
<meta name="viewport" content="width=device-width, initial-scale=1.0">
<meta name="description" content="A layout example that shows off a blog page with a list of posts.">
<title>Blog – Layout Examples – Pure</title>
<link rel="stylesheet" href="http://yui.yahooapis.com/pure/0.6.0/pure-min.css' %}">
<link rel="stylesheet" href="http://yui.yahooapis.com/pure/0.6.0/grids-responsive-old-ie-min.css' %}">
<link rel="stylesheet" href="http://yui.yahooapis.com/pure/0.6.0/grids-responsive-min.css' %}">
<link rel="stylesheet" href="{% static 'css/layouts/blog-old-ie.css' %}">
<link rel="stylesheet" href="{% static 'css/layouts/blog.css' %}">
</head>
<body>
<div class="content pure-u-1 pure-u-md-3-4">
<div>
<!-- A wrapper for all the blog posts -->
<div class="posts">
<h1 class="content-subhead">Pinned Post</h1>
{% for item in ArtiInfo %}
<!-- A single blog post -->
<section class="post">
<header class="post-header">
<img class="post-avatar" alt="Tilo Mitra's avatar" height="48" width="48" src="{% static 'img/common/tilo-avatar.png' %}">
<h3 class="post-title">{{ item.title }}</h3>
<p class="post-meta">
By <a href="#" class="post-author">{{ item.pub_date }}</a>
{% for each in item.cates %}
<a class="post-category post-category-design" href="#">{{ each }}</a>
{% endfor %}
</p>
</header>
<div class="post-description">
<p>
{{ item.url }}
</p>
</div>
</section>
{% endfor %}
</div>
<div class="main-content-pagitor">
{% if ArtiInfo.has_previous %}
<a href="?page={{ ArtiInfo.previous_page_number }}"> 上一页</a>
{% endif %}
<span>{{ ArtiInfo.number }} of {{ ArtiInfo.paginator.num_pages }}</span>
{% if ArtiInfo.has_next %}
<a href="?page={{ ArtiInfo.next_page_number }}">下一页</a>
{% endif %}
</div>
</div>
</div>
</body>
</html>
这是最终的显示效果

本文中使用到的css文件如下:
* {

    -webkit-box-sizing: border-box;

    -moz-box-sizing: border-box;

    box-sizing: border-box;

}

a {

    text-decoration: none;

    color: rgb(61, 146, 201);

}

a:hover,

a:focus {

    text-decoration: underline;

}

h3 {

    font-weight: 100;

}

/* LAYOUT CSS */

.pure-img-responsive {

    max-width: 100%;

    height: auto;

}

#layout {

    padding: 0;

}

.header {

    text-align: center;

    top: auto;

    margin: 3em auto;

}

.sidebar {

    background: rgb(61, 79, 93);

    color: #fff;

}

.brand-title,

.brand-tagline {

    margin: 0;

}

.brand-title {

    text-transform: uppercase;

}

.brand-tagline {

    font-weight: 300;

    color: rgb(176, 202, 219);

}

.nav-list {

    margin: 0;

    padding: 0;

    list-style: none;

}

.nav-item {

    display: inline-block;

    *display: inline;

    zoom: 1;

}

.nav-item a {

    background: transparent;

    border: 2px solid rgb(176, 202, 219);

    color: #fff;

    margin-top: 1em;

    letter-spacing: 0.05em;

    text-transform: uppercase;

    font-size: 85%;

}

.nav-item a:hover,

.nav-item a:focus {

    border: 2px solid rgb(61, 146, 201);

    text-decoration: none;

}

.content-subhead {

    text-transform: uppercase;

    color: #aaa;

    border-bottom: 1px solid #eee;

    padding: 0.4em 0;

    font-size: 80%;

    font-weight: 500;

    letter-spacing: 0.1em;

}

.content {

    padding: 2em 1em 0;

}

.post {

    padding-bottom: 2em;

}

.post-title {

    font-size: 2em;

    color: #222;

    margin-bottom: 0.2em;

}

.post-avatar {

    border-radius: 50px;

    float: right;

    margin-left: 1em;

}

.post-description {

    font-family: Georgia, "Cambria", serif;

    color: #444;

    line-height: 1.8em;

}

.post-meta {

    color: #999;

    font-size: 90%;

    margin: 0;

}

.post-category {

    margin: 0 0.1em;

    padding: 0.3em 1em;

    color: #fff;

    background: #999;

    font-size: 80%;

}

    .post-category-design {

        background: #5aba59;

    }

    .post-category-pure {

        background: #4d85d1;

    }

    .post-category-yui {

        background: #8156a7;

    }

    .post-category-js {

        background: #df2d4f;

    }

.post-images {

    margin: 1em 0;

}

.post-image-meta {

    margin-top: -3.5em;

    margin-left: 1em;

    color: #fff;

    text-shadow: 0 1px 1px #333;

}

.footer {

    text-align: center;

    padding: 1em 0;

}

.footer a {

    color: #ccc;

    font-size: 80%;

}

.footer .pure-menu a:hover,

.footer .pure-menu a:focus {

    background: none;

}

@media (min-width: 48em) {

    .content {

        padding: 2em 3em 0;

        margin-left: 25%;

    }

    .header {

        margin: 80% 2em 0;

        text-align: right;

    }

    .sidebar {

        position: fixed;

        top: 0;

        bottom: 0;

    }

}

.main-content-pagitor  {

    width: 50%;

    padding: 10px 20px 5px 20px;

    overflow: auto;

    margin: auto;

    /*position: relative;*/

    text-align: center;

}

.main-content-pagitor a {

    color: #cccccc;

    padding: 0 5px 0 5px;

}

.main-content-pagitor span {

    color: #585858;

    /*padding: 20px 20px 20px 20px;*/

}
Django工程读取mongodb并使用分页器的更多相关文章
- Django工程目录结构优化
1.我看到这篇文章,写的不错,在此复制了一份,防止以后找不到! 感谢作者的翻译--->原文的链接:http://www.loonapp.com/blog/11/ 如果原文存在,请打开原文件阅读 ...
- 在线读取Mongodb数据库下载EXCEL文件
版本:Mongodb2.4.8 通过页面下载Excel文件 jsp <%@ page language="java" contentType="text/html; ...
- Django工程搭建
-----环境安装 1.创建虚拟环境 mkvirtualenv django_py3_1.11 -p python3 2.安装django pip install django==1.11.11 ...
- Django工程的建立以及小网站的编写
这篇博文会详细的介绍如何创建django工程,介绍我如何做了第一个网站.本文基于windows7安装了python2.7.12,Django1.8.18(LTS)版.采用的IDE为pycharm.建议 ...
- python web框架 django 工程 创建 目录介绍
# 创建Django工程django-admin startproject [工程名称] 默认创建django 项目都会自带这些东西 django setting 配置文件 django可以配置缓存 ...
- django学习笔记【001】django版本的确定&创建一个django工程
2.3 查看当前的django版本 python3. -m django --version 2.3.1 创建一个django工程 django-admin startproject mysite 在 ...
- Django工程创建
方法一: 1.win+r进入cmd命令窗口: 2.找到Django的安装地址: 3.cmd窗口中利用cd 进入相应的文件夹,再输入命令如下: django-admin.exe startproject ...
- Django基于Pycharm开发之一【创建django工程】
Django的工程结构,可以通过pycharm里面,选择创建django工程来直接创建,也可以通过命令行通过pip来安装. 一.通过命令行安装的步骤 Install Python. Install a ...
- Django系列:(1)PyCharm下创建并运行我们的第一个Django工程
准备工作: 假设读者已经安装好python 2x或3x,以及安装好Django,以及Pycharm. 我的配置: – Python 2.7.11 – Pycharm Professional 5.0. ...
随机推荐
- 小白日记15:kali渗透测试之弱点扫描-漏扫三招、漏洞管理、CVE、CVSS、NVD
发现漏洞 弱点发现方法: 1.基于端口服务扫描结果版本信息,比对其是否为最新版本,若不是则去其 官网查看其补丁列表,然后去逐个尝试,但是此法弊端很大,因为各种端口应用比较多,造成耗时大. 2.搜索已公 ...
- 自问自答-hadoop在安全模式下究竟干了什么见不得人的事
本来想自己从网上搜集整理的,但是发现吴超写的刚刚好,不多不少,所以直接转载(图片失效了,用自己的图片) http://www.superwu.cn/2013/08/23/548/ 在hadoop集群的 ...
- CSS完成三角形
通过设置div的border属性,来实现! 将div的height和width属性分别设置为0px,将4边的border值设置为一样的宽度,通过调节边框的颜色课看到效果. <style> ...
- SSIS 学习(6):包配置(上)【转】
Integrartion Services 包实际上就是一个对象属性的集合,在前面我们开发的所有 Integration Services包,其中的变量.属性,比如:数据库链接.同步文件目录等,我们都 ...
- Android 自学之滚动视图ScrollView
滚动视图ScrollView由FarmeLayout派生而出,他就是一个用于为普通组件添加垂直滚动条的组件:ScrollView里面最多包含一个组件,而ScrollView的作用就是为该组件添加一个垂 ...
- [改善Java代码]避免带有变长参数的方法重载
建议4: 避免带有变长参数的方法重载 在项目和系统的开发中,为了提高方法的灵活度和可复用性,我们经常要传递不确定数量的参数到方法中,在Java 5之前常用的设计技巧就是把形参定义成Collection ...
- 软件设计师考试计算机系统知识——CPU
第一章: 计算机系统知识 1.1.1计算机系统硬件的基本组成 运算器.控制器.存储器.输入设备.输出设备 1.1.2 中央处理器 ①CPU的功能: a.程序控制:CPU通过执行指令来控制程序执行的顺序 ...
- Linux 命令 - chown: 更改文件的所有者和所属群组
chown 命令用来更改文件或者目录的所有者和所属群组.使用这个命令需要超级用户的权限. 命令格式 chown [OPTION]... [OWNER][:[GROUP]] FILE... chown ...
- jquery之css()改变字体大小,颜色,背景色
转: <script type="text/javascript"> $(document).ready(function() { $("#f ...
- sql常识-SQL 通配符
在搜索数据库中的数据时,您可以使用 SQL 通配符. SQL 通配符 在搜索数据库中的数据时,SQL 通配符可以替代一个或多个字符. SQL 通配符必须与 LIKE 运算符一起使用. 在 SQL 中, ...