
Spring创建Bean的顺序
一直对Spring创建bean的顺序很好奇,现在总算有时间写个代码测试一下。不想看过程的小伙伴可以直接看结论
目录结构:
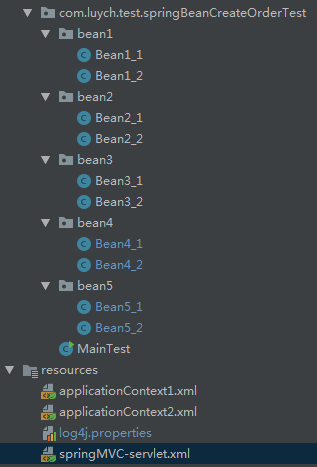
其中:bean4、bean5包下的class没有注解@Component,测试过程中,这两个包的class会直接通过<bean class="XXXXX"/>的方式创建。bean1、bean2、bean3包下的class注解了@Component,以便component-scan扫描。另外,bean创建之间没有依赖关系,例如bean1的创建不依赖于其他bean。
applicationContext1.xml
<bean class="com.luych.test.springBeanCreateOrderTest.bean5.Bean5_2"/>

<context:component-scan base-package="com.luych.test.springBeanCreateOrderTest.bean2" />

<bean class="com.luych.test.springBeanCreateOrderTest.bean5.Bean5_1"/>
applicationContext2.xml
<bean class="com.luych.test.springBeanCreateOrderTest.bean4.Bean4_1"/>

<context:component-scan base-package="com.luych.test.springBeanCreateOrderTest.bean1" />

<bean class="com.luych.test.springBeanCreateOrderTest.bean4.Bean4_2"/>
springMVC-servlet.xml
<context:component-scan base-package="com.luych.test.springBeanCreateOrderTest.bean3" />
web.xml
<servlet>

    <servlet-name>springMVC</servlet-name>

    <servlet-class>org.springframework.web.servlet.DispatcherServlet</servlet-class>

    <init-param>

        <param-name>contextConfigLocation</param-name>

        <param-value>classpath*:springMVC-servlet.xml</param-value>

    </init-param>

    <load-on-startup>1</load-on-startup>

</servlet>

<servlet-mapping>

    <servlet-name>springMVC</servlet-name>

    <url-pattern>/</url-pattern>

</servlet-mapping>

<listener>

    <listener-class>org.springframework.web.context.ContextLoaderListener</listener-class>

</listener>

<context-param>

    <param-name>contextConfigLocation</param-name>

    <param-value>

        classpath*:applicationContext*.xml

    </param-value>

</context-param>
运行结果
class com.luych.test.springBeanCreateOrderTest.bean5.Bean5_2 has been created
class com.luych.test.springBeanCreateOrderTest.bean2.Bean2_1 has been created
class com.luych.test.springBeanCreateOrderTest.bean2.Bean2_2 has been created
class com.luych.test.springBeanCreateOrderTest.bean5.Bean5_1 has been created
class com.luych.test.springBeanCreateOrderTest.bean4.Bean4_1 has been created
class com.luych.test.springBeanCreateOrderTest.bean1.Bean1_1 has been created
class com.luych.test.springBeanCreateOrderTest.bean1.Bean1_2 has been created
class com.luych.test.springBeanCreateOrderTest.bean4.Bean4_2 has been created
class com.luych.test.springBeanCreateOrderTest.bean3.Bean3_1 has been created
class com.luych.test.springBeanCreateOrderTest.bean3.Bean3_2 has been created
结论一:
1. 在web.xml中,ContextLoaderListener和DispatcherServlet的书写顺序不会影响相应的xml文件加载顺序。ContextLoaderListener中的xml先加载,DispatcherServlet中的xml后加载。
2. ContextLoaderListener中如果contextConfigLocation通过模糊匹配到多个xml文件时,xml按照文件命名顺序加载。但是如果contextConfigLocation逐个指定了具体加载某个xml,则会按照其指定顺序加载。
本例中可以改为(注意下面代码中蓝色部分):
<listener>

        <listener-class>org.springframework.web.context.ContextLoaderListener</listener-class>

    </listener>

    <context-param>

        <param-name>contextConfigLocation</param-name>

        <param-value>

            classpath*:applicationContext2.xml,classpath*:applicationContext1.xml

        </param-value>

    </context-param>
则其加载顺序为:
class com.luych.test.springBeanCreateOrderTest.bean4.Bean4_1 has been created
class com.luych.test.springBeanCreateOrderTest.bean1.Bean1_1 has been created
class com.luych.test.springBeanCreateOrderTest.bean1.Bean1_2 has been created
class com.luych.test.springBeanCreateOrderTest.bean4.Bean4_2 has been created
class com.luych.test.springBeanCreateOrderTest.bean5.Bean5_2 has been created
class com.luych.test.springBeanCreateOrderTest.bean2.Bean2_1 has been created
class com.luych.test.springBeanCreateOrderTest.bean2.Bean2_2 has been created
class com.luych.test.springBeanCreateOrderTest.bean5.Bean5_1 has been created
class com.luych.test.springBeanCreateOrderTest.bean3.Bean3_1 has been created
class com.luych.test.springBeanCreateOrderTest.bean3.Bean3_2 has been created
3. 同一个spring的xml文件中,bean的加载顺序按照书写顺序加载
4. 通过component-scan扫描的方式加载bean,在扫描范围内按照class的命名顺序加载
以上的测试过程中,bean的创建是没有依赖关系的,那么如果bean之间的创建存在依赖关系,则被依赖的bean会被优先创建。但是如果存在相互依赖的情况,则会发生异常。
例如:
@Component

public class Bean2_1 {

    private final Bean2_2 bean2_2;

    @Autowired

    public Bean2_1(Bean2_2 bean2_2) {

        this.bean2_2 = bean2_2;

        System.out.println(Bean2_1.class + " has been created");

    }

}
@Component

public class Bean2_2 {

    private final Bean2_1 bean2_1;

    @Autowired

    public Bean2_2(Bean2_1 bean2_1) {

        this.bean2_1 = bean2_1;

        System.out.println(Bean2_2.class + " has been created");

    }

}
异常信息:
Error creating bean with name 'bean2_1' defined in file......
Spring创建Bean的顺序的更多相关文章
- Spring 创建bean的模式
在默认情况下,spring创建bean是单例模式 scope="singleton ",还有一种方式为多例模式[prototype] scope sing ...
- spring创建bean的三种方式
spring创建bean的三种方式: 1通过构造方法创建bean(最常用) 1.1 spring默认会通过无参构造方法来创建bean,如果xml文件是这样配置,则实体类中必须要有无参构造方法,无参构造 ...
- spring创建bean模式singleton与prototype的区别
spring 创建bean有单例模式(singleton)和原始模型模式(prototype)这两种模式. 在默认的情况下,Spring中创建的bean都是单例模式的(注意Spring的单例模式与Go ...
- spring 创建Bean最全实现方法
创建bean方式,spring创建bean的方式包含:自动注入方式和人工注入方式.分别为:1)xml 配置化方式 2)@bean注解注入方式3)@Component方式 4)接口注入方式 5)imp ...
- Spring 创建Bean的6种方式
前言 本文讲解了在Spring 应用中创建Bean的多种方式,包括自动创建,以及手动创建注入方式,实际开发中可以根据业务场景选择合适的方案. 方式1: 使用Spring XML方式配置,该方式用于在纯 ...
- spring创建bean异常
org.springframework.beans.factory.BeanCreationException: Error creating bean with name 'requestMappi ...
- Spring创建Bean的过程Debug
目录 Spring流程Debug 1.1 Spring测试环境搭建 1.2 Debug容器创建过程 1.3 AbstractApplicationContext的refresh()包含的13个方法分析 ...
- []Spring创建Bean的过程
1. beans包提供了以编程方式管理和操作bean的基本功能,而context包增加了ApplicationContext,它以一种更加面向框架的方式增强了BeanFactory的功能. 2. co ...
- Spring 创建bean的时机
默认在启动spring容器的时候,spring容器配置文件中的类就已经创建完成对象了 在<bean>中添加属性lazy-init,默认值为false. true 在c ...
随机推荐
- sessionManager配置
在sessionManager配置的时候,有两个属性, 在这个类中,cacheManager是要注入到sessionDao中的,但要求sessionDao实现CacheManagerAware接口 C ...
- 解题报告:luogu P2678 跳石头
题目链接:P2678 跳石头 很简单的二分查找,可悲的是我并不会. 不过题解贴心的写得很清楚(学会了套路) 二分一次判断一次,复杂度是\(O(nlogl)\),可以通过此题. \(Code:\) #i ...
- 010.CI4框架CodeIgniter, autoload自动加载自己的helper函数类
01.自己定义了一个helper类,里面有个函数用来输出 02.定义一个Controller基本类,我们以后用到的Controllers类都继承自这个类.其中自动加载helper函数如图所示: 03. ...
- svn全局设置过滤文件没有作用的解决办法
svn全局设置过滤文件,网上教程文章很多, 都说了怎么配置,没有强调配置内容的格式 导致用惯了git的人,上手配置后,不起作用. 下面是我的配置内容: .classpath .project .set ...
- 吴裕雄 Bootstrap 前端框架开发——Bootstrap 字体图标(Glyphicons):glyphicon glyphicon-time
<!DOCTYPE html> <html> <head> <meta charset="utf-8"> <meta name ...
- (八)微信小程序---获取定位信息chooseLocation
微信小程序---获取定位信息 chooseLocation wxml <view bindtap="getlocalPath">{{localPath}}</v ...
- 剑指offer自学系列(三)
题目描述: 输入一个整数数组,实现一个函数来调整该数组中数字的顺序,使得所有的奇数位于数组的前半部分,所有的偶数位于数组的后半部分,并保证奇数和奇数,偶数和偶数之间的相对位置不变,例如{5,1,4,2 ...
- UVALive - 7752 Free Figurines
题意:有n个娃娃,如果大娃娃j直接套小娃娃i,则fa[i] = j.若fa[i] = 0,则该娃娃自由.给出每个娃娃初始的父亲,和改变后的父亲,在满足以下合法操作的条件下,问最少需要多少次变换. 1. ...
- 19 03 02 HTTP和https
HTTP协议(HyperText Transfer Protocol,超文本传输协议):是一种发布和接收 HTML页面的方法. HTTPS(Hypertext Transfer Protocol ov ...
- 035-PHP简单定义一个闭包函数
<?php /* + 什么是闭包函数?即一个函数内部,包含了1-N个匿名函数, + 用处是可以做局部数据缓存与实现封装(有点类似class) */ # 函数内部,定义一个匿名函数,即可称为闭包函 ...