转载自: https://blog.poxiao.me/p/wow64-process-inject-dll-into-x64-process/

向其他进程注入DLL通常的做法是通过调用CreateRemoteThread这个API在目标进程内创建一个远程线程,用这个线程来调用LoadLibraryALoadLibraryW(下文统称LoadLibrary)以实现让目标进程加载指定的DLL文件。使用CreateRemoteThread创建一个远程线程需要传入一个线程过程函数的地址,并且这个函数地址是需要在目标进程中有效的。由于LoadLibrary是kernel32.dll的导出函数,所以对于运行在同一个系统上的同为32位的进程或同为64位的进程可以假定彼此进程内的LoadLibrary函数的地址是相同的。并且CreateRemoteThread的线程过程函数和LoadLibrary的参数个数相同,且参数都是指针,因此通常都是直接将LoadLibrary作为CreateRemoteThread的过程函数。然后使用VirtualAllocEx在目标进程中分配内存,使用WriteProcessMemory往这块内存中写入DLL文件路径,将这块内存的地址作为线程过程函数(LoadLibrary)的参数。

在64位的Windows操作系统上32位进程中的LoadLibrary函数地址与64位进程的函数地址不同,因此如果想对64位进程注入DLL,简单的做法就是使用64位进程来执行注入工作。但是如果能让32位进程注入DLL到64位进程显然更好。

在一番Google之后找到了这篇文章。这篇文章的作者研究出来一种在Wow64进程中执行x64代码的方法,并且将其封装成了这个库
本文就是介绍如何使用这个库实现Wow64环境下32位进程向64位进程注入DLL。

Wow64环境下32位进程注入64位进程

32位进程难以注入DLL进64位进程是由于两个进程内LoadLibrary的地址不同,32位进程无法知道64位进程的LoadLibrary函数地址。使用wow64ext这个库在Wow64环境下可以让32位进程获取到64位的ntdll.dll的导出函数(得到的地址与64进程的地址是一样的)。

本文使用ntdll中的这3个未文档的函数来注入DLL。

1
2
3
4
5
6
7
8
9
10
11
12
13
14
15
16
17
18
19
20
21
22
23
24
25
26
27
28
29
NTSTATUS
NTAPI
RtlCreateUserThread(
_In_ HANDLE processHandle,
_In_ SECURITY_DESCRIPTOR* securityDescriptor,
_In_ BOOLEAN createSuspended,
_In_ ULONG stackZeroBits,
_Inout_opt_ size_t* stackReserved,
_Inout_opt_ size_t* stackCommit,
_In_ const void* startAddress,
_In_ void* startParameter,
_Inout_ HANDLE* threadHandle,
_Inout_opt_ CLIENT_ID* clientID
); NTSTATUS
NTAPI
LdrLoadDll(
_In_opt_ PWSTR SearchPath,
_In_opt_ PULONG LoadFlags,
_In_ PUNICODE_STRING Name,
_Out_opt_ PVOID *BaseAddress
); VOID
NTAPI
RtlExitUserThread(
_In_ NTSTATUS Status
);

使用RtlCreateUserThread创建远程线程,在远程线程中调用LdrLoadDll加载要注入的DLL文件,最后在远程线程中调用RtlExitUserThread退出线程。

为了在远程线程中调用两个函数(LdrLoadDll、RtlExitUserThread),需要将要执行的x64代码写入目标进程,然后让远程线程执行这段代码,在这之前需要了解一些预备知识。可以看MSDN中的这篇文章。通过这个篇文章我们知道了。

  • 在调用约定上Windows在x64进行了统一,也就是说不管你有没有显式指定调用约定,指定了何种调用约定,最终编译后都使用__fastcall这一种调用约定。
  • 在参数传递上对于Integer类型(含指针)前4个参数通过RCXRDXR8R9寄存器传递,其他参数通过栈传递。

LdrLoadDll有4个参数都是指针,RtlExitUserThread只有1个参数是Integer类型。为这两个函数传递参数只通过寄存器就足够了。
当然我们不需要自己去写汇编代码再将汇编代码转成机器码,首先先写下面这样一段代码。

1
2
3
4
5
6
7
8
9
10
typedef unsigned long long DWORD64;

typedef DWORD64 (*Func4_Type)(DWORD64, DWORD64, DWORD64, DWORD64);
typedef DWORD64 (*Func1_Type)(DWORD64); void ThreadProc(void*)
{
((Func4_Type)(0x1234567890123456))(0x1111111111111111, 0x2222222222222222, 0x3333333333333333, 0x4444444444444444);
((Func1_Type)(0x6543210987654321))(0x5555555555555555);
}

然后使用VC编译器将其编译成x64的代码,再反汇编它。
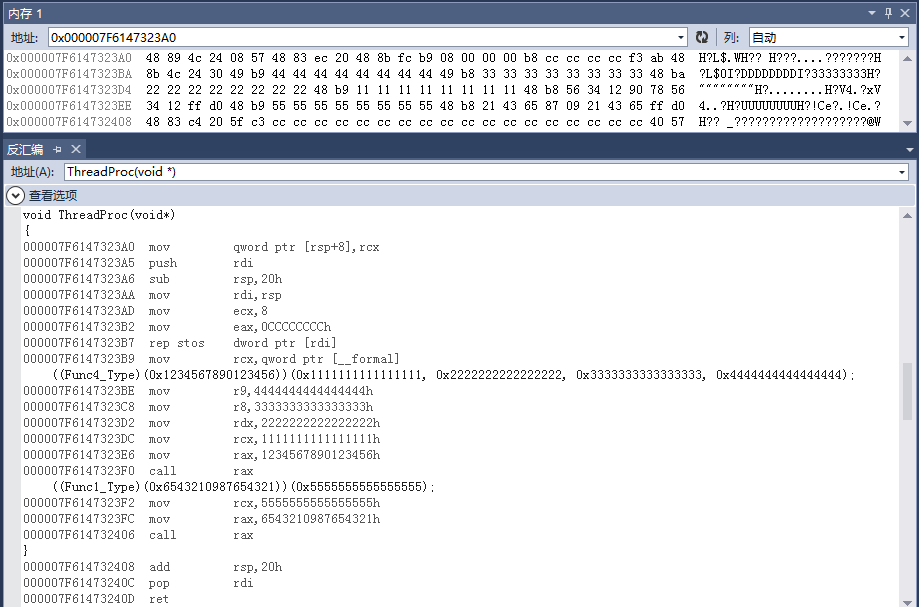
VS2013 Debug 反汇编的结果

跟据内存地址,容易得到下面的机器码与汇编代码的对应关系。

1
0x48 0x89 0x4c 0x24 0x08                           mov       qword ptr [rsp+8],rcx
0x57 push rdi
0x48 0x83 0xec 0x20 sub rsp,20h
0x48 0x8b 0xfc mov rdi,rsp
0xb9 0x08 0x00 0x00 0x00 mov ecx,8
0xb8 0xcc 0xcc 0xcc 0xcc mov eac,0CCCCCCCCh
0xf3 0xab rep stos dword ptr [rdi]
0x48 0x8b 0x4c 0x24 0x30 mov rcx,qword ptr [__formal]
0x49 0xb9 0x44 0x44 0x44 0x44 0x44 0x44 0x44 0x44 mov r9,4444444444444444h
0x49 0xb8 0x33 0x33 0x33 0x33 0x33 0x33 0x33 0x33 mov r8,3333333333333333h
0x48 0xba 0x22 0x22 0x22 0x22 0x22 0x22 0x22 0x22 mov rdx,2222222222222222h
0x48 0xb9 0x11 0x11 0x11 0x11 0x11 0x11 0x11 0x11 mov rcx,1111111111111111h
0x48 0xb8 0x56 0x34 0x12 0x90 0x78 0x56 0x34 0x12 mov rax,1234567890123456h
0xff 0xd0 call rax
0x48 0xb9 0x55 0x55 0x55 0x55 0x55 0x55 0x55 0x55 mov rcx,5555555555555555h
0x48 0xb8 0x21 0x43 0x65 0x87 0x09 0x21 0x43 0x65 mov rax,6543210987654321h
0xff 0xd0 call rax

只要在运行的时候根据获取到的函数地址和参数地址替换对应机器码然后将机器码写入目标进程,创建线程执行这段代码就能够实现Wow64进程注入DLL到64位进程了。
完整的实现代码如下(VS2012编译通过,Windows 8 x64测试注入成功)。

1
2
3
4
5
6
7
8
9
10
11
12
13
14
15
16
17
18
19
20
21
22
23
24
25
26
27
28
29
30
31
32
33
34
35
36
37
38
39
40
41
42
43
44
45
46
47
48
49
50
51
52
53
54
55
56
57
58
59
60
61
62
63
64
65
66
67
68
69
70
71
72
73
74
75
76
77
78
79
80
81
82
83
84
85
86
87
88
89
90
91
92
93
94
95
96
97
98
99
100
101
102
103
104
105
106
107
108
109
110
111
112
113
114
115
116
117
118
119
120
121
122
123
124
125
126
127
128
129
130
131
132
133
134
135
136
137
#include <memory>
#include <string>
#include <Windows.h> #include "wow64ext.h" enum class InjectResult {
OK,
Error_OpenProcess,
Error_VirtualAllocEx,
Error_GetProcAddress,
Error_WriteProcessMemory,
Error_CreateRemoteThread
}; template<typename Res, typename Deleter>
class ScopeResource {
Res res;
Deleter deleter;
ScopeResource(const ScopeResource&) {}
public:
Res get() const {
return this->res;
}
ScopeResource(Res res, Deleter deleter) : res(res), deleter(deleter) {}
~ScopeResource() {
this->deleter(this->res);
}
}; InjectResult Wow64InjectWin64(DWORD dwProcessId, const std::wstring& filename)
{
DWORD dwDesiredAccess = PROCESS_CREATE_THREAD | PROCESS_QUERY_INFORMATION | PROCESS_VM_OPERATION | PROCESS_VM_WRITE | PROCESS_VM_READ;
auto closeProcessHandle = [](HANDLE hProcess) {
if(hProcess != NULL) CloseHandle(hProcess);
};
ScopeResource<HANDLE, decltype(closeProcessHandle)> targetProcessHandle(OpenProcess(dwDesiredAccess, FALSE, dwProcessId), closeProcessHandle);
if(targetProcessHandle.get() == NULL) {
return InjectResult::Error_OpenProcess;
}
unsigned char injectCode[] = {
0x48, 0x89, 0x4c, 0x24, 0x08, // mov qword ptr [rsp+8],rcx
0x57, // push rdi
0x48, 0x83, 0xec, 0x20, // sub rsp,20h
0x48, 0x8b, 0xfc, // mov rdi,rsp
0xb9, 0x08, 0x00, 0x00, 0x00, // mov ecx,8
0xb8, 0xcc, 0xcc, 0xcc, 0xcc, // mov eac,0CCCCCCCCh
0xf3, 0xab, // rep stos dword ptr [rdi]
0x48, 0x8b, 0x4c, 0x24, 0x30, // mov rcx,qword ptr [__formal]
0x49, 0xb9, 0x00, 0x00, 0x00, 0x00, 0x00, 0x00, 0x00, 0x00, // mov r9,0
0x49, 0xb8, 0x00, 0x00, 0x00, 0x00, 0x00, 0x00, 0x00, 0x00, // mov r8,0
0x48, 0xba, 0x00, 0x00, 0x00, 0x00, 0x00, 0x00, 0x00, 0x00, // mov rdx,0
0x48, 0xb9, 0x00, 0x00, 0x00, 0x00, 0x00, 0x00, 0x00, 0x00, // mov rcx,0
0x48, 0xb8, 0x00, 0x00, 0x00, 0x00, 0x00, 0x00, 0x00, 0x00, // mov rax,0
0xff, 0xd0, // call rax
0x48, 0xb9, 0x00, 0x00, 0x00, 0x00, 0x00, 0x00, 0x00, 0x00, // mov rcx,0
0x48, 0xb8, 0x00, 0x00, 0x00, 0x00, 0x00, 0x00, 0x00, 0x00, // mov rax,0
0xff, 0xd0 // call rax
}; size_t parametersMemSize = sizeof(DWORD64) + sizeof(_UNICODE_STRING_T<DWORD64>) + (filename.size() + 1) * sizeof(wchar_t);
auto freeInjectCodeMem = [&targetProcessHandle, &injectCode](DWORD64 address) {
if(address != 0) VirtualFreeEx64(targetProcessHandle.get(), address, sizeof(injectCode), MEM_COMMIT | MEM_RESERVE);
};
ScopeResource<DWORD64, decltype(freeInjectCodeMem)> injectCodeMem(VirtualAllocEx64(targetProcessHandle.get(), NULL, sizeof(injectCode), MEM_COMMIT | MEM_RESERVE, PAGE_EXECUTE_READWRITE), freeInjectCodeMem);
auto freeParametersMem = [&targetProcessHandle, parametersMemSize](DWORD64 address) {
if(address != 0) VirtualFreeEx64(targetProcessHandle.get(), address, parametersMemSize, MEM_COMMIT | MEM_RESERVE);
};
ScopeResource<DWORD64, decltype(freeParametersMem)> parametersMem(VirtualAllocEx64(targetProcessHandle.get(), NULL, parametersMemSize, MEM_COMMIT | MEM_RESERVE, PAGE_READWRITE), freeParametersMem);
if (injectCodeMem.get() == 0 || parametersMem.get() == 0) {
return InjectResult::Error_VirtualAllocEx;
}
DWORD64 ntdll64 = GetModuleHandle64(L"ntdll.dll");
DWORD64 ntdll_LdrLoadDll = GetProcAddress64(ntdll64, "LdrLoadDll");
DWORD64 ntdll_RtlExitUserThread = GetProcAddress64(ntdll64, "RtlExitUserThread");
DWORD64 ntdll_RtlCreateUserThread = GetProcAddress64(ntdll64, "RtlCreateUserThread");
if(ntdll_LdrLoadDll == 0 || ntdll_RtlExitUserThread == 0 || ntdll_RtlCreateUserThread == 0) {
return InjectResult::Error_GetProcAddress;
}
std::unique_ptr<unsigned char[]> parameters(new unsigned char[parametersMemSize]);
std::memset(parameters.get(), 0, parametersMemSize);
_UNICODE_STRING_T<DWORD64>* upath = reinterpret_cast<_UNICODE_STRING_T<DWORD64>*>(parameters.get() + sizeof(DWORD64));
upath->Length = filename.size() * sizeof(wchar_t);
upath->MaximumLength = (filename.size() + 1) * sizeof(wchar_t);
wchar_t* path = reinterpret_cast<wchar_t*>(parameters.get() + sizeof(DWORD64) + sizeof(_UNICODE_STRING_T<DWORD64>));
std::copy(filename.begin(), filename.end(), path);
upath->Buffer = parametersMem.get() + sizeof(DWORD64) + sizeof(_UNICODE_STRING_T<DWORD64>); union {
DWORD64 from;
unsigned char to[8];
} cvt; // r9
cvt.from = parametersMem.get();
std::memcpy(injectCode + 32, cvt.to, sizeof(cvt.to)); // r8
cvt.from = parametersMem.get() + sizeof(DWORD64);
std::memcpy(injectCode + 42, cvt.to, sizeof(cvt.to)); // rax = LdrLoadDll
cvt.from = ntdll_LdrLoadDll;
std::memcpy(injectCode + 72, cvt.to, sizeof(cvt.to)); // rax = RtlExitUserThread
cvt.from = ntdll_RtlExitUserThread;
std::memcpy(injectCode + 94, cvt.to, sizeof(cvt.to)); if(FALSE == WriteProcessMemory64(targetProcessHandle.get(), injectCodeMem.get(), injectCode, sizeof(injectCode), NULL)
|| FALSE == WriteProcessMemory64(targetProcessHandle.get(), parametersMem.get(), parameters.get(), parametersMemSize, NULL)) {
return InjectResult::Error_WriteProcessMemory;
} DWORD64 hRemoteThread = 0;
struct {
DWORD64 UniqueProcess;
DWORD64 UniqueThread;
} client_id; X64Call(ntdll_RtlCreateUserThread, 10,
(DWORD64)targetProcessHandle.get(), // ProcessHandle
(DWORD64)NULL, // SecurityDescriptor
(DWORD64)FALSE, // CreateSuspended
(DWORD64)0, // StackZeroBits
(DWORD64)NULL, // StackReserved
(DWORD64)NULL, // StackCommit
injectCodeMem.get(), // StartAddress
(DWORD64)NULL, // StartParameter
(DWORD64)&hRemoteThread, // ThreadHandle
(DWORD64)&client_id); // ClientID
if(hRemoteThread != 0) {
CloseHandle((HANDLE)hRemoteThread);
return InjectResult::OK;
}
return InjectResult::Error_CreateRemoteThread;
}

这段代码在创建远程线程成功即认为注入成功,为了更加准确的判断是否注入成功可以在注入的机器码增加额外的代码来判断是否注入成功。

Wow64(32位进程)注入DLL到64位进程的更多相关文章

  1. Visual Studio远程调试监视器(MSVSMON.EXE)的32位版本不能用于调试64位进程或64位转储

    在VS2013中调试Silverlight项目时,提示:无法附加.Visual Studio远程调试监视器(MSVSMON.EXE)的32位版本不能用于调试64位进程或64位转储.请改用64位版本. ...

  2. 解决32位plsql客户端连接不64位Oracle11g上数据库

    一.解决方案 因为本人安装的是64位的Oracle,plsql 是32位的故连接不上.网上有方法能连接. 1. 文件下载 下载PLSQL_Developer地址 http://pan.baidu.co ...

  3. Hook任务栏时钟窗口(原理其实很简单,就是注入DLL到时钟窗口进程(explorer.exe))

    用过一些日历软件的小伙伴应该都知道它们都实现了在时钟窗口上的Hook,也就是屏蔽了系统原有的功能,实现自己的功能 某日历软件Hook时钟窗口后的效果 经过一番研究,发现原理其实很简单,就是注入DLL到 ...

  4. openstack安装系列问题:window7 64位安装的virtualBox 只能选择32位的系统安装不能选择64位的系统安装

    个人原创,转载请注明作者,出处,否则依法追究法律责任 2017-10-03-12:22:22 现象:window7 64位安装的virtualBox 只能选择32位的系统安装不能选择64位的系统安装 ...

  5. (64位oracle使用32位的PLSQL)安装64位的oracle数据库软件,使用32位的PLSQL Developer连接方法

    因为PLSQL Developer没有提供64位的,于是依据网上的资料做了一下整理,发上来 1.下载并安装Oracle 11g R2 64位,在server上安装时忽略硬件检測失败信息: 2.下载Or ...

  6. C#如何使SQLite程序集既能适应32位系统也能适应64位系统

    分享5: 需求:都知道Sqlite3是分32位和64位版本的,那如果将一个Sqlite3.dll文件全适用 分析:Sqlite是种轻量级的数据库文件,使用了混合编程而成的,一部分采用非托管的C++代码 ...

  7. 无光驱在32位windows系统下安装64位windows系统

    位的系统. 大家都知道,32位的操作系统最多只能支持3.2G的内存,现在内存白菜价,很多人都在原有基础上购入新内存,这样最少也有4G了,为了让内存不浪费,我 们只有升级到64位操作系统.但是很多朋友又 ...

  8. windows目标进程注入dll

    在别的程序注入dll 步骤: ,获取目标进程ID,CreateToolhelp32Snapshot()函数; ,获取目标进程句柄,OpenProcess()函数; ,目标进程要一块内存,Virtual ...

  9. 解决C#的64位打包程序,在64位机器上运行出现BadImageFormatException异常。

    转载自:http://msdn.microsoft.com/zh-cn/library/system.badimageformatexception%28v=vs.100%29.aspx BadIma ...

随机推荐

  1. zabbix AGENTS 在WINDOWS的安装

    1.下载 https://assets.zabbix.com/downloads/3.4.0/zabbix_agents_3.4.0.win.zip 解压 zabbix_agents_3.4.0.wi ...

  2. i3wm 调节音量

    i3wm,设置调节音量的快捷键 configure file: ~/.config/i3/config add # for sound control bindsym XF86AudioRaiseVo ...

  3. leetcode 764.Largest Plus Sign

    根据题意的话就是在非0的地方开始寻找上下左右分别能够走到的最大步长的. 那么使用暴力的方法竟然leetcode还是给过了. class Solution { public: int orderOfLa ...

  4. Ubuntu19.04配置SS+pac非全局代理

    1.先安装shadowsocks-qt5 sudo apt install shadowsocks-qt5 2.因为ss是sock5代理,而shell不支持socks5代理,只支持http/https ...

  5. hashlib,hmac,subprocess,configparser,xlrd,xlwt,xml模块基本功能

    hashlib模块:加密 import hashlib# 基本使用cipher = hashlib.md5('需要加密的数据的二进制形式'.encode('utf-8'))print(cipher.h ...

  6. pycharm+pydesigner+pyqt5 如何添加图片资源

    pydesigner 上添加资源比较容易: 步骤一用于编辑,步骤二步创建,步骤三创建文件新的qrc: 步骤一:新建一个Prefix,步骤二给prefix添加资源文件.至此,资源文件添加完成 采用 Py ...

  7. 学习笔记DL007:Moore-Penrose伪逆,迹运算,行列式,主成分分析PCA

    Moore-Penrose伪逆(pseudoinverse). 非方矩阵,逆矩阵没有定义.矩阵A的左逆B求解线性方程Ax=y.两边左乘左逆B,x=By.可能无法设计唯一映射将A映射到B.矩阵A行数大于 ...

  8. TCP 三次握爪 四次挥手

    TCP三次握手和四次挥手过程 1.三次握手 (1)三次握手的详述 首先Client端发送连接请求报文,Server段接受连接后回复ACK报文,并为这次连接分配资源.Client端接收到ACK报文后也向 ...

  9. [工作积累] TAA Ghosting 的相关问题

    因为TAA要使用上一帧的历史结果,那么在相机移动的时候,颜色就会有残留,出现ghosting(残影). 由于上一帧历史是累积的,是由上一帧的直接渲染结果和上上帧的结果做了合并,所以ghosting并不 ...

  10. Python爬取今日头条段子

    刚入门Python爬虫,试了下爬取今日头条官网中的段子,网址为https://www.toutiao.com/ch/essay_joke/源码比较简陋,如下: import requests impo ...