Springboot 拦截器的背后
今天写了个拦截器对一些mapping做了些处理,写完之后突然很想看看拦截器是怎么加进spring里面。对着源码debug了一遍。又有了新的收获。
1.拦截器的实现
1.实现HandlerInterceptor
public class MyHandlerInterceptor implements HandlerInterceptor {

    @Override

    public boolean preHandle(HttpServletRequest request,

                             HttpServletResponse response,

                             Object handler) throws Exception {

        System.out.println("---------preHandle--------");

        return true;

    }

    /**

     * controller执行之后,且页面渲染之前调用

     * @param request

     * @param response

     * @param handler

     * @param modelAndView

     * @throws Exception

     */

    @Override

    public void postHandle(HttpServletRequest request,

                           HttpServletResponse response,

                           Object handler,

                           ModelAndView modelAndView) throws Exception {

        System.out.println("---------postHandle--------");

    }

    /**

     * 页面渲染之后调用,一般用于资源清理操作

     * @param request

     * @param response

     * @param handler

     * @param ex

     * @throws Exception

     */

    @Override

    public void afterCompletion(HttpServletRequest request,

                                HttpServletResponse response,

                                Object handler,

                                Exception ex) throws Exception {

        System.out.println("---------afterCompletion--------");

    }
2.将拦截器加入到拦截链里面去,这里可以实现
WebMvcConfigurer
也可以继承
WebMvcConfigurerAdapter
只是 WebMvcConfigurerAdapter这个类在Springboot2.0已经 Deprecated了,这部分内容我们后面再讲
@Component

public class MyWebMvcConfigurerAdapter implements WebMvcConfigurer {

    @Override

    public void addInterceptors(InterceptorRegistry registry) {

        registry.addInterceptor(new MyHandlerInterceptor());

    }

}
接下来我们看看拦截是怎么被调用的,在 preHandle方法打断点
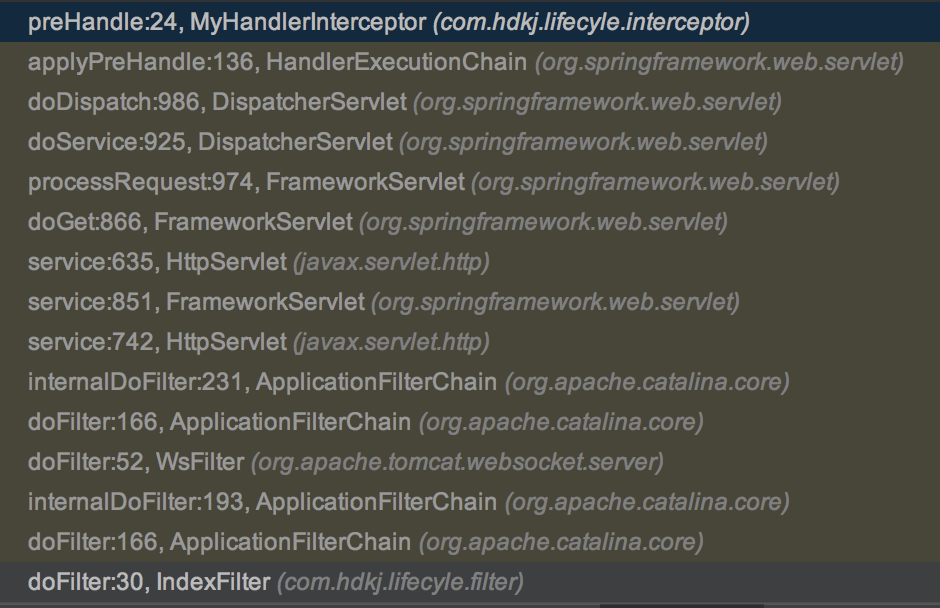
我们发现拦截器的获取在 org.springframework.web.servlet.HandlerExecutionChain#applyPreHandle 方法
boolean applyPreHandle(HttpServletRequest request, HttpServletResponse response) throws Exception {

        HandlerInterceptor[] interceptors = getInterceptors();

        if (!ObjectUtils.isEmpty(interceptors)) {

            for (int i = 0; i < interceptors.length; i++) {

                HandlerInterceptor interceptor = interceptors[i];

                if (!interceptor.preHandle(request, response, this.handler)) {

                    triggerAfterCompletion(request, response, null);

                    return false;

                }

                this.interceptorIndex = i;

            }

        }

        return true;

    }
这里的 getInterceptors 如下所示
public HandlerInterceptor[] getInterceptors() {

        if (this.interceptors == null && this.interceptorList != null) {

            this.interceptors = this.interceptorList.toArray(new HandlerInterceptor[0]);

        }

        return this.interceptors;

    }
那现在的问题就是要找到 interceptors是怎么初始化的呢。我们找到了HandlerExecutionChain的构造方法,发现interceptors就是在这赋值的
public HandlerExecutionChain(Object handler, @Nullable HandlerInterceptor... interceptors) {

        if (handler instanceof HandlerExecutionChain) {

            HandlerExecutionChain originalChain = (HandlerExecutionChain) handler;

            this.handler = originalChain.getHandler();

            this.interceptorList = new ArrayList<>();

            CollectionUtils.mergeArrayIntoCollection(originalChain.getInterceptors(), this.interceptorList);

            CollectionUtils.mergeArrayIntoCollection(interceptors, this.interceptorList);

        }

        else {

            this.handler = handler;

            this.interceptors = interceptors;

        }

    }
再在这打个断点,找到了调用这个构造方法的类
org.springframework.web.servlet.handler.AbstractHandlerMapping#getHandlerExecutionChain
protected HandlerExecutionChain getHandlerExecutionChain(Object handler, HttpServletRequest request) {

        HandlerExecutionChain chain = (handler instanceof HandlerExecutionChain ?

                (HandlerExecutionChain) handler : new HandlerExecutionChain(handler));

        String lookupPath = this.urlPathHelper.getLookupPathForRequest(request);

        for (HandlerInterceptor interceptor : this.adaptedInterceptors) {

            if (interceptor instanceof MappedInterceptor) {

                MappedInterceptor mappedInterceptor = (MappedInterceptor) interceptor;

                if (mappedInterceptor.matches(lookupPath, this.pathMatcher)) {

                    chain.addInterceptor(mappedInterceptor.getInterceptor());

                }

            }

            else {

                chain.addInterceptor(interceptor);

            }

        }

        return chain;

    }
看到 AbstractHandlerMapping 差不多就知道是怎么一回事情了,这里再把调用的代码贴出来
public final HandlerExecutionChain getHandler(HttpServletRequest request) throws Exception {

        Object handler = getHandlerInternal(request);

        if (handler == null) {

            handler = getDefaultHandler();

        }

        if (handler == null) {

            return null;

        }

        // Bean name or resolved handler?

        if (handler instanceof String) {

            String handlerName = (String) handler;

            handler = obtainApplicationContext().getBean(handlerName);

        }

        HandlerExecutionChain executionChain = getHandlerExecutionChain(handler, request);

        if (CorsUtils.isCorsRequest(request)) {

            CorsConfiguration globalConfig = this.globalCorsConfigSource.getCorsConfiguration(request);

            CorsConfiguration handlerConfig = getCorsConfiguration(handler, request);

            CorsConfiguration config = (globalConfig != null ? globalConfig.combine(handlerConfig) : handlerConfig);

            executionChain = getCorsHandlerExecutionChain(request, executionChain, config);

        }

        return executionChain;

    }
这个getHandler方法 其实就是RequestMapping注解调用的地方,这里的handle可以想象成是一个controller,getHandlerExecutionChain 这个方法的作用就是给我们的controller加上一层拦截器的属性,从HandlerExecutionChain的构造方法也能看出,HandlerExecutionChain 就是 handle和interceptor的封装。
到这里,我们大概是知道了拦截器是怎么被调用的。但是,我们还不知道拦截器是怎么被加载进spring的呢?
这里我们将重点放在 getHandlerExecutionChain 的 this.adaptedInterceptors 属性
我们找到了这个方法
protected void initInterceptors() {

        if (!this.interceptors.isEmpty()) {

            for (int i = 0; i < this.interceptors.size(); i++) {

                Object interceptor = this.interceptors.get(i);

                if (interceptor == null) {

                    throw new IllegalArgumentException("Entry number " + i + " in interceptors array is null");

                }

                this.adaptedInterceptors.add(adaptInterceptor(interceptor));

            }

        }

    }
这里的interceptor又是从interceptors获取而来,interceptors 的初始化是通过以下代码
public void setInterceptors(Object... interceptors) {

        this.interceptors.addAll(Arrays.asList(interceptors));

    }
我们在这里打个断点,最终找到了
org.springframework.web.servlet.config.annotation.WebMvcConfigurationSupport#requestMappingHandlerMapping
public RequestMappingHandlerMapping requestMappingHandlerMapping() {

        RequestMappingHandlerMapping mapping = createRequestMappingHandlerMapping();

        mapping.setOrder(0);

        mapping.setInterceptors(getInterceptors());

        mapping.setContentNegotiationManager(mvcContentNegotiationManager());

        mapping.setCorsConfigurations(getCorsConfigurations());
protected final Object[] getInterceptors() {

        if (this.interceptors == null) {

            InterceptorRegistry registry = new InterceptorRegistry();

            addInterceptors(registry);

            registry.addInterceptor(new ConversionServiceExposingInterceptor(mvcConversionService()));

            registry.addInterceptor(new ResourceUrlProviderExposingInterceptor(mvcResourceUrlProvider()));

            this.interceptors = registry.getInterceptors();

        }

        return this.interceptors.toArray();

    }
还记最开始我们说的 将拦截器加入到拦截链里面的方法么。就是在这里调用的。
public class MyWebMvcConfigurerAdapter implements WebMvcConfigurer {

    @Override

    public void addInterceptors(InterceptorRegistry registry) {

        registry.addInterceptor(new MyHandlerInterceptor());

    }

}
到这里我们大概的就知道了拦截器是怎么加入spring的。还剩最后一个问题,requestMappingHandlerMapping 是由怎么触发的呢?
我们找到了方法的调用
org.springframework.boot.autoconfigure.web.servlet.WebMvcAutoConfiguration.EnableWebMvcConfiguration#requestMappingHandlerMapping

@Bean

        @Primary

        @Override

        public RequestMappingHandlerMapping requestMappingHandlerMapping() {

            // Must be @Primary for MvcUriComponentsBuilder to work

            return super.requestMappingHandlerMapping();

        }
这个方法在 WebMvcAutoConfiguration里面,看到这个类名就知道这是个自动配置类。那么他一定和@EnableAutoconfigure 注解有关。我在 org/springframework/boot/spring-boot-autoconfigure/2.0.4.RELEASE/spring-boot-autoconfigure-2.0.4.RELEASE.jar!/META-INF/spring.factories 这个文件里面找到了AutoConfig的配置。所以 requestMappingHandlerMapping 是通过springboot自动配置扫描bean加载的。
# Auto Configure

org.springframework.boot.autoconfigure.EnableAutoConfiguration=\

org.springframework.boot.autoconfigure.web.servlet.WebMvcAutoConfiguration,\
最后 我们再看下 WebMvcAutoConfiguration这个类的几个注解
@Configuration

@ConditionalOnWebApplication(type = Type.SERVLET)

@ConditionalOnClass({ Servlet.class, DispatcherServlet.class, WebMvcConfigurer.class })

@ConditionalOnMissingBean(WebMvcConfigurationSupport.class)

@AutoConfigureOrder(Ordered.HIGHEST_PRECEDENCE + 10)

@AutoConfigureAfter({ DispatcherServletAutoConfiguration.class,

        ValidationAutoConfiguration.class })

public class WebMvcAutoConfiguration {
ConditionalOnMissingBean这个注解表明 只有不存在 WebMvcConfigurationSupport 这个bean才可以配置加载,所以这也是为什么我们在将拦截器加入到拦截链里面的方法里面是实现 WebMvcConfigurer 而不是继承WebMvcConfigurationSupport。
最后我们再总结下
1.项目启动的时候springboot会自动扫描相关配置类触发requestMappingHandlerMapping方法
2.requestMappingHandlerMapping会将系统的各个拦截添加到拦截器数组中,真正的http请求过来后会调用getHandler方法将过滤器和handle封装成HandlerExecutionChain。
3.按照过滤器添加顺序依次执行过滤器
以上,就是对拦截器的分析
转载请注明出处 https://www.cnblogs.com/xmzJava/p/9550535.html
Springboot 拦截器的背后的更多相关文章
- Java结合SpringBoot拦截器实现简单的登录认证模块
Java结合SpringBoot拦截器实现简单的登录认证模块 之前在做项目时需要实现一个简单的登录认证的功能,就寻思着使用Spring Boot的拦截器来实现,在此记录一下我的整个实现过程,源码见文章 ...
- SpringBoot拦截器中Bean无法注入(转)
问题 这两天遇到SpringBoot拦截器中Bean无法注入问题.下面介绍我的思考过程和解决过程: 1.由于其他bean在service,controller层注入一点问题也没有,开始根本没意识到Be ...
- 【SpringBoot】SpringBoot拦截器实战和 Servlet3.0自定义Filter、Listener
=================6.SpringBoot拦截器实战和 Servlet3.0自定义Filter.Listener ============ 1.深入SpringBoot2.x过滤器Fi ...
- SpringBoot拦截器中无法注入bean的解决方法
SpringBoot拦截器中无法注入bean的解决方法 在使用springboot的拦截器时,有时候希望在拦截器中注入bean方便使用 但是如果直接注入会发现无法注入而报空指针异常 解决方法: 在注册 ...
- Springboot拦截器未起作用
之前遇到要使用springboot拦截器却始终未生效的状况,查了网上的博客,大抵都是@Component,@Configuration注解未加,或是使用@ComponentScan增加包扫描,但是尝试 ...
- SpringBoot拦截器中service或者redis注入为空的问题
原文:https://my.oschina.net/u/1790105/blog/1490098 这两天遇到SpringBoot拦截器中Bean无法注入问题.下面介绍我的思考过程和解决过程: 1.由于 ...
- springboot + 拦截器 + 注解 实现自定义权限验证
springboot + 拦截器 + 注解 实现自定义权限验证最近用到一种前端模板技术:jtwig,在权限控制上没有用springSecurity.因此用拦截器和注解结合实现了权限控制. 1.1 定义 ...
- Springboot 拦截器配置(登录拦截)
Springboot 拦截器配置(登录拦截) 注意这里环境为springboot为2.1版本 1.编写拦截器实现类,实现接口 HandlerInterceptor, 重写里面需要的三个比较常用的方 ...
- Springboot拦截器实现IP黑名单
Springboot拦截器实现IP黑名单 一·业务场景和需要实现的功能 以redis作为IP存储地址实现. 业务场景:针对秒杀活动或者常规电商业务场景等,防止恶意脚本不停的刷接口. 实现功能:写一个拦 ...
随机推荐
- 使用JumpServer管理你的服务器
本文介绍CentOS 7从安装jumpserver到简单使用jumpserver管理服务器. 1.Jumpserver介绍 Jumpserver是一款开源的开源的堡垒机,如下图是官网介绍. 官网地址: ...
- Android SDK提供的常用控件Widget “常用控件”“Android原生”
Android提供一个标准的视图工具箱来帮助创建简单的UI界面.通过使用这些控件(必要时,可以对这些控件进行修改). 创建一个简单的.xml文件,从预览窗口可以看到Android SDK提供的原生控件 ...
- vue中使用stylus
1.创建完成一个初始项目后,通过 npm install stylus -D命令,在项目内安装stylus.(注意:命令结尾 -D 即是 --save-dev 的简写形式) 2.需要安装loader, ...
- ES6新增的常用数组方法(forEach,map,filter,every,some)
ES6新增的常用数组方法 let arr = [1, 2, 3, 2, 1]; 一 forEach => 遍历数组 arr.forEach((v, i) => { console.log( ...
- vue组件里定时器销毁问题
我在a页面写一个定时,让他每秒钟打印一个1,然后跳转到b页面,此时可以看到,定时器依然在执行.这样是非常消耗性能的.如下图所示: 解决方法1: 首先我在data函数里面进行定义定时器名称: data( ...
- 问题:这个新申请的内存为什么不能free掉?(已解决)
一.问题描述 先上代码, /*** 省略 ***/ uChar *base64 = NULL; /*** 省略 ***/ base64 = (一段内存) /*** 省略 ***/ base64 = s ...
- web测试实践——day01
一.任务进展情况 主要是找寻网站的bug,分析bug的严重程度.同时找了本专业的同学进行博客园系统的使用. 二.存在的问题 由于上线的网站做的比较完善,导致找寻bug比较困难. 三.解决方法 对此我们 ...
- mysql根据字符截取字符串(总结)
mysql根据字符截取字符串(总结) 1.1 前言 为结合自己平常查资料的习惯,我会先给出例子,然后再对相关知识进行详解.该案例使用到的函数为:SUBSTRING_INDEX 1.2 需要实现的实 ...
- 树莓派3B+ HDMI连接显示屏 因供电问题而不能进入系统
1.config.txt文件中hdmi_force_hotplug=1前面的注释符号"#"一定要去掉. 2.完成上述操作后,树莓派通过HDMI连接屏幕,一直在开机画面循环重复,却不 ...
- [Swift]LeetCode235. 二叉搜索树的最近公共祖先 | Lowest Common Ancestor of a Binary Search Tree
Given a binary search tree (BST), find the lowest common ancestor (LCA) of two given nodes in the BS ...