Scrapy 框架,持久化文件相关
持久化相关
相关文件
items.py
数据结构模板文件。定义数据属性。
pipelines.py
管道文件。接收数据(items),进行持久化操作。
持久化流程
▨ 爬虫文件爬取到数据后,将数据封装到 items 对象
▨ items.py 用 yield 关键字将 items对象 提交给 pipelines.py
▨ 在管道文件中的 process_item 方法中接收 item对象 进行存储
▨ settings.py 配置文件中开启管道
持久化方式
文件保存 ( 普通文件 / csv / json )
* scrapy crawl maoyan -o maoyan.csv

* scrapy crawl maoyan -o maoyan.json
导出时需要配合 settings.py 配置导出编码格式
FEED_EXPORT_ENCODING='utf-8'
ps:
scrapy1.6版本之前, 导出csv出现空行,
解决方法(修改源码exporters.py)
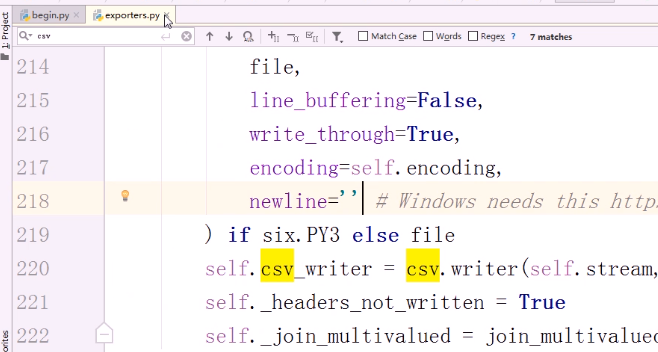
路径 :python安装目录的Lib\site-packages\scrapy\exporters.py
搜索 csv ,添加 newline='' 参数
数据库保存 ( redis / mongo / mysql )
详见下面实例
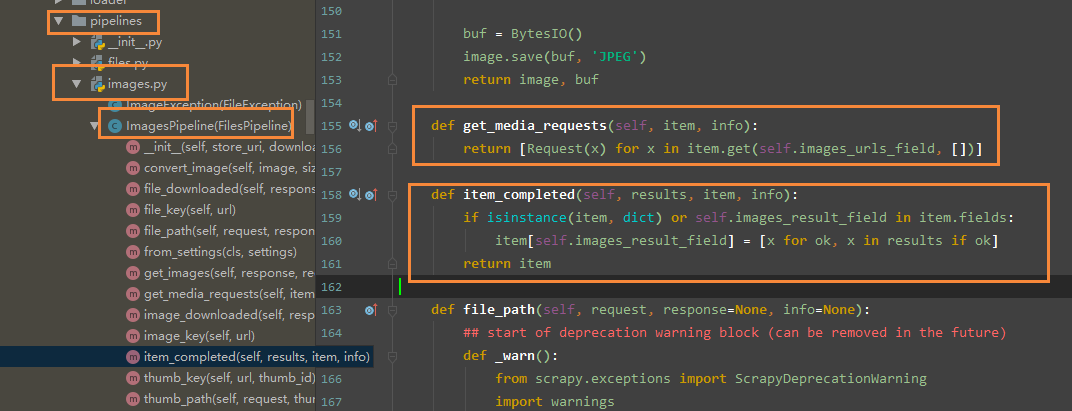
图片保存
官方文档 这里
pipline 设置
import scrapy

from scrapy.pipelines.images import ImagesPipeline

class MyImagesPipeline(ImagesPipeline):

    # 本质上就是拿到了 item 里面的 "image_urls" 字段的 url 地址然后再次发起请求带队列中

    # 重写get_media_requests方法, 指定图片持久化的字段

    def get_media_requests(self, item, info):

        yield scrapy.Request(item['img_link'])  # 这里指定 item 中要被图片持久的字段

    # 此函数用于处理拿到请求后的数据时的异常以及其他操作, 比如这里实现的操作就是拿到 url 后保存在了 item 的 image_file_path 字段中

    # 重写此函数可以拿到 图片的 地址, 用于数据库保存等

    def item_completed(self, results, item, info):

        for ok, value in results:

            image_file_path = value["path"]

        item['image_file_path'] = image_file_path

        return item
配置设置
使用内置的 图片管道, 需要在 settings.py 中设置保存路径以及大小限制
ITEM_PIPELINES = {'xxxx.pipelines.MyImagesPipeline': 1}
import os

project_dir = os.path.abspath(os.path.dirname(__file__))

IMAGES_STORE = os.path.join(project_dir, "images")


IMAGES_MIN_HEIGHT = 110  # 最小高

IMAGES_MIN_WIDTH = 110   # 最小宽
源码位置
综合实例 - 文件存入
爬虫文件
import scrapy

from secondblood.items import SecondbloodItem

class QiubaidemoSpider(scrapy.Spider):

    name = 'qiubaiDemo'

    allowed_domains = ['www.qiushibaike.com']

    start_urls = ['http://www.qiushibaike.com/']

    def parse(self, response):

        odiv = response.xpath('//div[@id="content-left"]/div')

        for div in odiv:

            # xpath函数返回的为列表,列表中存放的数据为Selector类型的数据。我们解析到的内容被封装在了Selector对象中,需要调用extract()函数将解析的内容从Selecor中取出。

            author = div.xpath('.//div[@class="author clearfix"]//h2/text()').extract_first()

            author = author.strip('\n') # 过滤空行

            content = div.xpath('.//div[@class="content"]/span/text()').extract_first()

            content = content.strip('\n') # 过滤空行

            # 将解析到的数据封装至items对象中

            item = SecondbloodItem()

            item['author'] = author

            item['content'] = content

            yield item # 提交item到管道文件(pipelines.py)
items文件
import scrapy

class SecondbloodItem(scrapy.Item):

    # define the fields for your item here like:

    # name = scrapy.Field()

    author = scrapy.Field() # 存储作者

    content = scrapy.Field() # 存储段子内容
管道文件
pipelines.py
from scrapy.exceptions import DropItem

class SecondbloodPipeline(object):

    def __init__(self,path):

        self.f = None

        self.path = path

        # 写入文件的路径参数 ,放在 setting 中了。

        # 通过 from_crawler 来拿到 path

    @classmethod

    def from_crawler(cls, crawler):

        """

        初始化时候,用于创建pipeline对象

        """

        print('File.from_crawler')

        path = crawler.settings.get('HREF_FILE_PATH')

        return cls(path)

    def open_spider(self,spider):

        """

        爬虫开始执行时,调用

        用于 文件的打开

        """

        # if spider.name == "chouti":  # spider参数 用于筛选个性化定制

        print('File.open_spider')

        self.f = open(self.path,'a+')

    def process_item(self, item, spider):

        # f = open('xx.log','a+')

        # f.write(item['href']+'\n')

        # f.close()

        # 这样写太low了,每次都要打开关闭文件

        # 因此选择 将 文件操作绕开每次循环。

        print('File',item['author'])

        print('File',item['content'])

        self.f.write(item['author'] + ':' + item['content'] + '\n')

        # return item      # 交给下一个pipeline的process_item方法

        raise DropItem()# 后续的 pipeline的process_item方法不再执行

    def close_spider(self,spider):

        """

        爬虫关闭时,被调用

        用于 文件的关闭

        """

        print('File.close_spider')

        self.f.close()
注意:pipeline 是所有爬虫公用,如果想要给某个爬虫定制需要使用spider参数自己进行处理
ps:
数据的处理当然可以写入 数据库,或者 redis 如下实例
# -*- coding: utf-8 -*-

# Define your item pipelines here

# Don't forget to add your pipeline to the ITEM_PIPELINES setting

# See: https://doc.scrapy.org/en/latest/topics/item-pipeline.html

#导入数据库的类

import pymysql

class QiubaiproPipelineByMysql(object):

    conn = None  #mysql的连接对象声明

    cursor = None#mysql游标对象声明

    def open_spider(self,spider):

        print('开始爬虫')

        #链接数据库

        self.conn = pymysql.Connect(host='127.0.0.1',port=3306,user='root',password='',db='qiubai')

    #编写向数据库中存储数据的相关代码

    def process_item(self, item, spider):

        #1.链接数据库

        #2.执行sql语句

        sql = 'insert into qiubai values("%s","%s")'%(item['author'],item['content'])

        self.cursor = self.conn.cursor()

        #执行事务

        try:

            self.cursor.execute(sql)

            self.conn.commit()

        except Exception as e:

            print(e)

            self.conn.rollback()

        return item

    def close_spider(self,spider):

        print('爬虫结束')

        self.cursor.close()

        self.conn.close()
MySQL 的数据处理
# -*- coding: utf-8 -*-

# Define your item pipelines here

# Don't forget to add your pipeline to the ITEM_PIPELINES setting

# See: https://doc.scrapy.org/en/latest/topics/item-pipeline.html

import redis

class QiubaiproPipelineByRedis(object):

    conn = None

    def open_spider(self,spider):

        print('开始爬虫')

        #创建链接对象

        self.conn = redis.Redis(host='127.0.0.1',port=6379)

    def process_item(self, item, spider):

        dict = {

            'author':item['author'],

            'content':item['content']

        }

        #写入redis中

        self.conn.lpush('data', dict)

        return item
redis 的数据处理
配置文件
#开启管道

ITEM_PIPELINES = {

    'secondblood.pipelines.SecondbloodPipeline': 300, # 300表示为优先级,值越小优先级越高

}
优先级顺序
可以写多个Pipeline类彼此优先级唯一以标识顺序
1、如果优先级高的 Pipeline 的 process_item 返回一个具体值或者None,会自动传给下一个 pipline 的process_item,
2、如果只想让第一个 Pipeline 执行,那得让第一个 pipline 的 process_item 抛出异常 raise DropItem()
3、可以用 spider.name == '爬虫名' 来控制哪些爬虫用哪些 pipeline
综合实例 - pymongo
'''

#1、settings.py

HOST="127.0.0.1"

PORT=27017

USER="root"

PWD="123"

DB="amazon"

TABLE="goods"

'''

from scrapy.exceptions import DropItem

from pymongo import MongoClient

class MongoPipeline(object):

    '''2、把解析好的item对象做一个持久化,保存到数据库中'''

    def __init__(self,db,collection,host,port,user,pwd):

        self.db = db

        self.collection = collection  #文档(表)

        self.host = host

        self.port = port

        self.user = user

        self.pwd = pwd

    @classmethod

    def from_crawler(cls,crawler):

        '''1、Scrapy会先通过getattr判断我们是否自定义了from_crawler,有则调它来完

        成实例化'''

        db = crawler.settings.get("DB")

        collection = crawler.settings.get("COLLECTION")

        host = crawler.settings.get("HOST")

        port = crawler.settings.get("PORT")

        user = crawler.settings.get("USER")

        pwd = crawler.settings.get("PWD")

        return cls(db,collection,host,port,user,pwd)   #cls是当前的类,类加括号执行__init__方法

    def open_spider(self,spider):

        '''3、爬虫刚启动时执行一次'''

        print('==============>爬虫程序刚刚启动')

        self.client = MongoClient('mongodb://%s:%s@%s:%s'%(

            self.user,

            self.pwd,

            self.host,

            self.port

        ))

    def close_spider(self,spider):

        '''5、关闭爬虫程序'''

        print('==============>爬虫程序运行完毕')

        self.client.close()

    def process_item(self, item, spider):

        '''4、操作并执行持久化'''

        # return表示会被后续的pipeline继续处理

        d = dict(item)

        if all(d.values()):

            self.client[self.db][self.collection].save(d)   #保存到数据库

        return item

        # 表示将item丢弃,不会被后续pipeline处理

        # raise DropItem()

class FilePipeline(object):

    def __init__(self, file_path):

        self.file_path=file_path

    @classmethod

    def from_crawler(cls, crawler):

        """

        Scrapy会先通过getattr判断我们是否自定义了from_crawler,有则调它来完

        成实例化

        """

        file_path = crawler.settings.get('FILE_PATH')

        return cls(file_path)

    def open_spider(self, spider):

        """

        爬虫刚启动时执行一次

        """

        print('==============>爬虫程序刚刚启动')

        self.fileobj=open(self.file_path,'w',encoding='utf-8')

    def close_spider(self, spider):

        """

        爬虫关闭时执行一次

        """

        print('==============>爬虫程序运行完毕')

        self.fileobj.close()

    def process_item(self, item, spider):

        # 操作并进行持久化

        # return表示会被后续的pipeline继续处理

        d = dict(item)

        if all(d.values()):

            self.fileobj.write(r"%s\n" %str(d))

        return item

        # 表示将item丢弃,不会被后续pipeline处理

        # raise DropItem()
综合实例 - mysql 存入
此示例是使用了 pymysql 的方式
可以使用 ORM 的方式, 详情可以使用 scrapy-djangoitem 模块完成
同步存入
class MysqlPipeline(object):

    # 采用同步的机制写入mysql

    def __init__(self):

        self.conn = MySQLdb.connect('192.168.0.106', 'root', 'root', 'article_spider', charset="utf8", use_unicode=True)

        self.cursor = self.conn.cursor()

    def process_item(self, item, spider):

        insert_sql = """

            insert into jobbole_article(title, url, create_date, fav_nums)

            VALUES (%s, %s, %s, %s)

        """

        self.cursor.execute(insert_sql, (item["title"], item["url"], item["create_date"], item["fav_nums"]))

        self.conn.commit()
异步存入
import pymysql

from twisted.enterprise import adbapi

class MysqlTwistedPipline(object):

    def __init__(self, dbpool):

        self.dbpool = dbpool

    @classmethod

    def from_settings(cls, settings):

        dbparms = dict(

            host=settings["MYSQL_HOST"],

            db=settings["MYSQL_DBNAME"],

            user=settings["MYSQL_USER"],

            passwd=settings["MYSQL_PASSWORD"],

            charset='utf8',

            cursorclass=MySQLdb.cursors.DictCursor,

            use_unicode=True,

        )

        dbpool = adbapi.ConnectionPool("MySQLdb", **dbparms)

        return cls(dbpool)

    def process_item(self, item, spider):

        # 使用twisted将mysql插入变成异步执行

        query = self.dbpool.runInteraction(self.do_insert, item)

        query.addErrback(self.handle_error, item, spider)  # 处理异常

    def handle_error(self, failure, item, spider):

        # 处理异步插入的异常

        print(failure)

    def do_insert(self, cursor, item):

        # 执行具体的插入

        # 根据不同的item 构建不同的sql语句并插入到mysql中

        insert_sql, params = item.get_insert_sql()

        cursor.execute(insert_sql, params)
Scrapy 框架,持久化文件相关的更多相关文章
- 11.scrapy框架持久化存储
今日概要 基于终端指令的持久化存储 基于管道的持久化存储 今日详情 1.基于终端指令的持久化存储 保证爬虫文件的parse方法中有可迭代类型对象(通常为列表or字典)的返回,该返回值可以通过终端指令的 ...
- scrapy框架持久化存储
基于终端指令的持久化存储 基于管道的持久化存储 1.基于终端指令的持久化存储 保证爬虫文件的parse方法中有可迭代类型对象(通常为列表or字典)的返回,该返回值可以通过终端指令的形式写入指定格式的文 ...
- 10 Scrapy框架持久化存储
一.基于终端指令的持久化存储 保证parse方法中有可迭代类型对象(通常为列表or字典)的返回,该返回值可以通过终端指令的形式写入指定格式的文件中进行持久化操作. 执行输出指定格式进行存储:将爬取到的 ...
- 11,scrapy框架持久化存储
今日总结 基于终端指令的持久化存储 基于管道的持久化存储 今日详情 1.基于终端指令的持久化存储 保证爬虫文件的parse方法中有可迭代类型对象(通常为列表or字典)的返回,该返回值可以通过终端指令的 ...
- scrapy 框架持久化存储
1.基于终端的持久化存储 保证爬虫文件的parse方法中有可迭代类型对象(通常为列表或字典)的返回,该返回值可以通过终端指令的形式写入指定格式的文件中进行持久化操作. # 执行输出指定格式进行存储:将 ...
- scrapy 框架持久化存储的三个方法 存入 mysql 文件 redis
这里就不做详细讲解了 毕竟不是一句两句能说的清楚,所以我把代码和注释放到了这里 谢谢! import pymysql from redis import Redis # 写入mysql class W ...
- Scrapy框架-爬虫程序相关属性和方法汇总
一.爬虫项目类相关属性 name:爬虫任务的名称 allowed_domains:允许访问的网站 start_urls: 如果没有指定url,就从该列表中读取url来生成第一个请求 custom_se ...
- Scrapy框架学习参考资料
00.Python网络爬虫第三弹<爬取get请求的页面数据> 01.jupyter环境安装 02.Python网络爬虫第二弹<http和https协议> 03.Python网络 ...
- scrapy的持久化相关
终端指令的持久化存储 保证爬虫文件的parse方法中有可迭代类型对象(通常为列表or字典)的返回,该返回值可以通过终端指令的形式写入指定格式的文件中进行持久化操作. 需求是:将糗百首页中段子的内容和标 ...
随机推荐
- 为什么我觉得Python烂的要死?
为什么我觉得Python烂的要死? https://www.toutiao.com/a6636558446030225923/ 作为机器学习程序员的首选编程语言,Python成为世界范围内最受大学生欢 ...
- SpringBoot集成mybatis配置
一个有趣的现象:传统企业大都喜欢使用hibernate,互联网行业通常使用mybatis:之所以出现这个问题感觉与对应的业务有关,比方说,互联网的业务更加的复杂,更加需要进行灵活性的处理,所以myba ...
- 当Flutter遇到节流与防抖
相信web前端的开发者都或多或少的遇到过节流与防抖的问题.函数节流和函数防抖,两者都是优化执行代码效率的一种手段.在一定时间内,代码执行的次数不一定是越多越好.相反,频繁的触发或者执行代码,会造成大量 ...
- [伟哥开源项目基金会](https://github.com/AspNetCoreFoundation)
伟哥开源项目基金会 GitHub_base=> 伟哥开源项目基金会 该项目作者为伟哥,GitHub地址:https://github.com/amh1979: 该项目维护者为鸟窝,GitHub地 ...
- KASAN实现原理【转】
1. 前言 KASAN是一个动态检测内存错误的工具.KASAN可以检测全局变量.栈.堆分配的内存发生越界访问等问题.功能比SLUB DEBUG齐全并且支持实时检测.越界访问的严重性和危害性通过我之前的 ...
- LeetCode算法题-Subtree of Another Tree(Java实现)
这是悦乐书的第265次更新,第278篇原创 01 看题和准备 今天介绍的是LeetCode算法题中Easy级别的第132题(顺位题号是572).给定两个非空的二进制树s和t,检查树t是否具有完全相同的 ...
- 谈谈当代大学生学习IT技术的必要性。
21世纪,人类社会已经从工业时代全面进入信息化时代,IT技术的发展正在影响人类的日常生活.比如,外卖平台给人们的用餐提供了更多的选择,移动支付颠覆了传统的支付方式.网购使得人们的购物更加方便,真正做到 ...
- 简单用数组模拟顺序栈(c++)
**栈是一种操作受限制的线性表,太多官方的话我也不说了,我们都知道栈元素是先进后出的,它有两种存储结构,分别是顺序存储结构和链式存储结构. **今天我先记一下顺序存储结构,后面我会加上链式存储结构的. ...
- ORACLESQL语句的优化
ORACLESQL语句的优化: 选择最有效率的表名顺序:应该选择记录条数最少的表作为基表! 因为Oracle解析器的处理顺序是从右至左的.当ORACLE处理多个表时, 会运用排序及合并的方式连接它们. ...
- localStorage和sessionStorage数据存储
var arr=[]; for(var i=0;i<4;i++){ arr[i]=i+i; } console.log(arr.toString()); //将json数据转化为字符串 var ...