
springboot+thymeleaf简单使用
关于springboot想必很多人都在使用,由于公司项目一直使用的是SpringMVC,所以自己抽空体验了一下springboot的简单使用。
环境搭建
springbooot的环境搭建可以说很灵活,可以新建maven普通项目来手动搭建,当然也可以使用Spring的STS来搭建,由于IDE使用eclipse,所以就直接使用STS插件。
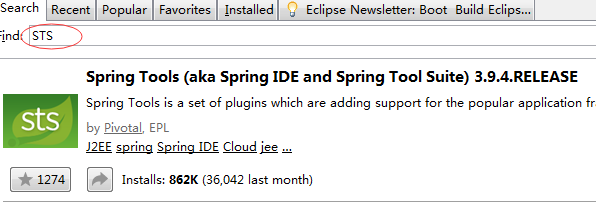
1. 在eclipse的Marketplace中搜索STS,后直接下载安装即可。
2. 安装好后,在新建项目中就可以看到springboot的相关内容,选择第二个新建springboot
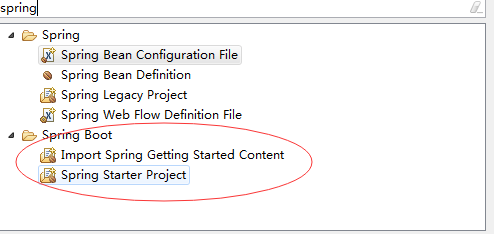
3. 第三步就是选择对应的依赖,当然你可以将需要的依赖全部添加,也可以先添加当前需要的,随后用到什么在添加。
代码结构
Springboot的启动很简单,如下:
 package com.yongcheng.liuyang;

 import org.springframework.boot.SpringApplication;

 import org.springframework.boot.autoconfigure.SpringBootApplication;

 @SpringBootApplication

 public class DemoApplication {

     public static void main(String[] args) {

         SpringApplication.run(DemoApplication.class, args);

     }

 }
其中最主要的是@SpringBootApplication的注解,当然从启动过程也可以发现,springboot其实质还是运行在web容器中,
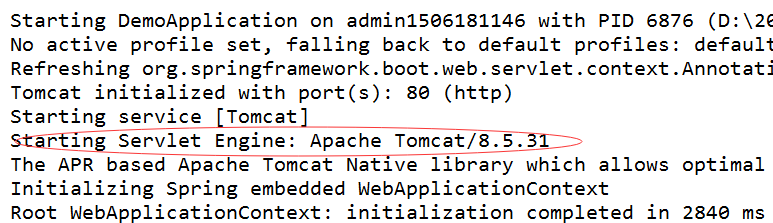
接下来就写一个springmvc中经常用到的Controller很简单的测试下,当然前端页面我们选择了官方推荐的thymeleaf,
所以首先要在pom.xml中导入这个依赖包,如下:
<!-- thymeleaf模板引擎包 -->
<dependency>
<groupId>org.springframework.boot</groupId>
<artifactId>spring-boot-starter-thymeleaf</artifactId>
</dependency>
controller的写法和springmvc一样,熟悉springmvc的基本不用多说,直接上代码:
 package com.yongcheng.liuyang.controller;

 import org.slf4j.Logger;

 import org.slf4j.LoggerFactory;

 import org.springframework.stereotype.Controller;

 import org.springframework.ui.Model;

 import org.springframework.web.bind.annotation.RequestMapping;

 import com.yongcheng.liuyang.entity.AuthorSetting;

 @Controller

 @RequestMapping(value="/")

 public class UserLoginController {

     private static final Logger logger = LoggerFactory.getLogger(UserLoginController.class);

      @RequestMapping("/test")

      public String testthymeleaf(Model model)

      {

          model.addAttribute("singlePerson", new AuthorSetting("zhangsan",18));

          return "viewTest";

      }

 }
由于我们需要返回页面所以使用的是@Controller注解,当然如果你要返回json数据,那么你的注解当然是@RestController
接下就是前台的页面
 <!DOCTYPE html SYSTEM "http://www.thymeleaf.org/dtd/xhtml1-strict-thymeleaf-4.dtd">

 <html xmlns="http://www.w3.org/1999/xhtml"

       xmlns:th="http://www.thymeleaf.org">

 <head>

 <meta content="text/html" charset="UTF-8">

 <link th:src="@{/css/bootstrap.min.css}" rel="stylesheet">

 <link th:src="@{/css/bootstrap-theme.min.css}" rel="stylesheet">

 <script  th:src="@{/js/jquery-3.2.1.min.js}" type="text/javascript"></script>

 <script  th:src="@{/js/bootstrap.min.js}" type="text/javascript"></script>

 <title>thymeleaf简单实用</title>

 </head>

 <body>

     <div class="panel panel-primary">

         <div class="panel-heading">

             <h3 class="panel-title">访问model</h3>

         </div>

         <div class="panel-body">

              <span th:text="${singlePerson.name}"></span>

         </div>

     </div>

   </body>

 </html>
注意html文件中引入xmlns:th="http://www.thymeleaf.org",其次就是这里的动态加载使用th:dom选择,比如项目中的th:text,
URL使用@{},比如项目中css和js的引入。
这样子整个问题就算解决了吗?没有,了解springmvc的都知道,springmvc在解析JSP文件时需要配置对应的文件前后缀,比如如下的配置:
<bean class="org.springframework.web.servlet.view.InternalResourceViewResolver"

         id="internalResourceViewResolver" >

<!--         自动添加到路径中的前缀 -->

        <property name="prefix" value="/jsp/" />

<!--         自动添加到路径中的后缀 -->

        <property name="suffix" value=".jsp" />

    </bean>
在springboot中一样也要配置这样的,其中springboot的所有配置信息都在application.properties或者application.yml文件中,
那么如何配置对应的thymeleaf的视图解析配置参数呢?
由于小编选择的是yml,配置参数如下:
spring:

   thymeleaf:

    prefix: "classpath:/templates/"

    suffix: ".html"
当然如果你的项目结构绝对严谨的话,比如使用STS创建的项目,那么其实上面的是可以不配置的,具体原因可参见ThymeleafProperties类。
重要提示:
为了让项目正常加载bean,main函数所在类的一定要是其它类的父包,否则无法扫描到配置的bean。
好了,以上就是springboot+thymeleaf的简单使用。
springboot+thymeleaf简单使用的更多相关文章
- org.springframework.expression.spel.SpelEvaluationException: EL1004E: Method call: Method service() cannot be found on com.my.blog.springboot.thymeleaf.util.MethodTest type
前言 本文中提到的解决方案,源码地址在:springboot-thymeleaf,希望可以帮你解决问题. 至于为什么已经写了一篇文章thymeleaf模板引擎调用java类中的方法,又多此一举的单独整 ...
- SpringBoot 搭建简单聊天室
SpringBoot 搭建简单聊天室(queue 点对点) 1.引用 SpringBoot 搭建 WebSocket 链接 https://www.cnblogs.com/yi1036943655/p ...
- springboot+thymeleaf+pageHelper带条件分页查询
html层 <div> <a class="num"><b th:text="'共 '+ ${result.resultMap['pages ...
- SpringBoot thymeleaf使用方法,thymeleaf模板迭代
SpringBoot thymeleaf使用方法,thymeleaf模板迭代 SpringBoot thymeleaf 循环List.Map ============================= ...
- SpringBoot thymeleaf模板页面没提示,SpringBoot thymeleaf模板插件安装
SpringBoot thymeleaf模板插件安装 SpringBoot thymeleaf模板Html页面没提示 SpringBoot thymeleaf模板页面没提示 SpringBoot t ...
- SpringBoot thymeleaf模板版本,thymeleaf模板更换版本
SpringBoot thymeleaf模板版本 thymeleaf模板更换版本 修改thymeleaf模板版本 ================================ ©Copyright ...
- Springboot+Thymeleaf框架的button错误
---恢复内容开始--- 在做公司项目时,遇到了一个Springboot+Thymeleaf框架问题: 使用框架写网站时,没有标明type类型的button默认成了‘submit’类型,每次点击按钮都 ...
- Springboot接口简单实现生成MySQL插入语句
Springboot接口简单实现调用接口生成MySQL插入语句 在实际测试中,有这样一个需求场景,比如:在性能压力测试中,可能需要我们事先插入数据库中一些相关联的数据. 我们在实际测试中,遇到问题,需 ...
- SpringBoot 发送简单邮件
使用SpringBoot 发送简单邮件 1. 在pom.xml中导入依赖 <!--邮件依赖--> <dependency> <groupId>org.springf ...
随机推荐
- web.py 模板错误记录
错误信息 Traceback (most recent call last): File , in process return self.handle() File , in handle retu ...
- Quartz.net创建windows服务
序言 安装服务 sc create XXService binpath= "XXService.exe" start= auto sc description XXService ...
- java程序在windows后台执行的办法
1.新建run.txt文件 2.在文件中输入一下内容: @echo off start javaw -jar xx.jar exit 3.保存,修改文件名为run.bat4.双击即可 5.删除wind ...
- 20155332 2016-2017-2 《Java程序设计》第9周学习总结
20155332 2016-2017-2 <Java程序设计>第9周学习总结 教材学习内容总结 了解JDBC架构 掌握JDBC架构 掌握反射与ClassLoader 了解自定义泛型和自定义 ...
- 树形控件QTreeWidget
import sys from PyQt5.QtCore import Qt from PyQt5.QtWidgets import QApplication, QWidget, QTreeWidge ...
- 给父元素与子元素分别设置visibility注意点
由于机顶盒的终端特性原因,不能用display:hidden去做隐藏,就选择了visibility:hidden. 在这里遇到一个现象: 给父元素设置了hidden,但是里面的子元素依然可见.以为只是 ...
- pyppeteer爬虫例子
如果在centos上使用,需要安装下面的依赖 yum install pango.x86_64 libXcomposite.x86_64 libXcursor.x86_64 libXdamage.x8 ...
- windows环境用python修改环境变量的注意点(含代码)
1.部分环境变量字段需要保留原来的值,只是做添加,不可以替换 2.Path和PATH对于python来说是一样的,也就是说存在名为Path的环境变量时,添加PATH的环境变量,会覆盖原有的Path环境 ...
- centos6.5环境通达OA数据库mysql5.0.67升级至mysql5.5.48方案
centos6.5环境通达OA数据库mysql5.0.67升级至mysql5.5.42方案 整体方案: 环境准备,在备用服务器安装mysql5.5数据库 1.停用生产环境的应用访问 直接修改web的访 ...
- S5PV210的根文件系统制作
一.移植BusyBox1.下载BusyBox的源代码下载地址:http://www.busybox.net/downloads/,此处下载busybox-1.20.2.tar.bz2.2.解压并进入目 ...