
S5PV210刷机
一. 刷机初识
1.1. 什么是刷机
a. 刷机就是通过各种手段把相应镜像烧录到设备中,让设备可以运行起来。常见的刷机如:安卓刷机,QT刷机
1.2. S5PV210刷机镜像
1.2.1. 刷安卓所需要的镜像
a. uboot镜像: uboot.bin
b. linux kernel镜像:zImage-android
c. android rom镜像: x210.img
1.2.2. 刷QT4.8 所需要的镜像
a. uboot镜像: uboot.bin
b. linux kernel镜像: zImage-qt
c. rootfs镜像:rootfs_qt4.ext3
1.3. 刷机过程使用到的工具
1.3.1. 烧录uboot所需要的工具
1.3.1. 使用SD卡烧录ubbot
a. 方式一:在windows中用刷卡工具去制作启动SD卡,刷卡工具 x210_Fusing_Tool
b. 方式二:在linux中用dd命令烧录uboot
1.3.1. 使用USB烧录uboot
a. 方式一:在window下使用dnw软件进行下载uboot.bin
b. 方式二:在linux下使用dnw工具进行下载uboot.bin
1.3.2. uboot启动后烧录全部镜像到flash中
1.3.1. 使用fastboot烧录
1.3.1.1. 使用fastboot烧录android4.0.4镜像
a. fastboot flash bootloader android4.0\uboot.bin 烧uboot
b. fastboot flash kernel android4.0\zImage-android 烧linux kernel
c. fastboot flash system android4.0\x210.img 烧android rom
1.3.1.2. 使用fastboot烧录linux+QT镜像
a. fastboot flash bootloader linuxQT\uboot.bin 烧uboot
b. fastboot flash kernel linuxQT\zImage-qt 烧linux kernel
c. fastboot flash system linuxQT\rootfs_qt4.ext3 烧rootfs
二. 烧录实践
2.1. 烧录uboot
2.1.1. 使用x210_Fusing_Tool烧录uboot
a. 最好使用管理员启动软件
b. 烧录效果如下:

2.2. 在linux中用dd命令烧录uboot
2.2.1. 将uboot_sd_fusing相关文件放到uboot源码下
2.2.1. 制作过程如下
root@ubuntu:~/x210_porting/uboot-jiuding/sd_fusing# ls

C110-EVT1-mkbl1.c   Makefile    sd_fusing2.sh

c110.signedBL1_bin  sd_fdisk.c  sd_fusing.sh

root@ubuntu:~/x210_porting/uboot-jiuding/sd_fusing# make

gcc -o    mkbl1 C110-EVT1-mkbl1.c

gcc -o    sd_fdisk sd_fdisk.c

root@ubuntu:~/x210_porting/uboot-jiuding/sd_fusing# ./sd_fusing.sh /dev/sdb

/dev/sdb reader is identified.

make sd card partition

./sd_fdisk /dev/sdb

+ records in

+ records out

 bytes ( B) copied, 0.00835414 s, 61.3 kB/s

mkfs.vfat -F  /dev/sdb1

mkfs.fat 3.0. (--)

BL1 fusing

+ records in

+ records out

 bytes (8.2 kB) copied, 0.195566 s, 41.9 kB/s

u-boot fusing

dd: writing to ‘/dev/sdb’: Input/output error

+ records in

+ records out

 bytes ( kB) copied, 30.7411 s, 1.0 kB/s

U-boot image is fused successfully.

Eject SD card and insert it again.

root@ubuntu:~/x210_porting/uboot-jiuding/sd_fusing#
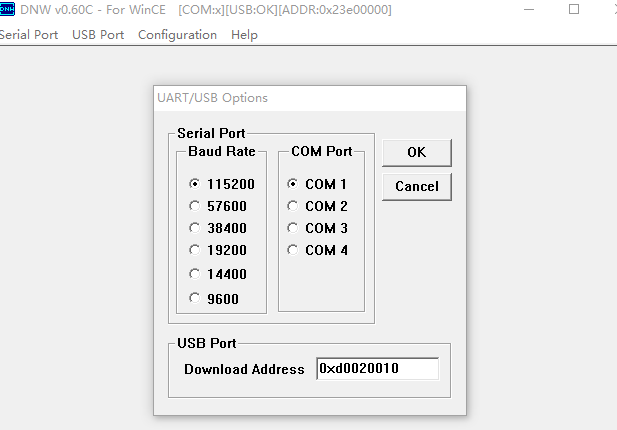
2.3. 在window下使用dnw烧录
2.3.1. 刷机分2步:
a. 第一步刷x210_usb.bin,地址是0xd0020010;
b. 第二步刷uboot.bin,刷机地址是0x23e00000
2.4. linux 使用dnw工具烧录uboot
2.4.1. 源码包获取,编译和安装
2.4.2. 成功连接后现象:
a. Windows下设备管理器没了;
b. ls /dev/secbulk0 设备节点自动出现
2.4.3. dnw进行下载uboot.bin
a. dnw -a 0xd0020010 x210_usb.bin
b. dnw -a 0x23e00000 uboot.bin
三. 使用fastboot烧录镜像到flash
3.1. 在uboot中对flash进行分区
3.1.1. 分区命令fdisk -c 0
x210 #

x210 # fdisk -c

fdisk is completed

partion #    size(MB)     block start #    block count    partition_Id

                                              0x83

                                             0x83

                                            0x83

                                          0x83

x210 #
3.2. uboot的参数中bootcmd和bootargs
x210 # print

baudrate=

ethaddr=::5c::0a:5b

gatewayip=192.168.1.1

ipaddr=192.168.1.20

netmask=255.255.255.0

serverip=192.168.1.141

bootdelay=

bootcmd=tftp 0x30008000 zImage;bootm 0x30008000

bootargs=root=/dev/nfs nfsroot=192.168.1.141:/root/x210_porting/rootfs/rootfs ip=192.168.1.20:192.168.1.141:192.168.1.1:

Environment size: / bytes

x210 # set bootcmd 'movi read kernel 30008000; bootm 30008000'

x210 # set bootargs console=ttySAC2, root=/dev/mmcblk0p2 rw init=/linuxrc rootfstype=ext3

x210 # saveenv

Saving Environment to SMDK bootable device...

done

x210 # print

baudrate=

ethaddr=::5c::0a:5b

gatewayip=192.168.1.1

ipaddr=192.168.1.20

netmask=255.255.255.0

serverip=192.168.1.141

bootdelay=

bootcmd=movi read kernel ; bootm

bootargs=console=ttySAC2, root=/dev/mmcblk0p2 rw init=/linuxrc rootfstype=ext3

Environment size: / bytes

x210 #
3.3. uboot进入fastboot
x210 # fastboot

[Partition table on MoviNAND]

ptn  name='bootloader' start=0x0 len=N/A (use hard-coded info. (cmd: movi))

ptn  name='kernel' start=N/A len=N/A (use hard-coded info. (cmd: movi))

ptn  name='ramdisk' start=N/A len=0x300000(~3072KB) (use hard-coded info. (cmd: movi))

ptn  name='config' start=0xAECC00 len=0x1028DC00(~264759KB)

ptn  name='system' start=0x10D7A800 len=0x1028DC00(~264759KB)

ptn  name='cache' start=0x21008400 len=0x65F7000(~104412KB)

ptn  name='userdata' start=0x275FF400 len=0xC0C6FC00(~3158463KB)
3.4. windown fastboot软件使用
3.4.1. 相关命令使用
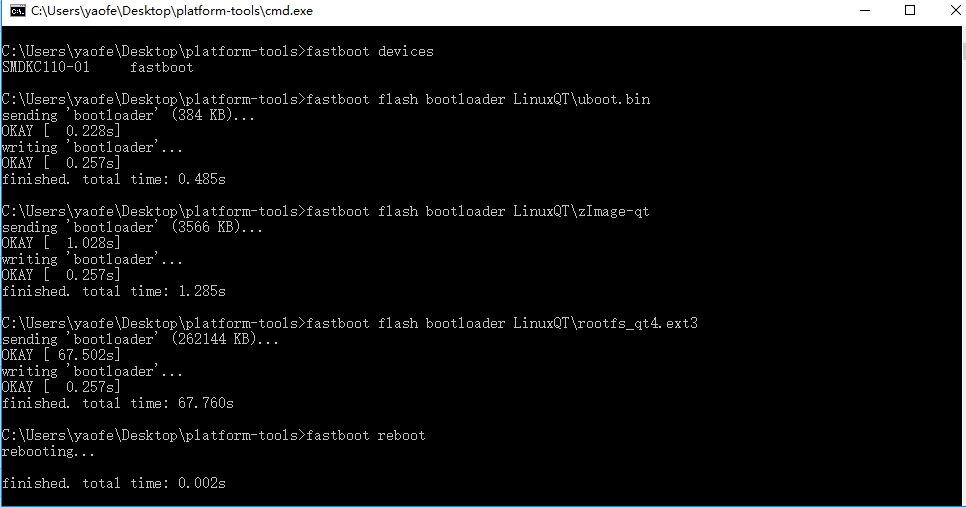
3.4.1.1. fastboot devices 命令用来查看当前连接的设备。(我们开发板看到的是:SMDKC110-01)
C:\Users\yaofe\Desktop\platform-tools>fastboot devices

SMDKC110-     fastboot

C:\Users\yaofe\Desktop\platform-tools>
3.4.1.2. fastboot flash xxx 命令用来烧录的
a. fastboot flash bootloader LinuxQT\uboot.bin 烧uboot
b. fastboot flash kernel LinuxQT\zImage-qt 烧linux kernel
c. fastboot flash system LinuxQT\rootfs_qt4.ext3 烧rootfs
C:\Users\yaofe\Desktop\platform-tools>fastboot flash bootloader LinuxQT\uboot.bin

sending 'bootloader' ( KB)...

OKAY [  .228s]

writing 'bootloader'...

OKAY [  .257s]

finished. total time: .485s

C:\Users\yaofe\Desktop\platform-tools>fastboot flash bootloader LinuxQT\zImage-qt

sending 'bootloader' ( KB)...

OKAY [  .028s]

writing 'bootloader'...

OKAY [  .257s]

finished. total time: .285s

C:\Users\yaofe\Desktop\platform-tools>fastboot flash bootloader LinuxQT\rootfs_qt4.ext3

sending 'bootloader' ( KB)...

OKAY [ .502s]

writing 'bootloader'...

OKAY [  .257s]

finished. total time: .760s
3.4.1.3. fastboot reboot 命令用来重启系统
C:\Users\yaofe\Desktop\platform-tools>fastboot reboot

rebooting...

finished. total time: .002s
S5PV210刷机的更多相关文章
- S5PV210开发板刷机(SD卡uboot、串口+USB-OTG刷机方法)
一.介绍 九鼎的S5PV210开发板,在出厂前已经默认刷了Android4.0系统.如果需要刷其它的系统或者是由于系统问题无法启动时,就需要对板子刷机. 其实,刷机是对210开发板的一个基础学习,目的 ...
- 用 S5PV210 学习 Linux (一) 刷机(一)
简介: 习惯了 用 keil 或者 IAR 一键下载 (烧写) 代码,S5PV210 貌似就不能这么简单用 仿真器的 方式 下载代码了,因此 学习 S5PV210 的第一步就是 学习怎么下载代码,下 ...
- 红米2A高配刷机记录
2014816 机型:红米2A高配版 设备型号:2014816 CPU:高通 线刷:fastboot平台 http://192.168.7.118/MesReports/Reports/Cutting ...
- andriod刷机
有句古话叫常在河边走,难免会翻船.对于经常刷机的Android刷友来说,难免会碰到刷机失败损坏recovery程序乃至手机无法启动的情况,也就是传说中的手机变砖块.不过刷机失败手机变砖并不是世界末日, ...
- 安卓刷机--fastboot线刷
首先需要下载fastboot.exe,copy到system32文件夹下. 对于安卓系统的智能手机,同时按住开机键和音量减键,或手机连上电脑,输入adb reboot bootloader进入fast ...
- Android刷机教程
我的机器是Nexus 5 一. 安装驱动 如何进入fastboot模式 1. 拔掉数据线,将手机关机 2. 关机后同时按住[音量减小键]和[开关机键]即可进入Fastboot模式 开启usb调试 - ...
- Redmi Note3 hennessy 刷机过程记录
本文只是凭记忆,记录大致的步骤,提供线索. 准备 刷机包和supersu刷机包,到xiaomi.eu上下载, 如果是稳定版可能有锁bootloader,需要到下载解锁软件.开发版无锁 刷入recove ...
- Sony Z1 flashtool 刷机笔记
第一次硬刷,(相较于recovery的卡刷)差点变成无限重启..记录一些关键步骤: 1 unlock bootloader http://developer.sonymobile.com/unlock ...
- 记一次酷派尚锋Y75刷机
昨天因为手机卡的原因,我的同学帮他的同学刷机,听他说是用刷机精灵线刷的rom包,但是刷机失败了,就来找我把弄好,他是个半吊子水平,刚接触这个东西,也是运气不好,什么刷机失败的问题都让他遇上了,刷了几个 ...
随机推荐
- bzoj4530 [Bjoi2014]大融合 子树信息 LCT
题目传送门 https://lydsy.com/JudgeOnline/problem.php?id=4530/ 题解 想要求出一条边的负载那么就是要求出一个点为根的时候的另一个点的子树大小. 又因为 ...
- mysql:联合索引及优化
命名规则:表名_字段名1.需要加索引的字段,要在where条件中2.数据量少的字段不需要加索引3.如果where条件中是OR关系,加索引不起作用4.符合最左原则 尽量不要用or,如果可以用union代 ...
- Python---进阶---logging---logger
一.####用logging的四大组件来实现日志的功能 - 打印出函数执行的时间,日志的等级,日志的消息 - 用装饰器 - 不同的日志,要记录不同等级的日志消息 ------------------- ...
- javaScript中的 call 和 apply
call 和apply都可以实现函数的调用 // 普通函数的调用 function foo() { console.log('foo'); } foo(); // foo foo.call(); // ...
- 借用的对vue-cli配置对解析
- Pytest安装介绍--使用(html报告)
Pytes是 一个单元测试框架,可以生成html报告. #卸载# pip uninstall pytest#安装# pip install -U pytest# 查看# pytest --versio ...
- python-hasattr()、getattr()、setattr()函数的使用
python中hasattr().getattr().setattr()函数 class A(): name = 'python' def __init__(self): setattr(self._ ...
- extjs计算两个DateField所间隔的月份(天数)
需求:两个DateField控件,分别为开始时间和结束时间.当选择完结束时间后,自动计算这两个时间段所间隔的月或天数. 需要解决的问题: 1.直接使用Ext.getCmp('endDate').get ...
- requiredBackgroundModes
申明需要后台运行的能力,类型为数组.目前支持以下项目: audio: 后台音乐播放如: { "pages": ["pages/index/index"], &q ...
- Java——常用类(File)
[File] <1>java.io.File类代表系统文件名(路径和文件名). ----注意:这里代表的只是文件名,而不是物理上的文件(硬盘上的数据),通过该类无法读 ...