
配置Nexus为maven的私服
1、配置Nexus为maven的私服
第一种方式:在项目的POM中如下配置
<repositories>

    <repository>

        <id>nexus_public</id>

        <url>http://localhost:8081/nexus/content/groups/public/</url>

        <releases>

            <enabled>true</enabled>

        <releases>

        <snapshots>

          <enabled>true</enabled>

        <snapshots>

      </repository>

  </repositories>

  <pluginRepositories>

      <pluginRepository>

               <id>nexus_public</id>

               <url>http://localhost:8081/nexus/content/groups/public/</url>

                <releases>

                       <enabled>true</enabled>

                 <releases>

                 <snapshots>

                       <enabled>true</enabled>

                 </snapshots>

        </pluginRepository>

   </pluginRepositories>
注意:这样的配置(第一个仓库是代码库,第二个是插件库)只对当前的Maven项目有效。实际的项目开发中,我们都想着一次配置就能让本机的所有Maven项目都使用Maven私服,那么我们就要用到下面的方法。
第二种方式:在settings.xml中如下配置:
<settings>

...

    <profiles>

        <profile>

            <id>nexus</id>

            <repositories>

                <repository>

                    <id>nexus_public</id>

                    <url>http://localhost:8081/nexus/content/groups/public/</url>

                    <releases>

                        <enabled>trueenabled>

                    </releases>

                    <snapshots>

                    <enabled>true</enabled>

                </snapshots>

            </repository>

        </repositories>

        <pluginRepositories>

            <pluginRepository>

                <id>nexus_public</id>

                <url>http://localhost:8081/nexus/content/groups/public/</url>

                <releases>

                    <enabled>true</enabled>

                </releases>

                <snapshots>

                    <enabled>true</enabled>

                </snapshots>

             </pluginRepository>

        </pluginRepositories>

    </profile>

</profiles>

<activeProfiles>

    <activeProfile>nexus</activeProfile>

</activeProfiles>

...

settings>
Maven提供的profile是一组可选的配置,可以用来设置或者覆盖配置默认值。有了profile,你就可以为不同的环境定制构建。
上面的配置中,使用了一个id为nexus的profile,这个profile包含了相关的仓库配置,同时配置中又使用了activeProfiles元素将nexus这个profile激活,这样当执行Maven构建的时候,激活的profile会将仓库配置应用到项目中去。
通过上面的配置,我们会发现Maven不仅会从Nexus下载构件外还会从中央仓库下载构件构件,为什么呢?因为超级POM文件定义了一个为central的远程仓库,如果这个ID没有被覆盖,那么请求下载构件时还可能会从central标识的远程仓库下载。既然是私服,那么我们就只希望Maven下载请求都仅仅通过Nexus。我们可以通过镜像实现这一需求。可以创建一个匹配任何仓库的镜像,镜像的地址是私服,这样Maven对任何仓库的构件下载请求都会转到私服中。
central的意思其实是重写了超级POM的资源库,那么这里通过重写导致覆盖,重要的是,镜像效果导致直接走镜像,而不会去理会这些资源库配置了,所以基本上url也失去了意义。不过对于快照和发布版本是否进行更新下载还是要靠这个配置来决定的,只有这个配置决定继续更新时才会走镜像下载资源,镜像其实是像在镜像内部寻找资源,如果没有则会在镜像配置的远程仓库下载资源到镜像中。
把上面的配置修改为如下配置:
<settings>

...

<mirrors>

    <mirror>

        <id>local_mirror</id>

        <mirrorOf>*</mirrorOf>

        <name>local_mirror</name>

        <url>http://localhost:8081/nexus/content/groups/public/</url>

    </mirror>

</mirrors>

<profiles>

    <profile>

         <id>nexus</id>

        <repositories>

        <repository>

            <id>central</id>

            <url>http://repo.maven.apache.org/maven2</url>

            <releases>

                <enabled>true</enabled>

            </releases>

            <snapshots>

                <enabled>true</enabled>

            </snapshots>

        </repository>

        <pluginRepositories>

            <pluginRepository>

                <id>central</id>

                <url>http://repo.maven.apache.org/maven2</url>

                <releases>

                    <enabled>true</enabled>

                </releases>

                <snapshots>

                    <enabled>true</enabled>

                </snapshots>

             </pluginRepository>

        </pluginRepositories>

    </profile>

</profiles>

<activeProfiles>

    <activeProfile>nexus</activeProfile>

</activeProfiles>

...

</settings>
注意:以上两种方法都是配置下载的地址,也就是说项目需要下载插件时、下载代码时请求的地址。如果想要上传自己的代码,那么还需要如下配置,也就是部署构件到私服。
2、部署构件到私服
我们在实际开发过程是多个人的,那么总有一些公共模块或者说第三方构件是无法从Maven中央库下载的。我们需要将这些构件部署到私服上,供其他开发人员下载。用户可以配置Maven自动部署构件至Nexus的宿主仓库,也可以通过界面手动上传构件。
第一种方式:使用Maven部署构件到Nexus私服上
日常开发的快照版本部署到Nexus中策略为Snapshot的宿主仓库中,正式项目部署到策略为Release的宿主仓库中,POM的配置方式如下(这个配置文件同样可以写在settings.xml文件中):
<distributionManagement>

    <repository>

        <id>local_nexus_releases</id>

        <name>core Release Repository</name>

        <url>http://localhost:8081/nexus/content/repositories/releases/</url>

    </repository>

    <snapshotRepository>

        <id>local_nexus_snapshots</id>

        <name>core Snapshots Repository</name>

        <url>http://localhost:8081/nexus/content/repositories/snapshots/</url>

    </snapshotRepository>

</distributionManagement>
Nexus的仓库对于匿名用户只是只读的。为了能够部署构件,我们还需要再settings.xml中配置验证信息(其中,验证信息中service的id应该与POM中repository的id一致):
<servers>

    <server>

        <id>local_nexus_releases</id>

        <username>admin</username>

        <password>admin123</password>

    </server>

    <server>

        <id>local_nexus_snapshots</id>

        <username>admin</username>

        <password>admin123</password>

</server>

</servers>
第二种方式:在Nexus界面上手动部署第三方构件至私服
我们除了自己的构件要部署到Nexus私服上外,我们有可能还要将第三方构件(如:SQLService的JDBC)部署到Nexus上。这个时候,在Nexus界面上选择一个宿主仓库(如3rd party),再在页面下方选择Artifact Upload选项卡。填写对应的Maven坐标。然后点击“Select Artifact(s) for Upload”按钮从本机选择要上传的构件,然后点击“Add Artifact”按钮将其加入到上传列表中。最后,单击页面底部的“Upload Artifact(s)”按钮将构件上传到仓库中。
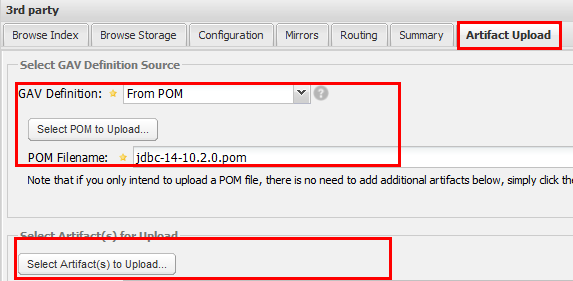
上传成功之后,就可以查看结果了:

测试附件信息
<?xml version="1.0" encoding="UTF-8"?>

<project xsi:schemaLocation="http://maven.apache.org/POM/4.0.0 http://maven.apache.org/xsd/maven-4.0.0.xsd" xmlns="http://maven.apache.org/POM/4.0.0"

    xmlns:xsi="http://www.w3.org/2001/XMLSchema-instance">

  <modelVersion>4.0.0</modelVersion>

  <groupId>oracle.ojdbc</groupId>

  <artifactId>jdbc</artifactId>

  <version>14-10.2.0</version>

  <description>POM was created from install:install-file</description>

</project>
配置Nexus为maven的私服的更多相关文章
- linux 安装配置nexus以及maven私服应用
---------------------nexus---------------------- 1.编辑nexus脚本, 配置 RUN_AS_USER 参数vi /usr/local/src/nex ...
- nexus(Maven仓库私服)的安装、配置、使用和仓库迁移
简介 Nexus下载:点击进入 Nexus 是Maven仓库管理器,如果你使用Maven,你可以从Maven中央仓库 下载所需要的构件(artifact),但这通常不是一个好的做法,你应该在本地架设一 ...
- 【Maven】Nexus(Maven仓库私服)下载与安装
Nexus介绍 Nexus 是Maven仓库管理器,如果你使用Maven,你可以从Maven中央仓库 下载所需要的构件(artifact),但这通常不是一个好的做法,你应该在本地架设一个Maven仓库 ...
- nexus建立maven仓库私服及Snapshots、release的版本管理
环境搭建 1.linux安装maven wget http://mirrors.cnnic.cn/apache/maven/maven-3/3.0.5/binaries/apache-mave ...
- 与Nexus为Maven搭建私服
目录 Nexus 的概述 Nexus 安装与部署 Nexus 在 Windows 上安装与使用 安装 使用 Nexus 在 Linux 上安装与使用 Nexus 的概述 引用百度百科一段话 Nexus ...
- CentOS安装Nexus(Maven私有库)详细配置及上传本地jar到私服
Nexus原理 Maven的原理就是将jar从远程中央仓库下载到PC磁盘的本地仓库,当本地仓库没有发现需要的jar就会去Maven默认的远程中央仓库Maven Central(由Apache维护)中寻 ...
- 配置maven从自己的私服下载jar包nexus、maven私服仓库(二)
配置maven项目从私服下载jar包 pom文件配置从maven私服下载jar包 settings文件配置从maven私服下载jar包 (方便自己关键字搜索,所以多写了几行o(* ̄︶ ̄*)o) 今天自 ...
- Maven学习二:使用Nexus搭建Maven私服及相关配置
处于安全等原因的考虑,一些企业内部网络是不允许访问外部网络的,但是项目内部搭建的项目又是Maven架构,这样就需要企业在内部网络中搭建自己的Maven仓库服务,再者一些大型企业或者内部模块化组件化划分 ...
- 用nexus搭建maven私服
首先介绍一下背景,公司访问外网有限制,项目组大部分人员不能访问maven的central repository,因此在局域网里找一台有外网权限的机器,搭建nexus私服,然后开发人员连到这台私服上 环 ...
随机推荐
- python基础之数据类型转换
方法转换:str -->list str.split() list -->str ''.join(list)强制转换:str -->list list(str) str --> ...
- 浅谈Angularjs至Angular2后内置指令的变化
一.科普概要说明 我们常说的 Angular 1 是指 AngularJS: 从Angular 2 开始已经改名了.不再带有JS,只是单纯的 Angular: Angular 1.x 是基于JavaS ...
- win10安装tensorflow (cpu版)
前提: 下载anaconda,然后创建一个python虚拟环境: 命令: conda create -n tf_cpu python=3.6 # (tf_cpu 是这个虚拟环境的名字) ...
- sqlalchemy orm 层面删除数据注意
#encoding: utf-8 from sqlalchemy import create_engine,Column,Integer,String,Float,func,and_,or_,Text ...
- 希尔排序--python
import random import time # 插入排序 def insertion_sort(arr, step): for i in range(step, len(arr)): for ...
- make j* make j4 make j8 区别
转载: make -j4是什么意思看书上说1) make(1)只衍生一个作业//作业是什么意思?make(1) 是不是就是make的意思?2) 在双处理器上make -j4,难道是让每个处理器跑两个作 ...
- PTA(Basic Level)1029.旧键盘
旧键盘上坏了几个键,于是在敲一段文字的时候,对应的字符就不会出现.现在给出应该输入的一段文字.以及实际被输入的文字,请你列出肯定坏掉的那些键. 输入格式: 输入在 2 行中分别给出应该输入的文字.以及 ...
- 在Ubuntu上安装Hbase
1.下载hbase2.0.5 解压缩并改名为hbase目录,放到/usr/local下(注意权限) sudo mv ~/hbase-2.0.5 /usr/local/hbase 2.修改目录所有者 / ...
- mweb发布文章为什么默认TinyMCE编辑器?
如果是通过 metaweblog api 发布的,需要在网站分类中添加 [Markdown] 标记
- Eslint报错整理与解决方法
1.‘Unexpected tab character’ 字面意思理解呢就是意想不到的制表符,当时出现的时候就是我习惯的使用Tab键去打空格,但是eslint默认不认可Tab,所以解决方法很简单: 在 ...