《Android Studio实战 快速、高效地构建Android应用》--五、备忘录实验(1/2)
- 通过开发App熟悉Android Studio的用法
- 开发一款用于管理备忘事项列表的App,核心功能:
- 创建、删除备忘
- 将某些备忘标记为重要(左侧带颜色标签突出显示)
- 涉及:操作栏菜单、上下文菜单、用于持久化的本地数据库、支持多选的设备上的多项选择
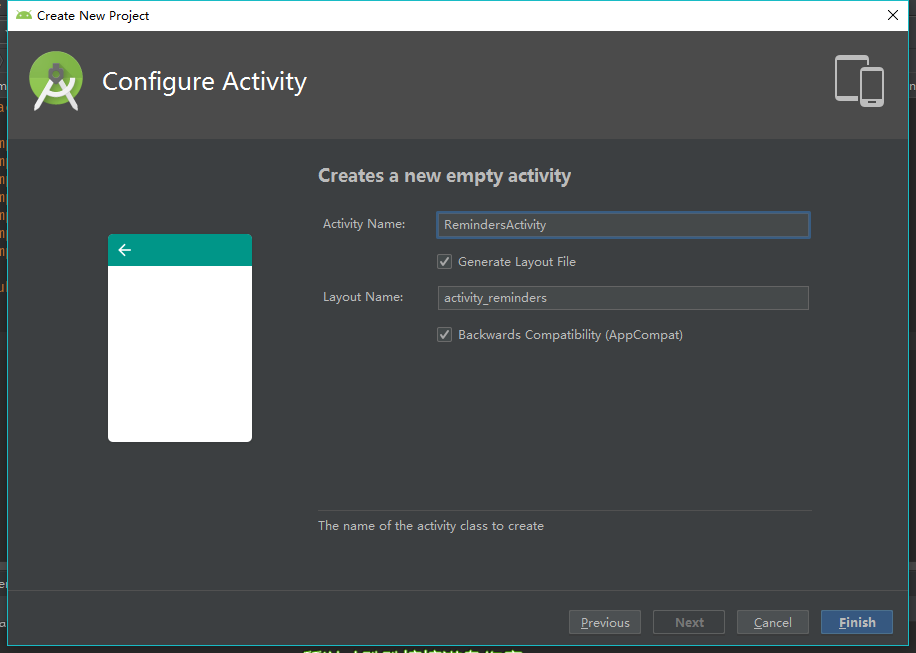
启动新项目
File|New|New project命名为Reminders,选择Empty Activity
初始化Git仓库
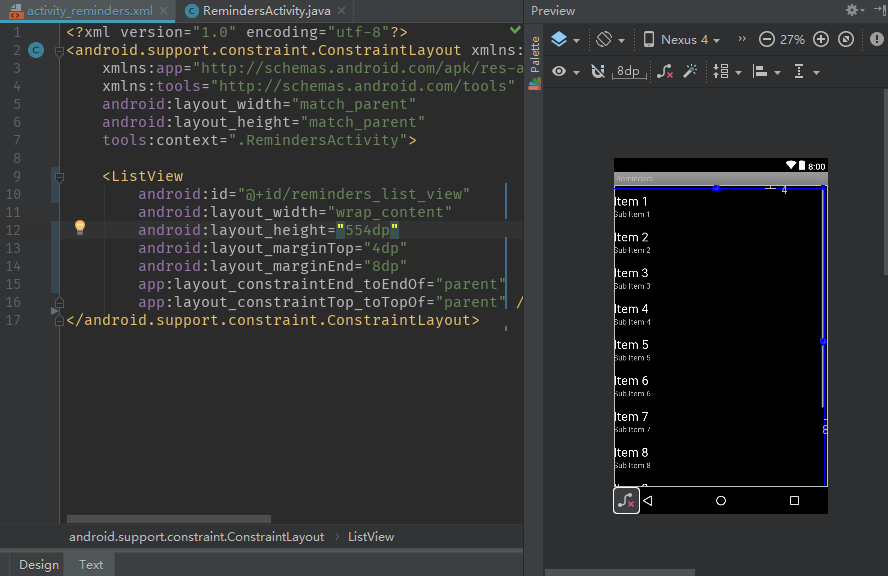
- 创建Git仓库

然后选择项目根目录来创建Git仓库
在Version Control工具窗口中右击Unversioned Files选择Add to VCS将这些文件添加到Git索引
提交文件(
Ctrl+K|将项目的修改记录到Git版本控制系统的过程)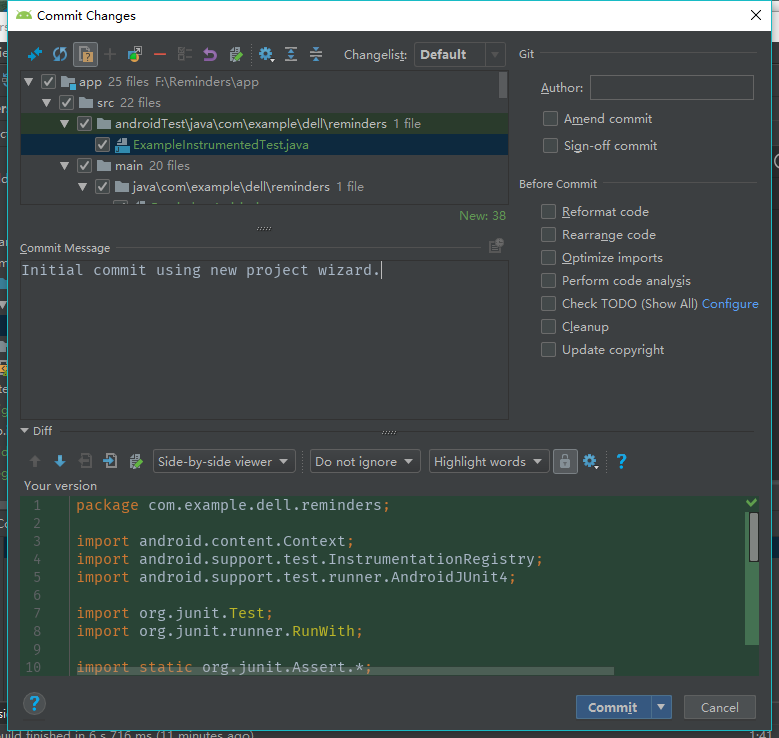
构建用户界面
visual designer布局
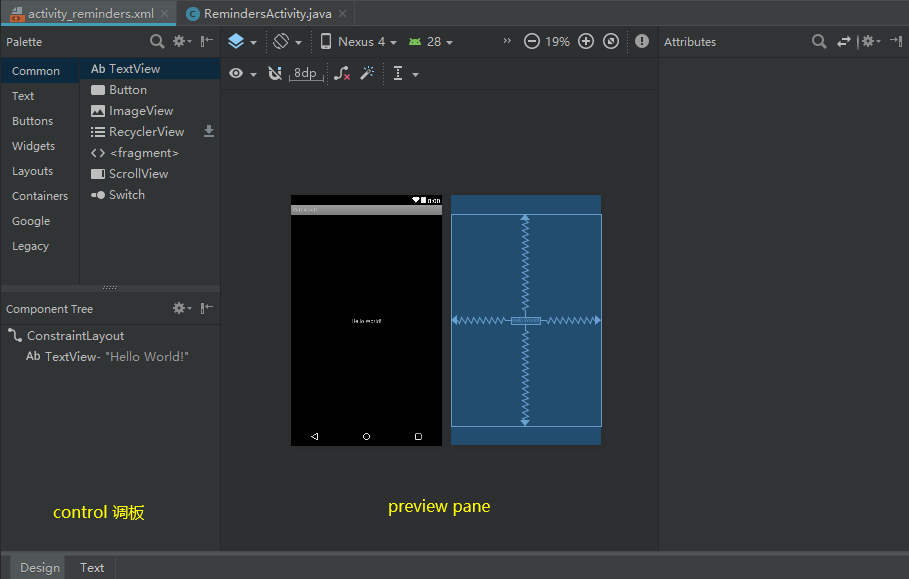
可视化设计器
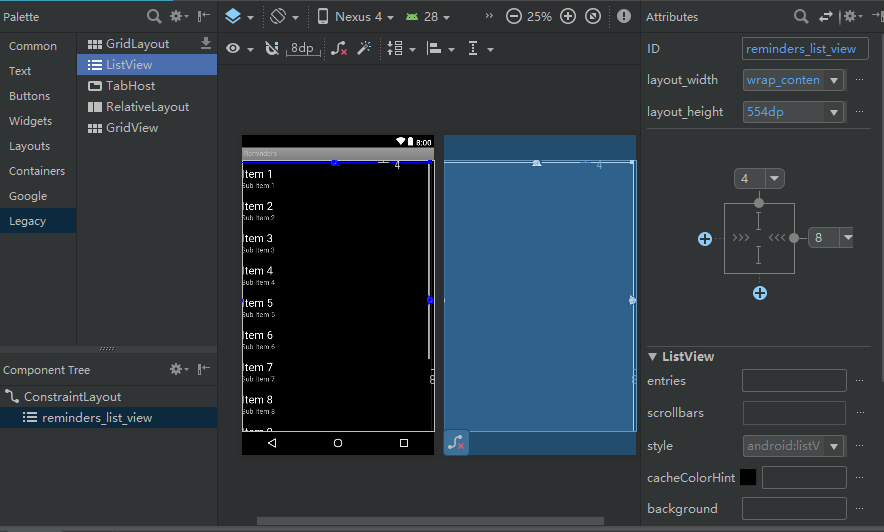
将左侧Palette\Legacy中的ListView拖到编辑区域放置该控件,右侧Attributes修改该控件各项属性
编辑布局的原始XML
单击底部Text,编辑原始XML
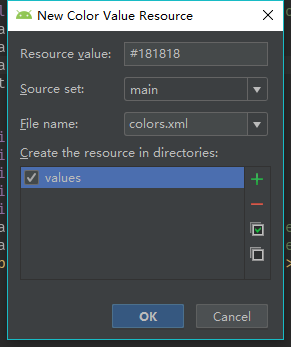
更改背景颜色:
android:background="#181818" //设置RelativeLayout背景颜色
在XML布局文件中硬编码颜色值并不是最佳方案,更好的方法:在values资源文件夹下定义colors.xml,在里面定义自己的颜色。这样便于编辑而且可以很容易地在整个项目中引用。
将代码修改为:
android:background="@color/dark_grey"
在错误提示中选择第二项(创建颜色资源)
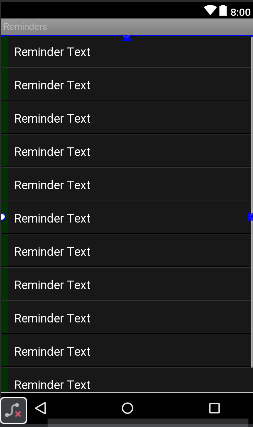
修改ListView列表项的显示方式
在res\layout文件夹中新建reminders_row,选择LinearLayout(LinearLayout是布局中的最外层元素)作为根ViewGroup来为单个列表项行创建布局,
<?xml version="1.0" encoding="utf-8"?>

<LinearLayout xmlns:android="http://schemas.android.com/apk/res/android"

           android:layout_width="match_parent"

           android:layout_height="50dp"

           android:orientation="vertical"

           android:background="@color/dark_grey">

 <LinearLayout

     android:orientation="horizontal"

     android:layout_width="match_parent"

     android:layout_height="48dp">

 <view

     android:layout_width="10dp"

     android:layout_height="match_parent"

     class="android.view.View"

     android:id="@+id/row_tab"

     android:background="@color/green"/>

 <TextView

     android:layout_width="match_parent"

     android:layout_height="50dp"

     android:text="Reminder Text"

     android:id="@+id/row_text"

     android:textColor="@color/white"

     android:textSize="18sp"

     android:gravity="center_vertical"

     android:padding="10dp"

     android:ellipsize="end"

     android:maxLines="1"/>

</LinearLayout>

 <view

     class="android.view.View"

     android:layout_width="fill_parent"

     android:layout_height="1dp"

     android:background="#000"/>

 <view

     class="android.view.View"

     android:layout_width="fill_parent"

     android:layout_height="1dp"

     android:background="#333"/>

</LinearLayout>

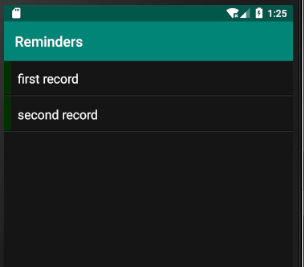
向ListView添加条目
修改相应的Activity文件(RemindersActivity.java),声明一个ListView成员、修改onCreate()方法
private ListView mListView;

 @Override

 protected void onCreate(Bundle savedInstanceState) {

     super.onCreate(savedInstanceState);

     setContentView(R.layout.activity_reminders);

     mListView = (ListView)findViewById(R.id.reminders_list_view);

     ArrayAdapter<String> arrayAdapter = new ArrayAdapter<String>(

             this,   //  当前Activity的Context对象

             R.layout.reminders_row, //使用哪个布局

             R.id.row_text,     //布局中的哪个字段来显示数据

             new String[]{"first record","second record"}    //示例条目

     );

     mListView.setAdapter(arrayAdapter);

 }
添加操作栏溢出菜单
在res文件夹下新建menu文件夹,右键New|Menu resource file命名为menu_reminders
menu/menu_reminders.xml:
<?xml version="1.0" encoding="utf-8"?>

<menu xmlns:android="http://schemas.android.com/apk/res/android"

    xmlns:app="http://schemas.android.com/apk/res-auto">

    <item android:id="@+id/action_new"

        android:title="New Reminder"

        android:orderInCategory="100"

        app:showAsAction="never"/>

    <item android:id="@+id/action_exit"

        android:title="exit"

        android:orderInCategory="200"

        app:showAsAction="never"/>

</menu>
在RemindersActivity.java中添加创建菜单的方法和菜单的点击事件
/**

     *创建菜单

     */

    @Override

    public boolean onCreateOptionsMenu(Menu menu) {

        getMenuInflater().inflate(R.menu.menu_reminders,menu); //通过getMenuInflater()方法得到MenuInflater对象,再调用它的inflate()方法就可以给当前活动创建菜单了,第一个参数:用于指定我们通过哪一个资源文件来创建菜单;第二个参数:用于指定我们的菜单项将添加到哪一个Menu对象当中。

        return true; // true:允许创建的菜单显示出来,false:创建的菜单将无法显示。

    }

    /**

     *菜单的点击事件

     */

    @Override

    public boolean onOptionsItemSelected(MenuItem item) {

        switch (item.getItemId()){

            case R.id.action_new:

                Log.d(getLocalClassName(),"create new Reminder");

                return true;

            case R.id.action_exit:

                finish();

                return true;

            default:

                return false;

        }

    }

持久化备忘录
- SQLite数据库
- 数据模型、数据库代理类、CursorAdapter
- 数据模型:保存从数据库读取以及写入数据库的数据
- 数据库代理类:适配器类,把来自App的简单调用转换为对SQLite数据库的API调用
- CursorAdapter:继承以抽象方式处理数据访问的标准Android类
数据模型
创建数据模型
com.example.dell.reminders右键New Java Class命名为Reminder
Reminder类:
public class Reminder {

    private int mId;

    private String mContent;

    private int mImportant;

    public Reminder(int id, String content, int important) {

        mId = id;

        mContent = content;

        mImportant = important;

    }

    public int getId() {

        return mId;

    }

    public void setId(int id) {

        mId = id;

    }

    public String getContent() {

        return mContent;

    }

    public void setContent(String content) {

        mContent = content;

    }

    public int getImportant() {

        return mImportant;

    }

    public void setImportant(int important) {

        mImportant = important;

    }

}
创建数据库代理
com.example.dell.reminders右键New Java Class命名为RemindersDbAdapter
public class RemindersDbAdapter {

    //定义列名

    public static final String COL_ID = "_id";

    public static final String COL_CONTENT = "content";

    public static final String COL_IMPORTANT = "important";

    //定义索引值

    public static final int INDEX_ID = 0;

    public static final int INDEX_CONTENT = INDEX_ID + 1;

    public static final int INDEX_IMPORTANT = INDEX_ID + 2;

    //用于日志的TAG

    public static final String TAG = "RemindersDbAdapter";

    //两个数据库API对象

    private DatabaseHelper mDbHelper;

    private SQLiteDatabase mDb;

    //数据库名称、主表名称、版本的常量

    public static final String DATABASE_NAME = "dba_remdrs";

    public static final String TABLE_NAME = "tbl_remdrs";

    public static final int DATABASE_VERSION = 1;

    //上下文对象

    private final Context mCtx;

    //用于创建数据库的SQL语句

    private static final String DATABASE_CREATE =

            "CREATE TABLE if not exists " + TABLE_NAME + " ( " +

                    COL_ID + "INTEGER PRIMARY KEY autoincrement, " +

                    COL_CONTENT + " TEXT, " +

                    COL_IMPORTANT + " INTEGER );";

}
SQLite API
DatabaseHelper:用于打开、关闭数据库的SQLite API类,是一个自定义的类,将其实现为RemindersDbAdapter的内部类
private static class DatabaseHelper extends SQLiteOpenHelper{

        //构造函数完成数据库初始化

        DatabaseHelper(Context context){

            //将数据库名和版本号传给超类,由超类完成建立数据库的繁重工作

            super(context,DATABASE_NAME,null,DATABASE_VERSION);

        }

        public void onCreate(SQLiteDatabase db){

            Log.w(TAG,DATABASE_CREATE);

            db.execSQL(DATABASE_CREATE);

        }

        public void onUpgrade(SQLiteDatabase db,int oldVersion, int newVersion){

            Log.w(TAG, "Upgrading database from version " + oldVersion + " to " + newVersion + ", which will destroy all old data");

            db.execSQL("DROP TABLE IF EXISTS " + TABLE_NAME);

            onCreate(db);

        }

    }
使用DatabaseHelper打开和关闭数据库,RemindersDbAdapter构造函数保存了Context实例,并传给DatabaseHelper
public RemindersDbAdapter(Context ctx) {

        this.mCtx = ctx;

    }

    public void open() throws SQLException{

        mDbHelper = new DatabaseHelper(mCtx);

        mDb = mDbHelper.getWritableDatabase();

    }

    public void close(){

        if(mDbHelper != null){

            mDbHelper.close();

        }

    }
数据库的增删改查:
创建方法使用特殊的ContentValues对象,用于将数据值传给数据库对象的insert方法,数据库会将这些对象转换为SQL insert语句并执行
//数据库的增删改查

    public void createReminder(String name, boolean important){

        ContentValues values = new ContentValues();

        values.put(COL_CONTENT, name);

        values.put(COL_IMPORTANT, important?1:0);

        mDb.insert(TABLE_NAME,null,values);

    }

    public long createReminder(Reminder reminder){

        ContentValues values = new ContentValues();

        values.put(COL_CONTENT,reminder.getContent());

        values.put(COL_IMPORTANT,reminder.getImportant());

        return mDb.insert(TABLE_NAME,null,values);

    }

    public Reminder fetchReminderById(int id){

        Cursor cursor = mDb.query(TABLE_NAME,new String[]{COL_ID,

                COL_CONTENT,COL_IMPORTANT},COL_ID + "=?",

                new String[]{String.valueOf(id)},null,null,null,null);

        if(cursor != null)

            cursor.moveToFirst();

            return new Reminder(

              cursor.getInt(INDEX_ID),

              cursor.getString(INDEX_CONTENT),

                    cursor.getInt(INDEX_IMPORTANT)

            );

    }

    public Cursor fetchAllReminders(){

        Cursor mCursor = mDb.query(TABLE_NAME,new String[]{COL_ID,

        COL_CONTENT,COL_IMPORTANT},null,null,null,null,null);

        if (mCursor != null){

            mCursor.moveToFirst();

        }

        return mCursor;

    }

    public void updateReminder(Reminder reminder){

        ContentValues values = new ContentValues();

        values.put(COL_CONTENT,reminder.getContent());

        values.put(COL_IMPORTANT,reminder.getImportant());

        mDb.update(TABLE_NAME,values,

                COL_ID+"=?",new String[]{String.valueOf(reminder.getId())});

    }

    public void deleteReminderById(int nId){

        mDb.delete(TABLE_NAME,COL_ID+"=?",new String[]{String.valueOf(nId)});

    }

    public void deleteAllReminders(){

        mDb.delete(TABLE_NAME,null,null);

    }
RemindersDbAdapter最终代码
public class RemindersDbAdapter {

    //定义列名

    public static final String COL_ID = "_id";

    public static final String COL_CONTENT = "content";

    public static final String COL_IMPORTANT = "important";

    //定义索引值

    public static final int INDEX_ID = 0;

    public static final int INDEX_CONTENT = INDEX_ID + 1;

    public static final int INDEX_IMPORTANT = INDEX_ID + 2;

    //用于日志的TAG

    public static final String TAG = "RemindersDbAdapter";

    //两个数据库API对象

    private DatabaseHelper mDbHelper;

    private SQLiteDatabase mDb;

    //数据库名称、主表名称、版本的常量

    public static final String DATABASE_NAME = "dba_remdrs";

    public static final String TABLE_NAME = "tbl_remdrs";

    public static final int DATABASE_VERSION = 1;

    //上下文对象

    private final Context mCtx;

    //用于创建数据库的SQL语句

    private static final String DATABASE_CREATE =

            "CREATE TABLE if not exists " + TABLE_NAME + " ( " +

                    COL_ID + "INTEGER PRIMARY KEY autoincrement, " +

                    COL_CONTENT + " TEXT, " +

                    COL_IMPORTANT + " INTEGER );";

    public RemindersDbAdapter(Context ctx) {

        this.mCtx = ctx;

    }

    public void open() throws SQLException{

        mDbHelper = new DatabaseHelper(mCtx);

        mDb = mDbHelper.getWritableDatabase();

    }

    public void close(){

        if(mDbHelper != null){

            mDbHelper.close();

        }

    }

    //数据库的增删改查

    public void createReminder(String name, boolean important){

        ContentValues values = new ContentValues();

        values.put(COL_CONTENT, name);

        values.put(COL_IMPORTANT, important?1:0);

        mDb.insert(TABLE_NAME,null,values);

    }

    public long createReminder(Reminder reminder){

        ContentValues values = new ContentValues();

        values.put(COL_CONTENT,reminder.getContent());

        values.put(COL_IMPORTANT,reminder.getImportant());

        return mDb.insert(TABLE_NAME,null,values);

    }

    public Reminder fetchReminderById(int id){

        Cursor cursor = mDb.query(TABLE_NAME,new String[]{COL_ID,

                COL_CONTENT,COL_IMPORTANT},COL_ID + "=?",

                new String[]{String.valueOf(id)},null,null,null,null);

        if(cursor != null)

            cursor.moveToFirst();

            return new Reminder(

              cursor.getInt(INDEX_ID),

              cursor.getString(INDEX_CONTENT),

                    cursor.getInt(INDEX_IMPORTANT)

            );

    }

    public Cursor fetchAllReminders(){

        Cursor mCursor = mDb.query(TABLE_NAME,new String[]{COL_ID,

        COL_CONTENT,COL_IMPORTANT},null,null,null,null,null);

        if (mCursor != null){

            mCursor.moveToFirst();

        }

        return mCursor;

    }

    public void updateReminder(Reminder reminder){

        ContentValues values = new ContentValues();

        values.put(COL_CONTENT,reminder.getContent());

        values.put(COL_IMPORTANT,reminder.getImportant());

        mDb.update(TABLE_NAME,values,

                COL_ID+"=?",new String[]{String.valueOf(reminder.getId())});

    }

    public void deleteReminderById(int nId){

        mDb.delete(TABLE_NAME,COL_ID+"=?",new String[]{String.valueOf(nId)});

    }

    public void deleteAllReminders(){

        mDb.delete(TABLE_NAME,null,null);

    }

    private static class DatabaseHelper extends SQLiteOpenHelper{

        //构造函数完成数据库初始化

        DatabaseHelper(Context context){

            //将数据库名和版本号传给超类,由超类完成建立数据库的繁重工作

            super(context,DATABASE_NAME,null,DATABASE_VERSION);

        }

        public void onCreate(SQLiteDatabase db){

            Log.w(TAG,DATABASE_CREATE);

            db.execSQL(DATABASE_CREATE);

        }

        public void onUpgrade(SQLiteDatabase db,int oldVersion, int newVersion){

            Log.w(TAG, "Upgrading database from version " + oldVersion + " to " + newVersion + ", which will destroy all old data");

            db.execSQL("DROP TABLE IF EXISTS " + TABLE_NAME);

            onCreate(db);

        }

    }

}
CursorAdapter
最后,需要一种从数据库获取备忘并加入到ListView中的方法,新建java类RemindersSimpleCursorAdapter
public class RemindersSimpleCursorAdapter extends SimpleCursorAdapter {

    public RemindersSimpleCursorAdapter(Context context, int layout, Cursor c, String[] from, int[] to, int flags) {

        super(context, layout, c, from, to, flags);

    }

    @Override

    public View newView(Context context, Cursor cursor, ViewGroup parent) {

        return super.newView(context, cursor, parent);

    }

    //ListView会利用屏幕上的单个View对象反复调用此方法,Adapter的职责就是使用列表项来填充这些视图

    @Override

    public void bindView(View view, Context context, Cursor cursor) {

        super.bindView(view, context, cursor);//调用超类方法,通过游标cursor获取到的值映射到View中的元素

        ViewHolder holder = (ViewHolder)view.getTag();

        if(holder == null){ //检查holder是否绑定到了标签

            holder = new ViewHolder();

            holder.colImp = cursor.getColumnIndexOrThrow(RemindersDbAdapter.COL_IMPORTANT);

            holder.listTab = view.findViewById(R.id.row_tab);

            view.setTag(holder);

        }

        //使用当前备忘COL_IMPORTANT常量对应的值来决定颜色1:重要 0:次要

        if(cursor.getInt(holder.colImp) > 0){

            holder.listTab.setBackgroundColor(context.getResources().getColor(R.color.orange));

        }

        else{

            holder.listTab.setBackgroundColor(context.getResources().getColor(R.color.green));

        }

    }

    //静态内部类

    static class ViewHolder{

        int colImp; //Important表列的索引

        View listTab;   //在布局中定义的row_tab视图

    }

}
调整ReminderActivity
public class RemindersActivity extends AppCompatActivity {

    private ListView mListView;

    private RemindersDbAdapter mDbAdapter;

    private RemindersSimpleCursorAdapter mCursorAdapter;

    @Override

    protected void onCreate(Bundle savedInstanceState) {

        super.onCreate(savedInstanceState);

        setContentView(R.layout.activity_reminders);

        mListView = (ListView)findViewById(R.id.reminders_list_view);

        mListView.setDivider(null);

        mDbAdapter = new RemindersDbAdapter(this);

        mDbAdapter.open();

        Cursor cursor = mDbAdapter.fetchAllReminders();

        String[] from = new String[]{RemindersDbAdapter.COL_CONTENT};

        int[] to = new int[]{R.id.row_text};

        mCursorAdapter = new RemindersSimpleCursorAdapter(

                RemindersActivity.this,

                R.layout.reminders_row,

                cursor,

                from,

                to,

                0

        );

        mListView.setAdapter(mCursorAdapter);

    }

}
调整完运行app,将不会在列表中看到任何内容,因为最后的修改插入的是SQLite功能而非示例数据
Ctrl+K提交备忘录实验1的最后一次修改

《Android Studio实战 快速、高效地构建Android应用》--五、备忘录实验(1/2)的更多相关文章
- 《Android Studio实战 快速、高效地构建Android应用》--四、Git入门
Git版本控制系统(VCS)是分布式的,仓库的每一个副本均包含项目的完整历史 安装Git 下载 下载地址:http://git-scm.com/downloads 选择适合自己操作系统的来下载 如果下 ...
- 《Android Studio实战 快速、高效地构建Android应用》--三、重构代码
要成为高效的Android程序员,需要头脑灵活,能够在开发.调试和测试的过程中重构代码,重构代码最大的风险是可能会引入意外的错误,Android Studio通过分析某些具有危险性的重构操作来降低风险 ...
- 《Android Studio实战 快速、高效地构建Android应用》--Android Studio操作
前言 摩尔定律:CPU的处理能力大约18个月翻一倍 Android&Java:想要在Android Studio中开发Android App,必须以充分了解Java为前提(Java流行的原因: ...
- 《Android Studio实战 快速、高效地构建Android应用》--二、在Android Studio中编程
代码折叠 Ctrl+数字加号展开光标处已折叠代码块 Ctrl+数字减号折叠光标处已展开代码块 Ctrl+Shift+数字加号展开窗口中全部代码 Ctrl+Shift+数字减号折叠窗口中全部代码 注释代 ...
- Android NDK开发 Android Studio使用新的Gradle构建工具配置NDK环境(一)
本文主要讲述了如何如何在Android Studio使用新的Gradle构建工具配置NDK环境,现在把相关的步骤整理出来分享给Android程序员兄弟们,希望给他们在配置NDK环境时带来帮助. 从An ...
- 拥抱 Android Studio 之一:从 ADT 到 Android Studio
http://kvh.io/cn/embrace-android-studio-migration.html 1. 拥抱变化,拥抱新事物 Android Studio(IntelliJ IDEA)vs ...
- [Learn Android Studio 汉化教程]第一章 : Android Studio 介绍
注:为了看上去比较清晰这里只转载了中文 原地址: [Learn Android Studio 汉化教程]第一章 : Android Studio 介绍 本章将引导您完成安装和设置开发环境,然后你就可 ...
- 第二章:Android Studio概述(一)[学习Android Studio汉化教程]
Android Studio是一个视窗化的开发环境.为了充分利用有限的屏幕空间,不让你束手束脚,Android Studio 在特定的时间仅仅显示一小部分可用窗口. 除了一些上下文敏感的窗口和上下文 ...
- 【Android Studio探索之路系列】之六:Android Studio加入依赖
作者:郭孝星 微博:郭孝星的新浪微博 邮箱:allenwells@163.com 博客:http://blog.csdn.net/allenwells github:https://github.co ...
随机推荐
- 【C++】CCFCSP201803-1跳一跳
// // main.cpp // CCFCSP20180318_1_跳一跳 // // Created by T.P on 2018/3/23. // Copyright © 2018年 T.P. ...
- 1042 字符统计 (20 分)C语言
请编写程序,找出一段给定文字中出现最频繁的那个英文字母. 输入格式: 输入在一行中给出一个长度不超过 1000 的字符串.字符串由 ASCII 码表中任意可见字符及空格组成,至少包含 1 个英文字母, ...
- linux下大文件查询具体段内容
有时候我们的文件比较大,比如几十G,甚至上百G.这么大的文件怎么查询呢? 有很多种方法都可以实现,这儿选择用 cat 这个命令实现. 先来看看 cat 的介绍 cat 有个对应的命令 tac,cat反 ...
- RedisCluster linux下批量删除 key
Redis Cluster linux下批量删除键 说明 使用时不支持传入参数 , 如 redis_batch_del.sh , 因为在linux下 会自动将 * 解析为当前目录下所有文件名, 目前还 ...
- Rust入坑指南:海纳百川
今天来聊Rust中两个重要的概念:泛型和trait.很多编程语言都支持泛型,Rust也不例外,相信大家对泛型也都比较熟悉,它可以表示任意一种数据类型.trait同样不是Rust所特有的特性,它借鉴于H ...
- ubuntu下打开html页面
相信遇到这个问题的各位都是闲人,所以肯定是有时间的,网上打开html教程很多,但是就不吐槽了emmm... 详细信息不在此篇幅,网络资源,我就不重复了,看着很烦的,见附录 下面进入正题 这个配置玩过的 ...
- 关于爬虫的日常复习(5)—— beautifulsoup库
- 洛谷 UVA1395 苗条的生成树 Slim Span
题目链接 题目描述 求所有生成树中最大边权与最小边权差最小的,输出它们的差值. 题目分析 要求所有生成树中边权极差最小值,起初令人无从下手.但既然要求所有生成树中边权极差最小值,我们自然需要对每一棵生 ...
- 7.Arrays数组的工具类
Arrays类: 数组的工具类java.util.Arrays 由于数组对象本身并没有什么方法可以供我们调用,但API中提供了一个工具类Arrays供我们使用,从而可以对数据对象进行一些基本的操作. ...
- 请求参content-type的值为json,返回报错的解决方法
如上图,请求后报参数错误 原因content-type的值为json requests.post左侧的data要改为json 即r = requests.post(url, json=data, he ...