
JUnit 入门
JUNIT了解学习
转自:JUnit 入门教程
JUnit高级用法之@RunWith
@RunWith
关于@RunWith注解,官方文档是这么描述的:
When a class is annotated with
@RunWithor extends a class annotated with@RunWith, JUnit will invoke the class it references to run the tests in that class instead of the runner built into JUnit.
JUnit用例都是在Runner(运行器)来执行的。通过它,可以为这个测试类指定一个特定的Runner。那么大多数时候我们都没有使用@RunWith这个注解,这是为什么呢?其实,JUnit中有一个默认的Runner,它的名字叫BlockJunit4ClassRunner,但这是在JUnit4.4之后才引入的,对于4.4之前版本的JUnit,它的名字叫Junit4ClassRunner。在新版本的源代码中已经添加了注释来说明这个问题:
/**

 * @deprecated Included for backwards compatibility with JUnit 4.4. Will be

 *             removed in the next major release. Please use

 *             {@link BlockJUnit4ClassRunner} in place of {@link JUnit4ClassRunner}.

 */

@Deprecated

public class JUnit4ClassRunner extends Runner implements Filterable, Sortable {

...
写过关于Spring项目的单元测试的同学可能见过这样的写法,就是用JUnit加载Spring的配置文件以完成Context的初始化,然后从Context中取出Bean并完成测试:
import org.junit.Test;

import org.junit.runner.RunWith;

import org.springframework.beans.factory.annotation.Autowired;

import org.springframework.context.ApplicationContext;

import org.springframework.test.context.ContextConfiguration;

import org.springframework.test.context.junit4.SpringJUnit4ClassRunner;

@RunWith(SpringJUnit4ClassRunner.class)

@ContextConfiguration(locations = { "classpath:applicationContext.xml" })

public class UserManagerTest {

  @Autowired

  ApplicationContext ctx;

  @Test

  public void testAddUser() {

    try {

      UserManager userManager = ctx.getBean(UserManager.class);

      userManager.addUser();

    } catch (Exception e) {

      e.printStackTrace();

    }

  }

}
注意这里使用了@RunWith注解,表明这个类中的测试用例需要使用SpringJUnit4ClassRunner类来执行。
@RunWith(Suite.class)
其作用是使用JUnit执行一个测试套件。Suite类是JUnit自带的,意为套件,顾名思义,就是一套东西。通过它,可以把多个相关的测试类看做一个测试套件一起测试。看个例子:
import org.junit.runner.RunWith;

import org.junit.runners.Suite;

@RunWith(Suite.class)

@Suite.SuiteClasses({ TestA.class, TestB.class, /*Any test class you want to run*/})

public class TestSuite {

    // Please note this case won't run. It will only run cases which

    // are configured in @Suite.SuiteClasses

    @Test

    public void testPrint() {

        System.out.println("Hello");

    }

}
@RunWith指定了Suite类,说明这个TestSuite类是一个套件。通过@Suite.SuiteClasses指定了要执行的测试类(这些类中的所有用例都会执行)。
需要注意的是,这个TestSuite类本身用例则不会执行了(如上面的testPrint()方法)。
@RunWith(Parameterized.class)
Parameterized类也是JUnit自带的,用于使用多个参数组合多次执行同一个测试用例。看下面的例子:
import static org.junit.Assert.assertEquals;

import java.util.Arrays;

import java.util.List;

import org.junit.Test;

import org.junit.runner.RunWith;

import org.junit.runners.Parameterized;

import org.junit.runners.Parameterized.Parameters;

@RunWith(Parameterized.class)

public class TestParameterized {

    private int expected;

    private int first;

    private int second;

    public TestParameterized(int expected, int firstNumber, int secondNumber) {

        this.expected = expected;

        this.first = firstNumber;

        this.second = secondNumber;

    }

    /**

     * Note: @Parameters annotated method must be public static,

     * otherwise an Exception will thrown.

     */

    @Parameters

    public static List<Integer[]> parameters() {

        return Arrays.asList(new Integer[][]{{3, 1, 2}, {5, 2, 3}, {7, 3, 4}, {9, 4, 5}});

    }

    @Test

    public void testAdd() {

        String format = "Using parameters: expect=%d, first=%d, second=%d";

        System.out.println(String.format(format, expected, first, second));

        Feature feature = new Feature();

        assertEquals(expected, feature.add(first, second));

    }

    @Test

    public void testPrint() {

        String format = "Print ----------: expect=%d, first=%d, second=%d";

        System.out.println(String.format(format, expected, first, second));

    }

}

class Feature {

    public int add(int i1, int i2) {

        return i1 + i2;

    }

}
执行结果如下:
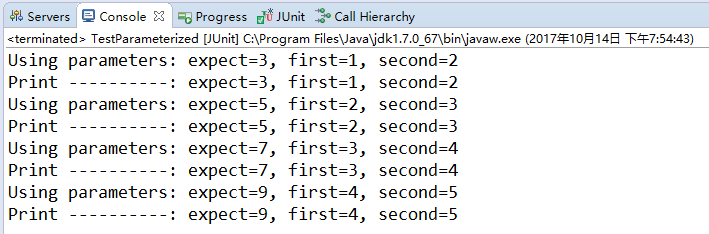
可以看到,虽然TestParameterized类中只有两个测试用例testAdd和testPrint,但是结果输出了8行,即每个用例都执行了4遍。
使用Parameterized注解需要注意几点:
- 该方法要有构造函数
- 有一个public static的方法被@Parameters标注,并且该方法只能返回Iterable类型或数组类型的数据(源代码是如下处理的)
if (parameters instanceof Iterable) {

    return (Iterable<Object>) parameters;

} else if (parameters instanceof Object[]) {

    return Arrays.asList((Object[]) parameters);

} else {

    throw parametersMethodReturnedWrongType();

}
因为上面的方式使用了构造方法来初始化数据,其实也可以使用字段注入来代替构造方法,只需稍加改变TestParameterized类即可:
- 用Parameter参数来修饰属性。注意:索引从0开始
- 属性要用public修饰
@Parameter(0)

public int expected;

@Parameter(1)

public int first;

@Parameter(2)

public int second;
@RunWith(Categories.class)
顾名思义,执行一个“类别”。和Suite类似,只是Suite是执行指定类中的所有用例,而Categories执行的范围更小,是在Suite的基础上只执行指定的“类别”的用例。这就需要事先在各个测试用例上用@Category标注该用例属于那些“类别”,之后便可以通过类别来选择执行某些用例。看例子:
/*-----TestA.java-----*/

import org.junit.Test;

import org.junit.experimental.categories.Category;

class Feature1 {}

class Feature2 {}

public class TestA {

    @Test

    @Category(Feature1.class)

    public void testAdd() {

        System.out.println("A.testAdd");

    }

    @Test

    @Category(Feature2.class)

    public void testAdd2() {

        System.out.println("A.testAdd2");

    }

    @Test

    @Category({Feature1.class, Feature2.class})

    public void testAdd3() {

        System.out.println("A.testAdd3");

    }

}

/*-----TestCategory.java-----*/

import org.junit.experimental.categories.Categories;

import org.junit.experimental.categories.Categories.ExcludeCategory;

import org.junit.experimental.categories.Categories.IncludeCategory;

import org.junit.runner.RunWith;

import org.junit.runners.Suite;

@RunWith(Categories.class)

@IncludeCategory(Feature1.class)

@ExcludeCategory(Feature2.class)

@Suite.SuiteClasses({ TestA.class, /*Any test class you want to run*/})

public class TestCategory {

    // Do nothing

}
其中,Feature1和Feature2代表两个不同的“类型”,TestA类中通过@Category标注了各个用例(可以为一个用例指定多个Category,例如上方的testAdd3方法)。@IncludeCategory指明了需要执行的类型,而@ExcludeCategory指明了不希望执行的类型,这个注解对于过滤类似testAdd3这样有多个类型的用例很有效。以下是执行结果:

可以看到,只有标注了Feature1的用例执行了,而且带有Feature2的则被过滤掉了,所以只剩下testAdd这一个用例了。
@RunWith(Theories.class)
提供一组参数的排列组合值作为待测方法的输入参数。同时注意到在使用Theories这个Runner的时候,我们的待测方法可以拥有输入参数,而这在其它的Runner中的测试方法是不行的。下面是一个例子:
import org.junit.experimental.theories.DataPoint;

import org.junit.experimental.theories.Theories;

import org.junit.experimental.theories.Theory;

import org.junit.runner.RunWith;

@RunWith(Theories.class)

public class TestTheories {

    @DataPoint

    public static String nameValue1 = "Tony";

    @DataPoint

    public static String nameValue2 = "Jim";

    @DataPoint

    public static int ageValue1 = 10;

    @DataPoint

    public static int ageValue2 = 20;

    @Theory

    public void testMethod(String name, int age){

        System.out.println(String.format("%s's age is %s", name, age));

    }

}
上面的代码的意思是,将”Tony”、”Jim”、10、20四个参数以类型合法的排列组合传给待测方法。因此输出的结果必然也有2x2=4种。下面是执行结果:

不过,为了简单,我们除了可以使用@DataPoint注解来提供参数之外,还可以通过@DataPoints注解来提供参数,参照上述代码,只需要将@DataPoint注解标注的四个字段参数替换为如下的两个即可:
@DataPoints

public static String[] names = {"Tony", "Jim"};

@DataPoints

public static int[] ageValue1 = {10, 20};
总结
介绍了这么几种Runner,现在回过头来看看一开始提到的SpringJUnit4ClassRunner,其实这个类继承与JUnit默认的运行器BlockJUnit4ClassRunner,来看看源代码中的声明(官方文档):
public class SpringJUnit4ClassRunner extends BlockJUnit4ClassRunner {继承的好处就是可以完全保留默认的功能,并且提供了一套支持Spring上下文的框架,正如官方文档所说:
SpringJUnit4ClassRunneris a custom extension of JUnit'sBlockJUnit4ClassRunnerwhich provides functionality of the Spring TestContext Framework to standard JUnit tests by means of theTestContextManagerand associated support classes and annotations.
JUnit 入门的更多相关文章
- junit入门
一.简介JUnitJUnit是一个开源的java单元测试框架.在1997年,由 Erich Gamma 和 Kent Beck 开发完成.这两个牛人中 Erich Gamma 是 GOF 之一:Ken ...
- [置顶] JUnit入门教程(二)
一:介绍 接着上次的课程,今天我们学习JUnit4的新特性 assertThat()方法,这种方式和其余的assert方法比起来,更加接进英语. 二:分析API API中的例子: 参数 T Actua ...
- Android接口测试-JUnit入门
1.下载:http://www.junit.org 2.配置AndroidManifest.xml,在application节点加入 <!--使用单元测试库--> <u ...
- Junit 入门使用教程
1.Junit 是什么? JUnit是一个Java语言的单元测试框架.它由Kent Beck和Erich Gamma建立,逐渐成为源于Kent Beck的sUnit的xUnit家族中最为成功的一个JU ...
- 【软件测试】Junit入门
写在前面:本博客为本人原创,严禁任何形式的转载!本博客只允许放在博客园(.cnblogs.com),如果您在其他网站看到这篇博文,请通过下面这个唯一的合法链接转到原文! 本博客全网唯一合法URL:ht ...
- Android JUnit 入门指南
自动化单元测试可以做许多的事,并帮你节省时间.它也可以被用作快速检验新建工程或进行冒烟测试.始终,单元测试是作为一种有效的.系统的检验应用程序各功能执行的方式.Android SDK支持JUnit的自 ...
- Junit入门教程
做开发的时候,完成一个接口.方法.函数或者功能等,需要测试,是否有bug,有逻辑错误.这里有两种方案测试 1. 在main中写测试方法 2. 使用开源框架,这里使用的junit main写测试方法优点 ...
- Ant, JUnit以及Sonar的安装+入门资料
Ant 感觉是个和Make/Grunt类似的东东,build一个项目用的.安装很容易,跟装JDK类似,就是解压->设环境变量->没了.注意装之前要先确认Java装好了(有点废话). 下载地 ...
- Java Junit测试框架
Java Junit测试框架 1.相关概念 Ø JUnit:是一个开发源代码的Java测试框架,用于编写和运行可重复的测试.它是用于单元测试框架体系xUnit的一个实例(用于java语言).主要 ...
随机推荐
- makefile 必知必会以及Makefile是怎样炼成的
Make必知必会原文链接 Makefile 必知必会 Makefile的根本任务是根据规则生成目标文件. 规则 一条规则包含三个:目标文件,目标文件依赖的文件,更新(或生成)目标文件的命令. 规则: ...
- Centos部署使用Jexus承载asp.net core2 web应用
一,首先安装本地开发项目用的的 core对应版本运行时: https://www.microsoft.com/net/download/linux-package-manager/centos/run ...
- Windows和linux下clock函数
windows: Calculates the wall-clock time used by the calling process. return:The elapsed wall-clock ...
- Linux下的sqlserver简单试用
微软自2017年就推出了可以在linux上使用的sql-server,最近接触到了一个用sqlserver的项目,便尝试使用了一下. 下载 为了简化安装,我还是使用的docker的方式,镜像可以直接从 ...
- bitnami-redmine邮件告警配置
配置 bitnami-redmine的配置文件与单纯的redmine配置文件可能并不相同,在这里我们需要打开一下配置文件: /opt/bitnami/apps/redmine/htdocs/confi ...
- Revit MEP API连接器类别
连接器的类别,风管不仅有两端,可能在曲线上也有. ; ; ; ; Connector conn = csi.Current ; ...
- 委托、Lambda表达式、事件系列05,Action委托与闭包
来看使用Action委托的一个实例: static void Main(string[] args) { int i = 0; Action a = () => i++; a(); a(); C ...
- win10系统更新不了,总出现错误0xc8000442
来自 win10系统更新不了,总出现错误0xc8000442,SHIZHI333的回答. 首先卸载制有第三方防护软件管管家类软件,再试试下面的方法:清理一下更新临时文件,具体操作如下: 1.右键点击开 ...
- mvn常用插件目标
由于Maven在使用时非常简单,比如下面是百度百科中对Maven常用命令的列表: mvn archetype:create 创建Maven项目 mvn compile 编译源代码 mvn deploy ...
- mariadb设置初始密码
mariadb设置初始密码 CENTOS7 自带MARIADB数据库.安装的时候可以勾选安装. 当然也可以以后在CENTOS7里面添加安装. MARIADB安装后,默认是没有密码的. 我们需要给ROO ...