MySQL5.7多实例自动化部署脚本
一、安装说明
------------------------------------------------------
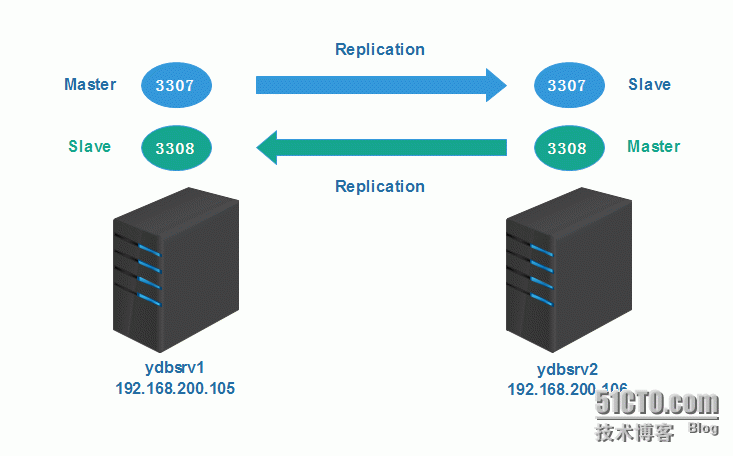
mysql5.7.10_onekey_install.sh自动化部署脚本支持mysql5.7.10初始化安装,多实例创建,且使用经过优化后的my.cnf配置文件和mysql.server启动脚本,该SHELL脚本在CentOS6.5_x86_64操作系统测试通过。部署示意图如下:
1、安装方式
需要准备的文件如下,放到同一个目录下,然后执行shell脚本
执行方式:
|
1
2
|
./mysql5.7.10_onekey_install.sh 3307 端口自定义,要求整数,且不和服务器端口冲突 |
|
1
2
3
4
5
6
|
# tree mysql5.7.10_onekey_installmysql5.7.10_onekey_install├── my.cnf├── mysql-5.7.10-linux-glibc2.5-x86_64.tar.gz├── mysql5.7.10_onekey_install.sh└── mysql.server |
1、如果是首次安装mysql,则会构建所需的所有预安装环境并创建第一个实例;
2、如果不是首次安装mysql,则会在原有基础上创建多实例;
2、安装软件版本
- 操作系统:CentOS6.5_x86_64
- MySQL版本:mysql-5.7.10-linux-glibc2.5-x86_64.tar.gz (最新版本5.7.10)
3、安装目录规划
上传软件包目录:/home/zkyw/install
mysql程序目录:/opt/application/mysql
mysql实例数据文件目录:/data/$Port
4、程序启停操作
启动mysql实例:/data/$Port/mysql.server start
停止mysql实例: /data/$Port/mysql.server stop
查看mysql实例状态:/data/$Port/mysql.server status
5、脚本执行过程
第一步:对传入的参数(端口号)做判断,要求为整数且不能与服务器已有端口号冲突;
第二步:如果服务器还没有安装过mysql,则进行初始化安装,自动配置所需安装环境;
第三步:如果服务器上已经安装了mysql,则会创建多实例;
第四步:初始化安装过程:删除msyql相关的rpm包→安装libaio包→创建安装所需的用户目录等→安装mysql→配置mysql
第五步:创建多实例过程:创建目录并授权→安装mysql→配置mysql
二、自动化部署脚本
--------------------------------------------------------
|
1
2
3
4
5
6
7
8
9
10
11
12
13
14
15
16
17
18
19
20
21
22
23
24
25
26
27
28
29
30
31
32
33
34
35
36
37
38
39
40
41
42
43
44
45
46
47
48
49
50
51
52
53
54
55
56
57
58
59
60
61
62
63
64
65
66
67
68
69
70
71
72
73
74
75
76
77
78
79
80
81
82
83
84
85
86
87
88
89
90
91
92
93
94
95
96
97
98
99
100
101
102
103
104
105
106
107
108
109
110
111
112
113
114
115
116
117
118
119
120
121
122
123
124
125
126
|
#!/bin/sh#auto install mysql5.7.10 #setting default directoryPort=$1SoftDir="/home/zkyw/install"tarbag="mysql-5.7.10-linux-glibc2.5-x86_64"BaseDir="/opt/application/mysql"DataDir="/data/$Port" #remove before being installed mysqlfunction rmMysql() { yum -y erase mysql >/dev/null 2>&1 yum -y erase mysql-server >/dev/null 2>&1 ret=`rpm -aq | grep -i "mysql-5" | wc -l` num=`rpm -aq | grep -i "mysql-server" | wc -l` test $ret -eq 1 && echo "mysql uninstall failed" && exit 1 test $num -eq 1 && echo "mysql-server uninstall failed" && exit 2}#libaio package is needed for mysql5.7.10function chkEnv() { yum -y install libaio >/dev/null 2>&1 res=`rpm -aq|grep libaio | wc -l` test $res -ne 1 && echo "libaio package install failed..." && exit 3} #create mysql user and group, authorization, extractfunction preInstall() { /usr/sbin/groupadd mysql /usr/sbin/useradd -r -g mysql -s /bin/false mysql mkdir -p $BaseDir mkdir -p $DataDir/data chown mysql.mysql $DataDir if test -f $SoftDir/$tarbag.tar.gz then cd $SoftDir && tar -zxf $tarbag.tar.gz cd $SoftDir/$tarbag && cp -r * $BaseDir else echo "$tarbag.tar.gz is not found..." exit 10 fi} function multPreInstall() { mkdir -p $DataDir/data chown mysql.mysql $DataDir} function install_mysql() { #initialize mysql database $BaseDir/bin/mysqld \ --initialize \ --user=mysql \ --basedir=$BaseDir \ --datadir=$DataDir/data \ --character-set-server=utf8 \ --collation-server=utf8_general_ci \ --initialize-insecure >/dev/null 2>&1}#get my.cnf and start/stop script, attention alter parameters by your envionmentfunction conf_mysql() { cp $SoftDir/my.cnf $DataDir cp $SoftDir/mysql.server $DataDir/usr/bin/vim $DataDir/my.cnf<<EOF >/dev/null 2>&1:%s/3306/$Port/g:wqEOF sed -i "s/port=3306/port=$Port/" $DataDir/mysql.server sed -i "s%CmdPath=\"\"%CmdPath=\"${BaseDir}\/bin\"%" $DataDir/mysql.server sed -i "s%mysql_sock=\"\"%mysql_sock=\"${DataDir}\/mysql.sock\"%" $DataDir/mysql.server chmod 600 $DataDir/my.cnf chmod 700 $DataDir/mysql.server $DataDir/mysql.server start >/dev/null 2>&1 sleep 3# ren=`netstat -natp|grep mysqld | grep "$1" | wc -l` if test -e $DataDir/mysql.sock;then echo "$DataDir/mysql.sock" echo -e "\033[33;1mmysql install success...\033[0m" pro=`grep $BaseDir /root/.bash_profile | wc -l` if test "$pro" -ne 1;then sed -i "s%PATH=\$PATH\:\$HOME\/bin%PATH=\$PATH\:\$HOME\/bin\:$BaseDir\/bin%" /root/.bash_profile source /root/.bash_profile fi else echo -e "\033[31;1mmysql install failed...\033[0m" fi} if [[ "$1" =~ ^[0-9]+$ ]]; then inPort=`netstat -natp | grep "mysqld" | grep "LISTEN" | awk '{print $4}' | cut -b 4-` if test ! -z "$inPort";then for myPort in $inPort do if test "$myPort" -eq "$1";then echo -e "\033[33;1m$1 instance has already existed...\033[0m" exit 1 fi done echo -e "\033[32;1m===========================================\033[0m" echo -e "\033[32;1mStarting create new instance $1\033[0m" multPreInstall install_mysql echo -e "\033[32;1m===========================================\033[0m" echo -e "\033[32;1mconfiguration and starting $1 instance...\033[0m" conf_mysql else echo -e "\033[32;1m===========================================\033[0m" echo -e "\033[32;1mremove before being installed mysql...\033[0m" rmMysql echo -e "\033[32;1m===========================================\033[0m" echo -e "\033[32;1minstall libaio package...\033[0m" chkEnv echo -e "\033[32;1m===========================================\033[0m" echo -e "\033[32;1mget ready install envionment...\033[0m" preInstall echo -e "\033[32;1m===========================================\033[0m" echo -e "\033[32;1mStarting install mysql ver5.7.10...\033[0m" install_mysql echo -e "\033[32;1m===========================================\033[0m" echo -e "\033[32;1mconfiguration mysql and starting mysql...\033[0m" conf_mysql fielse echo "Usage: $0 Port (Port is inteager)"fi |
三、MySQL优化后的配置文件(my.cnf)
|
1
2
3
4
5
6
7
8
9
10
11
12
13
14
15
16
17
18
19
20
21
22
23
24
25
26
27
28
29
30
31
32
33
34
35
36
37
38
39
40
41
42
43
44
45
46
47
48
49
50
51
52
53
54
55
56
57
58
59
60
61
62
63
64
65
66
67
68
69
70
71
72
73
74
75
76
77
78
79
80
81
82
83
84
85
86
87
88
89
90
91
92
93
94
95
|
[client]port = 3306socket = /data/3306/mysql.sockcharacter-set-server = utf8mb4 [mysql]no-auto-rehash [mysqld]user = mysqlport = 3306character-set-server = utf8mb4socket = /data/3306/mysql.sockbasedir = /opt/application/mysqldatadir = /data/3306/dataexplicit_defaults_for_timestamp = trueskip-sslsecure-file-priv = NULLlower_case_table_names = 1back_log = 300max_connections = 3000max_connect_errors = 100table_open_cache = 4096external-locking = FALSEmax_allowed_packet = 32Msort_buffer_size = 16Mjoin_buffer_size = 16Mthread_cache_size = 16query_cache_size = 128Mquery_cache_limit = 4Mft_min_word_len = 8thread_stack = 512Ktransaction_isolation = REPEATABLE-READtmp_table_size = 128Mmax_heap_table_size = 128M ###*** slow query parameterslong_query_time = 6slow_query_logslow_query_log_file = /data/3306/slow.log ###*** binlog parameterslog-bin = /data/3306/mysql-binbinlog_cache_size = 4Mmax_binlog_cache_size = 16Mmax_binlog_size = 32Mbinlog_format = rowexpire_logs_days = 7 ###*** relay-log parameters#relay-log = /data/3307/relay-bin#relay-log-info-file = /data/3307/relay-log.info#master-info-repository = table#relay-log-info-repository = table#relay-log-recovery = 1 #*** MyISAM parameterskey_buffer_size = 16Mread_buffer_size = 1Mread_rnd_buffer_size = 16Mbulk_insert_buffer_size = 1M #skip-name-resolve ###*** master-slave replication parametersserver-id = 105slave-skip-errors = all #*** Innodb storage engine parametersinnodb_buffer_pool_size = 6Ginnodb_data_file_path = ibdata1:1024M:autoextend#innodb_file_io_threads = 8innodb_thread_concurrency = 16innodb_flush_log_at_trx_commit = 2innodb_log_buffer_size = 16Minnodb_log_file_size = 512Minnodb_log_files_in_group = 3innodb_max_dirty_pages_pct = 90innodb_lock_wait_timeout = 120innodb_file_per_table = on [mysqldump]quickmax_allowed_packet = 32M [myisamchk]key_buffer = 16Msort_buffer_size = 16Mread_buffer = 8Mwrite_buffer = 8M [mysqld_safe]open-files-limit = 8192log-error=/data/3306/mysql_3306.errpid-file=/data/3306/mysqld.pid |
四、MySQL启动脚本(mysql.server)
#!/bin/sh# This is an interactive program, we needthe current locale [ -f /etc/profile.d/lang.sh ] && . /etc/profile.d/lang.sh # We can't Japanese on normal console atboot time, so force. if [ "$LANG" = "ja" -o "$LANG" = "ja_JP.eucJP" ]; then if [ "$TERM" = "linux" ] ; then LANG=C fifi # Source function library. . /etc/init.d/functions#initport=3306mysql_user="root"mysql_pwd=""CmdPath=""mysql_sock=""#startup functionfunction_start_mysql(){ if [ ! -e "$mysql_sock" ];then printf "Starting MySQL...\n" ${CmdPath}/mysqld_safe --defaults-file=/data/${port}/my.cnf --ledir=${CmdPath} 2>&1 > /dev/null & sleep 2 else printf "MySQL is running...\n" exit fi}#stop functionfunction_stop_mysql(){ if [ ! -e "$mysql_sock" ];then printf "MySQL is stopped...\n" exit else printf "Stoping MySQL...\n" ${CmdPath}/mysqladmin -u ${mysql_user} -p${mysql_pwd} -S $mysql_sock shutdown sleep 2 fi}#restart functionfunction_restart_mysql(){ printf "Restarting MySQL...\n" function_stop_mysql sleep 2 function_start_mysql}case $1 instart) function_start_mysql;;stop) function_stop_mysql;;restart) function_restart_mysql;;status) status mysqld;;*) printf "Usage: /data/${port}/mysql {start|stop|restart|status}\n"esacMySQL5.7多实例自动化部署脚本的更多相关文章
- 设置ssh免密码登录脚本(hadoop自动化部署脚本一)
设置ssh免密码登录脚本(hadoop自动化部署脚本一) 设置ssh免密码登录脚本(飞谷云大数据自动化部署脚本一) 1.#!/bin/sh2.#important note:this script i ...
- Jenkins持续集成-自动化部署脚本的实现
要实现Jenkins端的持续集成,其实在CI服务配置端很容易,难点呢?就是如何实现自动化的部署.我的脚本设计就是为了解决以下难题: 难点一.如何使得自动化部署脚本更通用 我用的脚本,依赖依赖一个配置文 ...
- 《转载》Jenkins持续集成-自动化部署脚本的实现《python》
本文转载自慕课网 读者须知:1.本手记本着记续接前面的两张手记内容整理2.本手记针对tomcat部署测试环境实现 最近工作比较繁忙,导致这章一直拖延,没有太抽出时间来总结.要实现Jenkins端的持续 ...
- 自动化部署脚本--linux执行sh脚本
自动化部署脚本文件目录: 运行主程序:./install.sh #!/bin/bash SCRIPTPATH=$(cd "$(dirname "$0")"; p ...
- Mysql安装及自动化部署脚本方案
一.简介 数据库(Database)是按照数据结构来组织.存储和管理数据的仓库, 每个数据库都有一个或多个不同的API用于创建,访问,管理,搜索和复制所保存的数据. 我们也可以将数据存储在文件中,但是 ...
- python+paramiko库+svn写的自动化部署脚本
第一篇博文 直接开门见山的说了. 这是件什么事?:每次部署都是复制本地的文件粘贴到服务器端,因为路径复杂,所以费时且手工容易出漏洞. 一直在想有什么办法可以解决这种,因为以前在微软的一个牛人同事做过一 ...
- Web系统自动化部署脚本
Web开发的项目,除了在本地直接运行外,还可能经常需要在服务器上部署. 写了个自动化部署的脚本,仅供参考. 不少地方需要配置路径,个人建议使用绝对路径,不用依赖执行脚本时所在的路径. #!/bin/s ...
- 前端 OSS 自动化部署脚本
部署脚本 (deploy.js 自己命名) const co = require('co') const OSS = require('ali-oss') const path = require(' ...
- Linux中kettle自动化部署脚本
自己写的一个自动化在Linux中部署kettle的脚本,包括一些遇到的问题在脚本中都有涉及. kettle是官网最新版本pdi-ce-6.1.0.1-196.zip 目前最新版本下载地址:https: ...
随机推荐
- php还原16进制特殊字符
特殊字符的16进制表:https://websitebuilders.com/tools/html-codes/ascii/ 可以通过 hexdec() 和 chr()方法来进行转换, 例子: < ...
- [Golang] GOROOT、GOPATH和Project目录说明
go env环境查看 用go env 可查看当前go环境变量. $ go env GOARCH="amd64" GOBIN="" GOEXE="&qu ...
- Hibernate进行对象的增删改查
首先我们看看hibernate手动配置步骤 (这个了解一点就可以了,以后是不会自己全部手动配置的) 1. 创建WEB项目 2 下载hibernate-release-4.3.11.F ...
- C#读取“我的文档”等特殊系统路径及环境变量
返回“我的文档”路径字符串 Environment.GetFolderPath(Environment.SpecialFolder.Personal) 本技巧使用GetFolderPath方法来获取指 ...
- WCF 学习总结1 -- 简单实例
从VS2005推出WCF以来,WCF逐步取代了Remoting, WebService成为.NET上分布式程序的主要技术.WCF统一的模型整合了以往的 WebService.Remoting.MSMQ ...
- C语言Win32 Application 的标题栏图标,任务栏图标,exe文件图标问题
我们这里新建的首先是一个空工程,新建c文件. 因为是空工程,我们没有资源文件,要用到图标资源,首先要新建和导入图标为资源. 选择引入资源,选择要引入的ico文件 完成,重命名保存Script_icon ...
- vb.net 使用MD5密碼加密
Function MD5(ByVal strSource As String, ByVal Code As Int16) As String'使用MD5加密 Dim dataToHash As Byt ...
- 浙大月赛ZOJ Monthly, August 2014
Abs Problem Time Limit: 2 Seconds Memory Limit: 65536 KB Special Judge Alice and Bob is playing a ga ...
- jdk源码->集合->HashMap
一.hash算法 1.1 hash简介 hash,一般翻译为散列,就是把任意长度的输入,通过散列算法,变换成固定长度的输出,该输出值就是散列值,这种转换是一种压缩映射,也就是散列的空间小于输入的空间, ...
- java设计模式(一)【六大原则】
开发一个系统并不是一件困难的事,但是为何维护好一个系统却是一件让人头疼不以的事? 在笔者的观念中这一切都源自于需求. 如果在软件开发完成之后,需求就不再改变,那大部分程序都不需要维护了.但是, ...