大数据的开始:安装hadoop
为实现全栈,从今天开始研究Hadoop,个人体会是成为某方面的专家需要从三个方面着手
- 系统化的知识(需要看书或者比较系统的培训)
- 碎片化的知识(需要根据关注点具体的深入的了解)
- 经验的积累(需要遇到问题)
好吧,我们从安装入手。
1.找三个CentOS的虚拟环境,我的是centos 7,大概的规划如下,一个master,两个slave
修改三台机器的/etc/hosts文件
192.168.0.104      master

192.168.0.105      slave1

192.168.0.106      slave2
2.配置ssh互信
在三台机器上输入下面的命令,生成ssh key以及authorized key,为了简单,我是在root用户下操作,大家可以在需要启动hadoop的用户下操作更规范一些
ssh-keygen -t rsa
cd .ssh

cp id_rsa.pub authorized_keys
然后将三台机器的authorized_keys合并成一个文件并且复制在三台机器上。比如我的authorized key
ssh-rsa AAAAB3NzaC1yc2EAAAADAQABAAABAQCrtxZC5VB1tyjU4nGy4+Yd//LsT3Zs2gtNtpw6z4bv7VdL6BI0tzFLs8QIHS0Q82BmiXdBIG2fkLZUHZuaAJlkE+GCPHBmQSdlS+ZvUWKFr+vpbzF86RBGwJp1HHs7GtDFtirN3Z/Qh6pKgNLFuFCxIF/Ee4sL50RUAh6wFOY/TRU4XxQissNXd9rhVFrZnOkctfA3Wek4FgNRyT+xUezSW1Vl2GliGc0siI5RCQezDhKwZNHyzY4yyiifeQYL14S4D0RrlCvv+5PIUZUrKznKc1BMYIljxMVOrAs0DsvQ0fkna/Q/pA53cuPhkD4P8ehA/fJuMCTZ+1q/Z2o1WW4j root@master

ssh-rsa AAAAB3NzaC1yc2EAAAADAQABAAABAQDBmuwzWdWI1oEwA8BC2RutAWWeCvFkkH7qYR4pWyMK8Ubkpc5HxB+mqCr24Bgug17bvFdrTdUyABY7GSJpGx3xBIcyh96bBgG9Thnc0k/XT6oO3cTai0jDr74CCTkkXymBwpVkAIlYY/MrdxQAym4gOMnU2celMMpkq7GhFJ7zOZqfI3cdQ6Q9x9LyNP6DcDFp7QQePcGylNpHeZITgABZzozWFyqg1nHi9qfGy3NtXM2lnGF+W+6JR/OtShTWeaxAOwQXt0rDEjHyUZ8JAv95J4sawGrwgWX89oWr4xorR8rMYl0FZz84OtvvNSFm5KR2NRxj8yPZZQKjaJ8nuDGN root@slave1

ssh-rsa AAAAB3NzaC1yc2EAAAADAQABAAABAQDCrRbwk8Xc2EHLNRL25ve3IlLLkshByTXwwWslP61ASNeKhYk2HObGAjL09mOpOmzdbVXJJ6YLDWIKczLSnSt4o5W7bjWQpCh136O9vCupibxCr1q4uJa+qpW69mUhrvREa4hOLvRXCXmz16p0/dOtCnPudF8AgzhezrqI/4yQkLubGZamQauHB8LEd+1VMdjRHWx0j6mQHrcDnqlaIEq8XW4UM2TcmSS7Ztp6q0zzcC39dz/xopwq/WixwQi2z4Ywc++YufXHmyDp/gkqyXG1tHwH9TMQ/kkmD3piEcnrFKDlU8Kk/B1YCnNIKTG5BT9k1JI1qenJ8NxHJ06gtM3J root@slave2
3.安装JDK,我们用jdk-7u79-linux-x64.gz版本。
tar xzvf jdk-7u79-linux-x64.gz
修改.bashrc
JAVA_HOME=/hadoop/jdk1..0_79

CLASSPATH=.:$JAVA_HOME/jre/lib/rt.jar:$JAVA_HOME/lib/dt.jar:$JAVA_HOME/lib/tools.jar

PATH=$JAVA_HOME/bin:$PATH

export JAVA_HOME CLASSPATH PATH
4.安装hadoop并配置
在下面链接下载2.8.1版本,然后解压
http://hadoop.apache.org/releases.html
我把jdk和hadoop都放在/hadoop目录下,然后建立目录
mkdir tmp

mkdir -p hdfs/data

mkdir -p hdfs/name
然后修改核心的几个配置文件。/hadoop/hadoop-2.8.1/etc/hadoop
core-site.xml
[root@master hadoop]# cat core-site.xml

<?xml version="1.0" encoding="UTF-8"?>

<?xml-stylesheet type="text/xsl" href="configuration.xsl"?>

<!--

  Licensed under the Apache License, Version 2.0 (the "License");

  you may not use this file except in compliance with the License.

  You may obtain a copy of the License at

    http://www.apache.org/licenses/LICENSE-2.0

  Unless required by applicable law or agreed to in writing, software

  distributed under the License is distributed on an "AS IS" BASIS,

  WITHOUT WARRANTIES OR CONDITIONS OF ANY KIND, either express or implied.

  See the License for the specific language governing permissions and

  limitations under the License. See accompanying LICENSE file.

-->

<!-- Put site-specific property overrides in this file. -->

<configuration>

 <property>

        <name>fs.defaultFS</name>

        <value>hdfs://192.168.0.104:9000</value>

    </property>

    <property>

        <name>hadoop.tmp.dir</name>

        <value>file:/hadoop/tmp</value>

    </property>

    <property>

        <name>io.file.buffer.size</name>

        <value></value>

    </property>

</configuration>
hdfs-site.xml
[root@master hadoop]# cat hdfs-site.xml

<?xml version="1.0" encoding="UTF-8"?>

<?xml-stylesheet type="text/xsl" href="configuration.xsl"?>

<!--

  Licensed under the Apache License, Version 2.0 (the "License");

  you may not use this file except in compliance with the License.

  You may obtain a copy of the License at

    http://www.apache.org/licenses/LICENSE-2.0

  Unless required by applicable law or agreed to in writing, software

  distributed under the License is distributed on an "AS IS" BASIS,

  WITHOUT WARRANTIES OR CONDITIONS OF ANY KIND, either express or implied.

  See the License for the specific language governing permissions and

  limitations under the License. See accompanying LICENSE file.

-->

<!-- Put site-specific property overrides in this file. -->

<configuration>

<property>

        <name>dfs.namenode.name.dir</name>

        <value>file:/hadoop/hdfs/name</value>

    </property>

    <property>

        <name>dfs.datanode.data.dir</name>

        <value>file:/hadoop/hdfs/data</value>

    </property>

    <property>

        <name>dfs.replication</name>

        <value></value>

    </property>

    <property>

        <name>dfs.namenode.secondary.http-address</name>

        <value>192.168.0.104:</value>

    </property>

    <property>

    <name>dfs.webhdfs.enabled</name>

    <value>true</value>

    </property>

</configuration>
mapred-site.xml
[root@slave1 hadoop]# cat mapred-site.xml

<configuration>

<property>

        <name>mapred.job.tracker</name>

        <value>master:</value>

    </property>

    <property>

        <name>mapred.local.dir</name>

        <value>/hadoop/var</value>

    </property>

    <property>

        <name>mapreduce.framework.name</name>

        <value>yarn</value>

    </property>

</configuration>
yarn-site.xml
[root@slave1 hadoop]# cat yarn-site.xml

<?xml version="1.0"?>

<!--

  Licensed under the Apache License, Version 2.0 (the "License");

  you may not use this file except in compliance with the License.

  You may obtain a copy of the License at

    http://www.apache.org/licenses/LICENSE-2.0

  Unless required by applicable law or agreed to in writing, software

  distributed under the License is distributed on an "AS IS" BASIS,

  WITHOUT WARRANTIES OR CONDITIONS OF ANY KIND, either express or implied.

  See the License for the specific language governing permissions and

  limitations under the License. See accompanying LICENSE file.

-->

<configuration>

 <property>

        <name>yarn.resourcemanager.hostname</name>

        <value>master</value>

    </property>

    <property>

        <description>The address of the applications manager interface in the RM.</description>

        <name>yarn.resourcemanager.address</name>

        <value>${yarn.resourcemanager.hostname}:</value>

    </property>

    <property>

        <description>The address of the scheduler interface.</description>

        <name>yarn.resourcemanager.scheduler.address</name>

        <value>${yarn.resourcemanager.hostname}:</value>

    </property>

    <property>

        <description>The http address of the RM web application.</description>

        <name>yarn.resourcemanager.webapp.address</name>

        <value>${yarn.resourcemanager.hostname}:</value>

    </property>

    <property>

        <description>The https adddress of the RM web application.</description>

        <name>yarn.resourcemanager.webapp.https.address</name>

        <value>${yarn.resourcemanager.hostname}:</value>

    </property>

    <property>

        <name>yarn.resourcemanager.resource-tracker.address</name>

        <value>${yarn.resourcemanager.hostname}:</value>

    </property>

    <property>

        <description>The address of the RM admin interface.</description>

        <name>yarn.resourcemanager.admin.address</name>

        <value>${yarn.resourcemanager.hostname}:</value>

    </property>

    <property>

        <name>yarn.nodemanager.aux-services</name>

        <value>mapreduce_shuffle</value>

    </property>

    <property>

        <name>yarn.scheduler.maximum-allocation-mb</name>

        <value></value>

    </property>

    <property>

        <name>yarn.nodemanager.vmem-pmem-ratio</name>

        <value>2.1</value>

    </property>

    <property>

        <name>yarn.nodemanager.resource.memory-mb</name>

        <value></value>

    </property>

    <property>

        <name>yarn.nodemanager.vmem-check-enabled</name>

        <value>false</value>

    </property>

</configuration>
配置hadoop-env.sh、yarn-env.sh中JAVA_HOME
配置slave节点
[root@master hadoop]# cat slaves

192.168.0.105

192.168.0.106
将master节点的软件复制到slave上。
scp -r /hadoop 192.168.0.105:/

scp -r /hadoop 192.168.0.106:/
5.格式化
在master节点上进入/hadoop/hadoop-2.8.1/bin目录运行,格式化hdfs系统
./hdfs namenode -format
6.启动,停止
需要在三台机器上关闭防火墙
service firewalld stop

chkconfig firewalld off
全部启动sbin/start-all.sh,也可以分开sbin/start-dfs.sh、sbin/start-yarn.sh
[root@master sbin]# ./start-all.sh

This script is Deprecated. Instead use start-dfs.sh and start-yarn.sh

Starting namenodes on [master]

master: starting namenode, logging to /hadoop/hadoop-2.8./logs/hadoop-root-namenode-master.out

192.168.0.106: starting datanode, logging to /hadoop/hadoop-2.8./logs/hadoop-root-datanode-slave2.out

192.168.0.105: starting datanode, logging to /hadoop/hadoop-2.8./logs/hadoop-root-datanode-slave1.out

Starting secondary namenodes [master]

master: starting secondarynamenode, logging to /hadoop/hadoop-2.8./logs/hadoop-root-secondarynamenode-master.out

starting yarn daemons

starting resourcemanager, logging to /hadoop/hadoop-2.8./logs/yarn-root-resourcemanager-master.out

192.168.0.105: starting nodemanager, logging to /hadoop/hadoop-2.8./logs/yarn-root-nodemanager-slave1.out

192.168.0.106: starting nodemanager, logging to /hadoop/hadoop-2.8./logs/yarn-root-nodemanager-slave2.out
停止的话,输入命令,sbin/stop-all.sh
输入命令,jps,可以看到相关信息
master上
[root@master bin]# jps

 NameNode

 SecondaryNameNode

 ResourceManager

 Jps
slave上
[root@slave2 ~]# jps

 NodeManager

 DataNode

 Jps
运行验证/bin/hadoop dfsadmin -report
[root@master bin]# ./hadoop dfsadmin -report

DEPRECATED: Use of this script to execute hdfs command is deprecated.

Instead use the hdfs command for it.

Configured Capacity:  (73.95 GB)

Present Capacity:  (59.03 GB)

DFS Remaining:  (59.03 GB)

DFS Used:  ( KB)

DFS Used%: 0.00%

Under replicated blocks:

Blocks with corrupt replicas:

Missing blocks:

Missing blocks (with replication factor ):

Pending deletion blocks:

-------------------------------------------------

Live datanodes ():

Name: 192.168.0.105: (slave1)

Hostname: slave1

Decommission Status : Normal

Configured Capacity:  (36.97 GB)

DFS Used:  ( KB)

Non DFS Used:  (7.46 GB)

DFS Remaining:  (29.51 GB)

DFS Used%: 0.00%

DFS Remaining%: 79.82%

Configured Cache Capacity:  ( B)

Cache Used:  ( B)

Cache Remaining:  ( B)

Cache Used%: 100.00%

Cache Remaining%: 0.00%

Xceivers:

Last contact: Thu Aug  :: CST

Name: 192.168.0.106: (slave2)

Hostname: slave2

Decommission Status : Normal

Configured Capacity:  (36.97 GB)

DFS Used:  ( KB)

Non DFS Used:  (7.45 GB)

DFS Remaining:  (29.52 GB)

DFS Used%: 0.00%

DFS Remaining%: 79.85%

Configured Cache Capacity:  ( B)

Cache Used:  ( B)

Cache Remaining:  ( B)

Cache Used%: 100.00%

Cache Remaining%: 0.00%

Xceivers:

Last contact: Thu Aug  :: CST
7.访问
要先开放端口或者直接关闭防火墙
(1)输入命令,systemctl stop firewalld.service
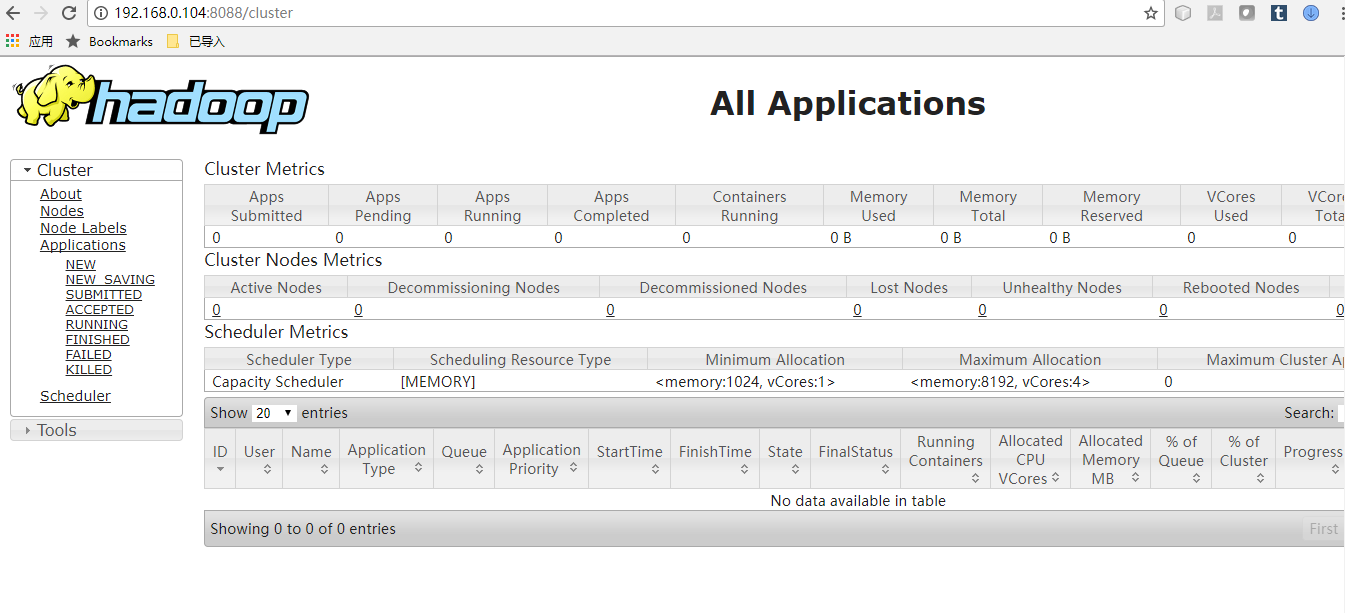
(2)浏览器打开http://192.168.0.104:8088/
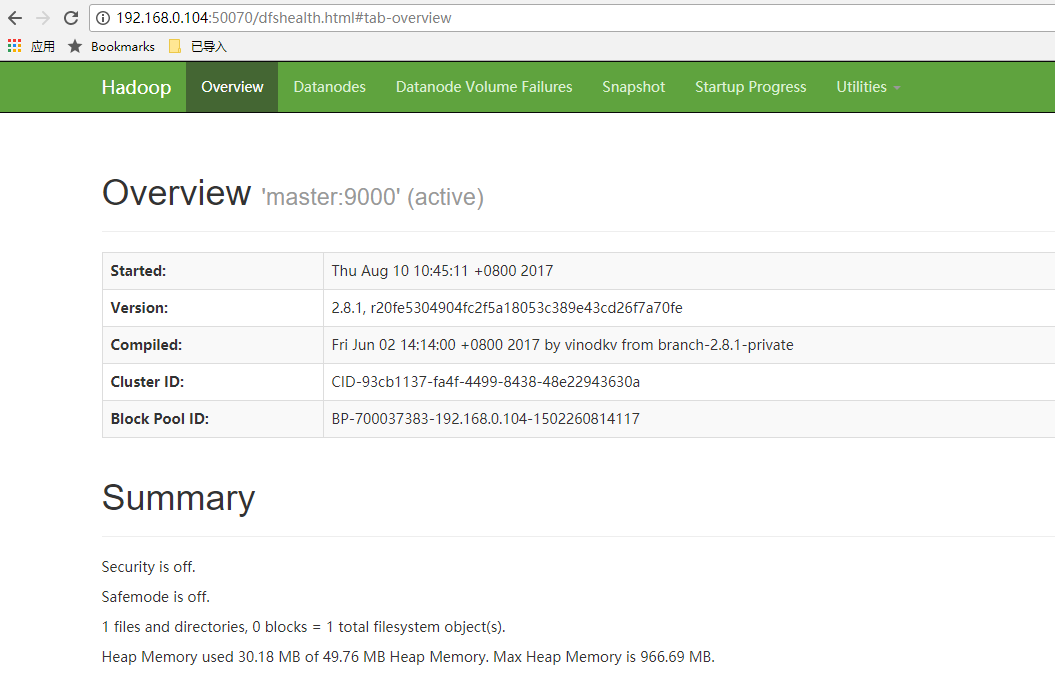
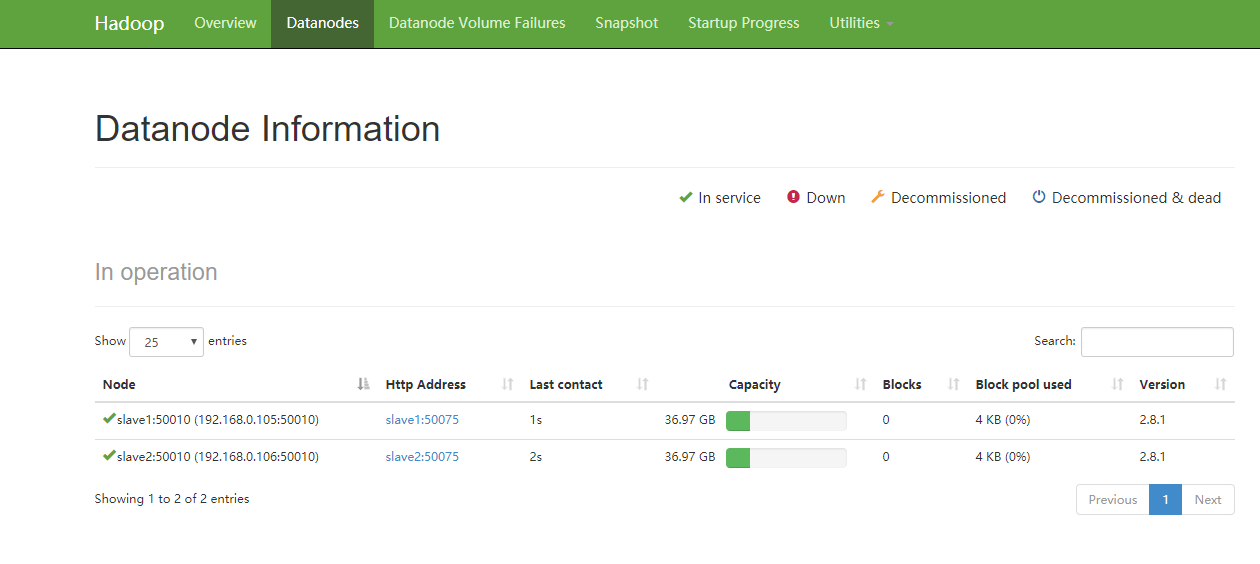
(3)浏览器打开http://192.168.0.104:50070/
8. 放入文件,并且浏览
[root@master bin]# ./hadoop dfs -put /hadoop/input /input

DEPRECATED: Use of this script to execute hdfs command is deprecated.

Instead use the hdfs command for it.

[root@master bin]# ./hadoop dfs -ls /input

DEPRECATED: Use of this script to execute hdfs command is deprecated.

Instead use the hdfs command for it.

Found  items

-rw-r--r--    root supergroup          -- : /input/test1.txt

-rw-r--r--    root supergroup          -- : /input/test2.txt
运行wordcount
[root@master bin]# ./hadoop jar /hadoop/hadoop-2.8./share/hadoop/mapreduce/hadoop-mapreduce-examples-2.8..jar wordcount /input /output

// :: INFO client.RMProxy: Connecting to ResourceManager at master/192.168.0.104:

// :: INFO input.FileInputFormat: Total input files to process :

// :: INFO mapreduce.JobSubmitter: number of splits:

// :: INFO mapreduce.JobSubmitter: Submitting tokens for job: job_1502543903142_0002

// :: INFO impl.YarnClientImpl: Submitted application application_1502543903142_0002

// :: INFO mapreduce.Job: The url to track the job: http://master:8088/proxy/application_1502543903142_0002/

// :: INFO mapreduce.Job: Running job: job_1502543903142_0002

// :: INFO mapreduce.Job: Job job_1502543903142_0002 running in uber mode : false

// :: INFO mapreduce.Job:  map % reduce %

// :: INFO mapreduce.Job:  map % reduce %

// :: INFO mapreduce.Job:  map % reduce %

// :: INFO mapreduce.Job:  map % reduce %

// :: INFO mapreduce.Job: Job job_1502543903142_0002 completed successfully

// :: INFO mapreduce.Job: Counters:

    File System Counters

        FILE: Number of bytes read=

        FILE: Number of bytes written=

        FILE: Number of read operations=

        FILE: Number of large read operations=

        FILE: Number of write operations=

        HDFS: Number of bytes read=

        HDFS: Number of bytes written=

        HDFS: Number of read operations=

        HDFS: Number of large read operations=

        HDFS: Number of write operations=

    Job Counters

        Launched map tasks=

        Launched reduce tasks=

        Data-local map tasks=

        Total time spent by all maps in occupied slots (ms)=

        Total time spent by all reduces in occupied slots (ms)=

        Total time spent by all map tasks (ms)=

        Total time spent by all reduce tasks (ms)=

        Total vcore-milliseconds taken by all map tasks=

        Total vcore-milliseconds taken by all reduce tasks=

        Total megabyte-milliseconds taken by all map tasks=

        Total megabyte-milliseconds taken by all reduce tasks=

    Map-Reduce Framework

        Map input records=

        Map output records=

        Map output bytes=

        Map output materialized bytes=

        Input split bytes=

        Combine input records=

        Combine output records=

        Reduce input groups=

        Reduce shuffle bytes=

        Reduce input records=

        Reduce output records=

        Spilled Records=

        Shuffled Maps =

        Failed Shuffles=

        Merged Map outputs=

        GC time elapsed (ms)=

        CPU time spent (ms)=

        Physical memory (bytes) snapshot=

        Virtual memory (bytes) snapshot=

        Total committed heap usage (bytes)=

    Shuffle Errors

        BAD_ID=

        CONNECTION=

        IO_ERROR=

        WRONG_LENGTH=

        WRONG_MAP=

        WRONG_REDUCE=

    File Input Format Counters

        Bytes Read=

    File Output Format Counters

        Bytes Written=
查看结果
[root@master bin]# ./hadoop dfs -ls /output

DEPRECATED: Use of this script to execute hdfs command is deprecated.

Instead use the hdfs command for it.

Found  items

-rw-r--r--    root supergroup           -- : /output/_SUCCESS

-rw-r--r--    root supergroup          -- : /output/part-r-

[root@master bin]# ./hadoop dfs -cat /output/part-r-

DEPRECATED: Use of this script to execute hdfs command is deprecated.

Instead use the hdfs command for it.

hadoop

hello

world
问题和定位
1.启动后发现slave的nodemanager全部没有启动起来,但看log信息又没有什么问题,修改yarn-site.xml文件后解决。
2.运行wordcount的时候报错说memory问题,调整了yarn-site.xml中的yarn.scheduler.maximum-allocation-mb,yarn.nodemanager.resource.memory-mb后解决
3.name node in safe mode,主要引起的原因是作业在运行过程中用了ctrl-c来进行退出,解决办法是:
[root@master bin]# ./hadoop dfsadmin -safemode leave

DEPRECATED: Use of this script to execute hdfs command is deprecated.

Instead use the hdfs command for it.

Safe mode is OFF
大数据的开始:安装hadoop的更多相关文章
- 大数据之pig安装
大数据之pig安装 1.下载 pig download 2. 解压安装 mapreduce模式安装: 1:设置HADOOP_HOME,如果pig所在节点不是集群中的节点,那就需要把集群中使用的hado ...
- 大数据平台搭建(hadoop+spark)
大数据平台搭建(hadoop+spark) 一.基本信息 1. 服务器基本信息 主机名 ip地址 安装服务 spark-master 172.16.200.81 jdk.hadoop.spark.sc ...
- 大数据学习系列之四 ----- Hadoop+Hive环境搭建图文详解(单机)
引言 在大数据学习系列之一 ----- Hadoop环境搭建(单机) 成功的搭建了Hadoop的环境,在大数据学习系列之二 ----- HBase环境搭建(单机)成功搭建了HBase的环境以及相关使用 ...
- 大数据学习系列之六 ----- Hadoop+Spark环境搭建
引言 在上一篇中 大数据学习系列之五 ----- Hive整合HBase图文详解 : http://www.panchengming.com/2017/12/18/pancm62/ 中使用Hive整合 ...
- 大数据学习系列之七 ----- Hadoop+Spark+Zookeeper+HBase+Hive集群搭建 图文详解
引言 在之前的大数据学习系列中,搭建了Hadoop+Spark+HBase+Hive 环境以及一些测试.其实要说的话,我开始学习大数据的时候,搭建的就是集群,并不是单机模式和伪分布式.至于为什么先写单 ...
- 大数据实时计算工程师/Hadoop工程师/数据分析师职业路线图
http://edu.51cto.com/roadmap/view/id-29.html http://my.oschina.net/infiniteSpace/blog/308401 大数据实时计算 ...
- CentOS6安装各种大数据软件 第九章:Hue大数据可视化工具安装和配置
相关文章链接 CentOS6安装各种大数据软件 第一章:各个软件版本介绍 CentOS6安装各种大数据软件 第二章:Linux各个软件启动命令 CentOS6安装各种大数据软件 第三章:Linux基础 ...
- 大数据学习笔记之Hadoop(一):Hadoop入门
文章目录 大数据概论 一.大数据概念 二.大数据的特点 三.大数据能干啥? 四.大数据发展前景 五.企业数据部的业务流程分析 六.企业数据部的一般组织结构 Hadoop(入门) 一 从Hadoop框架 ...
- 大数据hbase分布式安装及其部署。
大数据hbase分布式安装及其部署. 首先要启动Hadoop以及zookeeper,可以参考前面发布的文章. 将hbase的包上传至master节点 这里我使用的是1.3.6的版本,具体的根据自己的版 ...
随机推荐
- [BZOJ3033]太鼓达人|欧拉图
Description 七夕祭上,Vani牵着cl的手,在明亮的灯光和欢乐的气氛中愉快地穿行.这时,在前面忽然出现了一台太鼓达人机台,而在机台前坐着的是刚刚被精英队伍成员XLk.Poet_shy和ly ...
- asp单页面301跳转
<% Response.Status="301 Moved Permanently"Response.AddHeader "Location", &quo ...
- 原生sql和django的事务控制
def test(request): with connections['default'].cursor() as c: try: with transaction.atomic(using='de ...
- JAVA开发环境及其开发
成功安装之后,进行测试是否真的成功安装,点击[开始]----[运行]----输入 CMD,在命令提示符里面输入"Java -version"并按回车键,出现下图,即为安装成功. 选 ...
- Python 数据库连接池DButils
常规的数据库链接存在的问题: 场景一: 缺点:每次请求反复创建数据库连接,连接数太多 import pymysql def index(): conn = pymysql.connect() curs ...
- Linux c括号作用域【原创笔记】
大师指点后,所做的笔记,很感谢一起愿意研究技术的同事,以下不是本人原创,是他分析的成果 #include <stdio.h> #include <time.h> struct ...
- UVALIVE 3486 Cells
通过入栈出栈顺序判断祖先关系 这里UVALIVE还 #include <map> #include <set> #include <list> #include & ...
- requests-html的js执行功能简单使用
#!/usr/bin/env python # encoding: utf-8 import asyncio from requests_html import HTMLSession import ...
- django学习随笔:ManagementUtility
ManagementUtility类,位于django.core.management目录下的__init__.py文件. 这个类,在其init中: def __init__(self, argv=N ...
- EA(Enterprise Architect) UML 建模之活动图
一.活动图的概念作用 活动图本质上是一种流程图,它描述活动的序列,即系统从一个活动到另一个活动的控制流. 活动图的作用:描述用例 . 描述类的操作.描述算法(单独使用) 二. 活动图的基本符号 ...