使用CodeBlocks编译64位程序(用的编译器仅仅是windows sdk的)
需求:
-CodeBlocks使用nightly版本;
-Windows SDK(我使用的是6.0A,即微软针对vista的,因为这个比较小,你也可以选择其他版本但是要有64位编译器。他也适用于xpsp2及以上但是要安装.net2.0以上才能运行)对应的链接
Step1) Make sure you have a nightly build because I don’t think that RC2 supports all the needed functionality to setup the compiler.
//废话,上面不是说了么。。。
Step2) Install the Windows SDK, you can deselect all the .net stuff because we won’t be needing it.
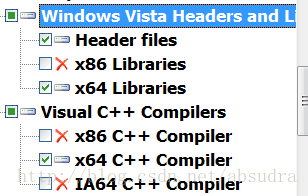
安装WinSDK,我只选择了Developers Tools->window Vista Headers and libraries 下图中的三个。其他一概不安。
Step3) Start Code::Blocks and go to ‘Settings->Compiler and Debugger settings’, then select ‘Microsoft Visual C++ 2005’ from the dropdown box and click the copy button. Now choose a name I used ‘Windows SDK x64’ but you can name it whatever you like.
//在CB里面的编译器设置,选择,vc2005,我选的是vc2005/2008(新的CB版本都一样),到头来还是手动修改。废话不说,把刚才说的这个设置复制出一个新的,然后随便起个名字,我起的是wnsdkv6x64.
Step4) Now with ‘Windows SDK x64’ as the selected compiler go to the ‘Toolchain executables’ tab andEMPTY the directory text box. Then click the ‘Additional Paths’ tab inside the ‘Toolchain executables’ tab. Remove the directory that goes to your Visual C++ 2005 install dirNOT the debug one and add the following directory’s:
- C:\Program Files\Microsoft SDKs\Windows\v6.0\Bin\x64
- C:\Program Files\Microsoft SDKs\Windows\v6.0\VC\Bin\x64
//他说开始设置交叉编译工具链程序(不用管,英文版本的就是‘Toolchain executables’这个标签,说把

这个控件清空,之后在下面的Additional Paths这个额外路径选项卡里面加入下面这两个目录,但是要把原来的那个默认的删除掉就行了。要添加的路径就是如下:
注意:如果你都是默认安装就用上面的路径就可以了。
%YourSDK%\Bin\x64 (由于我自己按照上面安装之后在这个没有这个目录,我也没设置,莫非我的版本和他的不一样?不过我确实编译通过了)
%YourSDK\VC\Bin\x64
Step5) Now go to the ‘Search Directories’ tab and remove all items under the ‘Compiler’, ‘Linker’ and ‘Resource compiler’ tabs. And then add the following,Compiler:
- C:\Program Files\Microsoft SDKs\Windows\v6.0\VC\INCLUDE
- C:\Program Files\Microsoft SDKs\Windows\v6.0\Include
//现在去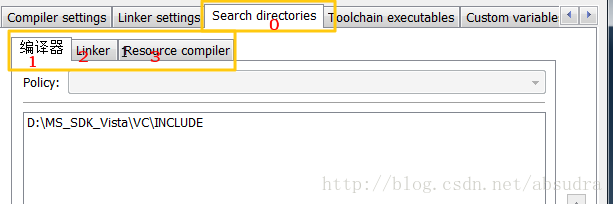
%YourSDK%\VC\INCLUDE
%YourSDK%\Include
2号linker填写下面的:
Linker:
- C:\Program Files\Microsoft SDKs\Windows\v6.0\VC\LIB\x64
- C:\Program Files\Microsoft SDKs\Windows\v6.0\Lib\x64
或者自定义目录填写:
%YourSDK%\Lib\x64
%YourSDK%\Lib\VC\LIB\x64
3号不用填写,因为sdk里面没有。。。
Resource Compiler:
- None
Step6) Create a new project (console project) and select our new ‘Windows SDK x64’ compiler as the compiler to use. Now in the generated code add the following line:
- cout << “sizeof(void*) = ” << sizeof(void*) << ";" << endl;
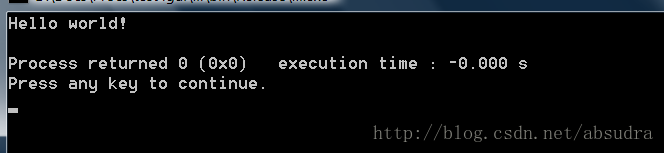
Hit the compile button and off we go. When we execute the program it appears to have a 8byte long address (64 bits).
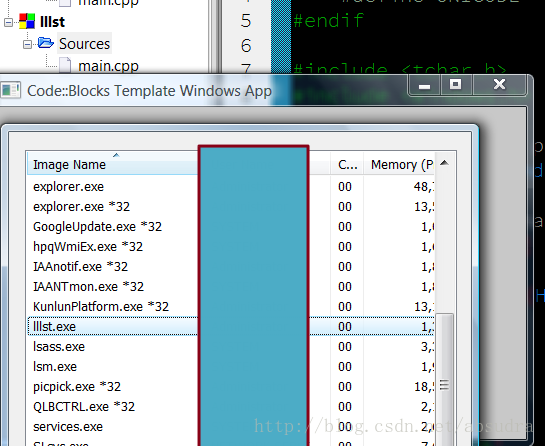
基本完事了,这个是测试用的,他只是测试控制台程序是否能被正确编译,反正我已经编译出来了,看图:
使用向导建立新console project,
之后就可以编译出来了
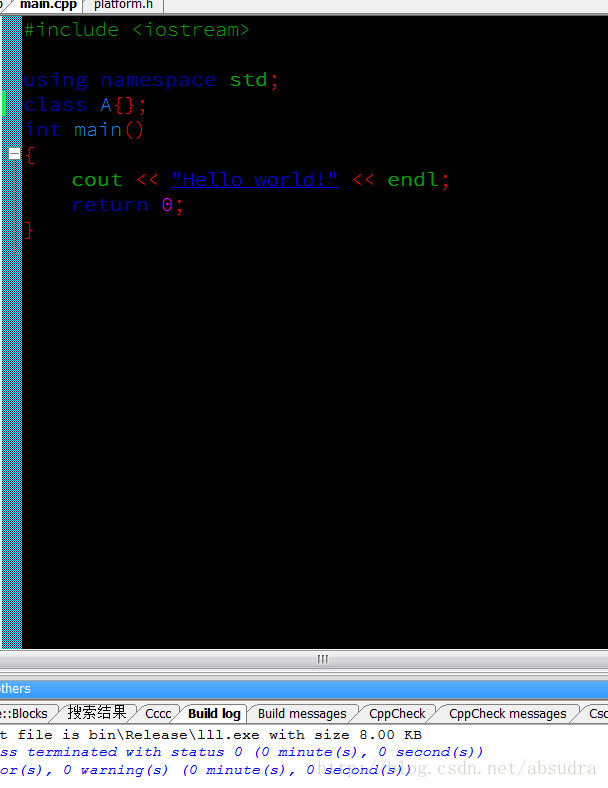
没有错误:显示如下:
我又使用win32向导建立了一个标准的win32api的窗口,
绝对是64位的程序。其他的还没试过,接下来的是使用ms2010编译amd64的教程了,应该很容易,就是因为不想使用ms2010那么大的体积才不用他的,谁想用就试试吧,他用的express版本来编译amd64的,当然也要安装winsdk,最新的vs2012据说连direct sdk都不用安装了,没用过不知道。
The following instructions will allow you to compile 64-bit code using Microsoft's VC 2010 compiler (with the Windows SDK).Requirements:
- Code::Bocks (at least as of 2012-07-23 the nightly build worked) [2]
-Microsoft Visual C++ 2010 express (or better) [3]
-Microsoft Windows SDK v7.1 (earlier versions might not work, later version will probably work but directories will change)[4]
Step 1) Install Visual Studio 2010.
Step 2) Install Windwos SDK.
Step 3) Install Code::Blocks following instructions listed in nightly build forum.
Note: Prior to setting up Code::Blocks for 64-Bit compiling, you may need to set the MSbuild environment to x64. This can be done my running the command:
"C:\Program Files\Microsoft SDKs\Windows\v7.1\Bin\SetEnv.cmd" /x64
Step 5) Run the new installation for the nightly build of Code::BLocks. It should auto-detect your installed compilers, including the recently installed Visual C++ 2010.
Step 6) Once Code::Blocks open the 'Global Compiler Settings' (Settings->Compiler...). Select 'Microsoft Visual C++ 2010'.
Now under the 'Toolchain executables' Tab change the Compiler's installation directory to:
C:\Program Files (x86)\Microsoft Visual Studio 10.0\VC\bin\amd64
Note: if you installed VC to a different directory this path will change. The important part is that you change the path to look in the '.\bin\amd64' directory.
While still in the 'Toolchain...' tab, click on 'Additional Paths'. Add the following:
C:\Program Files\Microsoft SDKs\Windows\v7.1\Bin\x64
C:\Program Files\Microsoft SDKs\Windows\v7.1\Bin
C:\Program Files (x86)\Microsoft Visual Studio 10.0\Common7\IDE
Next you need to add the x64 includes and lib file.
Under the 'Search Directories' tab add the following to the Compiler search path:
C:\Program Files\Microsoft SDKs\Windows\v7.1\Include
C:\Program Files (x86)\Microsoft Visual Studio 10.0\VC\include
Note: the Windows SDK directory should be listed first
Now add the following to the Linker search path (in this order):
C:\Program Files (x86)\Microsoft Visual Studio 10.0\VC\lib\amd64
C:\Program Files\Microsoft SDKs\Windows\v7.1\Lib\x64
C:\Program Files\Microsoft SDKs\Windows\v7.1\Lib
C:\Program Files (x86)\Microsoft Visual Studio 10.0\VC\lib
You should now be able to compile x64 code using VC 2010 (express).
原文请看http://wiki.codeblocks.org/index.php?title=64Bit_Windows
使用CodeBlocks编译64位程序(用的编译器仅仅是windows sdk的)的更多相关文章
- 如何在linux 32位机器编译64位程序
编译64位程序,不一定要编译机器是64位的,但是32位机器默认安装的gcc编译环境还是不能用来编译64位程序. 编译64位程序,需要加上-m64编译器参数,默认安装的gcc已经支持该参数,但是缺少64 ...
- ubuntu16 64位 编译64位程序和32位程序
安装了ubuntu16 64位的系统,想在该环境下用gcc编译64位和32位的程序 默认已经安装了64位环境的gcc 1. 首先确认安装的环境是不是64位的 cocoa@cocoaUKlyn:~/De ...
- Linux:32/64位程序(应用程序、共享库、内核模块)
摘要: Linux系统区分32/64位,相应地,应用程序.共享库和内核模块也区分32/64位. 本文以Ubuntu系统为例,介绍如何编译和使用32/64位的应用程序.共享库和内核模块. 1. 应用程序 ...
- 64位程序调用32DLL解决方案
最近做一个.NETCore项目,需要调用以前用VB6写的老程序,原本想重写,但由于其调用了大量32DLL,重写后还需要编译为32位才能运行,于是干脆把老代码整个封装为32DLL,然后准备在64位程序中 ...
- 64位ubuntu编译32位程序
最近在64位ubuntu上开发,需要编译32位程序,需要安装这两个包,然后在编译器参数加上-m32.不放心的话可以用ldd或file查看一下是否生成了对应位数的程序. $ apt-get inst ...
- 在64位linux下编译32位程序
在64位linux下编译32位程序 http://blog.csdn.net/xsckernel/article/details/38045783
- 64位linux编译32位程序
昨天接到的任务,编译64位和32位两个版本的.so动态库给其他部门,我的ubuntu虚拟机是64位的,编译32位时遇到了问题: /usr/bin/ld: cannot find -lstdc++ 最后 ...
- 使用visual c++ 2005编译64位可执行文件
最近需要将一个32位的程序移植到64位上,由于原来是使用vs2003写的,vs2003本身并不支持编译64位系统上,只能升级到vs2005以上版本.个人还是比较喜欢vs2005,对c++来说,vs20 ...
- Linux:使用rpcgen实现64位程序调用32位库函数
摘要:本文介绍使用rpcgent实现64位程序调用32位库函数的方法,并给出样例代码. 我的问题 我的程序运行在64位Linux系统上,需要使用一个从外部获得的共享库中的函数,这个共享库是32位的,无 ...
随机推荐
- Android学习笔记_42_各种图形的炫酷效果的实现和使用
一.文档位置: 这里在android中的图形,在帮助文档的这个页面, android-sdk-windows\docs\guide\topics\resources\drawable-resourc ...
- GYM 101550 G.Game Rank(模拟)
The gaming company Sandstorm is developing an online two player game. You have been asked to impleme ...
- ubuntu开启ssh连接
1.安装openssh-server sudo apt-get install -y openssh-server 2.修改/etc/ssh/sshd-config配置 PermitRootLogin ...
- 【Linux-CentOS】【转-更正】使用CentOS DVD1 和DVD2做本地yum源
原文在此.此文写的非常好,怕网络丢失,特转来,并做了更正. CentOS6以上版本一般都会提供一个DVD1和一个DVD2镜像,使用DVD1即可安装使用CentOS了,DVD2中存放了一些额外的软件包, ...
- 课时59.体验css(理解)
我们想做这样一个样式,应该怎么做? 分析: 有一个标题(h1),还有一些段落(p) 标题是居中的,段落也是居中的,所以我们可以设置h标签和p标签居的align属性等于center来实现 标题和段落都有 ...
- js函数只触发一次
如何让js中的函数只被执行一次?我们有时候会有这种需求,即让一个函数只执行一次,第二次调用不会返回任何有价值的值,也不会报错.下面将通过三个小demo展示使用的方法,当做个人笔记. 1.通过闭包来实现 ...
- 高级同步器:交换器Exchanger
引自:https://blog.csdn.net/Dason_yu/article/details/79764467 一.定义每个线程将条目上的某个方法呈现给 exchange 方法,与伙伴线程进行匹 ...
- JS高度融合入门笔记(二)
<!DOCTYPE html><html><head> <meta charset="utf-8"> <title>JS ...
- MySQL多表数据查询(DQL)
数据准备: /* ------------------------------------创建班级表------------------------------------ */ CREATE TAB ...
- ThinkPHP中的pathinfo模式和URL重写
语文一直不太好,要我怎么解释这个pathinfo模式还真不知道怎么说,那就先来一段代码说下pathinfo模式吧 http://serverName/appName/module/action/id/ ...