
新浪微博登录界面上下拉伸图片--第三方开源--PullToZoomListViewEx(二)
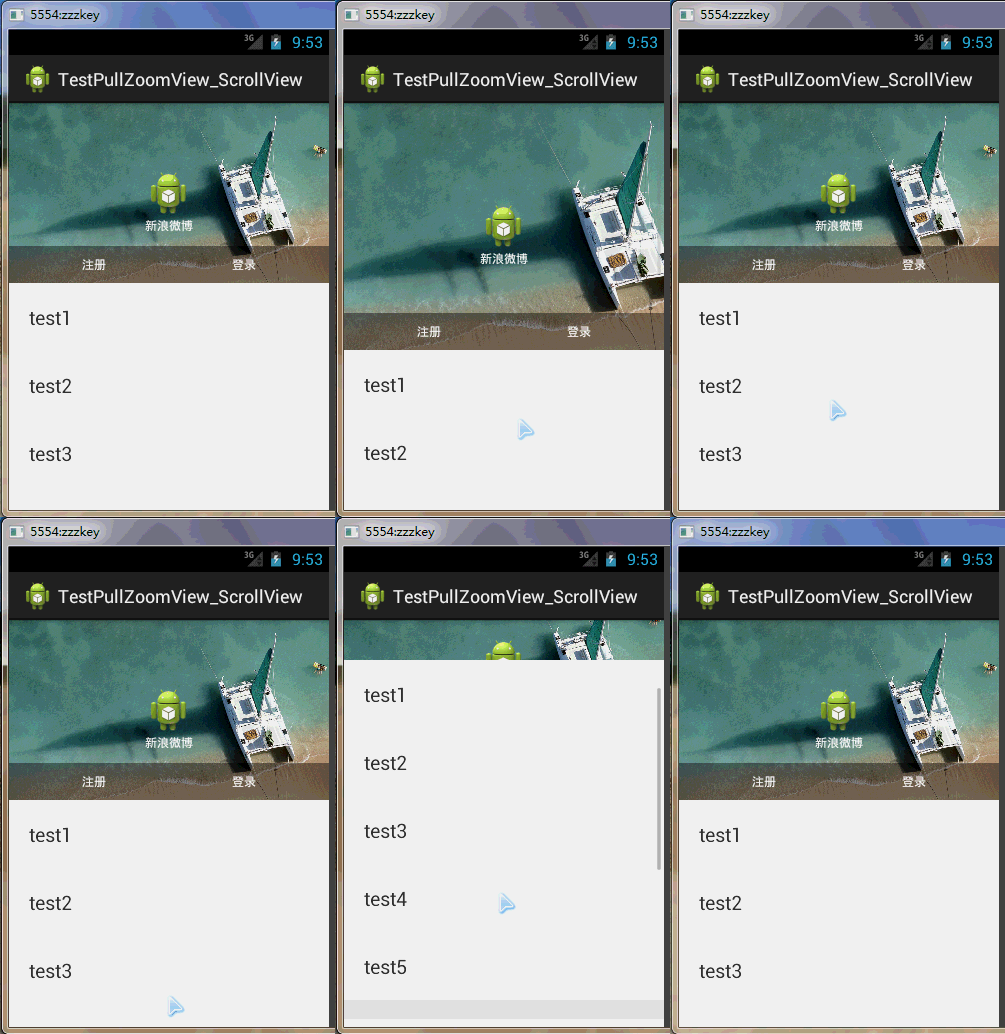
这是PullZoomView在ScrollView实现,Android PullZoomView在ScrollView的实现是:PullToZoomScrollViewEx
下载地址:https://github.com/Frank-Zhu/PullZoomView
本文要说的PullToZoomScrollViewEx则以另外一种方式在Java代码中动态的为PullZoomView装载View:
private void loadViewForPullToZoomScrollView(PullToZoomScrollViewEx scrollView) {

        View headView = LayoutInflater.from(this).inflate(R.layout.head_view, null);

        View zoomView = LayoutInflater.from(this).inflate(R.layout.head_zoom_view, null);

        View contentView = LayoutInflater.from(this).inflate(R.layout.content_view, null);

        scrollView.setHeaderView(headView);

        scrollView.setZoomView(zoomView);

        scrollView.setScrollContentView(contentView);

    }
两点内容需要注意:
(1)所有Android PullZoomView的头部及缩放效果都可以关闭或者开启,具体方式就是通过改变设置各种方法的true或false值。以下是比较重要的几个方法:
setParallax(boolean b);
true则有视差效果,false则无。
setHideHeader(boolean b);
true则隐藏自己定义的head view,false则显示。
setZoomEnabled(boolean b);
true支持缩放,false不支持缩放。
默认的,
setParallax(true);
setHideHeader(false);
setZoomEnabled(true);
(2)PullZoomView中嵌套的子View,需要通过getPullRootView().findViewById(R.id.xxxx)这样的方式找出来,而不是直接的findViewById()。
下面给出一个完整例子加以说明。
先写一个布局:
 <RelativeLayout xmlns:android="http://schemas.android.com/apk/res/android"

     xmlns:tools="http://schemas.android.com/tools"

     xmlns:custom="http://schemas.android.com/apk/res-auto"

     android:layout_width="match_parent"

     android:layout_height="match_parent" >

     <com.ecloud.pulltozoomview.PullToZoomScrollViewEx

         android:id="@+id/scroll_view"

         android:layout_width="match_parent"

         android:layout_height="match_parent" />

 </RelativeLayout>
Java代码:
 package com.zzw.testpullzoomview_scrollview;

 import com.ecloud.pulltozoomview.PullToZoomScrollViewEx;

 import android.app.Activity;

 import android.os.Bundle;

 import android.util.DisplayMetrics;

 import android.util.Log;

 import android.view.LayoutInflater;

 import android.view.Menu;

 import android.view.MenuItem;

 import android.view.View;

 import android.widget.LinearLayout;

 public class MainActivity extends Activity {

     @Override

     protected void onCreate(Bundle savedInstanceState) {

         super.onCreate(savedInstanceState);

         setContentView(R.layout.activity_main);

         // 注意初始化顺序,不要弄乱,否则抛出运行时空指针

         PullToZoomScrollViewEx scrollView = (PullToZoomScrollViewEx) findViewById(R.id.scroll_view);

         loadViewForPullToZoomScrollView(scrollView);

         scrollView.getPullRootView().findViewById(R.id.tv_test1).setOnClickListener(new View.OnClickListener() {

             @Override

             public void onClick(View v) {

                 Log.d("PullToZoomScrollViewEx1", "onClick");

             }

         });

         scrollView.getPullRootView().findViewById(R.id.tv_test2).setOnClickListener(new View.OnClickListener() {

             @Override

             public void onClick(View v) {

                 Log.e("PullToZoomScrollViewEx2", "onClick");

             }

         });

         scrollView.getPullRootView().findViewById(R.id.tv_test3).setOnClickListener(new View.OnClickListener() {

             @Override

             public void onClick(View v) {

                 Log.d("PullToZoomScrollViewEx3", "onClick");

             }

         });

         setPullToZoomViewLayoutParams(scrollView);

     }

     private void loadViewForPullToZoomScrollView(PullToZoomScrollViewEx scrollView) {

         View headView = LayoutInflater.from(this).inflate(R.layout.head_view, null);

         View zoomView = LayoutInflater.from(this).inflate(R.layout.head_zoom_view, null);

         View contentView = LayoutInflater.from(this).inflate(R.layout.content_view, null);

         scrollView.setHeaderView(headView);

         scrollView.setZoomView(zoomView);

         scrollView.setScrollContentView(contentView);

     }

     // 设置头部的View的宽高。

     private void setPullToZoomViewLayoutParams(PullToZoomScrollViewEx scrollView) {

         DisplayMetrics localDisplayMetrics = new DisplayMetrics();

         getWindowManager().getDefaultDisplay().getMetrics(localDisplayMetrics);

         int mScreenHeight = localDisplayMetrics.heightPixels;

         int mScreenWidth = localDisplayMetrics.widthPixels;

         LinearLayout.LayoutParams localObject = new LinearLayout.LayoutParams(mScreenWidth,

                 (int) (9.0F * (mScreenWidth / 16.0F)));

         scrollView.setHeaderLayoutParams(localObject);

     }

 }
java代码需要的子布局:
head_view.xml:
 <RelativeLayout xmlns:android="http://schemas.android.com/apk/res/android"

     android:id="@+id/layout_view"

     android:layout_width="match_parent"

     android:layout_height="match_parent"

     android:layout_gravity="bottom"

     android:gravity="bottom">

     <ImageView

         android:id="@+id/iv_user_head"

         android:layout_width="wrap_content"

         android:layout_height="wrap_content"

         android:layout_centerInParent="true"

         android:src="@drawable/ic_launcher" />

     <TextView

         android:id="@+id/tv_user_name"

         android:textSize="12sp"

         android:layout_width="wrap_content"

         android:layout_height="wrap_content"

         android:layout_below="@id/iv_user_head"

         android:layout_centerHorizontal="true"

         android:text="新浪微博"

         android:textColor="#ffffff" />

     <LinearLayout

         android:id="@+id/ll_action_button"

         android:layout_width="match_parent"

         android:layout_height="wrap_content"

         android:background="#66000000"

         android:layout_alignParentBottom="true"

         android:padding="10dip">

         <TextView

             android:id="@+id/tv_register"

             android:layout_width="match_parent"

             android:layout_height="wrap_content"

             android:text="注册"

             android:layout_weight="1"

             android:textSize="12sp"

             android:gravity="center"

             android:layout_gravity="center"

             android:textColor="#ffffff" />

         <TextView

             android:id="@+id/tv_login"

             android:layout_width="match_parent"

             android:layout_height="wrap_content"

             android:text="登录"

             android:layout_weight="1"

             android:textSize="12sp"

             android:gravity="center"

             android:layout_gravity="center"

             android:textColor="#ffffff" />

     </LinearLayout>

 </RelativeLayout>
head_zoom_view.xml:
 <?xml version="1.0" encoding="utf-8"?>

 <ImageView xmlns:android="http://schemas.android.com/apk/res/android"

     android:id="@+id/imageView"

     android:layout_width="match_parent"

     android:layout_height="match_parent"

     android:layout_gravity="center_horizontal"

     android:scaleType="centerCrop"

     android:src="@drawable/a" />
head_zoom_view其实就放了一张可供缩放拉伸的图片。
content_view.xml:
 <?xml version="1.0" encoding="utf-8"?>

 <LinearLayout xmlns:android="http://schemas.android.com/apk/res/android"

     android:layout_width="match_parent"

     android:layout_height="match_parent"

     android:background="#ffffff"

     android:orientation="vertical" >

     <TextView

         android:id="@+id/tv_test1"

         android:layout_width="match_parent"

         android:layout_height="wrap_content"

         android:gravity="center_vertical"

         android:padding="20dp"

         android:text="test1"

         android:textSize="20sp" />

     <TextView

         android:id="@+id/tv_test2"

         android:layout_width="match_parent"

         android:layout_height="wrap_content"

         android:gravity="center_vertical"

         android:padding="20dp"

         android:text="test2"

         android:textSize="20sp" />

     <TextView

         android:id="@+id/tv_test3"

         android:layout_width="match_parent"

         android:layout_height="wrap_content"

         android:gravity="center_vertical"

         android:padding="20dp"

         android:text="test3"

         android:textSize="20sp" />

     <TextView

         android:layout_width="match_parent"

         android:layout_height="wrap_content"

         android:gravity="center_vertical"

         android:padding="20dp"

         android:text="test4"

         android:textSize="20sp" />

     <TextView

         android:layout_width="match_parent"

         android:layout_height="wrap_content"

         android:gravity="center_vertical"

         android:padding="20dp"

         android:text="test5"

         android:textSize="20sp" />

     <TextView

         android:layout_width="match_parent"

         android:layout_height="wrap_content"

         android:background="#eeeeee" />

     <TextView

         android:layout_width="match_parent"

         android:layout_height="wrap_content"

         android:gravity="center_vertical"

         android:padding="20dp"

         android:text="test1"

         android:textSize="20sp" />

     <TextView

         android:layout_width="match_parent"

         android:layout_height="wrap_content"

         android:gravity="center_vertical"

         android:padding="20dp"

         android:text="test2"

         android:textSize="20sp" />

     <TextView

         android:layout_width="match_parent"

         android:layout_height="wrap_content"

         android:gravity="center_vertical"

         android:padding="20dp"

         android:text="test3"

         android:textSize="20sp" />

     <TextView

         android:layout_width="match_parent"

         android:layout_height="wrap_content"

         android:gravity="center_vertical"

         android:padding="20dp"

         android:text="test4"

         android:textSize="20sp" />

     <TextView

         android:layout_width="match_parent"

         android:layout_height="wrap_content"

         android:gravity="center_vertical"

         android:padding="20dp"

         android:text="test5"

         android:textSize="20sp" />

 </LinearLayout>
实际开发中,如果确定要用ScrollView包括自己项目中的子View,那么content_view.xml就是其他View的装载“父”布局。重点需要在content_view.xml中展开。
新浪微博登录界面上下拉伸图片--第三方开源--PullToZoomListViewEx(二)的更多相关文章
- Python3.x:获取登录界面校验码图片
Python3.x:获取登录界面校验码图片 实例代码: # python3 # author lizm # datetime 2018-06-01 18:00:00 # -*- coding: utf ...
- Windows 10 登录界面的背景图片地址
C:\Users\******\appdata\Local\Packages\Microsoft.Windows.ContentDeliveryManager_********\LocalState\ ...
- swing实现QQ登录界面1.0( 实现了同一张图片只加载一次)、(以及实现简单的布局面板添加背景图片控件的标签控件和添加一个关闭按钮控件)
swing实现QQ登录界面1.0( 实现了同一张图片只加载一次).(以及实现简单的布局面板添加背景图片控件的标签控件和添加一个关闭按钮控件) 代码思路分析: 1.(同一张图片仅仅需要加载一次就够了,下 ...
- 界面编程模仿篇(QQ登录界面逼真篇)
写了好多天的爬虫,偷空前前后后用了两天的时间(排除吃饭睡觉)写完了这个QQ登录界面,看起来还凑和着吧,如果是的大神的,莫见笑,纯属业余作品,废话先不多说,截图如下,其中第二幅图片中的红色方框部份有待完 ...
- jquery自己主动旋转的登录界面的背景代码登录页背景图
在其他网站上看到比较爽Web登录界面.背景图片可以自己主动旋转. 介绍给大家.有兴趣的可以改改下来作为自己的系统登录界面. 如图: watermark/2/text/aHR0cDovL2Jsb2cuY ...
- 怎么更改win7登录界面
方法/步骤 1 第一步,先打开注册表.快捷键是win+R.Win就是Windows图片那个键.打开会是这个. 2 在其中输入Regedit.就打开了传说中的注册表了.然后在注册表中选择.选择的顺序 ...
- 030 Android 第三方开源下拉框:NiceSpinner的使用+自定义Button样式+shape绘制控件背景图+图片选择器(selector)
1.NiceSpinner下拉框控件介绍 Android原生的下拉框Spinner基本上可以满足Android开发对于下拉选项的设计需求,但现在越来越流行的下拉框不满足于Android原生提供的下拉框 ...
- Android的SwipeToDismiss第三方开源框架模拟QQ对话列表侧滑删除,置顶,将头像图片圆形化处理。
<Android SwipeToDismiss:左右滑动删除ListView条目Item> Android的SwipeToDismiss是github上一个第三方开源框架(github ...
- 第三方登录 QQ登录 人人网登录 新浪微博登录
http://www.pp6.cn/Index.aspx http://www.pp6.cn/Login.aspx 网站有自己的账号系统,这里使用的第三方登录仅仅是获取第三方账号的唯一id,昵称,性别 ...
随机推荐
- (转)Log4net 配置类库
原文地址:http://blog.csdn.net/pfe_nova/article/details/20072137 1.单文件日志 对于单文件的日志,封装代码如下: public enum Log ...
- HDU 4334 Trouble
Trouble Time Limit: 10000/5000 MS (Java/Others) Memory Limit: 32768/32768 K (Java/Others)Total Su ...
- SQL Server int类型值最大2147483647(2^31 - 1)
突发奇想,一个字增字段,假设每天增加1000条记录,多少年之后写不进int类型的字段了2147483647 / 1000 / 365 = 5883.51684109589041095890410958 ...
- CPPUTest 单元测试框架(针对 C 单元测试的使用说明)
CPPUTest 虽然名称上看起来是 C++ 的单元测试框架, 其实它也是支持测试 C 代码的. 本文主要介绍用CPPUTest来测试 C 代码. (C++没用过, 平时主要用的是C) C++相关的内 ...
- visual studio R6034解决方案集 从VC6.0 或VC2003 到VC2005发现的问题
这是我转的一篇非常全的帖子 能查到的解决方法都在里面有提及: 我是使用 stdafx.h加入这句 code #pragma comment(linker, "\"/manifest ...
- A+B问题通解_Pascal_C++_Java
世界不断发展,各种电子设备不断变得更加迷你,代码却越写越长…… A+B Problem Input:Two integer A,B Output:The ans of A+B 1971年,Niklau ...
- Filter Blue Light for Better Sleep(APP 推荐)
Filter Blue Light for Better Sleep By Carolyn Mohr11 May, 2016 Many people like to use their phones ...
- Loggly:提高ElasticSearch性能的九个高级配置技巧
Loggly日志管理服务在其很多核心功能里使用ElasticSearch作为搜索引擎.Jon Gifford在其文章“ElasticSearch vs Solr”中指出,日志管理领域对搜索技术有了更高 ...
- java中List Set Map使用
@Test public void run() { ArrayList<String> list= ...
- 开源项目:libbpg
1 ubuntu下编译libbpg(编译机器64bit) 安装cmake,libpng,yasm,gcc,g++ cmake版本最低为2.8.8,安装完毕后使用cmake --version查看是否安 ...