KubeSphere 升级 && 安装后启用插件
KubeSphere 升级
root@master1:~# export KKZONE=cn

root@master1:~# kk upgrade --with-kubernetes v1.22.1 --with-kubesphere v3.2.0 -f sample.yaml
启用插件
用户可以使用 KubeSphere Web 控制台查看和操作不同的资源。要在安装后启用可插拔组件,只需要在控制台中进行略微调整。对于那些习惯使用 Kubernetes 命令行工具 kubectl 的人来说,由于该工具已集成到控制台中,因此使用 KubeSphere 将毫无困难。
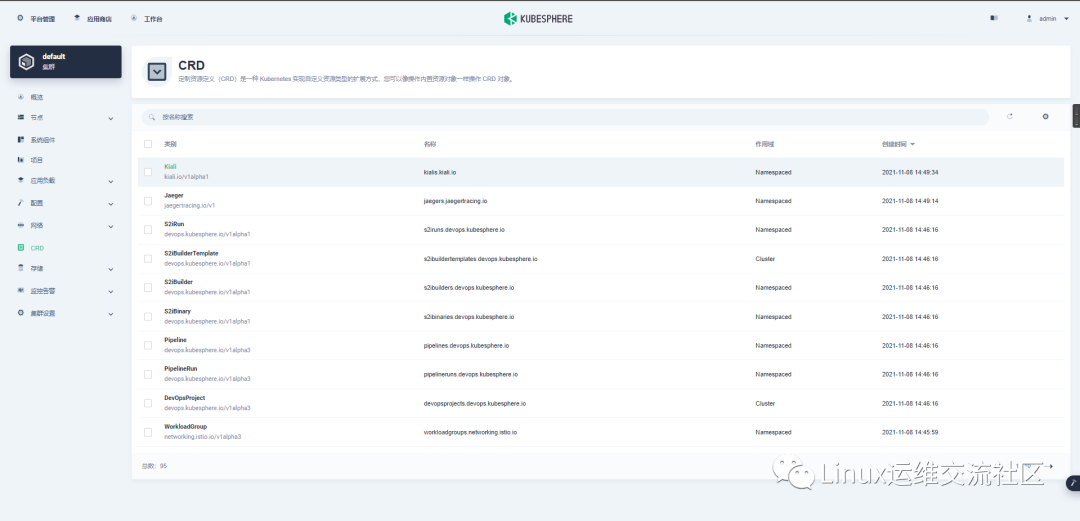
以 admin 身份登录控制台。点击左上角的平台管理 ,然后选择集群管理。
集群管理

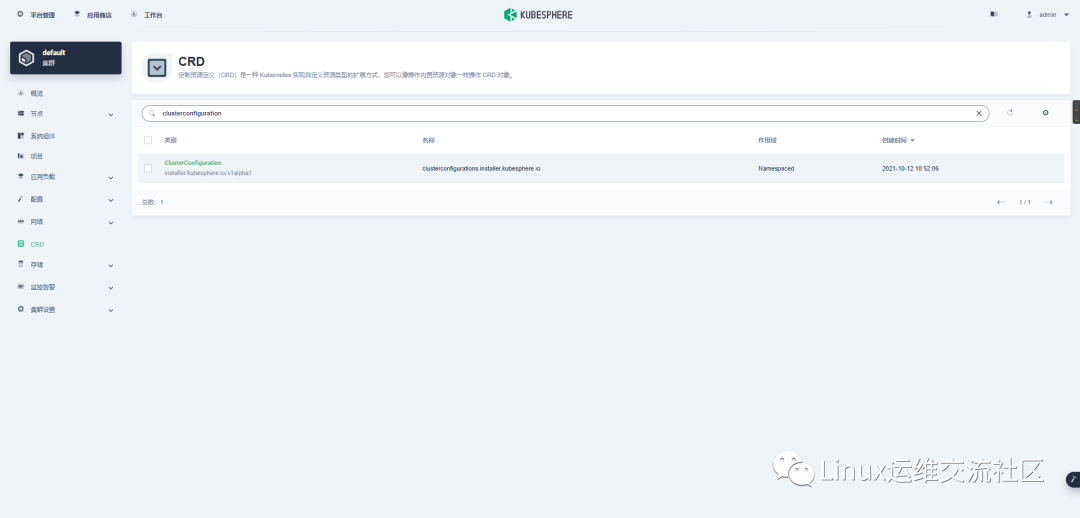
点击 CRD,然后在搜索栏中输入 clusterconfiguration,点击搜索结果进入其详情页面。
CRD
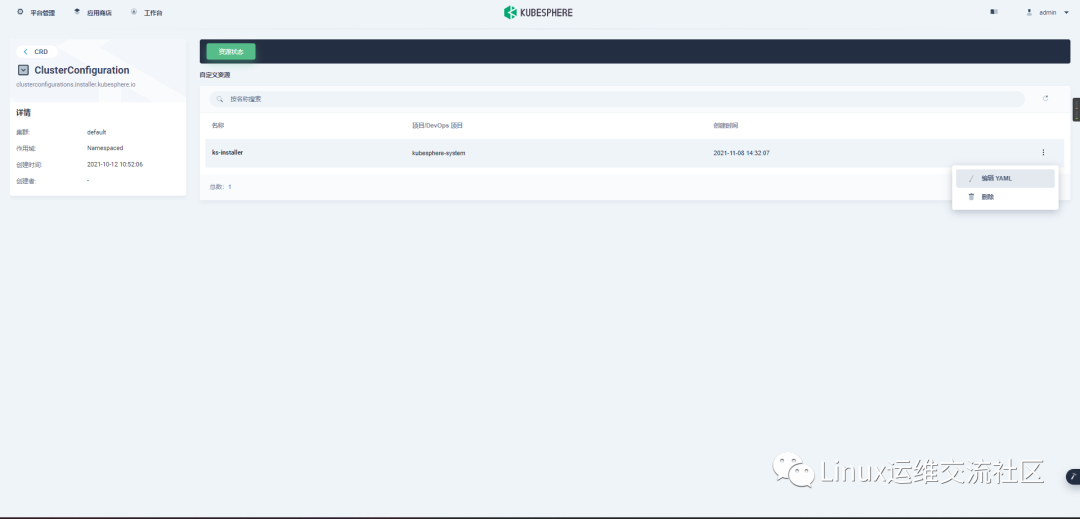
编辑配置文件
在该配置文件中,将对应组件 enabled 的 false 更改为 true,以启用要安装的组件。完成后,点击更新以保存配置。
我的内容:
apiVersion: installer.kubesphere.io/v1alpha1

kind: ClusterConfiguration

metadata:

  labels:

    version: v3.2.0

  name: ks-installer

  namespace: kubesphere-system

spec:

  alerting:

    enabled: true

  auditing:

    enabled: true

  authentication:

    jwtSecret: ''

  common:

    core:

      console:

        enableMultiLogin: true

        port: 30880

        type: NodePort

    es:

      basicAuth:

        enabled: true

        password: ''

        username: ''

      data:

        volumeSize: 20Gi

      elkPrefix: logstash

      externalElasticsearchPort: ''

      externalElasticsearchUrl: ''

      logMaxAge: 7

      master:

        volumeSize: 4Gi

    gpu:

      kinds:

        - default: true

          resourceName: nvidia.com/gpu

          resourceType: GPU

    minio:

      volumeSize: 20Gi

    monitoring:

      GPUMonitoring:

        enabled: true

      endpoint: 'http://prometheus-operated.kubesphere-monitoring-system.svc:9090'

    openldap:

      enabled: true

    redis:

      enabled: true

  devops:

    enabled: true

    jenkinsJavaOpts_MaxRAM: 2g

    jenkinsJavaOpts_Xms: 512m

    jenkinsJavaOpts_Xmx: 512m

    jenkinsMemoryLim: 2Gi

    jenkinsMemoryReq: 1500Mi

    jenkinsVolumeSize: 8Gi

  etcd:

    endpointIps: 192.168.1.10

    monitoring: false

    port: 2379

    tlsEnable: true

  events:

    enabled: true

  kubeedge:

    cloudCore:

      cloudHub:

        advertiseAddress:

          - ''

        nodeLimit: '100'

      cloudhubHttpsPort: '10002'

      cloudhubPort: '10000'

      cloudhubQuicPort: '10001'

      cloudstreamPort: '10003'

      nodeSelector:

        node-role.kubernetes.io/worker: ''

      service:

        cloudhubHttpsNodePort: '30002'

        cloudhubNodePort: '30000'

        cloudhubQuicNodePort: '30001'

        cloudstreamNodePort: '30003'

        tunnelNodePort: '30004'

      tolerations: []

      tunnelPort: '10004'

    edgeWatcher:

      edgeWatcherAgent:

        nodeSelector:

          node-role.kubernetes.io/worker: ''

        tolerations: []

      nodeSelector:

        node-role.kubernetes.io/worker: ''

      tolerations: []

    enabled: true

  logging:

    containerruntime: docker

    enabled: true

    logsidecar:

      enabled: true

      replicas: 2

  metrics_server:

    enabled: true

  monitoring:

    gpu:

      nvidia_dcgm_exporter:

        enabled: true

    storageClass: ''

  multicluster:

    clusterRole: none

  network:

    ippool:

      type: none

    networkpolicy:

      enabled: true

    topology:

      type: none

  openpitrix:

    store:

      enabled: true

  persistence:

    storageClass: ''

  servicemesh:

    enabled: true
启用组件
执行以下命令,使用 Web kubectl 来检查安装过程:
root@master1:~# kubectl logs -n kubesphere-system $(kubectl get pod -n kubesphere-system -l app=ks-install -o jsonpath='{.items[0].metadata.name}') -f如果组件安装成功,输出将显示以下消息。
#####################################################
### Welcome to KubeSphere! ###
#####################################################
Console: http://192.168.0.2:30880
Account: admin
Password: P@88w0rd
NOTES:
1. After you log into the console, please check the
monitoring status of service components in
"Cluster Management". If any service is not
ready, please wait patiently until all components
are up and running.
2. Please change the default password after login.
#####################################################
https://kubesphere.io 20xx-xx-xx xx:xx:xx
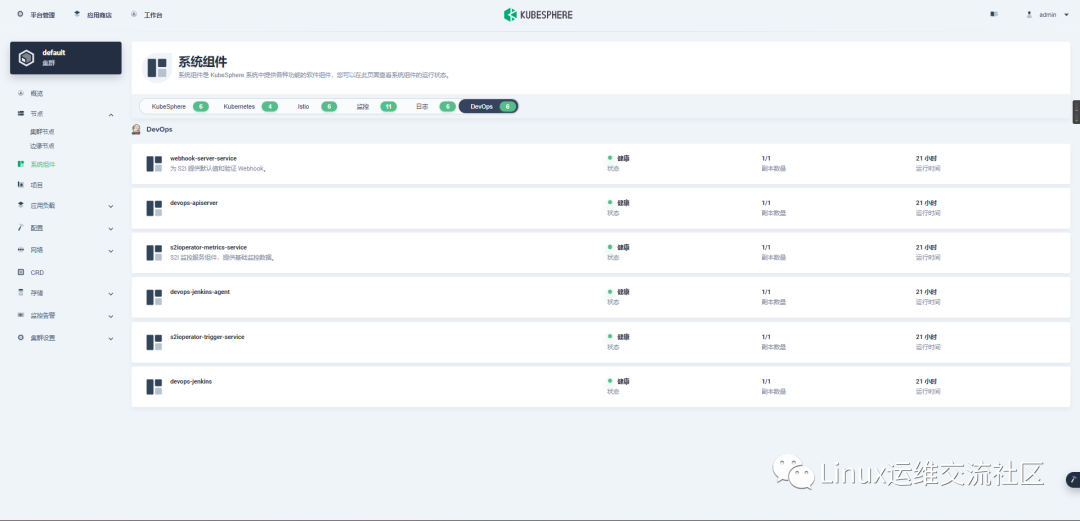
#####################################################登录 KubeSphere 控制台,在系统组件中可以查看不同组件的状态。
服务组件

https://blog.csdn.net/qq_33921750
https://my.oschina.net/u/3981543
https://www.zhihu.com/people/chen-bu-yun-2
https://segmentfault.com/u/hppyvyv6/articles
https://juejin.cn/user/3315782802482007
https://space.bilibili.com/352476552/article
https://cloud.tencent.com/developer/column/93230
知乎、CSDN、开源中国、思否、掘金、哔哩哔哩、腾讯云
KubeSphere 升级 && 安装后启用插件的更多相关文章
- VScode安装后的插件安装
杭州SEO:Chinese(Simplified) Language Pack for Visual Stidio Code 中文汉化包 对于一些英文不太好的小伙伴,上来第一件事肯定是要切换成中文语言 ...
- python升级安装后的yum的修复
升级python版本号后,执行yum # yum -y install openssl 提演示样例如以下: There was a problem importing one of the Pytho ...
- CentOS最小化安装后启用无线连接网络
想要链接无线就需要无线工具包. yum install -y wireless-tools安装完成之后就有 iwconfig,iwlist,iw等命令行工具了. 首先启动无线网卡,记得开启无线开关, ...
- 解决每次升级Xcode后三方插件失效问题
其实就是插件里面的UIID没有加新XcodedeUIID 拿常用的Alactraz来说 在Terminal中 un these 2 lines in terminal:1:find ~/Library ...
- CentOS7 最小化安装后启用无线连接网络
1.ip addr 找到自己的无线网接口 (ps:本人的是wlp2s0) 2.ip link set wlp2s0 up 打开无线网的驱动 3.ip link show wlp2s0 查看该网络接口的 ...
- selenium2入门 用selenium安装、加载、启用插件(一)
一:下载 下载地址是:http://docs.seleniumhq.org/download/
- selenium2 用selenium安装、加载、启用插件(一)
一:下载 下载地址是:http://docs.seleniumhq.org/download/
- 【iOS】Xcode 插件安装后无效
今天把 Xcode 升级到 7.3.1,发现插件安装后无效…… 原因:苹果要求加入UUID证书从而保证插件的稳定性. 解决方法: 1. 查看Xcode的UUID 在终端输入以下命令: defaults ...
- Eclipse安装完findbugs插件后,SVN插件不可用有关问题解决
Eclipse安装完findbugs插件后,SVN插件不可用问题解决: 安装findbugs插件后,SVN插件就消失了.后来从网上查到解决方案:eclipse/configuration目录下的org ...
- 【转】chrome 67版本后无法拖拽离线安装CRX格式插件的解决方法
第一种:开启开发者模式即可 (推荐) chrome 的设置 -> 更多工具 -> 扩展程序,开启开发者模式即可! 第二种方法:修改参数 首先打开下面地址:chrome://flags/# ...
随机推荐
- bert一些思考
bert结构 首先是embdding lookup,[batch * seq]-->[batch, seq, hidden] 然后是加个mask embdding和type embdding和p ...
- 20200926--矩阵转置(奥赛一本通P95 8 多维数组)
输入一个n行m列的矩阵A,输出它的转置(看下面说明) 输入:第1行包含两个整数n和m(1<=n<=100,1<=m<=100),表示矩阵A的行数和列数.接下来n行,每行m个整数 ...
- sqlsever中使用的 select top n在mysql 语句中如何更改
string sqlSelect = "select top(3) ROW_NUMBER() over(order by UserTime) as Num,* from " + & ...
- Verilog中端口的连接规则
摘自于(15条消息) Verilog中端口应该设置为wire形还是reg形_CLL_caicai的博客-CSDN博客, 以及(15条消息) Verilog端口连接规则_「已注销」的博客-CSDN博客_ ...
- pytorch 创建图与叶子节点与根节点
创建时用户直接给出的为叶子节点,没有fn 由几个叶子节点推导来的为最终结果,为root节点,有fn. 譬如: x=tt.tensor([1],dtype='flaot',requires_grad=T ...
- python3GUI--轮播图效果展示By:PyQt5(附源码下载地址)
@ 目录 一.前言 二.展示 1.酷我音乐 2.QQ飞车 3.虎牙 4.网易云音乐 5.英雄联盟 6.英雄联盟(Pro) 7.腾讯视频 三.源代码 1.demo02GUI.py 2.engine.py ...
- java绘图技术
- 【PostgreSql】more than one owned sequence found
do --check seq not in sync $$ declare _r record; _i bigint; _m bigint; begin for _r in ( Select DIST ...
- SQL Server 手工 锁表、查询被锁表、解锁相关语句
SQL Server 手工 锁表.查询被锁表.解锁相关语句 --锁表(其它事务不能读.更新.删除) BEGIN TRAN SELECT * FROM <表名> WITH(TABLOCKX) ...
- Python数据可视化,自适应浏览器
pyecharts生成的html默认是靠左上显示的需要生成的文件居中显示,且能根据浏览器窗口大小自动调整需要修改html当然,如果你是熟悉html,且只是临时少量生成表格的话,每次生成完后手动修改ht ...