Spring框架3--Web
Spring框架之Web
Javaweb三大组件和四大域
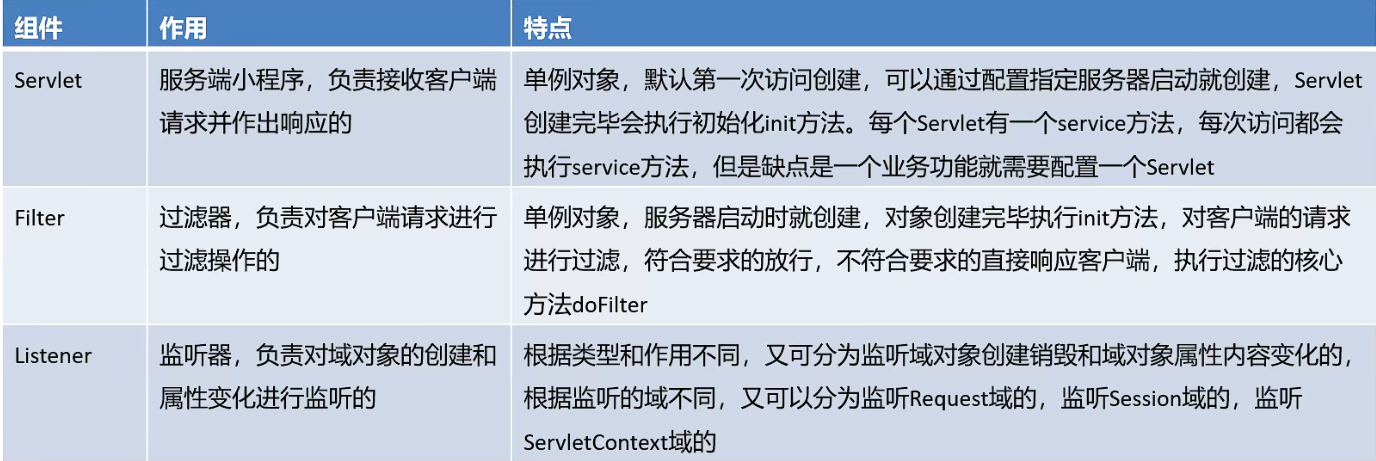
顺便:Javaweb中的四大域,作用范围如下:PageContext<Request<Session<ServletContext(Application)
| 域对象 | 属性的作用范围 |
|---|---|
| PageContext | 仅限于当前jsp页面,在servlet中无法获取该对象 |
| Request | 仅限于同一个请求,主要用于请求转发,服务器跳转有效,客户端跳转无效 |
| Session | 仅限于一次会话,从浏览器打开直到关闭称为一次会话,搭配cookie使用 |
| Application | 限于当前Web应用,是范围最大的属性作用范围,只要在一处设置属性,在其他各处的jsp或servlet中都可以获取到,在servlet中对应于ServletContext对象 |
Spring-Web实现
@WebServlet("/loginServlet")

public class LoginServlet extends HttpServlet {

    @Override

    protected void doPost(HttpServletRequest req, HttpServletResponse resp) throws ServletException, IOException {

        ApplicationContext applicationContext = new ClassPathXmlApplicationContext("applicationContext.xml");//创建Spring容器

        UserService userService = (UserService) applicationContext.getBean("userService");//获取Bean

        User user = userService.login("zhangsan", "123");

        System.out.println(user);

    }

    @Override

    protected void doGet(HttpServletRequest req, HttpServletResponse resp) throws ServletException, IOException {

        this.doPost(req, resp);

    }

}
正常实现的话需要在对应业务的文件中先创建Spring容器,然后再获取对应的Bean对象,业务代码重复。实际上创建容器的过程可以在程序开始执行的时候创建一个单例对象,之后再次使用时只要拿到这个对象直接使用即可,具体实现可以在ServletContext监听器中实现。
Spring整合Servlet:
<!DOCTYPE web-app PUBLIC

 "-//Sun Microsystems, Inc.//DTD Web Application 2.3//EN"

 "http://java.sun.com/dtd/web-app_2_3.dtd" >

<!--web.xml文件-->

<web-app>

  <context-param>

    <param-name>contextConfigLocation</param-name>

    <param-value>classpath:applicationContext.xml</param-value>

  </context-param>

    <!--指定加载的配置文件-->

  <listener>

    <listener-class>org.springframework.web.context.ContextLoaderListener</listener-class>

  </listener>

    <!--监听器-->

</web-app>
然后将Servlet文件中的内容更改为:
@WebServlet("/loginServlet")

public class LoginServlet extends HttpServlet {

    @Override

    protected void doPost(HttpServletRequest req, HttpServletResponse resp) throws ServletException, IOException {

        ServletContext servletContext = req.getServletContext();

        WebApplicationContext webApplicationContext = WebApplicationContextUtils.getWebApplicationContext(servletContext);//Spring容器

        UserService userService = (UserService) webApplicationContext.getBean("userService");//获取Bean

        User user = userService.login("zhangsan", "123");

        System.out.println(user);

    }

    @Override

    protected void doGet(HttpServletRequest req, HttpServletResponse resp) throws ServletException, IOException {

        this.doPost(req, resp);

    }

}
整合Web的痛点
传统的MVC+三层架构:
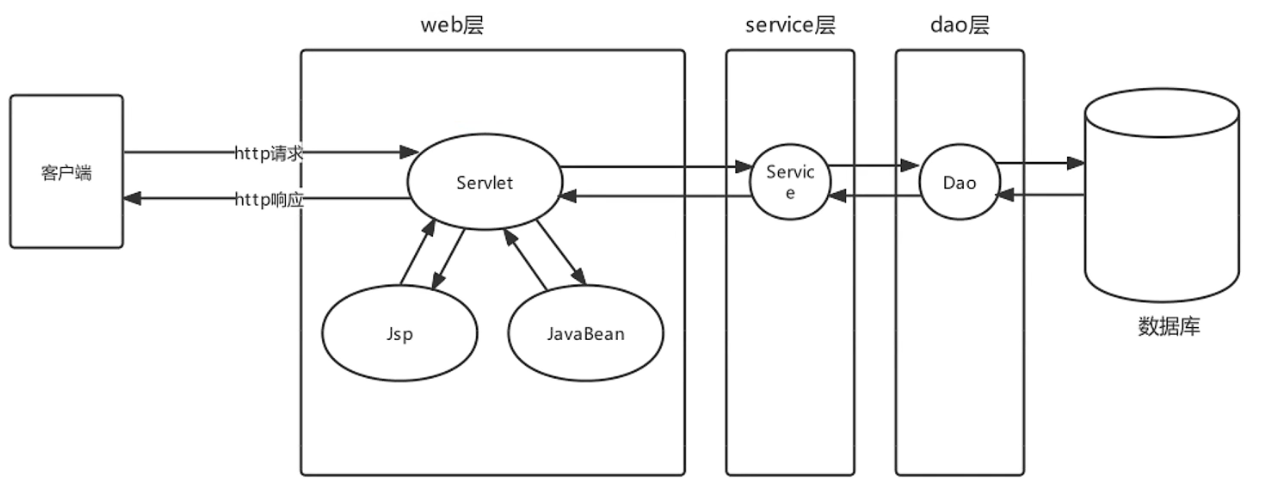
原始Javaweb开发中,Servlet充当Controller的角色, Jsp充当View角色, JavaBean充当模型角色,后期Ajax异
步流行后,在加上现在前后端分离开发模式成熟后, View就被原始HtmI+ Vue替代。原始Javaweb开发中,
Servlet充当Controller有很多弊端,显而易见的有如下几个:

利用一个Servlet负责共有行为,JavaBean负责对应的业务行为:
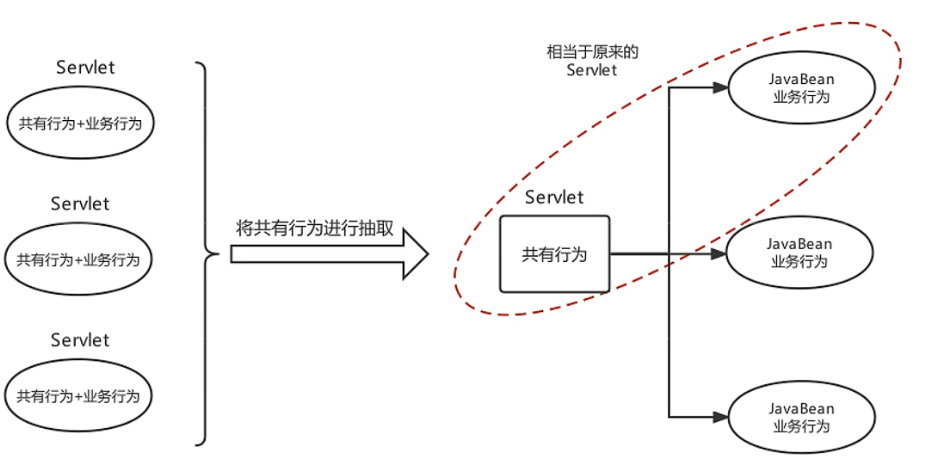
负责共有行为的Servlet称为前端控制器,应具有以下作用:
- 具备可以映射到业务Bean的能力
- 具备可以解析请求参数、封装实体等共有功能
- 具备响应视图及响应其他数据的功能
SpringMVC
- 配置过程

<!DOCTYPE web-app PUBLIC

 "-//Sun Microsystems, Inc.//DTD Web Application 2.3//EN"

 "http://java.sun.com/dtd/web-app_2_3.dtd" >

<web-app>

  <servlet>

      <!--前端控制器DispatchServlet-->

    <servlet-name>DispatcherServlet</servlet-name>

    <servlet-class>org.springframework.web.servlet.DispatcherServlet</servlet-class>

    <init-param>

      <param-name>contextConfigLocation</param-name>

      <param-value>classpath:spring_mvc.xml</param-value>

    </init-param> <!--加载的配置文件-->

      <load-on-startup>2</load-on-startup>

      <!--启动时加载 大于0生效,数字越小优先级越高-->

  </servlet>

  <servlet-mapping>

    <servlet-name>DispatcherServlet</servlet-name>

    <url-pattern>/</url-pattern>

  </servlet-mapping>

</web-app>
<?xml version="1.0" encoding="UTF-8"?>

<beans xmlns="http://www.springframework.org/schema/beans"

       xmlns:context="http://www.springframework.org/schema/context"

       xmlns:xsi="http://www.w3.org/2001/XMLSchema-instance"

       xsi:schemaLocation="

       http://www.springframework.org/schema/beans

       http://www.springframework.org/schema/beans/spring-beans.xsd

       http://www.springframework.org/schema/context

       http://www.springframework.org/schema/context/spring-context.xsd">

    <context:component-scan base-package="com.azy.web.controller"/>

	<!--交给Spring容器-->

</beans>
@Controller

public class UserController {

    @RequestMapping("/show")

    public String show(){

        System.out.println("show ...");

        return "index.jsp"

    }

}
SpringMVC的工作原理
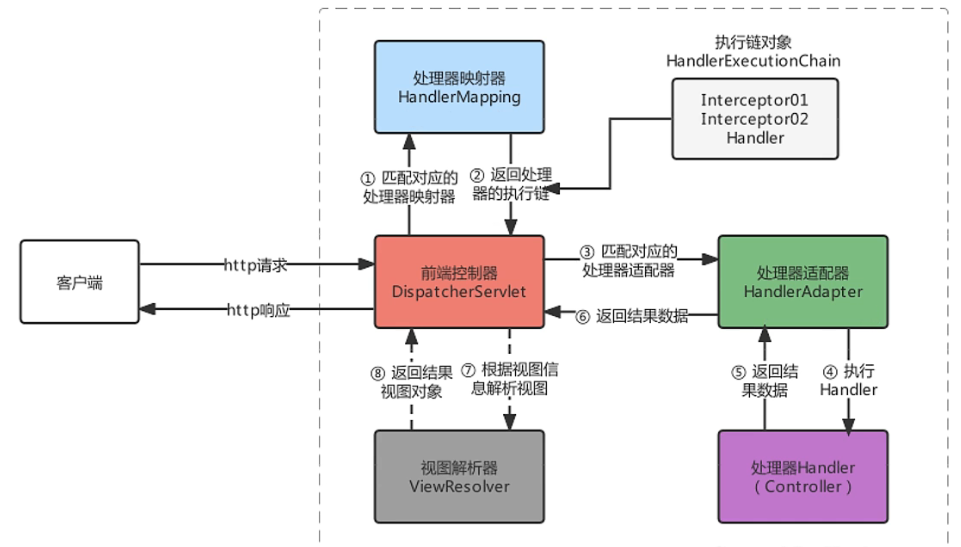
- 客户端发出一个http请求给web服务器,web服务器对http请求进行解析,如果匹配
DispatcherServlet的请求映射路径(在web.xml中指定),web容器将请求转交给DispatcherServlet. DipatcherServlet接收到这个请求之后将根据请求的信息(包括URL、Http方法、请求报文头和请求参数Cookie等)以及HandlerMapping的配置找到处理请求的处理器(Handler)DispatcherServlet根据HandlerMapping找到对应的Handler,将处理权交给Handler(Handler将具体的处理进行封装),再由具体的HandlerAdapter对Handler进行具体的调用。Handler对数据处理完成以后将返回一个ModelAndView对象给DispatcherServlet。Handler返回的ModelAndView是一个逻辑视图并不是一个正式的视图,DispatcherSevlet通过ViewResolver将逻辑视图转化为真正的视图View。Dispatcher通过model解析出ModelAndView中的参数进行解析最终展现出完整的view并返回给客户端。
- 客户端发出一个http请求给web服务器,web服务器对http请求进行解析,如果匹配
在文件DispatcherServlet.properties中包含默认的各部分组件:
org.springframework.web.servlet.HandlerMapping=org.springframework.web.servlet.handler.BeanNameUrlHandlerMapping,\

org.springframework.web.servlet.mvc.method.annotation.RequestMappingHandlerMapping,\

org.springframework.web.servlet.function.support.RouterFunctionMapping

org.springframework.web.servlet.HandlerAdapter=org.springframework.web.servlet.mvc.HttpRequestHandlerAdapter,\

org.springframework.web.servlet.mvc.SimpleControllerHandlerAdapter,\

org.springframework.web.servlet.mvc.method.annotation.RequestMappingHandlerAdapter,\

org.springframework.web.servlet.function.support.HandlerFunctionAdapter

org.springframework.web.servlet.ViewResolver=org.springframework.web.servlet.view.InternalResourceViewResolver
可以自定义各个组件,在spring_mvc.xml文件中进行配置即可:
<context:component-scan base-package="com.azy.web.controller"/>

<bean class="org.springframework.web.servlet.mvc.method.annotation.

             RequestMappingHandlerAdapter"> <!--配置HandlerAdapter-->

    <property name="messageConverters">

        <list>

            <bean class="org.springframework.http.converter.json.

                         MappingJackson2HttpMessageConverter"/>

        </list><!--注入JSON数据转换为实体类的转换器-->

    </property>

</bean>
配置好JSON转换器后,在使用JSON数据传输时就可以自动转换为实体类对象。
Spring整合SpringMVC
- xml方式:
<!DOCTYPE web-app PUBLIC

 "-//Sun Microsystems, Inc.//DTD Web Application 2.3//EN"

 "http://java.sun.com/dtd/web-app_2_3.dtd" >

<web-app>

    <!--Spring加载-->

  <context-param>

    <param-name>contextConfigLocation</param-name>

    <param-value>classpath:applicationContext.xml</param-value>

  </context-param>

  <listener>

    <listener-class>org.springframework.web.context.ContextLoaderListener</listener-class>

  </listener>

  <servlet>

      <!--前端控制器DispatchServlet-->

    <servlet-name>DispatcherServlet</servlet-name>

    <servlet-class>org.springframework.web.servlet.DispatcherServlet</servlet-class>

    <init-param>

      <param-name>contextConfigLocation</param-name>

      <param-value>classpath:spring_mvc.xml</param-value>

    </init-param> <!--加载的配置文件-->

      <load-on-startup>2</load-on-startup>

      <!--启动时加载 大于0生效,数字越小优先级越高-->

  </servlet>

  <servlet-mapping>

    <servlet-name>DispatcherServlet</servlet-name>

    <url-pattern>/</url-pattern>

  </servlet-mapping>

</web-app>
<!--spring_mvc.xml-->

<?xml version="1.0" encoding="UTF-8"?>

<beans xmlns="http://www.springframework.org/schema/beans"

       xmlns:context="http://www.springframework.org/schema/context"

       xmlns:xsi="http://www.w3.org/2001/XMLSchema-instance"

       xsi:schemaLocation="

       http://www.springframework.org/schema/beans

       http://www.springframework.org/schema/beans/spring-beans.xsd

       http://www.springframework.org/schema/context

       http://www.springframework.org/schema/context/spring-context.xsd">

    <context:component-scan base-package="com.azy.web.controller"/>

	<!--交给Spring容器-->

    <bean class="org.springframework.web.servlet.mvc.method.annotation.

             RequestMappingHandlerAdapter"> <!--配置HandlerAdapter-->

        <property name="messageConverters">

            <list>

                <bean class="org.springframework.http.converter.json.

                             MappingJackson2HttpMessageConverter"/>

            </list><!--注入JSON数据转换为实体类的转换器-->

        </property>

	</bean>

</beans>

<!--applicationContext.xml-->

<?xml version="1.0" encoding="UTF-8"?>

<beans xmlns="http://www.springframework.org/schema/beans"

       xmlns:context="http://www.springframework.org/schema/context"

       xmlns:xsi="http://www.w3.org/2001/XMLSchema-instance"

       xsi:schemaLocation="

       http://www.springframework.org/schema/beans

       http://www.springframework.org/schema/beans/spring-beans.xsd

       http://www.springframework.org/schema/context

       http://www.springframework.org/schema/context/spring-context.xsd">

    <context:component-scan base-package="com.azy.web.service"/>

</beans>
@Controller

public class UserController {

    @Autowired

    private UserService userService;

    @RequestMapping("/show")

    public String show(@RequestBody User user){//JSON可以自动转换

        System.out.println(user);

        return "/index.jsp";

    }

}
Spring框架3--Web的更多相关文章
- Spring学习之旅(二)极速创建Spring框架java Web工程项目
编译工具:eclipse 1)创建Web工程:spring_web_helloworld 2)导入所需jar包: 3)创建实体类:同上篇博文 4)创建配置文件hellobean.xml.同上篇博文 不 ...
- Spring 框架配置web.xml 整合web struts
package cn.itcast.e_web; import java.io.IOException; import javax.servlet.ServletContext; import jav ...
- 使用NetBeans搭建基于Spring框架的Web应用
NetBeans下载链接:https://netbeans.org/. 第一步:选择“文件”菜单下的“新建项目”: 第二步:类别选择“Java Web”,项目选择“Web应用程序”,单击“下一步”: ...
- 基于Spring框架的Web应用开发笔记 - Outline
Motivation 最近的工作涉及Web框架搭建,在了解公司原有采用框架基础上对Web开发技术栈做了一次升级,在次做记录. Audience J2EE Web Application Develop ...
- Spring框架整合WEB解决配置文件加载多次的问题
1. 创建JavaWEB项目,引入Spring的开发包.编写具体的类和方法. * 环境搭建好后,启动服务器来测试项目,发送每访问一次都会加载一次配置文件,这样效率会非常非常慢!! 2. 解决上面的问题 ...
- 集成spring框架的web.xml
<?xml version="1.0" encoding="UTF-8"?> <web-app version="2.5" ...
- spring框架等web程序在tomcat下的启动顺序
http://www.cnblogs.com/panxuejun/p/5847774.html
- 使用 Spring Security 保护 Web 应用的安全
安全一直是 Web 应用开发中非常重要的一个方面.从安全的角度来说,需要考虑用户认证和授权两个方面.为 Web 应用增加安全方面的能力并非一件简单的事情,需要考虑不同的认证和授权机制.Spring S ...
- Spring框架的第四天(整合ssh框架)
## Spring框架的第四天 ## ---------- **课程回顾:Spring框架第三天** 1. AOP注解方式 * 编写切面类(包含通知和切入点) * 开启自动代理 2. JDBC模板技术 ...
- Spring框架第一天
## 今天课程:Spring框架第一天 ## ---------- **Spring框架的学习路线** 1. Spring第一天:Spring的IOC容器之XML的方式,Spring框架与Web项目整 ...
随机推荐
- 12月2日内容总结——边框属性,display属性,css盒子模型,浮动、溢出、定位、z-index属性和建议博客页面搭建
目录 一.边框 边框简介 border-style--边框样式 border-width--边框宽度 border-color--边框颜色 二.display属性 三.CSS盒子模型 概念 margi ...
- 以交互的方式升级ESXi主机
以交互的方式升级ESXi主机 环境说明: 需求:要将 ESXi 6.0 主机和 ESXi 6.5 主机升级到 ESXi 6.7,可从 CD.DVD 或 USB 闪存驱动器引导 ESXi 安装程序. 注 ...
- Monkey 命令
1) 参数: -p 参数-p用于约束限制,用此参数指定一个或多个包(Package,即App).指定 包之后,Monkey将只允许系统启动指定的APP.如果不指定包,Monkey将允许系统启动设备中 ...
- 命令行部署KingbaseES流复制+切换测试
建立系统数据库安装用户组及用户,在所有的节点执行 root用户登陆服务器,创建用户组及用户并且设置密码 groupadd -g 2000 kingbase useradd -G kingbase -g ...
- 洛谷p2669
#include<bits/stdc++.h> using namespace std; int main() { int k,m=0,p=1;//p:给j个金币的第p天(1~j循环变化) ...
- gitlabApi如何获取项目文件夹的commitId
在我们做配置管理系统和gitlab系统集成的时候,有一个常见的场景,就是要获取某个文件的commitId,来记录本次配置文件提交的版本.这个通过gitlabApi很容易实现: GET /proje ...
- Eureka+SpringCloud微服务(入门一)
项目地址 [CloudStudy项目](zko0/cloudStudy: Springcloud学习工程 (github.com)) 1.依赖版本 cloud:Hoxton.SR1 boot:2.2. ...
- python_变量类型
列表:用[]标识,可以用下标进行访问,可以更改值 List = [123,'book'] print List 元组:用()标识,可以用下标进行访问,但是不能更改元素值,相当于只读 tuple = ( ...
- Zstack迁移实战记录1
https://blog.csdn.net/weixin_43767046/article/details/113748775 这段时间除了那个重度烤机测试(上面链接),还在做另一件事,想再做一个服务 ...
- [ARC107D] Number of Multisets
\(\text{Solution}\) 学习到了一些 \(dp\) 的 \(trick\) 设 \(f_{i,j}\) 表示用了 \(i\) 的元素,当前和为 \(j\) 的方案数 \(dp\) 有两 ...