
Spark集群安装MySQL环境
1.修改yum源
鉴于用国外的Yum源,速度比较慢,所以想到将国外的yum源改为国内的Yum源,这里选择使用比较多的阿里云源。具体修改方法可以参考此连接
我们先新建一个新的文件用来存放Yum源:
[kfk@bigdata-pro01 ~]$ cd /etc/yum.repos.d/

[kfk@bigdata-pro01 yum.repos.d]$ ll

total

-rw-r--r--.  root root  Nov    CentOS-Base.repo

-rw-r--r--.  root root   Nov    CentOS-Debuginfo.repo

-rw-r--r--.  root root   Nov    CentOS-Media.repo

-rw-r--r--.  root root  Nov    CentOS-Vault.repo

[kfk@bigdata-pro01 yum.repos.d]$ sudo touch CentOS-Base
下载新的CentOS-Base.repo 到/etc/yum.repos.d/:
[kfk@bigdata-pro01 yum.repos.d]$ sudo wget -O /etc/yum.repos.d/CentOS-Base.repo http://mirrors.aliyun.com/repo/Centos-6.repo
---- ::-- http://mirrors.aliyun.com/repo/Centos-6.repo
Resolving mirrors.aliyun.com... 183.232.170.189, 183.232.170.182, 111.29.22.220, ...
Connecting to mirrors.aliyun.com|183.232.170.189|:... connected.
HTTP request sent, awaiting response... OK
Length: (.5K) [application/octet-stream]
Saving to: “/etc/yum.repos.d/CentOS-Base.repo”
%[===================================================================================================================>] , --.-K/s in 0s
-- :: ( MB/s) - “/etc/yum.repos.d/CentOS-Base.repo” saved [/]
[kfk@bigdata-pro01 yum.repos.d]$ cd /etc/yum.repos.d
[kfk@bigdata-pro01 yum.repos.d]$ ls
CentOS-Base CentOS-Base.repo CentOS-Debuginfo.repo CentOS-Media.repo CentOS-Vault.repo
[kfk@bigdata-pro01 yum.repos.d]$ yum makecache //生成缓存
Loaded plugins: fastestmirror, refresh-packagekit, security
Determining fastest mirrors
* base: mirrors.aliyun.com
* extras: mirrors.aliyun.com
* updates: mirrors.aliyun.com
base | 3.7 kB :
extras | 3.4 kB :
extras/filelists_db | kB :
extras/prestodelta | 1.7 kB :
extras/primary_db | kB :
extras/other_db | kB :
updates | 3.4 kB :
updates/filelists_db | 2.4 MB :
updates/prestodelta | kB :
updates/primary_db | 3.2 MB :
updates/other_db| 179 kB 00:00

然后在notepad++里打开我们下载的文件,然后将其中的内容拷贝到我们刚才新建的文件中去。
[kfk@bigdata-pro01 yum.repos.d]$ sudo vi CentOS-Base
粘贴内容,然后保存退出。
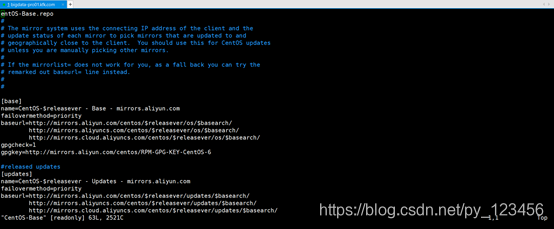
# CentOS-Base.repo

#

# The mirror system uses the connecting IP address of the client and the

# update status of each mirror to pick mirrors that are updated to and

# geographically close to the client.  You should use this for CentOS updates

# unless you are manually picking other mirrors.

#

# If the mirrorlist= does not work for you, as a fall back you can try the

# remarked out baseurl= line instead.

#

#

[base]

name=CentOS-$releasever - Base - mirrors.aliyun.com

failovermethod=priority

baseurl=http://mirrors.aliyun.com/centos/$releasever/os/$basearch/

        http://mirrors.aliyuncs.com/centos/$releasever/os/$basearch/

#mirrorlist=http://mirrorlist.centos.org/?release=$releasever&arch=$basearch&repo=os

gpgcheck=

gpgkey=http://mirrors.aliyun.com/centos/RPM-GPG-KEY-CentOS-6

#released updates

[updates]

name=CentOS-$releasever - Updates - mirrors.aliyun.com

failovermethod=priority

baseurl=http://mirrors.aliyun.com/centos/$releasever/updates/$basearch/

        http://mirrors.aliyuncs.com/centos/$releasever/updates/$basearch/

#mirrorlist=http://mirrorlist.centos.org/?release=$releasever&arch=$basearch&repo=updates

gpgcheck=

gpgkey=http://mirrors.aliyun.com/centos/RPM-GPG-KEY-CentOS-6

#additional packages that may be useful

[extras]

name=CentOS-$releasever - Extras - mirrors.aliyun.com

failovermethod=priority

baseurl=http://mirrors.aliyun.com/centos/$releasever/extras/$basearch/

        http://mirrors.aliyuncs.com/centos/$releasever/extras/$basearch/

#mirrorlist=http://mirrorlist.centos.org/?release=$releasever&arch=$basearch&repo=extras

gpgcheck=

gpgkey=http://mirrors.aliyun.com/centos/RPM-GPG-KEY-CentOS-6

#additional packages that extend functionality of existing packages

[centosplus]

name=CentOS-$releasever - Plus - mirrors.aliyun.com

failovermethod=priority

baseurl=http://mirrors.aliyun.com/centos/$releasever/centosplus/$basearch/

        http://mirrors.aliyuncs.com/centos/$releasever/centosplus/$basearch/

#mirrorlist=http://mirrorlist.centos.org/?release=$releasever&arch=$basearch&repo=centosplus

gpgcheck=

enabled=

gpgkey=http://mirrors.aliyun.com/centos/RPM-GPG-KEY-CentOS-6

#contrib - packages by Centos Users

[contrib]

name=CentOS-$releasever - Contrib - mirrors.aliyun.com

failovermethod=priority

baseurl=http://mirrors.aliyun.com/centos/$releasever/contrib/$basearch/

        http://mirrors.aliyuncs.com/centos/$releasever/contrib/$basearch/

#mirrorlist=http://mirrorlist.centos.org/?release=$releasever&arch=$basearch&repo=contrib

gpgcheck=

enabled=

gpgkey=http://mirrors.aliyun.com/centos/RPM-GPG-KEY-CentOS-6
2.在线安装mysql
[kfk@bigdata-pro01 yum.repos.d]$ yum clean all

Loaded plugins: fastestmirror, refresh-packagekit, security

Cleaning repos: base extras updates

Cleaning up Everything

Cannot remove rpmdb file /var/lib/yum/rpmdb-indexes/file-requires

Cannot remove rpmdb file /var/lib/yum/rpmdb-indexes/version

Cannot remove rpmdb file /var/lib/yum/rpmdb-indexes/conflicts

Cannot remove rpmdb file /var/lib/yum/rpmdb-indexes/pkgtups-checksums

Cleaning up list of fastest mirrors

[kfk@bigdata-pro01 yum.repos.d]$ sudo yum install mysql-server

Loaded plugins: fastestmirror, refresh-packagekit, security

Loading mirror speeds from cached hostfile

 * base: mirrors.aliyun.com

 * extras: mirrors.aliyun.com

 * updates: mirrors.aliyun.com

Setting up Install Process

Resolving Dependencies

--> Running transaction check

---> Package mysql-server.x86_64 :5.1.-.el6_8 will be installed

--> Processing Dependency: mysql = 5.1.-.el6_8 for package: mysql-server-5.1.-.el6_8.x86_64

--> Processing Dependency: perl-DBI for package: mysql-server-5.1.-.el6_8.x86_64

--> Processing Dependency: perl-DBD-MySQL for package: mysql-server-5.1.-.el6_8.x86_64

--> Processing Dependency: perl(DBI) for package: mysql-server-5.1.-.el6_8.x86_64

--> Running transaction check

---> Package mysql.x86_64 :5.1.-.el6_8 will be installed

--> Processing Dependency: mysql-libs = 5.1.-.el6_8 for package: mysql-5.1.-.el6_8.x86_64

---> Package perl-DBD-MySQL.x86_64 :4.013-.el6 will be installed

---> Package perl-DBI.x86_64 :1.609-.el6 will be installed

--> Running transaction check

---> Package mysql-libs.x86_64 :5.1.-.el6 will be updated

---> Package mysql-libs.x86_64 :5.1.-.el6_8 will be an update

--> Finished Dependency Resolution

Dependencies Resolved

=============================================================================================================================================================

 Package                                   Arch                              Version                                   Repository                       Size

=============================================================================================================================================================

Installing:

 mysql-server                              x86_64                            5.1.-.el6_8                            base                            8.6 M

Installing for dependencies:

 mysql                                     x86_64                            5.1.-.el6_8                            base                             k

 perl-DBD-MySQL                            x86_64                            4.013-.el6                               base                             k

 perl-DBI                                  x86_64                            1.609-.el6                               base                             k

Updating for dependencies:

 mysql-libs                                x86_64                            5.1.-.el6_8                            base                            1.2 M

Transaction Summary

=============================================================================================================================================================

Install        Package(s)

Upgrade        Package(s)

Total download size:  M

Is this ok [y/N]: y

Downloading Packages:

(/): mysql-5.1.-.el6_8.x86_64.rpm                                                                                                |  kB     :

(/): mysql-libs-5.1.-.el6_8.x86_64.rpm                                                                                           | 1.2 MB     :

(/): mysql-server-5.1.-.el6_8.x86_64.rpm                                                                                         | 8.6 MB     :

(/): perl-DBD-MySQL-4.013-.el6.x86_64.rpm                                                                                          |  kB     :

(/): perl-DBI-1.609-.el6.x86_64.rpm                                                                                                |  kB     :

-------------------------------------------------------------------------------------------------------------------------------------------------------------

Total                                                                                                                        4.3 MB/s |   MB     :

Running rpm_check_debug

Running Transaction Test

Transaction Test Succeeded

Running Transaction

  Updating   : mysql-libs-5.1.-.el6_8.x86_64                                                                                                          /

  Installing : perl-DBI-1.609-.el6.x86_64                                                                                                               /

  Installing : perl-DBD-MySQL-4.013-.el6.x86_64                                                                                                         /

  Installing : mysql-5.1.-.el6_8.x86_64                                                                                                               /

  Installing : mysql-server-5.1.-.el6_8.x86_64                                                                                                        /

  Cleanup    : mysql-libs-5.1.-.el6.x86_64                                                                                                            /

  Verifying  : perl-DBD-MySQL-4.013-.el6.x86_64                                                                                                         /

  Verifying  : mysql-server-5.1.-.el6_8.x86_64                                                                                                        /

  Verifying  : perl-DBI-1.609-.el6.x86_64                                                                                                               /

  Verifying  : mysql-5.1.-.el6_8.x86_64                                                                                                               /

  Verifying  : mysql-libs-5.1.-.el6_8.x86_64                                                                                                          /

  Verifying  : mysql-libs-5.1.-.el6.x86_64                                                                                                            /

Installed:

  mysql-server.x86_64 :5.1.-.el6_8

Dependency Installed:

  mysql.x86_64 :5.1.-.el6_8                     perl-DBD-MySQL.x86_64 :4.013-.el6                     perl-DBI.x86_64 :1.609-.el6

Dependency Updated:

  mysql-libs.x86_64 :5.1.-.el6_8

Complete!

[kfk@bigdata-pro01 yum.repos.d]$ which mysql

/usr/bin/mysql
3.mysql 服务启动并测试
1)查看mysql服务状态
[kfk@bigdata-pro01 yum.repos.d]$ service mysqld status

mysqld is stopped
2)启动mysql服务
[kfk@bigdata-pro01 yum.repos.d]$ sudo service mysqld start

Initializing MySQL database:  Installing MySQL system tables...

OK

Filling help tables...

OK

To start mysqld at boot time you have to copy

support-files/mysql.server to the right place for your system

PLEASE REMEMBER TO SET A PASSWORD FOR THE MySQL root USER !

To do so, start the server, then issue the following commands:

/usr/bin/mysqladmin -u root password 'new-password'

/usr/bin/mysqladmin -u root -h bigdata-pro01.kfk.com password 'new-password'

Alternatively you can run:

/usr/bin/mysql_secure_installation

which will also give you the option of removing the test

databases and anonymous user created by default.  This is

strongly recommended for production servers.

See the manual for more instructions.

You can start the MySQL daemon with:

cd /usr ; /usr/bin/mysqld_safe &

You can test the MySQL daemon with mysql-test-run.pl

cd /usr/mysql-test ; perl mysql-test-run.pl

Please report any problems with the /usr/bin/mysqlbug script!

                                                           [  OK  ]

Starting mysqld:                                           [  OK  ]
3)设置mysql密码
[kfk@bigdata-pro01 yum.repos.d]$ /usr/bin/mysqladmin -u root password 'root'
4)连接mysql
[kfk@bigdata-pro01 yum.repos.d]$ mysql -u root -proot

Welcome to the MySQL monitor.  Commands end with ; or \g.

Your MySQL connection id is

Server version: 5.1. Source distribution

Copyright (c) , , Oracle and/or its affiliates. All rights reserved.

Oracle is a registered trademark of Oracle Corporation and/or its

affiliates. Other names may be trademarks of their respective

owners.

Type 'help;' or '\h' for help. Type '\c' to clear the current input statement.

mysql>
查看数据库
mysql> show databases;

+--------------------+

| Database           |

+--------------------+

| information_schema |

| mysql              |

| test               |

+--------------------+

 rows in set (0.00 sec)
数据库安装成功!
以上就是博主为大家介绍的这一板块的主要内容,这都是博主自己的学习过程,希望能给大家带来一定的指导作用,有用的还望大家点个支持,如果对你没用也望包涵,有错误烦请指出。如有期待可关注博主以第一时间获取更新哦,谢谢!同时也欢迎转载,但必须在博文明显位置标注原文地址,解释权归博主所有!
Spark集群安装MySQL环境的更多相关文章
- CentOS6安装各种大数据软件 第十章:Spark集群安装和部署
相关文章链接 CentOS6安装各种大数据软件 第一章:各个软件版本介绍 CentOS6安装各种大数据软件 第二章:Linux各个软件启动命令 CentOS6安装各种大数据软件 第三章:Linux基础 ...
- [bigdata] spark集群安装及测试
在spark安装之前,应该已经安装了hadoop原生版或者cdh,因为spark基本要基于hdfs来进行计算. 1. 下载 spark: http://mirrors.cnnic.cn/apache ...
- spark集群安装配置
spark集群安装配置 一. Spark简介 Spark是一个通用的并行计算框架,由UCBerkeley的AMP实验室开发.Spark基于map reduce 算法模式实现的分布式计算,拥有Hadoo ...
- 大数据技术之_19_Spark学习_01_Spark 基础解析 + Spark 概述 + Spark 集群安装 + 执行 Spark 程序
第1章 Spark 概述1.1 什么是 Spark1.2 Spark 特点1.3 Spark 的用户和用途第2章 Spark 集群安装2.1 集群角色2.2 机器准备2.3 下载 Spark 安装包2 ...
- Spark入门:第2节 Spark集群安装:1 - 3;第3节 Spark HA高可用部署:1 - 2
三. Spark集群安装 3.1 下载spark安装包 下载地址spark官网:http://spark.apache.org/downloads.html 这里我们使用 spark-2.1.3-bi ...
- 3 Spark 集群安装
第3章 Spark集群安装 3.1 Spark安装地址 1.官网地址 http://spark.apache.org/ 2.文档查看地址 https://spark.apache.org/docs/2 ...
- Spark 个人实战系列(1)--Spark 集群安装
前言: CDH4不带yarn和spark, 因此需要自己搭建spark集群. 这边简单描述spark集群的安装过程, 并讲述spark的standalone模式, 以及对相关的脚本进行简单的分析. s ...
- 大数据平台搭建-spark集群安装
版本要求 java 版本:1.8.*(1.8.0_60) 下载地址:http://www.oracle.com/technetwork/java/javase/downloads/jdk8-downl ...
- Spark集群安装和WordCount编写
一.Spark概述 官网:http://spark.apache.org/ Apache Spark™是用于大规模数据处理的统一分析引擎. 为大数据处理而设计的快速通用的计算引擎. Spark加州大学 ...
随机推荐
- sina 接口 根据ip获取各个国家和地区
http://int.dpool.sina.com.cn/iplookup/iplookup.php?format=json&ip=ip
- c++位运算符 | & ^ ~ && ||,补码,反码
一:简介 1 位逻辑运算符: & (位 “与”) and ^ (位 “异或”) | (位 “或”) or ~ (位 “取反” ...
- Python3中集合的混合使用
比较简单没什么好说的: list_1 = [1,2,3,4,6,3,2,5,7,8,2,1] list_1 = set(list_1) list_1.add(999) list_2 = set([2, ...
- 与HDFS交互- By java API编程
环境(ubuntu下) jdk eclipse jar(很烦,整了很久才清楚) - 导包方法 查看:https://www.cnblogs.com/floakss/p/9739030.html ()” ...
- 继承&多态
继承: 概念: 基类,超累,父类 访问权限: Public :无限制,自由访问 Private:不可继承 protected :包内,包外,可访问,继承 default:没有指明任何权限下,默认在同一 ...
- php 生成读取csv文件并解决中文乱码
csv其实是文本文件,但是里面的内容是利用逗号分隔的. 1. 生成csv文件 function new_csv($arr) { $string=""; foreach ($arr ...
- Java内存区域与内存溢出异常---运行时数据区域
运行时数据区域 Java虚拟机所管理的内存将会包括以下几个运行时数据区域 线程私有区域 1.程序计数器 程序计数器记录的是当前正在执行的虚拟机字节码指令所在的地址.在虚拟机的概念模型中,字节码解释 ...
- sublime侧边栏管理sidebarEnhancements浏览器设置
sidebarEnhancements是为了增强sublime Text侧边栏功能的一个插件,但是同时也可以实现设置浏览器浏览当前文件的功能. Ctrl+Shift+p 输入package contr ...
- ubuntu下vnc部署安装
ubuntu下vnc部署安装,参考如下博客:https://www.cnblogs.com/xuliangxing/p/7642650.html https://jingyan.baidu.com/a ...
- input keyup的时候实现内容过滤
当在文本框中输入关键字,就会搜索出包含关键字的数据 实现: 只需要一个内容过滤即可 <body> <input type="text" id="sear ...