MAC环境下idea:maven+Spring+Dubbo+Zookeeper简单工程搭建
:
一:安装软件:
tomcat
Zookeeper
Dubbo+admin
二:工程:
总工程
API
Pom.xml:不用引用任何东西
Provider
Pom.xml:要denpendency API的模块。
provider.xml:向dubbo注册所提供的服务。
Consumer
Pom.xml:要denpendency API的模块。
consumer.xml:向dubbo注册。
Pom.xml:dependency:Spring Dubbo Zookeeper
三:具体步骤:
1. 安装tomcat。这个可以自己在网上找。修改名称为tomcat,放/usr/local/下边。然后启动tomcat(bin/startup.sh)。
2. Zookeeper,
a. 下载(http://mirrors.shuosc.org/apache/zookeeper/),然后修改名称为zookeeper,拷贝到/usr/local/文件夹下。
b. 配置、启动zookeeper,在命令行中,进入/usr/local/zookeeper/conf文件夹,修改zoo_sample.cfg为zoo.cfg,然后返回上个目录,在命令行中执行 bin/zkServer.sh start。
3.
a. 安装Dubbo+admin,用于管理zookeeper,下载(http://dubbo.io/),进入dubbo+admin中,用idea打开pom.xml文件,然后在idea的终端中,打包 mvn install -DskipTests
b. 进入dubbo-admin->targer文件夹下,找到dubbo-admin-2.5.5.war文件,拷贝到/usr/local/tomcat/webapps/文件夹下,然后可以直接在浏览器中访问改地址。
c. 一般地址是http://localhost:8080/dubbo-admin-2.5.5/,用户名密码都是root,root。
http://m.blog.csdn.net/think12/article/details/78162971
详细讲解IntellJ 下Dubbo +zookeeper+springmvc的配置
http://blog.csdn.net/guyang5863637/article/details/62041425
zookeeper已经开启
dubbo-admin安装成功
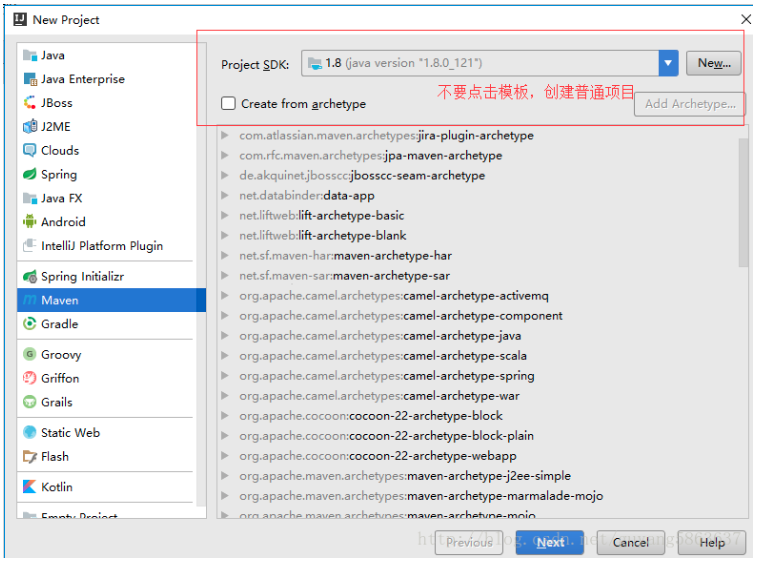
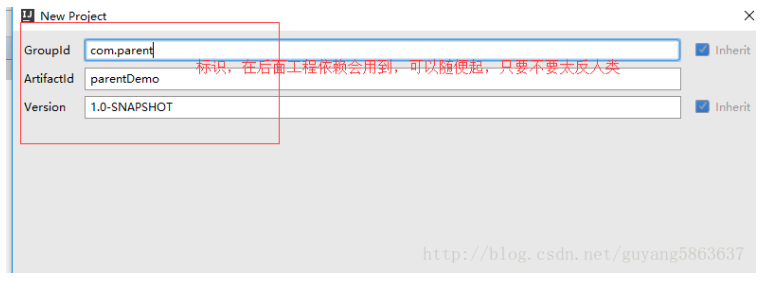
1、开始搭建一个空maven工程 作为父工程管理其他模块
2、创建子工程 MyController(消费者). MyInterfence. MyService(提供者)
MyController可以使用maven模版, MyInterfence. MyService不使用maven模版
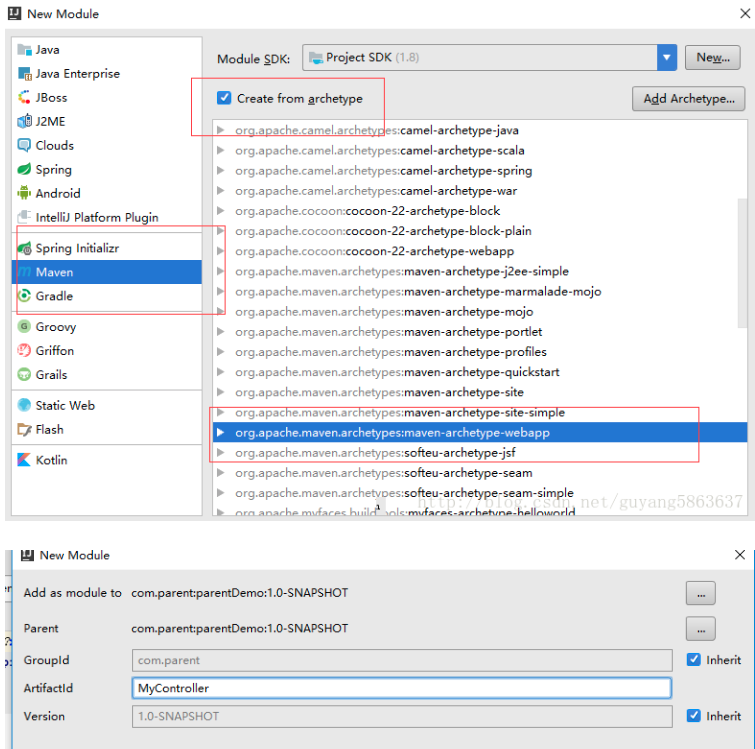
MyInterfence. MyService的maven创建省略,不需要使用模版
3、MyInterfence项目.的java目录下创建包com.start.interfence 创建接口MyInterfence,如下

MyInterfence的简单代码
 package com.start.interfence;

 public interface MyInterfence {

     public String helloWorld();

 }
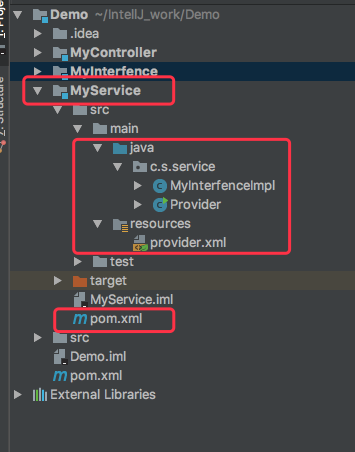
4、MyService项目
首先在pom.xml中引入依赖的jar包
 <?xml version="1.0" encoding="UTF-8"?>

 <project xmlns="http://maven.apache.org/POM/4.0.0"

          xmlns:xsi="http://www.w3.org/2001/XMLSchema-instance"

          xsi:schemaLocation="http://maven.apache.org/POM/4.0.0 http://maven.apache.org/xsd/maven-4.0.0.xsd">

     <parent>

         <artifactId>Demo</artifactId>

         <groupId>com.parent</groupId>

         <version>1.0-SNAPSHOT</version>

     </parent>

     <modelVersion>4.0.0</modelVersion>

     <artifactId>MyService</artifactId>

     <dependencies>

         <dependency>

             <groupId>com.parent</groupId>

             <artifactId>MyInterfence</artifactId>

             <version>1.0-SNAPSHOT</version>

         </dependency>

         <dependency>

             <groupId>com.alibaba</groupId>

             <artifactId>dubbo</artifactId>

             <version>2.5.3</version>

         </dependency>

         <dependency>

             <groupId>org.javassist</groupId>

             <artifactId>javassist</artifactId>

             <version>3.18.2-GA</version>

         </dependency>

         <dependency>

             <groupId>org.apache.zookeeper</groupId>

             <artifactId>zookeeper</artifactId>

             <version>3.3.6</version>

         </dependency>

         <dependency>

             <groupId>com.github.sgroschupf</groupId>

             <artifactId>zkclient</artifactId>

             <version>0.1</version>

         </dependency>

     </dependencies>

 </project>
然后在resources目录下创建provider.xml (Spring的xm l)
 <?xml version="1.0" encoding="ISO-8859-1"?>

 <beans  xmlns="http://www.springframework.org/schema/beans"

         xmlns:xsi="http://www.w3.org/2001/XMLSchema-instance"

         xmlns:jee="http://www.springframework.org/schema/jee"

         xmlns:tx="http://www.springframework.org/schema/tx"

         xmlns:dubbo="http://code.alibabatech.com/schema/dubbo"

         xmlns:context="http://www.springframework.org/schema/context"

         xsi:schemaLocation="http://www.springframework.org/schema/beans http://www.springframework.org/schema/beans/spring-beans-3.1.xsd

         http://www.springframework.org/schema/tx http://www.springframework.org/schema/tx/spring-tx-3.1.xsd

         http://www.springframework.org/schema/jee http://www.springframework.org/schema/jee/spring-jee-3.1.xsd

              http://code.alibabatech.com/schema/dubbo http://code.alibabatech.com/schema/dubbo/dubbo.xsd

         http://www.springframework.org/schema/context http://www.springframework.org/schema/context/spring-context-3.1.xsd"

         default-lazy-init="false" >

     <bean id="myInterfence" class="com.start.service.MyInterfenceImpl"></bean>

     <dubbo:application name="dubbo_provider"></dubbo:application>

     <dubbo:registry address="zookeeper://127.0.0.1:2181" check="false" subscribe="false" ></dubbo:registry>

     <dubbo:service interface="com.start.interfence.MyInterfence" ref="myInterfence" />

 </beans>
在java目录下创建包com.start.service。 在此包下创建MyInterfence.java 实现MyInterfence接口,MyInterfence.java代码如下
 package com.start.service;

 import com.start.interfence.MyInterfence;

 public class MyInterfenceImpl implements MyInterfence{

     public String helloWorld() {

         return "Hello 你好";

     }

 }
在java目录的包com.start.service。下创建Provider.java类 用于启动服务 Provider.java代码如下
 package com.start.service;

 import org.springframework.context.support.ClassPathXmlApplicationContext;

 import java.io.IOException;

 public class Provider {

     public static void main(String[] args){

         ClassPathXmlApplicationContext context=new ClassPathXmlApplicationContext(new String[]{"provider.xml"});

         context.start();

         System.out.println("provider 服务开启");

         try {

             System.in.read();

         } catch (IOException e) {

             e.printStackTrace();

         }

     }

 }
此时,打开网页http://localhost:8080/dubbo-admin-2.5.8/ (dubbo-admin-2.5.8根据你的配置)
5、配置MyController项目,
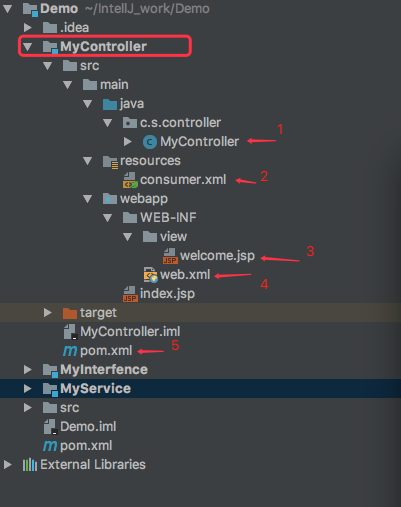
首先,在resources目录下新建consumer.xml配置文件,配置SpringMVC注解,视图解析器,dubbo。 consumer.xml代码如下
 <?xml version="1.0" encoding="UTF-8"?>

 <beans xmlns="http://www.springframework.org/schema/beans"

        xmlns:xsi="http://www.w3.org/2001/XMLSchema-instance"

        xmlns:p="http://www.springframework.org/schema/p"

        xmlns:context="http://www.springframework.org/schema/context"

        xmlns:mvc="http://www.springframework.org/schema/mvc"

        xmlns:dubbo="http://code.alibabatech.com/schema/dubbo"

        xsi:schemaLocation="http://www.springframework.org/schema/beans

        http://www.springframework.org/schema/beans/spring-beans.xsd

        http://www.springframework.org/schema/mvc

        http://www.springframework.org/schema/mvc/spring-mvc-4.0.xsd

        http://www.springframework.org/schema/context

        http://www.springframework.org/schema/context/spring-context.xsd

  http://code.alibabatech.com/schema/dubbo http://code.alibabatech.com/schema/dubbo/dubbo.xsd">

     <context:component-scan base-package="com.start.controller"/>

     <!-- 配置注解驱动 -->

     <mvc:annotation-driven/>

     <mvc:default-servlet-handler/>

     <!-- 视图解析器 -->

     <bean class="org.springframework.beans.factory.annotation.AutowiredAnnotationBeanPostProcessor"/>

     <bean class="org.springframework.web.servlet.view.InternalResourceViewResolver">

         <property name="prefix" value="/WEB-INF/view/"/>

         <property name="suffix" value=".jsp"/>

     </bean>

     <dubbo:application name="dubbo_consumer"></dubbo:application>

     <!-- 使用zookeeper注册中心暴露服务地址 -->

     <dubbo:registry address="zookeeper://127.0.0.1:2181" check="false"></dubbo:registry>

     <!-- 要引用的服务 -->

     <dubbo:reference interface="com.start.interfence.MyInterfence" id="myInterfence"></dubbo:reference>

 </beans>
然后在web.xml添加配置信息,注意标签的顺序
 <!DOCTYPE web-app PUBLIC

  "-//Sun Microsystems, Inc.//DTD Web Application 2.3//EN"

  "http://java.sun.com/dtd/web-app_2_3.dtd" >

 <web-app>

   <display-name>Archetype Created Web Application</display-name>

     <filter>

         <filter-name>encodingFilter</filter-name>

         <filter-class>org.springframework.web.filter.CharacterEncodingFilter</filter-class>

         <init-param>

             <param-name>encoding</param-name>

             <param-value>UTF-8</param-value>

         </init-param>

     </filter>

     <filter-mapping>

         <filter-name>encodingFilter</filter-name>

         <url-pattern>/*</url-pattern>

     </filter-mapping>

     <servlet>

         <servlet-name>dispatcherServlet</servlet-name>

         <servlet-class>org.springframework.web.servlet.DispatcherServlet</servlet-class>

         <init-param>

             <param-name>contextConfigLocation</param-name>

             <param-value>classpath:consumer.xml</param-value>

         </init-param>

         <load-on-startup>1</load-on-startup>

     </servlet>

     <servlet-mapping>

         <servlet-name>dispatcherServlet</servlet-name>

         <url-pattern>*.do</url-pattern>

     </servlet-mapping>

 </web-app>
在java目录下新建包com.start.controller 并在此包下新建MyController.java 测试消费者 代码如下
 package com.start.controller;

 import com.start.interfence.MyInterfence;

 import org.springframework.beans.factory.annotation.Autowired;

 import org.springframework.context.support.ClassPathXmlApplicationContext;

 import org.springframework.stereotype.Controller;

 import org.springframework.web.bind.annotation.RequestMapping;

 @Controller

 public class MyController {

     @Autowired

     private MyInterfence myInterfence;

     @RequestMapping("/test.do")

     public String getTest() {

         System.out.print("11111111111");

         String str = myInterfence.helloWorld();

         System.out.print(str);

         return "welcome";

     }

     /*public static void main(String[] args){

         //ClassPathXmlApplicationContext context=new ClassPathXmlApplicationContext("consumer.xml");

         ClassPathXmlApplicationContext context=new ClassPathXmlApplicationContext(new String[]{"consumer.xml"});

         context.start();

         System.out.println("消费者。。。");

         MyInterfence my= (MyInterfence) context.getBean("myInterfence");

         my.helloWorld();

     }*/

 }
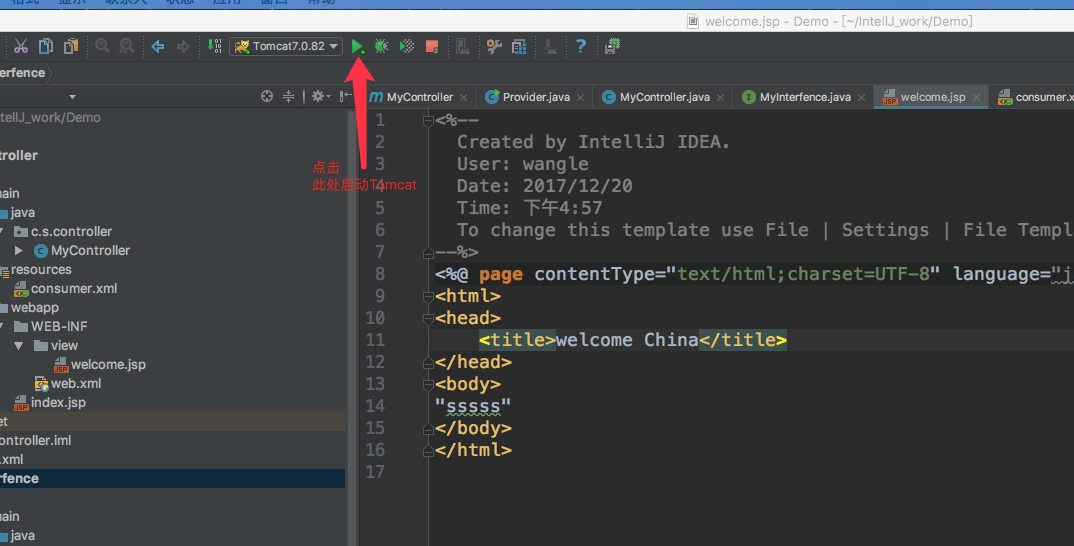
在WEB-INF 下建view/welcome.jsp
 <%@ page contentType="text/html;charset=UTF-8" language="java" %>

 <html>

 <head>

     <title>welcome China</title>

 </head>

 <body>

 "sssss"

 </body>

 </html>
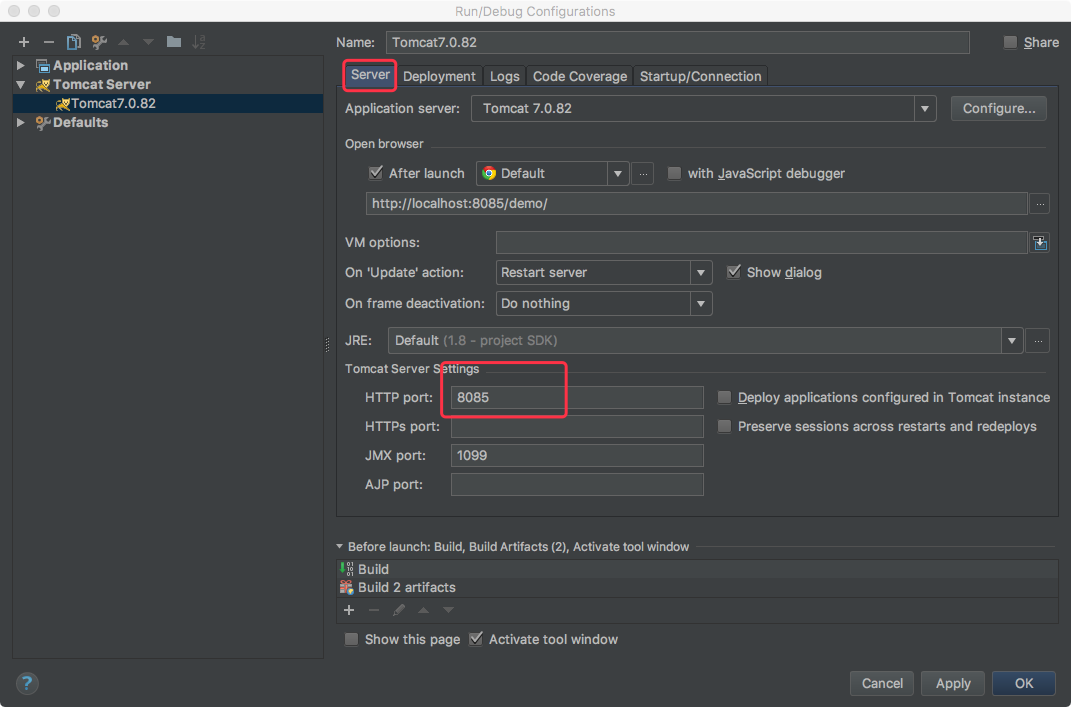
配置Tomcat,点击下图进行Tomcat的配置,点击左上角的➕选择下面的Tomcat Server ,然后选择Local
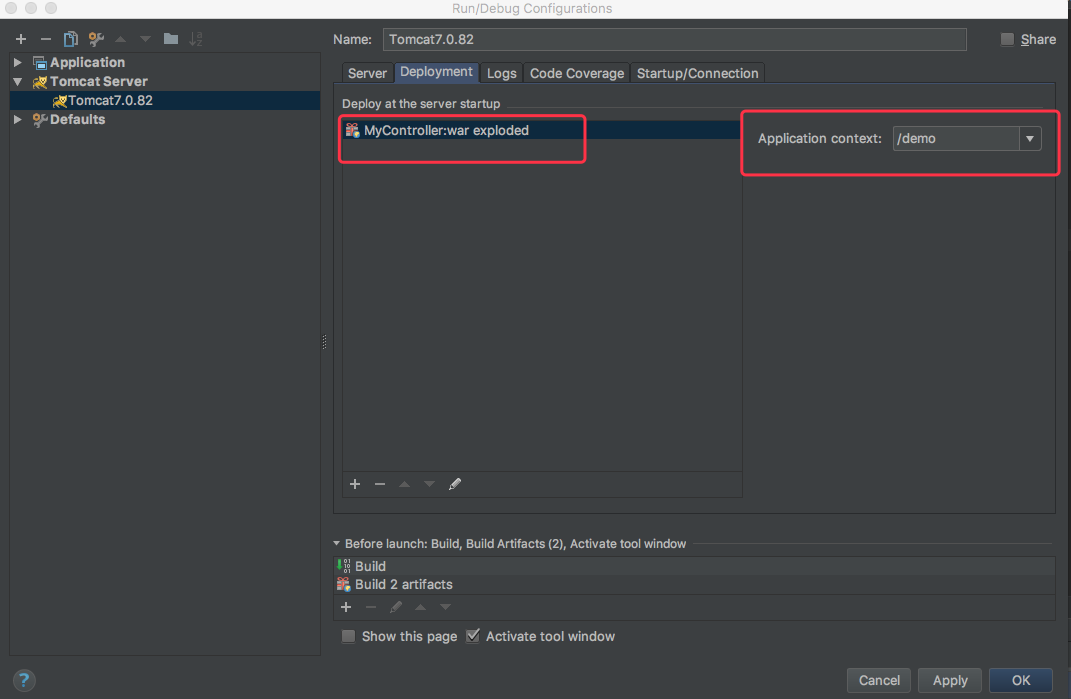
然后选择右侧的Deployment,点击左下角的➕,选择Artifcat,结果如图3所示
图1

图2
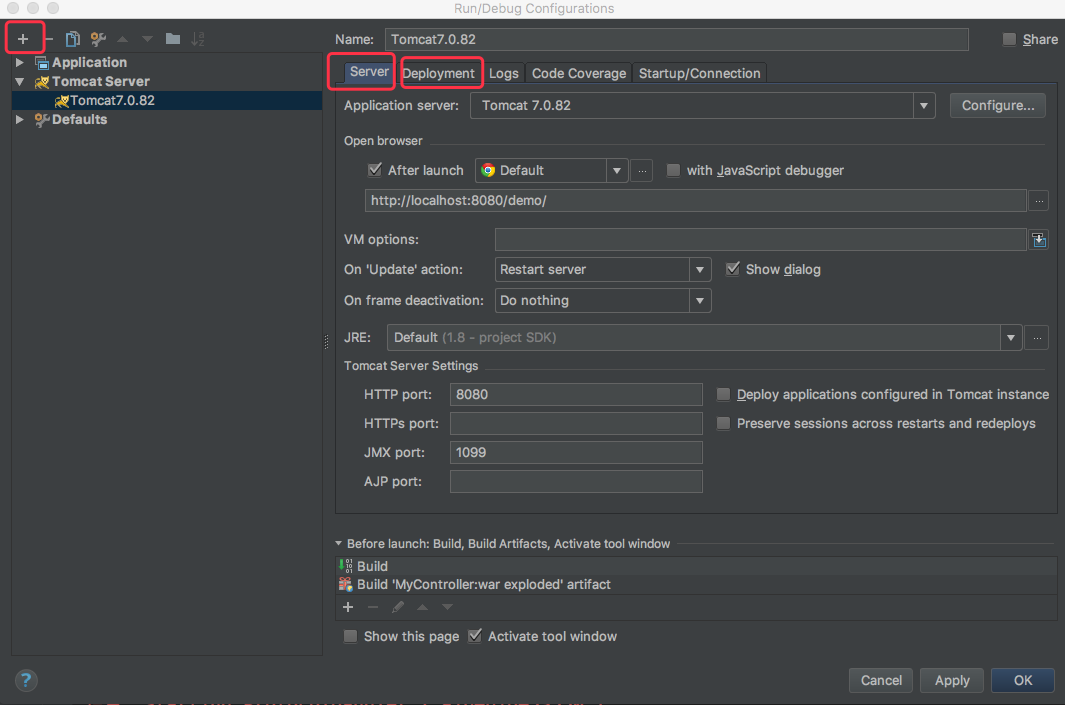
图3
启动Tomcat
此时会报错,显示404 因为在后台开了一个Tomcat了,端口号为8080,开着的目的,主要是打开dubbo的admin页面,查看提供者和消费者的
把端口号换一下,重新运行
打开界面,输入配置的路径,然后输入请求路径,成功
http://localhost:8085/demo/test.do

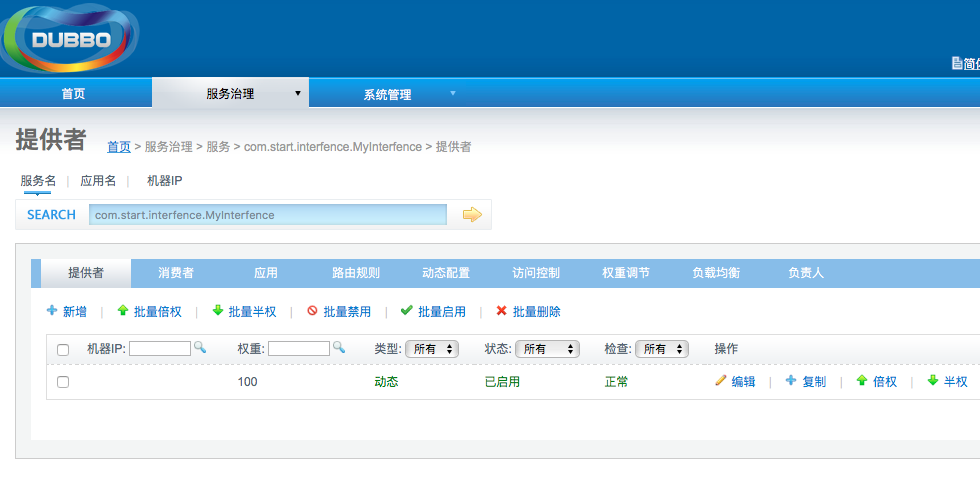
登录到dubbo的admin页面,发现消费者也出来了
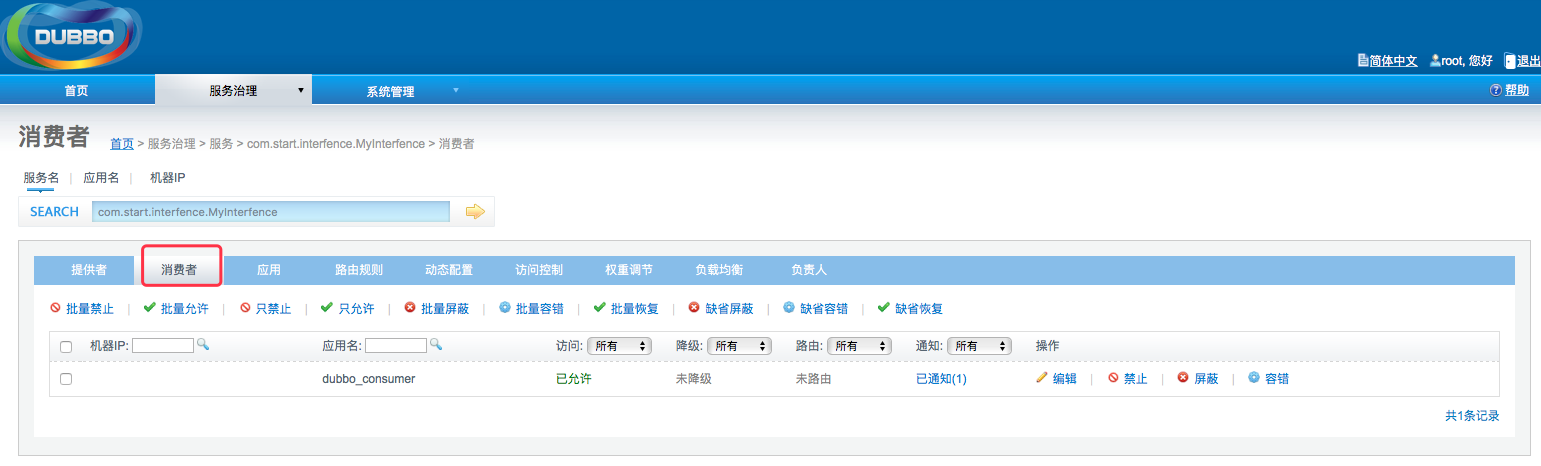
一个简单的小项目就完成了。
注意,在写提供者那一块,Zookeeper的服务就要打开,放那不用管它,Tomcat也可以本地先启动,为的是能够打开dubbo的admin,当然,你在Tomcat本地上先要把dubbo.war包解压后放到webapp目录下,也可以解压替换root文件夹,这样一打开tomcat首页就是dubbo-admin页面,注意后来发布项目的时候,Tomcat的端口号不要再用8080了,容易冲突。
第一次尝试很好的例子
本文的源代码https://github.com/wanglecp/Demo.git
MAC环境下idea:maven+Spring+Dubbo+Zookeeper简单工程搭建的更多相关文章
- 160719、Spring + Dubbo + zookeeper (linux) 框架搭建
转载一篇博客,写得不错(至少我参考一下搭建成功了) 转载地址:http://my.oschina.net/wangt10/blog/522799 dubbo简介 节点角色说明: Provider: 暴 ...
- Mac电脑下配置maven环境变量
Mac电脑下配置maven环境变量 打开终端,使用 touch 命令创建 .bash_profile 文件 touch .bash_profile 编辑刚刚创建的文件 .bash_profile vi ...
- Xamarin Studio在Mac环境下的配置和Xamarin.iOS常用控件的示例
看过好多帖子都是Win环境装XS,Mac只是个模拟器,讲解在Mac环境下如何配置Xamarin Studio很少,也是一点点找资料,东拼西凑才把Xamarin Studio装在Mac上跑起来,如下: ...
- Mac环境下svn的使用
在Windows环境中,我们一般使用TortoiseSVN来搭建svn环境.在Mac环境下,由于Mac自带了svn的服务器端和客户端功能,所以我们可以在不装任何第三方软件的前提下使用svn功能,不过还 ...
- MAC环境下 nodejs 4.5.0 卸载
MAC 环境下,我之前的删除 node 环境如果是用brew 安装的 node.js 4.4 之前的版本.可以网上参考其他方法,我之前的帖子也有之前的删除方法.参考帖子: http://www.cnb ...
- php大力力 [003节]php在百度文库的几个基础教程mac环境下文本编辑工具
2015-08-22 php大力力003.mac环境下文本编辑工具 在windows下,使用notepad特别多.在mac下使用“备忘录”app,word,反而没有存储过txt后缀等不同文本. mac ...
- Mac环境下svn的使用(转载)
在Windows环境中,我们一般使用TortoiseSVN来搭建svn环境.在Mac环境下,由于Mac自带了svn的服务器端和客户端功能,所以我们可以在不装任何第三方软件的前提下使用svn功能,不过还 ...
- 【Xamarin挖墙脚系列:时刻下载最新的Mac环境下的Xamarin安装包】
原文:[Xamarin挖墙脚系列:时刻下载最新的Mac环境下的Xamarin安装包] 打开这两个地址,就能看到最新的安装包了.... http://www.jianshu.com/p/c67c14b3 ...
- MAC 环境下 初始化新的mysql root 密码
mac 环境下初始化mysql的root密码 关掉mysql服务,打开系统设置最后的mysql,然后将mysql先关掉 生成一个文件命名mysql-init,文件中放入:一句话,这句话不同版本不一样, ...
随机推荐
- scala中lazy
Scala中通过lazy关键字来定义惰性变量,惰性变量只能是不可变变量.只有在调用惰性变量的时候,才会去实例化这个变量
- 小组作业wordCountPro·
基本任务:代码编写+单元测试 (1) Github地址: https://github.com/LongtermPartner/ExtendWordCount (2) PSP表格: psp 2.1 ...
- java Linkedhashmap源码分析
LinkedHashMap类似于HashMap,但是迭代遍历它时,取得“键值对”的顺序是插入次序,或者是最近最少使用(LRU)的次序.只比HashMap慢一点:而在迭代访问时反而更快,因为它使用链表维 ...
- Jquery Accordion 折叠面板
属性 类型 默认值 active Boolean/Number/jQuery/Selector/Element 第一个面板 设定默认显示的面板.设置为 false 时默认不显示面板,需 collaps ...
- python产生随机字符串
def GenerateRandomString(len, basechars = []): if (basechars == []): x = range(ord() x.extend(range( ...
- GridView里的按钮事件
http://www.cnblogs.com/insus/archive/2012/09/22/2697862.html using System;using System.Collections.G ...
- nodejs nodejs模块使用及简单的示例
nodejs模块使用及简单的示例 参考菜鸟教程网:http://www.runoob.com/ 一.fs模块的使用: 1.文件操作: 读文件: //读文件 var fs=require('fs'); ...
- Windows Services windows服务如何删除服务
如何删除服务 一.为何要删除服务: 1.当服务文件丢失时,在服务里还会显示. 2.现在好多都会有服务,你看那个不顺眼就可以把它干掉.前提是不用的软件. 二.使用: 使用sc.exe 这个是window ...
- Glib学习笔记(一)
你将学到什么 如何使用GObject实现一个新类 类头文件 声明一个类型的方法选择取决于类型是可被继承的还是不可被继承的. 不可被继承的类型(Final类型)使用G_DECLARE_FINAL_TYP ...
- jzoj4918. 【GDOI2017模拟12.9】最近公共祖先 (树链剖分+线段树)
题面 题解 首先,点变黑的过程是不可逆的,黑化了就再也洗不白了 其次,对于\(v\)的祖先\(rt\),\(rt\)能用来更新答案当且仅当\(sz_{rt}>sz_{x}\),其中\(sz\)表 ...