Vue 核心技术
1.1 Vue简介
1.1.1 官网
1.1.2 介绍与描述
- 动态构建用户界面的 渐进式
JavaScript框架 - 作者:尤雨溪
1.1.3 Vue的特点
- 遵循
MVVM模式 - 编码简洁,体积小,运行效率高,适合移动/PC端开发
- 它本身只关注UI,也可以引入其它第三方库开发项目
1.1.4 与其它JS框架的关联
- 借鉴
Angular的模板和数据绑定技术 - 借鉴
React的组件化和虚拟DOM技术
1.1.5 Vue 周边库
Vue CLI: 项目脚手架Vue ResourceAxiosVue Router: 路由Vuex: 状态管理element-ui:基于Vue的UI组件库(PC端)
......
1.2 初识 Vue
<!DOCTYPE html>

<html lang="en">

<head>

    <meta charset="UTF-8">

    <meta http-equiv="X-UA-Compatible" content="IE=edge">

    <meta name="viewport" content="width=device-width, initial-scale=1.0">

    <title>初识Vue</title>

    <script src="../js/vue.js"></script>

</head>

<body>

    <!--

        初识Vue:

            1.想让 Vue工作,就必须创建一个 Vue实例,且要传入一个配置对象;

            2.root 容器里的代码依然符合 html 规范,只不过混入了一些特殊的 Vue语法;

            3.root 容器里的代码被称为【Vue模板】;

            4.Vue 实例和容器是一一对应的;

            5.真实开发中只有一个 Vue 实例,并且会配合着组件一起使用;

            6.{{xxx}} 中的 xxx 要写 js 表达式,且 xxx 可以自动读取到 data 中的所有属性;

            7.一旦 data 中的数据发生改变,那么页面中用到该数据的地方也会自动更新;

            注意区分:js 表达式和 js 代码(语句)

                1.表达式:一个表达式会产生一个值,可以放在任何一个需要值的地方:

                    (1). a

                    (2). a+b

                    (3). demo(1)

                    (4). x === y ? 'a' : 'b'

                2.js代码(语句)

                    (1). if(){}

                    (2). for(){}

    -->

    <div id="root">

        <h1>Hello {{name}}</h1>

    </div>

    <script>

        // 阻止 Vue 在启动时生成生产提示

        // You are running Vue in development mode.

        // Make sure to turn on production mode when deploying for production.

        // See more tips at https://vuejs.org/guide/deployment.html

        Vue.config.productionTip = false

        // 创建 Vue 实例

        new Vue({

            // el 用于指定当前 Vue 实例为哪个容器服务,值通常为 css 选择器字符串

            el: '#root',

            // data 用于存储数据,数据供 el 所指定的容器去使用

            data: {

                name: "张三"

            },

        })

    </script>

</body>

</html>
1.3 模板语法
1.3.1 模板的理解
html 中包含了一些 js 语法代码,语法分为两种,分别为:
- 插值语法(双大括号表达式)
- 指令(以v-开头)
1.3.2 插值语法
- 功能:用于解析标签体内容
1.3.3 指令语法
- 功能:解析标签属性、解析标签体内容、绑定事件
- 举例:
v-bind:href='xxxx',xxxx会作为js表达式被解析 - 说明:
Vue中有有很多的指令,此处只是用v-bind举个例子
1.3.4 示例代码
<!DOCTYPE html>

<html lang="en">

<head>

    <meta charset="UTF-8">

    <meta http-equiv="X-UA-Compatible" content="IE=edge">

    <meta name="viewport" content="width=device-width, initial-scale=1.0">

    <title>Vue 模板语法</title>

    <script src="../js/vue.js"></script>

</head>

<body>

    <!--

        Vue模板语法有2大类:

            1.插值语法:

                功能:用于解析标签体内容。

                写法:{{xxx}},xxx 是 js 表达式,且可以直接读取到 data 中的所有属性。

            2.指令语法:

                功能:用于解析标签(包括:标签属性、标签体内容、绑定事件.....)。

                举例:v-bind:href="xxx" 或  简写为 :href="xxx",xxx同样要写js表达式,且可以直接读取到 data 中的所有属性。

                备注:Vue 中有很多的指令,且形式都是:v-????,此处我们只是拿 v-bind 举个例子。

    -->

    <div id="root">

        <h1>插值语法</h1>

        <h3>你好,{{name}}</h3>

        <hr></hr>

        <h1>指令语法</h1>

        <a href="http://baidu.com">去百度</a>

        <br/>

        <a v-bind:href="school.url">去百度</a>

        <br/>

        <a :href="school.url">去百度</a>

    </div>

    <script>

        // 阻止 Vue 在启动时生成生产提示

        Vue.config.productionTip = false

        new Vue({

            el: "#root",

            data: {

                name: "张三",

                school: {

                    url: "http://baidu.com"

                }

            }

        })

    </script>

</body>

</html>
1.4 数据绑定
1.4.1 单向数据绑定
- 语法:
v-bind:href="xxx"或简写为:href - 特点:数据只能从
data流向页面
1.4.2 双向数据绑定
- 语法:
v-model:value="xxx"或简写为v-model="xxx" - 特点:数据不仅能从
data流向页面,还能从页面流向data
1.4.3 示例代码
<!DOCTYPE html>

<html lang="en">

<head>

    <meta charset="UTF-8">

    <meta http-equiv="X-UA-Compatible" content="IE=edge">

    <meta name="viewport" content="width=device-width, initial-scale=1.0">

    <title>数据绑定</title>

    <script src="../js/vue.js"></script>

</head>

<body>

    <!--  Vue中有2种数据绑定的方式:

            1.单向绑定(v-bind):数据只能从 data 流向页面。

            2.双向绑定(v-model):数据不仅能从 data 流向页面,还可以从页面流向 data 。

                备注:

                    1.双向绑定一般都应用在表单类元素上(如:input、select等)

                    2.v-model:value 可以简写为 v-model,因为 v-model默认收集的就是 value 值。

    -->

    <div id="root">

        <!-- 单向绑定 -->

        <!-- 普通写法 -->

        单向绑定普通写法:<input type="text" v-bind:value="name"></input>

        <br/>

        <!-- 简写 -->

        单向绑定简写:<input type="text" :value="name"></input>

        <hr></hr>

        <!-- 双向绑定 -->

        <!-- 普通写法 -->

        双向绑定普通写法:<input type="text" v-model:value="name"></input>

        <br/>

        <!-- 简写 -->

        双向绑定简写:<input type="text" v-model="name"></input>

        <!-- 如下代码是错误的,因为 v-model只能应用在表单类元素(输入类元素)上 -->

        <!-- <h2 v-model="name">: v-model is not supported on this element type.

            If you are working with contenteditable, it's recommended to wrap a library dedicated for that purpose inside a custom component. -->

        <h2 v-model:x="name"></h2>

    </div>

    <script>

        // 组织 Vue 在启动时生成生产提示

        Vue.config.productionTip = false

        new Vue({

            el: "#root",

            data: {

                name: "张三"

            }

        })

    </script>

</body>

</html>
1.5 MVVM模型
- M:模型(Model):对应
data中的数据 - V:视图(View):模板
- VM:视图模型(ViewModel):
Vue实例对象

1.6 事件处理
1.6.1 绑定监听
v-on:xxx="fun"@xxx="fun"@xxx="fun(参数)"- 默认事件形参:
event - 隐含属性对象:
$event
<!DOCTYPE html>

<html lang="en">

<head>

    <meta charset="UTF-8">

    <meta http-equiv="X-UA-Compatible" content="IE=edge">

    <meta name="viewport" content="width=device-width, initial-scale=1.0">

    <title>事件的基本使用</title>

    <script src="../js/vue.js"></script>

</head>

<body>

    <!--

        事件的基本使用:

            1.使用 v-on:xxx 或 @xxx 绑定事件,其中 xxx 是事件名;

            2.事件的回调需要配置在 vue 实例中的 methods 对象,最终会在 vm 实例上;

            3.methods 中配置配置的函数,不要用箭头函数,否则 this 就不是 vm 实例了;

            4.methods 中配置的函数,都是被 vue 实例所管理的函数,this 的指向是 vm 或 组件实例对象;

            5.@click="demo" 和 @click="demo($event)" 效果一致,但后者可以传参

     -->

    <div id="root">

        <h2>欢迎来到 {{name}} 学习</h2>

        <button v-on:click = "showInfo01">点我去学习1</button>

        <button v-on:click = "showInfo02">点我去学习2</button>

        <button @click = "showInfo03">点我去学习3</button>

        <button @click = "showInfo04(88)">点我去学习4</button>

        <button @click = "showInfo05(88, $event)">点我去学习5</button>

    </div>

    <script>

        // 阻止 vue 在启动时生成生产提示

        Vue.config.productionTip = false

        new Vue({

            el: "#root",

            data() {

                return {

                    name: "北京大学"

                }

            },

            methods: {

                showInfo01() {

                    alert("点我去学习1")

                },

                showInfo02(event) {

                    console.log(event);

                },

                showInfo03() {

                    alert("点我去学习3")

                },

                showInfo04(number) {

                    console.log(number);

                    alert("点我去学习4" + number)

                },

                showInfo05(number, event) {

                    console.log(number, event);

                    alert("点我去学习5")

                },

            },

        })

    </script>

</body>

</html>
1.6.2 事件修饰符
prevent: 阻止事件的默认行为event.preventDefault()stop: 停止事件冒泡event.stopPropagation()
<!DOCTYPE html>

<html lang="en">

<head>

    <meta charset="UTF-8">

    <meta http-equiv="X-UA-Compatible" content="IE=edge">

    <meta name="viewport" content="width=device-width, initial-scale=1.0">

    <title>事件修饰符</title>

    <script src="../js/vue.js"></script>

    <style>

        *{

            margin-top: 20px;

        }

        .box1 {

            height: 50px;

            padding: 5px;

            background-color: skyblue;

        }

        .box2 {

            height: 50px;

            padding: 5px;

            background-color: orange;

        }

        .box3 {

            height: 5px;

            padding: 5px;

            background-color: rebeccapurple;

        }

        .box4 {

            height: 50px;

            padding: 5px;

            background-color: antiquewhite;

        }

        .list {

            width: 200px;

            height: 200px;

            background-color: peru;

            /* 在容器内生成滑动窗口 */

            overflow: auto;

        }

        li {

            height: 100px;

        }

    </style>

</head>

<body>

    <!--

        Vue中的事件修饰符:

            1.prevent:阻止默认事件(常用);

            2.stop:阻止事件冒泡(常用);

            3.once:事件只触发一次(常用);

            4.capture:使用事件的捕获模式;

            5.self:只有event.target是当前操作的元素时才触发事件;

            6.passive:事件的默认行为立即执行,无需等待事件回调执行完毕;

    -->

    <div id="root">

        <!-- 1.阻止默认事件 -->

        <!-- 弹窗点击确认后会跳转到百度 -->

        <a href="https://www.baidu.com" @click="gotoBaidu">点我去百度</a><br/>

        <!-- 弹窗点击确认后不会跳转到百度 -->

        <a href="https://www.baidu.com" @click.prevent="gotoBaidu">点我去百度</a><br>

        <!-- 2.stop:阻止事件冒泡 -->

        <div class = "box1" @click="showInfo">

            <button @click="showInfo">点我提示信息</button>

        </div>

        <div class = "box1" @click="showInfo">

            <button @click.stop="showInfo">点我提示信息</button>

        </div>

        <!--  3.once:事件只触发一次 -->

        <button @click.once="showInfo">点我提示信息</button>

        <!-- 4.capture:使用事件的捕获模式 -->

        <div class="box2" @click.capture="showMessage(1)">

            div01

            <div class="box3" @click.capture="showMessage(2)">

                div02

            </div>

        </div>

        <!-- 5.self:只有event.target是当前操作的元素时才触发事件 -->

        <div class="box4" @click.self="showInfo">

            <button @click="showInfo">点我提示信息</button>

        </div>

        <!--  6.passive:事件的默认行为立即执行,无需等待事件回调执行完毕 -->\

        <!--

            @scroll、@wheel 滚轮滑动事件,两者的区别:

                1.scroll是页面滚动条滚动会触发的事件,而 wheel是鼠标滚轮滚动会触发的事件。

                2,一旦滚动条到底部后,滑动鼠标滚轮继续滚动,wheel 就会一直触发,而 scroll 不会触发

        -->

        <ul class="list" @scroll="list">

        <!-- <ul class="list" @wheel="list"> -->

        <!-- <ul class="list" @wheel.passive="list"> -->

            <li>1</li>

            <li>2</li>

            <li>3</li>

            <li>4</li>

            <li>5</li>

        </ul>

        <!-- 7.多个修饰符 -->

        <div @click="showInfo">

            <a href="https://www.baidu.com" @click="showInfo">点我去百度</a>

            <a href="https://www.baidu.com" @click.prevent.stop="showInfo">点我去百度</a>

        </div>

    </div>

    <script>

        // 阻止 vue 在启动时生成生产提示

        Vue.config.productionTip = false

        new Vue({

            el: "#root",

            data: {

            },

            methods: {

                gotoBaidu() {

                    alert("点我去百度!")

                },

                showInfo() {

                    alert("hello world")

                },

                showMessage(message) {

                    console.log(message);

                },

                list() {

                    for(let i = 0; i < 10; i++) {

                        console.log("#");

                    }

                    console.log("累坏了");

                }

            },

        })

    </script>

</body>

</html>
1.6.3 按键修饰符
keycode: 操作的是某个keycode值的键keyName: 操作的某个按键名的键(少部分)
<!DOCTYPE html>

<html lang="en">

<head>

    <meta charset="UTF-8">

    <meta http-equiv="X-UA-Compatible" content="IE=edge">

    <meta name="viewport" content="width=device-width, initial-scale=1.0">

    <title>键盘事件</title>

    <script src="../js/vue.js"></script>

</head>

<body>

    <!--

        1.Vue中常用的按键别名:

            回车 => enter

            删除 => delete (捕获“删除”和“退格”键)

            退出 => esc

            空格 => space

            换行 => tab (特殊,必须配合keydown去使用)

            上 => up

            下 => down

            左 => left

            右 => right

        2.Vue未提供别名的按键,可以使用按键原始的key值去绑定,但注意要转为kebab-case(短横线命名)

        3.系统修饰键(用法特殊):ctrl、alt、shift、meta

            (1).配合keyup使用:按下修饰键的同时,再按下其他键,随后释放其他键,事件才被触发。

            (2).配合keydown使用:正常触发事件。

        4.也可以使用keyCode去指定具体的按键(不推荐)

        5.Vue.config.keyCodes.自定义键名 = 键码,可以去定制按键别名

    -->

    <div id="root">

        <h3>欢迎来到{{name}}学习</h3>

        <!-- @keydown、@keyup两者的区别:前者是键盘按下事件,后者是键盘恢复事件 -->

        <input placeholder="回车事件" @keydown="demo" ></input><br/>

        <input placeholder="回车事件" @keydown.enter="demo"></input><br/>

        <input placeholder="回车事件" @keydown.13="demo"></input><br/>

        <input placeholder="回车事件" @keydown.huiche="demo"></input><br/>

        <input placeholder="删除事件" @keydown.delete="demo"></input><br/>

        <input placeholder="退出事件" @keydown.esc="demo"></input><br/>

        <input placeholder="空格事件" @keydown.space="demo"></input><br/>

        <input placeholder="换行事件" @keydown.tab="demo"></input><br/>

        <input placeholder="上事件" @keydown.up="demo"></input><br/>

        <input placeholder="下事件" @keydown.down="demo"></input><br/>

        <input placeholder="左事件" @keydown.left="demo"></input><br/>

        <input placeholder="右事件" @keydown.right="demo"></input><br/>

    </div>

    <script>

        // 阻止 vue 在启动时生成生产提示

        Vue.config.productionTip = false

        // 自定义键盘别名

        Vue.config.keyCodes.huiche = 13

        new Vue({

            el: "#root",

            data: {

                name: "Blili"

            },

            methods: {

                demo(event) {

                    // 输出键值

                    console.log(event.key, event.keyCode);

                    console.log("hello world");

                }

            },

        })

    </script>

</body>

</html>
1.7 计算属性与监视属性
1.7.1 计算属性 computed
要显示的数据不存在,要通过计算得来。
在
computed对象中定义计算属性。在页面中使用插值语法来显示计算的结果。
<!DOCTYPE html>

<html lang="en">

<head>

    <meta charset="UTF-8">

    <meta http-equiv="X-UA-Compatible" content="IE=edge">

    <meta name="viewport" content="width=device-width, initial-scale=1.0">

    <title>姓名案例-计算属性实现</title>

    <script src="../js/vue.js"></script>

</head>

<body>

    <!--

        计算属性:

            1.定义:要用的属性不存在,要通过已有属性计算得来。

            2.原理:底层借助了 Objcet.defineproperty 方法提供的 getter 和 setter 。

            3.get 函数什么时候执行?

                (1).初次读取时会执行一次。

                (2).当依赖的数据发生改变时会被再次调用。

            4.优势:与 methods 实现相比,内部有缓存机制(复用),效率更高,调试方便。

            5.备注:

                1.计算属性最终会出现在 vm 上,直接读取使用即可。

                2.如果计算属性要被修改,那必须写 set 函数去响应修改,且 set 中要引起计算时依赖的数据发生改变。

     -->

    <div id="root">

        姓:<input type="text" v-model="firstName"> <br/>

        名:<input type="text" v-model="lastName"> <br/>

        <!-- 测试:<input type="text" v-model="x"> <br/> -->

        全名:<span>{{fullName}}</span> <br/>

        <!-- 全名:<span>{{fullName}}</span> <br/>

        全名:<span>{{fullName}}</span> <br/>

        全名:<span>{{fullName}}</span> -->

    </div>

    <script>

        // 阻止 vue 在启动时生成生产提示

        Vue.config.productionTip = false

        const vm = new Vue({

            el: "#root",

            data: {

                firstName: "张",

                lastName: "三",

            },

            computed: {

                fullName: {

                    get() {

                        //get 有什么作用?当有人读取 fullName 时,get 就会被调用,且返回值就作为 fullName 的值

					    //get 什么时候调用?1.初次读取 fullName 时。2.所依赖的数据发生变化时。

                        console.log("get 被调用了");

                        return this.firstName + " - " + this.lastName

                    },

                    // set 什么时候被调用?fullName 被修改时

                    set(value) {

                        console.log("set 被调用了");

                        const arr = value.split("-")

                        this.firstName = arr[0]

                        this.lastName = arr[1]

                    }

                }

            }

        });

    </script>

</body>

</html>
<!DOCTYPE html>

<html lang="en">

<head>

    <meta charset="UTF-8">

    <meta http-equiv="X-UA-Compatible" content="IE=edge">

    <meta name="viewport" content="width=device-width, initial-scale=1.0">

    <title>姓名案例-计算属性简写</title>

    <script src="../js/vue.js"></script>

</head>

<body>

    <div id="root">

        姓:<input type="text" v-model="firstName"> <br/>

        名:<input type="text" v-model="lastName"> <br/>

        <!-- 测试:<input type="text" v-model="x"> <br/> -->

        全名:<span>{{fullName}}</span> <br/>

    </div>

    <script>

        // 阻止 vue 在启动时生成生产提示

        Vue.config.productionTip = false

        new Vue({

            el: "#root",

            data: {

                firstName: "张",

                lastName: "三",

            },

            computed: {

                // fullName:function() {

                //     return this.firstName + " - " + this.lastName

                // },

                fullName() {

                    return this.firstName + " - " + this.lastName

                }

            }

        })

    </script>

</body>

</html>
1.7.2 监视属性 watch
通过通过
vm对象的$watch()或watch配置来监视指定的属性当属性变化时,回调函数自动调用,在函数内部进行计算
<!DOCTYPE html>

<html lang="en">

<head>

    <meta charset="UTF-8">

    <meta http-equiv="X-UA-Compatible" content="IE=edge">

    <meta name="viewport" content="width=device-width, initial-scale=1.0">

    <title>天气案例-监视属性</title>

    <script src="../js/vue.js"></script>

</head>

<body>

    <!--

        监视属性 watch:

            1.当被监视的属性变化时, 回调函数自动调用, 进行相关操作

            2.监视的属性必须存在,才能进行监视!!

            3.监视的两种写法:

                (1).new Vue 时传入 watch 配置

                (2).通过 vm.$watch 监视

     -->

    <div id="root">

        <h2>今天天气很{{info}}</h2>

        <button @click="changeWeather">切换天气</button>

    </div>

    <script>

        // 阻止 vue 在启动时生成生产提示

        Vue.config.productionTip = false

        const vm = new Vue({

            el: "#root",

            data: {

                isHot: true

            },

            computed: {

                info() {

                    return this.isHot ? "炎热":"凉爽";

                }

            },

            methods: {

                changeWeather() {

                    this.isHot = !this.isHot

                }

            },

            watch: {

                // isHot: {

                //     // 初始化的时候让 handler 调用一下

                //     immediate: true,

                //     // handler 什么时候被调用?当isHot值发生变化时

                //     handler(newValue, oldValue) {

                //         console.log("isHot 值被修改了", newValue, oldValue);

                //     }

                // },

                // computed 中定义的属性也能被监视

                info: {

                    handler(newValue, oldValue) {

                        console.log("info值被修改了", newValue, oldValue);

                    }

                }

            }

        });

        // watch 属性的另外一种写法

        vm.$watch("isHot", {

            // 初始化的时候让 handler 调用一下

            immediate: true,

            // handler 什么时候被调用?当isHot值发生变化时

            handler(newValue, oldValue) {

                console.log("isHot 值被修改了", newValue, oldValue);

            }

        })

    </script>

</body>

</html>
<!DOCTYPE html>

<html lang="en">

<head>

    <meta charset="UTF-8">

    <meta http-equiv="X-UA-Compatible" content="IE=edge">

    <meta name="viewport" content="width=device-width, initial-scale=1.0">

    <title>天气案例-深度监视</title>

    <script src="../js/vue.js"></script>

</head>

<body>

    <!--

        深度监视:

            (1).Vue 中的 watch 默认不监测对象内部值的改变(一层)。

            (2).配置 deep:true 可以监测对象内部值改变(多层)。

            备注:

                (1).Vue 自身可以监测对象内部值的改变,但 Vue 提供的 watch 默认不可以!

                (2).使用 watch 时根据数据的具体结构,决定是否采用深度监视。

     -->

    <div id="root">

        <h2>今天天气很{{info}}</h2>

        <button @click="changeWeather">切换天气</button>

        <hr/>

        <h3>x的值是:{{numbers.x}}</h3>

        <button @click="numbers.x ++">点我让x + 1</button>

        <h3>y的值是:{{numbers.y}}</h3>

        <button @click="numbers.y ++">点我让y + 1</button>

        <br/>

        <br/>

        <button @click="numbers = {x:666, y:888}">彻底替换掉numbers</button>

    </div>

    <script>

        // 阻止 vue 在启动时生成生产提示

        Vue.config.productionTip = false

        new Vue({

            el: "#root",

            data: {

                isHot: true,

                numbers: {

                    x: 100,

                    y: 200

                },

                a: {

                    b: {

                        c: {

                            d: "e"

                        }

                    }

                }

            },

            computed: {

                info() {

                    return this.isHot ? "炎热":"凉爽";

                }

            },

            methods: {

                changeWeather() {

                    this.isHot = !this.isHot

                }

            },

            watch: {

                isHot: {

                    // 初始化的时候让 handler 调用一下

                    immediate: true,

                    // handler 什么时候被调用?当isHot值发生变化时

                    handler(newValue, oldValue) {

                        console.log("isHot 值被修改了", newValue, oldValue);

                    }

                },

                // computed 中定义的属性也能被监视

                info: {

                    handler(newValue, oldValue) {

                        console.log("info值被修改了", newValue, oldValue);

                    }

                },

                // 监视多级结构中某个属性的变化

                "numbers.x": {

                    handler(newValue, oldValue) {

                        console.log("numbers.x 值被修改了", newValue, oldValue);

                    }

                },

                //监视多级结构中所有属性的变化

                numbers: {

                    deep: true,

                    handler(newValue, oldValue) {

                        console.log("numbers 值被修改了", newValue, oldValue);

                    }

                }

            }

        })

    </script>

</body>

</html>
<!DOCTYPE html>

<html lang="en">

<head>

    <meta charset="UTF-8">

    <meta http-equiv="X-UA-Compatible" content="IE=edge">

    <meta name="viewport" content="width=device-width, initial-scale=1.0">

    <title>天气案例-监视属性-简写</title>

    <script src="../js/vue.js"></script>

</head>

<body>

    <div id="root">

        <h2>今天天气很{{info}}</h2>

        <button @click="changeWeather">切换天气</button>

    </div>

    <script>

        // 阻止 vue 在启动时生成生产提示

        Vue.config.productionTip = false

        const vm = new Vue({

            el: "#root",

            data: {

                isHot: true

            },

            computed: {

                info() {

                    return this.isHot ? "炎热":"凉爽"

                }

            },

            methods: {

                changeWeather() {

                    this.isHot = !this.isHot

                }

            },

            watch: {

                // 正常写法

                // isHot: {

                //     // 在初始化时调用 handler 一次

                //     immediate: true,

                //     handler(newValue, oldValue) {

                //         console.log("isHot 值被修改了", newValue, oldValue);

                //     }

                // },

                // 简写

                // 简写的缺点时不能写属性信息

                // isHot(newValue, oldValue) {

                //     console.log("isHot 值被修改了", newValue, oldValue);

                // }

            },

        });

        // 正常写法

        // vm.$watch("isHot", {

        //     // 初始化的时候让 handler 调用一下

        //     immediate: true,

        //     // handler 什么时候被调用?当isHot值发生变化时

        //     handler(newValue, oldValue) {

        //         console.log("isHot 值被修改了", newValue, oldValue);

        //     }

        // })

        // 简写

        vm.$watch("isHot", function(newValue, oldValue) {

            console.log("isHot 值被修改了", newValue, oldValue);

        })

    </script>

</body>

</html>
1.8 class 与 style 绑定
1.8.1 理解
- 在应用界面中,某个(些)元素的样式是变化的
class/style绑定就是专门用来实现动态样式效果的技术
1.8.2 class 绑定
:class='xxx'- 表达式是字符串:
'classA' - 表达式是对象:
{classA:isA,classB:isB} - 表达式是数组:
['classA','classB']
1.8.3 style 绑定
:style="{color:activeColor,fontSize:fontSize+'px'}"- 其中
activeColor/fontSize是data属性
1.8.4 示例代码
<!DOCTYPE html>

<html lang="en">

<head>

    <meta charset="UTF-8">

    <meta http-equiv="X-UA-Compatible" content="IE=edge">

    <meta name="viewport" content="width=device-width, initial-scale=1.0">

    <title>绑定样式</title>

    <style>

        .basic{

            width: 400px;

            height: 100px;

            border: 1px solid black;

        }

        .happy{

            border: 4px solid red;;

            background-color: rgba(255, 255, 0, 0.644);

            background: linear-gradient(30deg,yellow,pink,orange,yellow);

        }

        .sad{

            border: 4px dashed rgb(2, 197, 2);

            background-color: gray;

        }

        .normal{

            background-color: skyblue;

        }

        .box1{

            background-color: yellowgreen;

        }

        .box2{

            font-size: 30px;

            text-shadow:2px 2px 10px red;

        }

        .box3{

            border-radius: 20px;

        }

    </style>

    <script src="../js/vue.js"></script>

</head>

<body>

    <!--

        绑定样式:

            1. class样式

                写法:class="xxx" xxx可以是字符串、对象、数组。

                    字符串写法适用于:类名不确定,要动态获取。

                    对象写法适用于:要绑定多个样式,个数不确定,名字也不确定。

                    数组写法适用于:要绑定多个样式,个数确定,名字也确定,但不确定用不用。

            2. style样式

                :style="{fontSize: xxx}"其中xxx是动态值。

                :style="[a,b]"其中a、b是样式对象。

            3. 二者的区别:

                :class 动态绑定 class 的名称,然后专门在 <style></style> 中去设置对应 class 的样式

                :style 动态绑定 style 的效果,直接把 css 写在里面

     -->

    <div id="root">

        <!-- 绑定 class 样式(字符串写法),适用于:样式的类名不确定,需要动态指定 -->

        <div class="basic" :class="mood" @click="changeMood1">{{name}}</div> </br>

        <!-- 绑定 class 样式(数组写法),适用于:要绑定的样式个数不确定、名字也不确定-->

        <div class="basic" :class="moodArr">{{name}}</div> </br>

        <!-- 绑定 class 样式(对象写法),适用于:要绑定的样式个数确定、名字也确定,但要动态决定用不用 -->

        <div class="basic" :class="moodObj">{{name}}</div> </br>

        <!-- 绑定 style 样式(对象写法) -->

        <div class="basic" :style="{fontSize: '40px', color: 'orange'}">{{name}}</div> </br>

        <div class="basic" :style="styleObj">{{name}}</div> </br>

        <!-- 绑定 style 样式(数组写法) -->

        <div class="basic" :style="styleArr">{{name}}</div> </br>

    </div>

    <script>

        // 阻止 vue 在启动时生成生产提示

        Vue.config.productionTip = false

        new Vue({

            el: "#root",

            data: {

                name: "Hello World",

                mood: "happy",

                moodArr: ["box1", "box2", "box3"],

                moodObj: {

                    box1: true,

                    box2: false,

                    box3: true

                },

                styleObj: {

                    fontSize: "40px",

                    color: "red"

                },

                styleArr: [

                    {

                        fontSize: "40px",

                        color: "blue"

                    },

                    {

                        backgroundColor: "green"

                    }

                ]

            },

            methods: {

                changeMood1() {

                    this.mood = "sad"

                },

            },

        })

    </script>

</body>

</html>
1.9 条件渲染
1.9.1 条件渲染指令
v-if与v-elsev-show
1.9.2 比较 v-if 与 v-show
- 如果需要频繁切换
v-show较好 - 当条件不成立时,
v-if的所有子节点不会解析(项目中使用)
1.9.3 示例代码
<!DOCTYPE html>

<html lang="en">

<head>

    <meta charset="UTF-8">

    <meta http-equiv="X-UA-Compatible" content="IE=edge">

    <meta name="viewport" content="width=device-width, initial-scale=1.0">

    <title>条件渲染</title>

    <script src="../js/vue.js"></script>

</head>

<body>

    <!--

        条件渲染:

            1.v-if

                写法:

                        (1).v-if="表达式"

                        (2).v-else-if="表达式"

                        (3).v-else="表达式"

                适用于:切换频率较低的场景。

                特点:不展示的 DOM 元素直接被移除。

                注意:v-if 可以和: v-else-if、v-else 一起使用,但要求结构不能被“打断”。

            2.v-show

                写法:v-show="表达式"

                适用于:切换频率较高的场景。

                特点:不展示的 DOM 元素未被移除,仅仅是使用样式隐藏掉

            3.备注:使用 v-if 时,元素可能无法获取到,而使用 v-show 一定可以获取到。

    -->

    <div id="root">

        <!-- 使用 v-show 来做条件渲染 -->

        <!-- <h2 style="display: none;"> 欢迎来到百度</h2> -->

        <h2 v-show="false"> 欢迎来到{{name}}</h2>

        <h2 v-show=" 1 === 1"> 欢迎来到{{name}}</h2>

        <!-- 使用 v-if 来做条件渲染 -->

        <h2 v-if="false"> 欢迎来到{{name}}</h2>

        <h2 v-if="2 === 2"> 欢迎来到{{name}}</h2>

        <!-- v-if与template的配合使用 -->

        <template v-if="n === 1">

            <h2>Angular</h2>

            <h2>React</h2>

            <h2>Vue</h2>

        </template>

    </div>

    <script>

        // 阻止 vue 在启动时生成生产提示

        Vue.config.productionTip = false

        new Vue({

            el: "#root",

            data: {

                name: "百度",

                n: 1

            }

        })

    </script>

</body>

</html>
1.10 列表渲染
1.10.1 列表显示指令
- 遍历数组:
v-for/index - 遍历对象:
v-for/key
1.10.2 示例代码
基本列表
<!DOCTYPE html>

<html lang="en">

<head>

    <meta charset="UTF-8">

    <meta http-equiv="X-UA-Compatible" content="IE=edge">

    <meta name="viewport" content="width=device-width, initial-scale=1.0">

    <title>基本列表</title>

    <script src="../js/vue.js"></script>

</head>

<body>

    <!--

        v-for指令:

            1.用于展示列表数据

            2.语法:v-for="(item, index) in xxx" :key="yyy"

            3.可遍历:数组、对象、字符串(用的很少)、指定次数(用的很少)

    -->

    <div id="root">

        <!-- 遍历数组 -->

        <h2>遍历数组</h2>

        <!-- 用 id 作为 key -->

        <!-- <ul v-for="p in personList" :key = "p.id">

            <li>{{p.name}} - {{p.age}}</li>

        </ul> -->

        <!-- 用索引 index 作为 key -->

        <ul v-for="(p, index) in personList" :key = "index">

            <li>{{p.name}} - {{p.age}}</li>

        </ul>

        <hr/>

        <!-- 遍历对象 -->

        <h2>遍历对象</h2>

        <!-- 注意:key 在后面,value 在前面 -->

        <ul v-for="(v, k) in car" ::key="k">

            <li>{{k}} - {{v}}</li>

        </ul>

        <hr/>

        <!-- 遍历字符串 -->

        <h2>遍历字符串</h2>

        <ul v-for="(char, index) in str" :key="index">

            <ul>{{index}} - {{char}}</ul>

        </ul>

        <hr/>

        <!-- 遍历指定次数 -->

        <h2>遍历指定次数</h2>

        <ul v-for="i in 5">

            <ul>{{i}}</ul>

        </ul>

    </div>

    <script>

        // 阻止 vue 在启动时生成生产提示

        Vue.config.productionTip = false

        new Vue({

            el: "#root",

            data: {

                personList: [

                    {id: "001", name: "张三", age: 18},

                    {id: "002", name: "李四", age: 19},

                    {id: "003", name: "王五", age: 20},

                ],

                car: {

                    name: "奥迪 A8",

                    price: "80万",

                    color: "黑色"

                },

                str: "hello world"

            }

        })

    </script>

</body>

</html>
key的原理<!DOCTYPE html>
<html lang="en">
<head>
<meta charset="UTF-8">
<meta http-equiv="X-UA-Compatible" content="IE=edge">
<meta name="viewport" content="width=device-width, initial-scale=1.0">
<title>key的原理</title>
<script src="../js/vue.js"></script>
</head>
<body>
<!--
面试题:react、vue 中的 key 有什么作用?(key 的内部原理)
1. 虚拟 DOM 中 key 的作用:
key 是虚拟 DOM 对象的标识,当数据发生变化时,Vue 会根据【新数据】生成【新的虚拟 DOM】,
随后 Vue 进行【新虚拟 DOM】与【旧虚拟 DOM】的差异比较,比较规则如下:
2.对比规则:
(1).旧虚拟 DOM 中找到了与新虚拟 DOM 相同的 key:
①.若虚拟 DOM 中内容没变, 直接使用之前的真实 DOM!
②.若虚拟 DOM 中内容变了, 则生成新的真实 DOM,随后替换掉页面中之前的真实 DOM。
(2).旧虚拟 DOM 中未找到与新虚拟 DOM 相同的 key
创建新的真实DOM,随后渲染到到页面。
3. 用 index 作为 key 可能会引发的问题:
1. 若对数据进行:逆序添加、逆序删除等破坏顺序操作:
会产生没有必要的真实 DOM 更新 ==> 界面效果没问题, 但效率低。
2. 如果结构中还包含输入类的 DOM:
会产生错误 DOM 更新 ==> 界面有问题。
4. 开发中如何选择 key?:
1.最好使用每条数据的唯一标识作为 key, 比如 id、手机号、身份证号、学号等唯一值。
2.如果不存在对数据的逆序添加、逆序删除等破坏顺序操作,仅用于渲染列表用于展示,
使用 index 作为 key 是没有问题的。
-->
<div id="root">
<h2>遍历数组</h2>
<button @click="add">在前面添加一个赵六</button>
<!-- <ul v-for="(p, index) in personList" :key = "p.id"> -->
<ul v-for="(p, index) in personList" :key = "index">
<li>
{{p.name}} - {{p.age}}
<input type="text"></input>
</li>
</ul>
</div> <script>
// 阻止 vue 在启动时生成生产提示
Vue.config.productionTip = false new Vue({
el: "#root",
data: {
personList: [
{id: "001", name: "张三", age: 18},
{id: "002", name: "李四", age: 19},
{id: "003", name: "王五", age: 20},
],
},
methods: {
add() {
this.personList.unshift({
id: "004", name: "赵六", age: 38
})
}
},
})
</script>
</body>
</html>
列表过滤
<!DOCTYPE html>

<html lang="en">

<head>

    <meta charset="UTF-8">

    <meta http-equiv="X-UA-Compatible" content="IE=edge">

    <meta name="viewport" content="width=device-width, initial-scale=1.0">

    <title>列表过滤</title></title>

    <script src="../js/vue.js"></script>

</head>

<body>

    <div id="root">

        <h2>遍历数组</h2>

        <input type="text" placeholder="输入名字进行过滤" v-model="keyWord"></input>

        <ul v-for="(p, index) in filterPersonList" ::key="index">

            <li>{{p.name}} - {{p.age}} - {{p.sex}}</li>

        </ul>

    </div>

    <script>

        // 阻止 vue 在启动时生成生产提示

        Vue.config.productionTip = false

        new Vue({

            el: "#root",

            data: {

                keyWord:'',

                personList:[

                    {id:'001',name:'马冬梅',age:19,sex:'女'},

                    {id:'002',name:'周冬雨',age:20,sex:'女'},

                    {id:'003',name:'周杰伦',age:21,sex:'男'},

                    {id:'004',name:'温兆伦',age:22,sex:'男'}

                ],

                filterPersonList: []

            },

            // 用 comouted 实现

            computed: {

                // filterPersonList() {

                //     return this.personList.filter((item) => {

                //         return item.name.indexOf(this.keyWord) > -1

                //     })

                // }

            },

            // 用 watch 实现

            watch: {

                keyWord: {

                    immediate: true,

                    handler(val) {

                        this.filterPersonList = this.personList.filter((item) => {

                            return item.name.indexOf(this.keyWord) > -1

                        })

                    }

                }

            }

        })

    </script>

</body>

</html>
列表排序
<!DOCTYPE html>

<html lang="en">

<head>

    <meta charset="UTF-8">

    <meta http-equiv="X-UA-Compatible" content="IE=edge">

    <meta name="viewport" content="width=device-width, initial-scale=1.0">

    <title>列表排序</title>

    <script src="../js/vue.js"></script>

</head>

<body>

    <div id="root">

        <h2>遍历数组</h2>

        <input type="text" placeholder="输入名字进行过滤" v-model="keyWord"></input>

        <button @click="sortType = 1">升序排序</button></button>

        <button @click="sortType = 2">降序排列</button></button>

        <button @click="sortType = 0">原序排序</button></button>

        <ul v-for="(p, index) in filterPersonList" ::key="index">

            <li>{{p.name}} - {{p.age}} - {{p.sex}}</li>

        </ul>

    </div>

    <script>

        // 阻止 vue 在启动时生成生产提示

        Vue.config.productionTip = false

        new Vue({

            el: "#root",

            data: {

                keyWord:'',

                personList:[

                    {id:'001',name:'马冬梅',age:19,sex:'女'},

                    {id:'002',name:'周冬雨',age:20,sex:'女'},

                    {id:'003',name:'周杰伦',age:21,sex:'男'},

                    {id:'004',name:'温兆伦',age:22,sex:'男'}

                ],

                sortType: 1

            },

             // 用 comouted 实现

            computed: {

                filterPersonList() {

                    const arr = this.personList.filter((item) => {

                        return item.name.indexOf(this.keyWord) > -1

                    })

                    if (this.sortType) {

                        arr.sort((p1, p2) => {

                            return this.sortType === 1 ? p1.age - p2.age : p2.age - p1.age

                        })

                    }

                    return arr

                }

            },

        })

    </script>

</body>

</html>
更新时的一个问题
<!DOCTYPE html>

<html lang="en">

<head>

    <meta charset="UTF-8">

    <meta http-equiv="X-UA-Compatible" content="IE=edge">

    <meta name="viewport" content="width=device-width, initial-scale=1.0">

    <title>更新时的一个问题</title>

    <script src="../js/vue.js"></script>

</head>

<body>

    <div id="root">

        <h2>人员列表</h2>

        <button @click="updateMa">更新马冬梅的信息</button>

        <ul>

            <li v-for="p in personList" :key="p.id">

                {{p.name}} - {{p.age}} - {{p.sex}}

            </li>

        </ul>

    </div>

    <script>

        // 阻止 vue 在启动时生成生产提示

        Vue.config.productionTip = false

        new Vue({

            el: "#root",

            data: {

                personList: [

                    {id:'001',name:'马冬梅',age:19,sex:'女'},

                    {id:'002',name:'周冬雨',age:20,sex:'女'},

                    {id:'003',name:'周杰伦',age:21,sex:'男'},

                    {id:'004',name:'温兆伦',age:22,sex:'男'}

                ]

            },

            methods: {

                updateMa() {

                    // 奏效的写法

                    // this.personList[0].name = "马老师"

                    // this.personList[0].age = 50

                    // this.personList[0].sex = "男"

                    // 不奏效的写法

                    this.personList[0] = {name: "马老师", age: 50, sex: "男"}

                }

            },

        })

    </script>

</body>

</html>
Vue监测数据改变的原理-对象<!DOCTYPE html>
<html lang="en">
<head>
<meta charset="UTF-8">
<meta http-equiv="X-UA-Compatible" content="IE=edge">
<meta name="viewport" content="width=device-width, initial-scale=1.0">
<title>Vue 数据检测改变的原理-对象</title>
<script src="../js/vue.js"></script>
</head>
<body>
<div id="root">
<h2>学校名称: {{name}}</h2>
<h2>学校地址: {{address}}</h2>
</div> <script>
// 阻止 vue 在启动时生成生产提示
Vue.config.productionTip = false new Vue({
el: "#root",
data: {
name: "北京大学",
address: "北京",
student: {
name: "tom",
age: {
rAge: 40,
sAge: 18
},
friends: [
{name: "jack", age: 38}
]
}
}
})
</script>
</body>
</html>
模拟一个数据监测
<!DOCTYPE html>

<html lang="en">

<head>

    <meta charset="UTF-8">

    <meta http-equiv="X-UA-Compatible" content="IE=edge">

    <meta name="viewport" content="width=device-width, initial-scale=1.0">

    <title>模拟一个数据检测</title>

</head>

<body>

    <div id="root">

    </div>

    <script>

        let data = {

            name: "北京大学",

            address: "北京",

            student: {

                name: "tom",

                age: 18

            }

        }

        // 创建一个监视的实例对象,用于监视 data 中属性的变化

        const obs = new Observer(data);

        // 准备一个 vm 实例对象

        let vm = {}

        vm._data = data = obs

        function Observer(obj) {

            // 汇总对象中所有的属性形成一个数组

            const keys = Object.keys(obj);

            // 遍历

            keys.forEach((k) => {

                Object.defineProperty(this, k, {

                    get() {

                        return obj[k]

                    },

                    set(val) {

                        obj[k] = val;

                    }

                })

            })

        }

        // 存在的问题是对于深层次的属性无法生成 get set 如:student 中的属性

    </script>

</body>

</html>
Vue.set的使用<!DOCTYPE html>
<html lang="en">
<head>
<meta charset="UTF-8">
<meta http-equiv="X-UA-Compatible" content="IE=edge">
<meta name="viewport" content="width=device-width, initial-scale=1.0">
<title>Vue.set的使用</title>
<script src="../js/vue.js"></script>
</head>
<body>
<div id="root">
<h1>学校信息</h1>
<h2>学校名称:{{shcool.name}}</h2>
<h2>学校地址:{{shcool.address}}</h2>
<hr/>
<h1>学生信息</h1>
<button @click="addSex">添加性别</button>
<h2>学生姓名:{{student.name}}</h2>
<h2>学生年龄:真实-{{student.age.rAge}} 对外-{{student.age.sAge}}</h2>
<h2 v-if="student.sex">学生性别:{{student.sex}}</h2>
<h2>学生朋友</h2>
<ul>
<li v-for="(f, index) in student.friends" :key="index">
{{f.name}} - {{f.age}}
</li>
</ul>
</div> <script>
// 阻止 vue 在启动时生成生产提示
Vue.config.productionTip = false new Vue({
el: "#root",
data: {
shcool: {
name: "北京大学",
address: "北京"
},
student: {
name: "tom",
age: {
rAge: 40,
sAge: 18
},
friends: [
{name: "jerry", age: 35},
{name: "tony", age: 36}
]
}
},
methods: {
addSex() {
// 写法一
// Vue.set(this.student, 'sex', "男")
// 写法二
this.$set(this.student, 'sex', "女")
}
},
})
</script>
</body>
</html>
Vue监测数据改变的原理-数组<!DOCTYPE html>
<html lang="en">
<head>
<meta charset="UTF-8">
<meta http-equiv="X-UA-Compatible" content="IE=edge">
<meta name="viewport" content="width=device-width, initial-scale=1.0">
<title>Vue监测数据改变的原理-数组</title>
<script src="../js/vue.js"></script>
</head>
<body>
<div id="root">
<h1>学校信息</h1>
<h2>学校名称:{{school.name}}</h2>
<h2>学校地址:{{school.address}}</h2>
<h2>校长是:{{school.leader}}</h2>
<hr/>
<h1>学生信息</h1>
<button @click="addHobby">在最前面添加一个爱好</button>
<button @click="updateHobby">修改第一个爱好</button>
<h2>姓名:{{student.name}}</h2>
<h2 v-if="student.sex">性别:{{student.sex}}</h2>
<h2>年龄:真实{{student.age.rAge}},对外{{student.age.sAge}}</h2>
<h2>爱好</h2>
<ul>
<li v-for="(h,index) in student.hobby" :key="index">
{{h}}
</li>
</ul>
<h2>朋友们</h2>
<ul>
<li v-for="(f,index) in student.friends" :key="index">
{{f.name}}--{{f.age}}
</li>
</ul>
</div> <script>
// 阻止 vue 在启动时生成生产提示
Vue.config.productionTip = false new Vue({
el: "#root",
data: {
school:{
name: "北京大学",
address: "北京",
},
student:{
name: "tom",
age:{
rAge: 40,
sAge: 29,
},
hobby: ["抽烟", "喝酒", "烫头"],
friends: [
{ name: "jerry", age: 35},
{ name: "tony", age: 36}
]
}
},
methods: {
addHobby() {
this.student.hobby.unshift("睡觉")
},
updateHobby() {
// 不起作用
// this.student.hobby[0] = "唱跳" // 方式一
// Vue.set(this.student.hobby, 0, '唱跳') // 方式二
// this.$set(this.student.hobby, 0, "唱跳") // 方式三
this.student.hobby.splice(0, 1, "唱跳") }
},
})
</script>
</body>
</html>
总结
Vue的数据监测<!DOCTYPE html>
<html lang="en">
<head>
<meta charset="UTF-8">
<meta http-equiv="X-UA-Compatible" content="IE=edge">
<meta name="viewport" content="width=device-width, initial-scale=1.0">
<title>总结Vue中的数据监测</title>
<script src="../js/vue.js"></script>
</head>
<body>
<!--
Vue监视数据的原理:
1. Vue会监视 data 中所有层次的数据。 2. 如何监测对象中的数据?
通过 setter 实现监视,且要在 new Vue 时就传入要监测的数据。
(1).对象中后追加的属性,Vue 默认不做响应式处理
(2).如需给后添加的属性做响应式,请使用如下API:
Vue.set(target,propertyName/index,value) 或
vm.$set(target,propertyName/index,value) 3. 如何监测数组中的数据?
通过包裹数组更新元素的方法实现,本质就是做了两件事:
(1).调用原生对应的方法对数组进行更新。
(2).重新解析模板,进而更新页面。 4.在 Vue 修改数组中的某个元素一定要用如下方法:
1.使用这些 API: push()、pop()、shift()、unshift()、splice()、sort()、reverse()
2.Vue.set() 或 vm.$set()
特别注意:Vue.set() 和 vm.$set() 不能给 vm 或 vm的根数据对象 添加属性!!!
-->
<div id="root">
<h1>学生信息</h1>
<button @click="addSex">添加性别</button> <br/>
<button @click="updateSex">修改性别</button> <br/>
<button @click="addFriend">在列表首位添加一个朋友</button> <br/>
<button @click="updateFirstFriendName">修改第一个朋友的名字为:赵六</button> <br/>
<button @click="addHobby">添加一个爱好</button> <br/>
<button @click="updateHobby">修改第一个爱好为:篮球</button> <br/>
<button @click="removeRap">过滤掉爱好中的rap</button> <br/>
<h2>姓名: {{ student.name }}</h2>
<h2>年龄: {{ student.age }}</h2>
<h2 v-if="student.sex">性别: {{ student.sex }}</h2>
<h2>爱好: </h2>
<ul>
<li v-for="(h, index) in student.hobby" :key="index">
{{ h }}
</li>
</ul>
<h2>朋友: </h2>
<ul>
<li v-for="(f, index) in student.friends" :key="index">
{{ f.name }} - {{f.age}}
</li>
</ul>
</div> <script>
// 阻止 vue 在启动时生成生产提示
Vue.config.productionTip = false new Vue({
el: "#root",
data: {
student: {
name: "张三",
age: 18,
hobby: ["唱", "跳", "rap"],
friends: [
{ name: "李四", age: 20},
{ name: "王五", age: 19},
]
}
},
methods: {
addSex() {
// 不起作用
// this.student.sex = "男" // 方式一
// Vue.set(this.student, "sex", "男") // 方式二
this.$set(this.student, "sex", "男")
},
updateSex() {
this.student.sex = "女"
},
addFriend() {
this.student.friends.unshift({ name: "老王", age: 28})
},
updateFirstFriendName() {
this.student.friends[0].name = "赵六"
},
addHobby() {
this.student.hobby.push("篮球")
},
updateHobby() {
// 不起作用
// this.student.hobby[0] = "篮球" // 方式一
// Vue.set(this.student.hobby, 0, "篮球") // 方式二
// this.$set(this.student.hobby, 0, "篮球") // 方式三
this.student.hobby.splice(0, 1, "篮球")
},
removeRap() {
this.student.hobby = this.student.hobby.filter(item => {
return item !== "rap"
})
}
},
})
</script>
</body>
</html>
1.11 收集表单数据
<!DOCTYPE html>

<html lang="en">

<head>

    <meta charset="UTF-8">

    <meta http-equiv="X-UA-Compatible" content="IE=edge">

    <meta name="viewport" content="width=device-width, initial-scale=1.0">

    <title>收集表单数据</title>

    <script src="../js/vue.js"></script>

</head>

<body>

    <!--

        收集表单数据:

            若:<input type="text"/>,则 v-model收集的是 value 值,用户输入的就是 value 值。

            若:<input type="radio"/>,则 v-model收集的是value值,且要给标签配置 value 值。

            若:<input type="checkbox"/>

                1.没有配置 input 的 value 属性,那么收集的就是 checked(勾选 or 未勾选,是布尔值)

                2.配置 input 的 value 属性:

                    (1)v-model 的初始值是非数组,那么收集的就是 checked(勾选 or 未勾选,是布尔值)

                    (2)v-model 的初始值是数组,那么收集的的就是 value 组成的数组

            备注:v-model的三个修饰符:

                lazy:失去焦点再收集数据

                number:输入字符串转为有效的数字

                trim:输入首尾空格过滤

    -->

    <div id="root">

        <form @submit.prevent="demo">

            <!-- 账号这么写的好处是:点击账号时,鼠标光标会自动定位到输入框内 -->

            <label for="account">账号:</label><input type="text" id="account" v-model.trim="userInfo.account"></input></br>

            年龄:<input type="number" v-model.number="userInfo.age"> <br/><br/>

            密码:<input type="password" v-model="userInfo.password"></input></br>

            性别:

            <input type="radio" name="sex" v-model="userInfo.sex" value="male">男</input>

            <input type="radio" name="sex" v-model="userInfo.sex" value="female">女</input></br>

            爱好:

            <input type="checkbox"  v-model="userInfo.hobby" value="chang">唱</input>

            <input type="checkbox"  v-model="userInfo.hobby" value="tiao">跳</input>

            <input type="checkbox"  v-model="userInfo.hobby" value="rap">Rap</input></br>

            所属校区

            <select v-model="userInfo.city">

                <option value="">请选择校区</option>

                <option value="beijing">北京</option>

                <option value="shanghai">上海</option>

                <option value="shenzhen">深圳</option>

                <option value="wuhan">武汉</option>

            </select>

            <br/><br/>

            其他信息:

            <textarea v-model.lazy="userInfo.other"></textarea> <br/><br/>

            <input type="checkbox" v-model="userInfo.agree">阅读并接受<a href="http://www.baidu.com">《用户协议》</a></br>

            <button>提交</button>

        </form>

    </div>

    <script>

        // 阻止 vue 在启动时生成生产提示

        Vue.config.productionTip = false

        new Vue({

            el: "#root",

            data: {

                userInfo:{

					account: '',

					age: 18,

					password: '',

					sex: '',

					hobby: [],

					city: '',

					other: '',

					agree: ''

				}

            },

            methods: {

				demo(){

					console.log(JSON.stringify(this.userInfo))

				}

			}

        })

    </script>

</body>

</html>
1.12 过滤器
1.12.1 理解过滤器
- 功能:对要显示的数据进行特定格式化后再显示
- 注意:并没有改变原本的数据,是产生新的对应的数据
1.12.2 示例代码
<!DOCTYPE html>

<html lang="en">

<head>

    <meta charset="UTF-8">

    <meta http-equiv="X-UA-Compatible" content="IE=edge">

    <meta name="viewport" content="width=device-width, initial-scale=1.0">

    <title>过滤器</title>

    <script src="../js/vue.js"></script>

    <script src="../js/dayjs.min.js"></script>

</head>

<body>

    <!--

        过滤器:

            定义:对要显示的数据进行特定格式化后再显示(适用于一些简单逻辑的处理)。

            语法:

                1.注册过滤器:Vue.filter(name,callback) 或 new Vue{ filters: {} }

                2.使用过滤器:{{ xxx | 过滤器名}}  或  v-bind:属性 = "xxx | 过滤器名"

            备注:

                1.过滤器也可以接收额外参数、多个过滤器也可以串联

                2.并没有改变原本的数据, 是产生新的对应的数据

    -->

    <div id="root">

        <h2>显示格式化后的时间</h2>

        <!-- 计算属性实现 -->

        <h3>计算属性实现,现在是{{ fmtTime }}</h3>

        <!-- methods 方法实现 -->

        <h3>计算属性实现,现在是{{ getFmtTime() }}</h3>

        <!-- 过滤器实现 -->

        <h3>过滤器实现,现在是{{ fmtTime | timeFormat }}</h3>

        <!-- 过滤器实现(传参) -->

        <h3>过滤器实现,现在是{{ fmtTime | timeFormat2("YYYY-MM-DD") | strSlice }}</h3>

    </div>

    <div id="root2">

        <h2>显示格式化后的时间</h2>

        <!-- 过滤器实现(传参) -->

        <h3>过滤器实现,现在是{{ msg | strSlice }}</h3>

    </div>

    <script>

        // 阻止 vue 在启动时生成生产提示

        Vue.config.productionTip = false

        // 定义全局过滤器

        Vue.filter('strSlice', function(value) {

            return value.slice(0, 4)

        })

        new Vue({

            el: "#root",

            data: {

                time: Date.now()

            },

            computed: {

                fmtTime() {

                    return dayjs(this.time).format('YYYY-MM-DD HH:mm:ss')

                }

            },

            methods: {

                getFmtTime() {

                    return dayjs(this.time).format('YYYY年MM月DD日 HH:mm:ss')

                }

            },

            // 局部过滤器

            filters: {

                timeFormat() {

                    return dayjs(this.time).format('YYYY_MM_DD HH:mm:ss')

                },

                timeFormat2(val) {

                    return dayjs(this.time).format(val)

                },

                // strSlice(value) {

                //     return value.slice(0, 4)

                // }

            }

        })

        new Vue({

            el: "#root2",

            data: {

                msg: "hello world"

            }

        })

    </script>

</body>

</html>
1.13 内置指令与自定义指令
1.13.1 常用内置指令
v-text: 更新元素的textContentv-html: 更新元素的innerHTMLv-if: 如果为true, 当前标签才会输出到页面v-else: 如果为false, 当前标签才会输出到页面v-show: 通过控制display样式来控制显示/隐藏v-for: 遍历数组/对象v-on: 绑定事件监听,一般简写为 @v-bind: 绑定解析表达式,可以省略v-bindv-model: 双向数据绑定v-cloak: 防止闪现,与css配合:[v-cloak]{display:none}
1.13.2 自定义指令
注册全局指令
Vue.directive('my-directive',function(el,binding){

	el.innerHTML=binding.value.toupperCase()

})
注册局部指令
directives:{

    'my-directive':{

        bind(el,binding){

        	el.innerHTML = binding.value.toupperCase()

        }

    }

}
使用指令
v-my-directive='xxx'
1.14 Vue实例生命周期
1.14.1 生命周期流程图
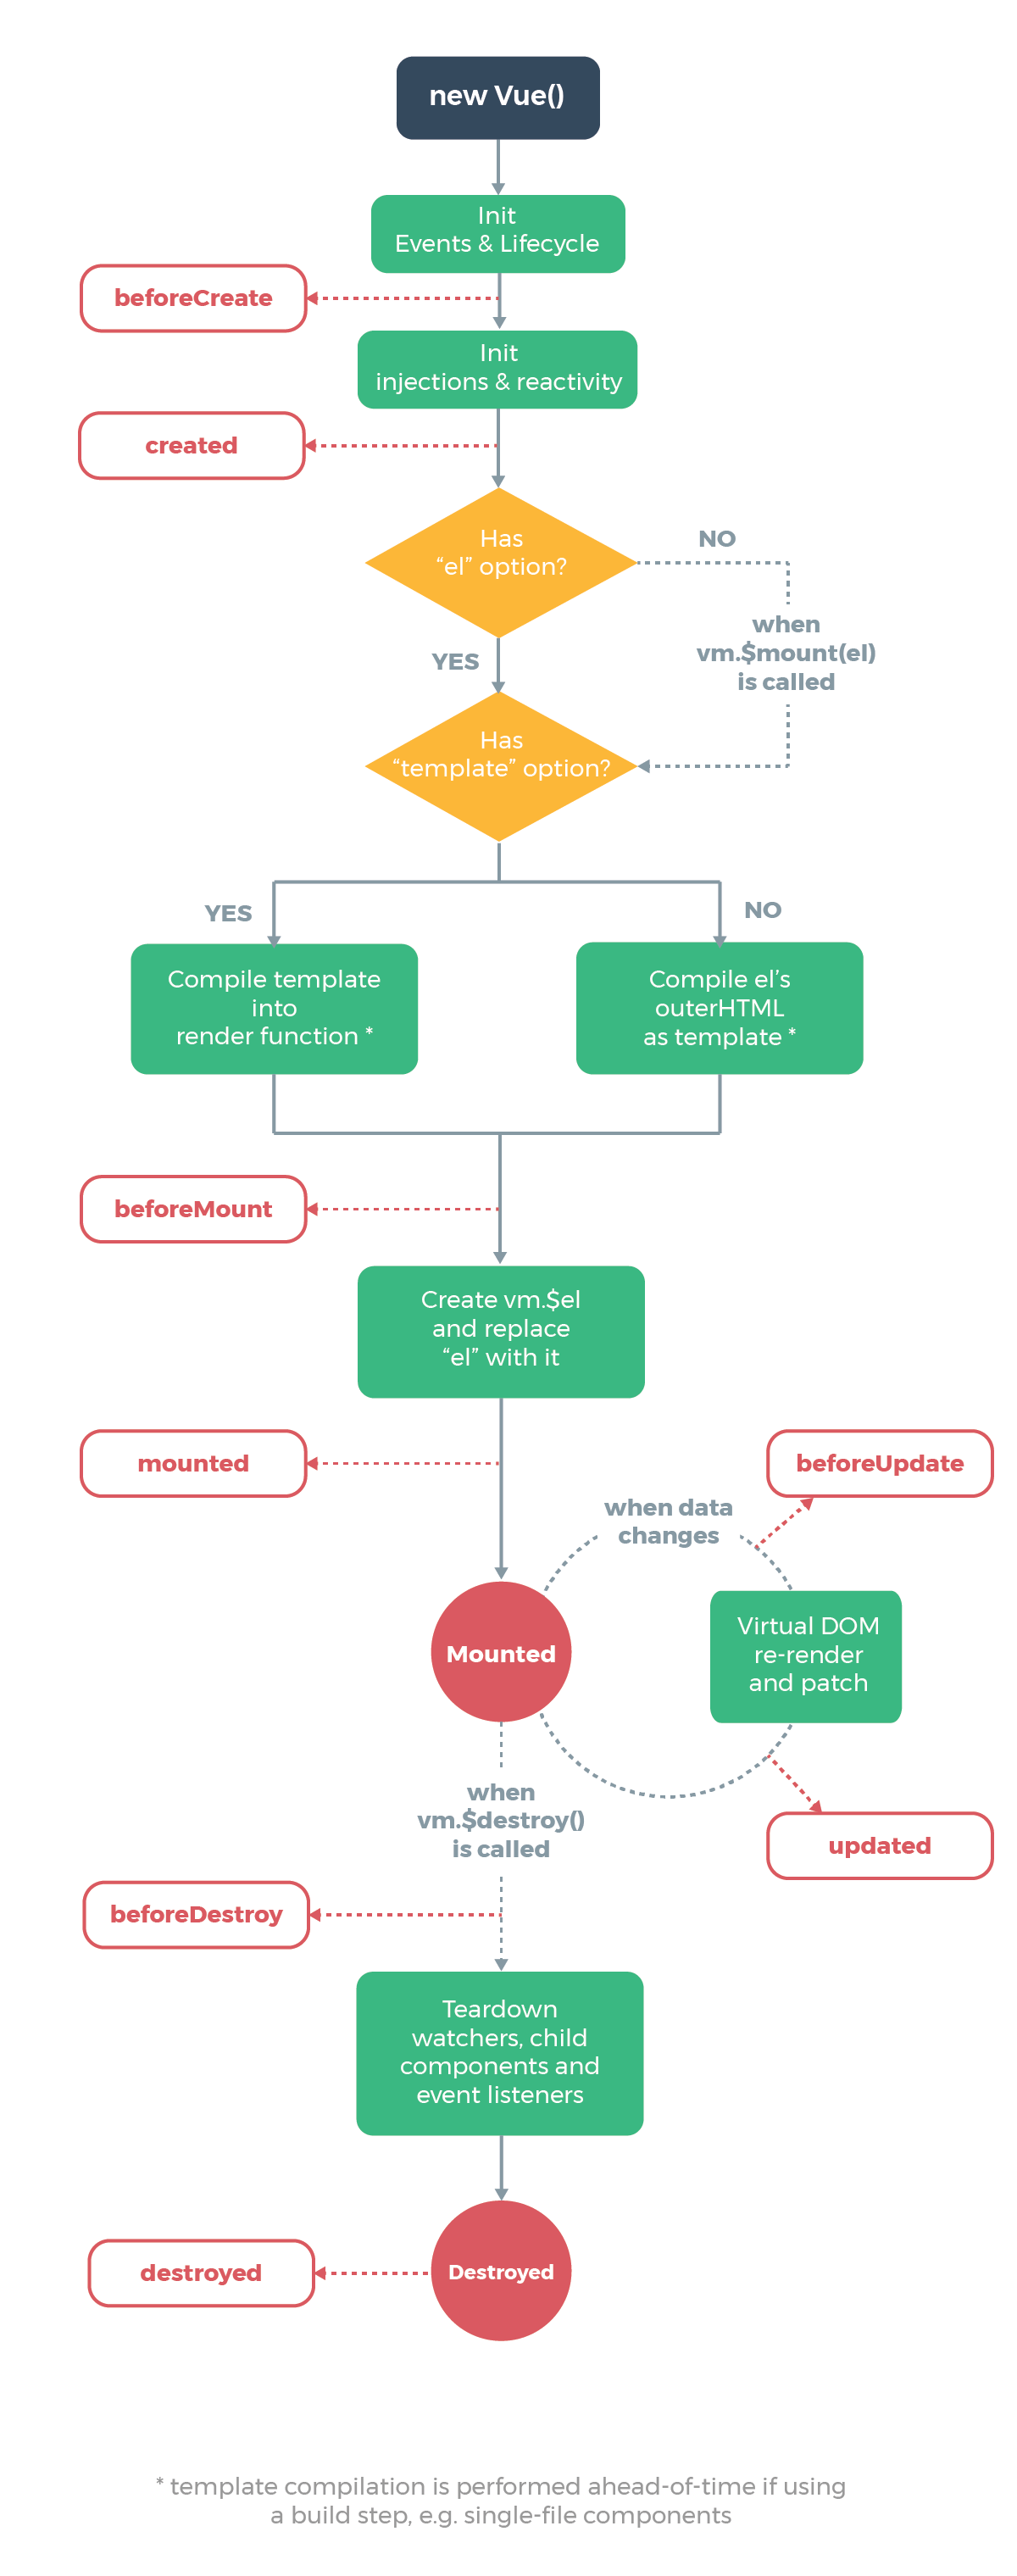
1.14.2 vue生命周期分析
初始化显示
beforeCreate()created()beforeMount()mounted()
更新状态:
this.xxx=valuebeforeUpdate()updated()
销毁
Vue实例:vm.$destory()beforeDestory()destoryed()
1.14.3 示例代码
<!DOCTYPE html>

<html lang="en">

<head>

    <meta charset="UTF-8">

    <meta http-equiv="X-UA-Compatible" content="IE=edge">

    <meta name="viewport" content="width=device-width, initial-scale=1.0">

    <title>分析生命周期</title>

    <script src="../js/vue.js"></script>

</head>

<body>

    <div id="root">

        <h2 v-text="n"></h2>

        <h2>n 的值: {{ n }}</h2>

        <button @click="addN">点我 n + 1</button> <br/>

        <button @click="destroy">点我销毁 Vm</button>

    </div>

    <script>

        // 阻止 vue 在启动时生成生产提示

        Vue.config.productionTip = false

        const vm = new Vue({

            el: "#root",

            data: {

                n: 1

            },

            methods: {

                addN() {

                    this.n++

                },

                destroy() {

                    console.log("bye...bye... ");

                    // 销毁 vm 的方式

                    this.$destroy()

                }

            },

            watch: {

                n() {

                    console.log("n 的值发生改变");

                }

            },

            // 数据监测、数据代理之前,此时无法通过 vm 访问到 data 中的数据、methods 中的方法

            beforeCreate() {

                console.log("beforeCreate... ")

                console.log("beforeCreate... ", this, this.n) // this.n undefined

                // debugger;

            },

            // 数据监测、数据代理之后,此时可以通过 vm 访问到 data 中的数据、methods 中的方法

            created() {

                console.log("created... ");

                console.log("created... ", this, this.n);

                // debugger;

            },

            // 此时页面呈现的是未经 Vue 编译的 DOM 结构,所有对 DOM 的操作,最终都不奏效

            beforeMount() {

                console.log("beforeMount... ");

                // debugger; // 模板尚未解析

            },

            // 此时页面中呈现的经 Vue 编译的 DOM,对 DOM 的操作均有效(尽可能避免)

            // 至此初始化过程结束

            // 一般在此进行:开启定时器、发送网络请求、订阅消息、绑定自定义事件等初始化工作

            mounted() {

                console.log("mounted... ")

                // debugger;

            },

            // 此时数据是新的,但页面是旧的,即页面尚未和数据保持同步

            beforeUpdate() {

                console.log("beforeUpdate... ")

                // debugger;

            },

            // 此时数据是新的,但页面也是新的,即页面和数据保持同步

            updated() {

                console.log("updated... ")

                // debugger;

            },

            // 此时 Vm 中的所有 data、methods、指令等等,都处于可用状态,马上要执行销毁过程

            // 一般在此进行:关闭定时器、取消订阅消息、解绑自定义事件等

            beforeDestroy() {

                console.log("beforeDestroy... ")

                // debugger;

            },

            // 销毁 vm 实例

            destroyed() {

                console.log("destroyed... ")

            },

        })

    </script>

</body>

</html>
1.14.4 常用的生命周期方法
mounted(): 发送ajax请求,启动定时器等异步任务beforeDestory(): 做收尾工作,如:清除定时器
Vue 核心技术的更多相关文章
- Vue核心技术 Vue+Vue-Router+Vuex+SSR实战精讲
第1章 课程介绍课程介绍,介绍课程的章节安排和学习本门课程的一些注意点.1-1 课程导学 试看1-2 项目介绍1-3 Webpack4升级注意 第2章 Vue+Webpack的前端工程工作流搭建详细讲 ...
- vue webpack配置Error
学写慕课网的Vue核心技术Vue+Vue-Router+Vuex+SSR实战精讲时,发现因为webpack,babel等升级了.按照视频的代码配置webpack会出问题. 报错:TypeError: ...
- (19)打鸡儿教你Vue.js
了解vue2.x的核心技术 建立前端组件化的思想 常用的vue语法 vue-router,vuex,vue-cli 使用vue-cli工具 Vue框架常用知识点 vue核心技术 集成Vue 重点看,重 ...
- Java+Python+前端 学习资料大全 百度云盘
Java架构师3大阶段 链接:https://pan.baidu.com/s/1DlXh33y5t4cZUmZH0cLvCw 提取码:5s76 2019前端架构阶段 链接:https://pan.ba ...
- Java大全-吐血整理
gqzdev
- WEB前端资源项目整合
WEB前端资源项目整合 vue.js高仿饿了么(1-13章全)链接:https://pan.baidu.com/s/1qYSiYXluA1AlEV0EskxWZw提取码:25z9 Vue.js 2.5 ...
- IT知识圈视频学习资源整理贴
原文地址 热门课程 1.2019 尚学堂大数据全套视频教程(视频.源码.课件) 2.IDEA破解补丁(支持最新2019.2) 3.2019年 MySQL DBA 6期视频教程 4.微信小程序实战开发特 ...
- 【一套代码小程序&Native&Web阶段总结篇】可以这样阅读Vue源码
前言 前面我们对微信小程序进行了研究:[微信小程序项目实践总结]30分钟从陌生到熟悉 在实际代码过程中我们发现,我们可能又要做H5站又要做小程序同时还要做个APP,这里会造成很大的资源浪费,如果设定一 ...
- vue 双向数据绑定的实现学习(一)
前言:本系列学习笔记从以下几个点展开 什么是双向数据绑定 双向数据绑定的好处 怎么实现双向数据绑定 实现双向数据数据绑定需要哪些知识点 数据劫持 发布订阅模式 先看看我们要实现的目标是什么,如下动图: ...
- Vue(七) 组件详解
组件 (Component) 是 Vue.js 最核心的功能,也是整个框架设计最精彩的部分,当然也是最难掌握的. 组件与复用 组件用法 组件与创建 Vue 实例类似,需要注册后才可以使用.注册有全局注 ...
随机推荐
- 在 RedHat 使用 gdc-client 下载 TCGA 数据
今天,只聊一下 RedHat/CentOS 下 gdc-client 安装的那些事. gdc-client,官网地址:https://gdc.cancer.gov/access-data/gdc-da ...
- 【IntelliJ】添加javaweb、tomcat语法支持
默认情况下:idea不支持javaweb的语法 但,我们的期望是: 解决方法:配置tomcat如下: (假设你已经配置好了tomcat)接下来: 1.打开[项目结构(快捷键:Ctrl + Shift ...
- 前端vue自定义简单实用下拉筛选 下拉菜单
前端vue自定义简单实用下拉筛选 下拉菜单, 下载完整代码请访问: https://ext.dcloud.net.cn/plugin?id=13020 效果图如下: #### 使用方法 ``` ...
- Linux 可执行文件瘦身指令 strip 使用示例
以下内容为本人的学习笔记,如需要转载,请声明原文链接微信公众号「ENG八戒」https://mp.weixin.qq.com/s/lJ8vj-FszEoplMVcmT0I0w 在 Linux 系统下开 ...
- .NET 7 新特性全面解析
在 2021 年 11 月 8 日发布的 .NET 6 当前已经广泛使用.微软团队已经开始着手为.NET 7制定计划和新特性.本文将为您全面解析.NET 7 的新特性,并提供源代码示例. 1. 更好的 ...
- 1.6 编写双管道ShellCode后门
本文将介绍如何将CMD绑定到双向管道上,这是一种常用的黑客反弹技巧,可以让用户在命令行界面下与其他程序进行交互,我们将从创建管道.启动进程.传输数据等方面对这个功能进行详细讲解.此外,本文还将通过使用 ...
- SQL专家云回溯某时间段内的阻塞
背景 SQL专家云像"摄像头"一样,对环境.参数配置.服务器性能指标.活动会话.慢语句.磁盘空间.数据库文件.索引.作业.日志等几十个运行指标进行不同频率的实时采集,保存到SQL专 ...
- animation动画+关键帧实现轮播图效果(再次学习)!
再次遇到要实现轮播图效果的时候,发现还是不怎么会,因为对js还没有熟练使用,只希望使用h5和css3实现效果 虽然之前已经学习了一遍了,但是还是不熟练,再次学习一下了 这次的可作为套板使用,无序列表为 ...
- java学习中的一些总结
最近java要考试了,在复习的时候就发现什么成员变量,成员函数,静态,非静态,里面的一些东西都乱七八糟的(其实是我太菜了,没有理解透彻) 我查了很多相关的资料,网上很多大佬总结的非常好 知识点一 成员 ...
- stegsolve与zsteg的使用
zsteg 介绍:用来检测PNG和BMP中隐藏数据的工具,可以快速提取隐藏信息 使用环境:kali kali自带zsteg,可以用这个指令使用 gem install zsteg 下载完之后查看使用方 ...