
前后端分离实现注册+登录(Vue3.0 + Django3.2)
一、使用 vite+webstorm 搭建 Vue 环境,构建前端
1、结构树
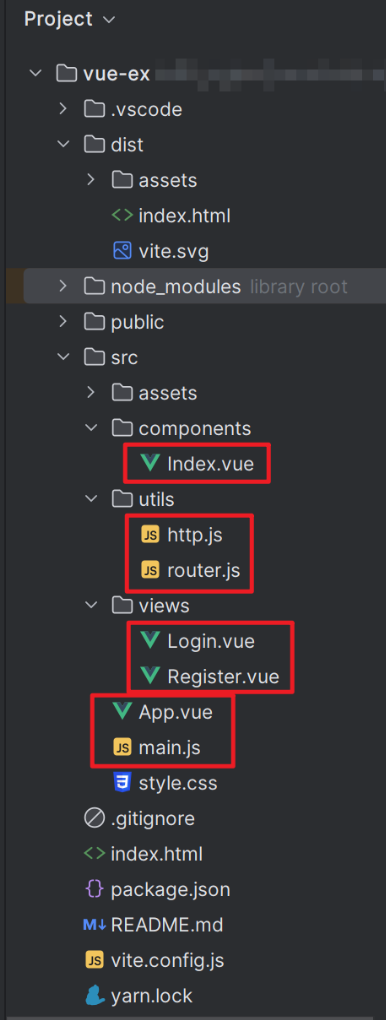
2、main.js
import { createApp } from 'vue'

//import './style.css'

import App from './App.vue'

import router from "./utils/router";

createApp(App).use(router).mount('#app')
3、http.js
import axios from "axios";  // 要导入安装的包,则直接填写包名即可。不需要使用路径

// 实例化

const http = axios.create({

    //baseURL: 'http://wthrcdn.etouch.cn/',    // 请求的公共路径,一般填写服务端的默认的api地址,这个地址在具体使用的时候覆盖

    baseURL: 'http://127.0.0.1:8000/vue/',    // 请求的公共路径,一般填写服务端的默认的api地址,这个地址在具体使用的时候覆盖

    timeout: 8000,                           // 最大请求超时时间,请求超过这个时间则报错,有文件上传的站点不要设置这个参数

    //headers: {'X-Custom-Header': 'foobar'}   // 默认的预定义请求头,一般工作中这里填写隐藏了客户端身份的字段

});

export default http;
4、router.js
import {createRouter, createWebHistory} from 'vue-router';

import Login from "../views/Login.vue";

import Register from "../views/Register.vue";

import Index from "../components/Index.vue";

const router = createRouter({

    history: createWebHistory(),

    routes: [

        {

            path: "/",

            name: "myLogin",

            component: Login,

        },

        {

            path: "/login",

            name: "Login",

            component: Login,

        },

        {

            path: "/reg",

            name: "Register",

            component: Register,

        },

        {

            path: "/index",

            name: "Index",

            component: Index,

        },

    ]

})

export default router;
5、App.vue
<script>

</script>

<template>

  <router-view></router-view>

</template>

<style scoped>

</style>
6、Index.vue
<template>

  <button><router-link to="/reg">register</router-link></button>

  <button><router-link to="/login">login</router-link></button>

  <h3 @click="log">{{ message }}</h3>

  <span>{{ login_message }}</span>

</template>

<!-- 以下为选项API格式 -->

<script>

export default {

  name: "Index",

  data() {

    return {

      message: "welcome to INDEX",

      login_message: '登录成功!!!',

    }

  },

  methods: {

    log() {

      console.log(this.message)

    },

  },

}

</script>

<style scoped>

</style>
7、Register.vue
<template>

  <hr>

  <h1>注册页面</h1>

  <hr>

  用户账号:<input type="text" v-model="username"><span>{{ info1 }}</span><br>

  设置密码:<input :type="password1" v-model="passwd1">

  <button @click="pwd1">{{ tip1 }}</button>

  <span>{{ info2 }}</span><br>

  确认密码:<input :type="password2" v-model="passwd2">

  <button @click="pwd2">{{ tip2 }}</button>

  <span>{{ info2 }}</span><br>

  <button><a href="/login" @click.prevent="send_post">register</a></button>

  <button>

    <router-link to="/login">login</router-link>

  </button>

</template>

<script>

import http from "../utils/http.js";

export default {

  name: "Register",

  data() {

    return {

      username: '请输入用户名',

      passwd1: '请输入密码',

      passwd2: '请确认密码',

      password1: 'password',

      password2: 'password',

      tip1: '显示密码',

      tip2: '显示密码',

      num1: 0,

      num2: 0,

      info1: '',

      info2: ''

    }

  },

  methods: {

    pwd1() {

      if (this.num1 === 0) {

        this.password1 = 'text'

        this.tip1 = '隐藏密码'

        this.num1 = 1

      } else {

        this.password1 = 'password'

        this.tip1 = '显示密码'

        this.num1 = 0

      }

    },

    pwd2() {

      if (this.num2 === 0) {

        this.password2 = 'text'

        this.tip2 = '隐藏密码'

        this.num2 = 1

      } else {

        this.password2 = 'password'

        this.tip2 = '显示密码'

        this.num2 = 0

      }

    },

    send_post() {

      http.post("http://127.0.0.1:8000/vue/", {

            username: this.username,

            passwd: this.passwd1,

            passwd2: this.passwd2,

          },

      ).then(response => {

        //console.log(response.data); // 服务端响应的响应体

        if (response.data.state == 'fail1') {

          //console.log('注册失败')

          this.info1 = response.data.tip

          this.info2 = ''

        } else if (response.data.state == 'fail2') {

          this.info1 = ''

          this.info2 = response.data.tip

        } else {

          window.location.href = "/login"

        }

      }).catch(error => {

        console.log('请求错误!error=', error)

      })

    },

  }

}

</script>

<style scoped>

* {

  margin: 10px;

}

span {

  color: red;

}

</style>
8、Login.vue
<template>

  <hr>

  <h1>登录页面</h1>

  <hr>

  账号:<input type="text" v-model="username"><span>{{ info3 }}</span><br>

  密码:<input :type="password" v-model="passwd">

  <button @click="pwd">{{ tip }}</button>

  <span>{{ info4 }}</span>

  <br>

  <button>

    <a href="/" @click.prevent="send_post">login</a>

  </button>

  <button>

    <router-link to="/reg">register</router-link>

  </button>

</template>

<script>

import http from "../utils/http.js";

export default {

  name: "Login",

  data() {

    return {

      username: '请输入用户名',

      passwd: '请输入密码',

      password: 'password',

      tip: '显示密码',

      num: 0,

      info3: '',

      info4: '',

    }

  },

  methods: {

    pwd() {

      if (this.num === 0) {

        this.password = 'text'

        this.tip = '隐藏密码'

        this.num = 1

      } else {

        this.password = 'password'

        this.tip = '显示密码'

        this.num = 0

      }

    },

    send_post() {

      http.post("http://127.0.0.1:8000/vue/", {

            username: this.username,

            passwd: this.passwd,

          },

      ).then(response => {

        //console.log(response.data); // 服务端响应的响应体

        if (response.data.state == 'fail3') {

          //console.log('注册失败')

          this.info3 = ''

          this.info4 = response.data.tip

        } else if (response.data.state == 'fail4') {

          this.info3 = response.data.tip

          this.info4 = ''

        } else {

          window.location.href = "/index"

        }

      }).catch(error => {

        console.log('请求错误!error=', error)

      })

    },

  }

}

</script>

<style scoped>

* {

  margin: 10px;

}

span {

  color: red;

}

</style>
二、使用 pycharm 搭建 Django 环境,构建后端
1、结构树
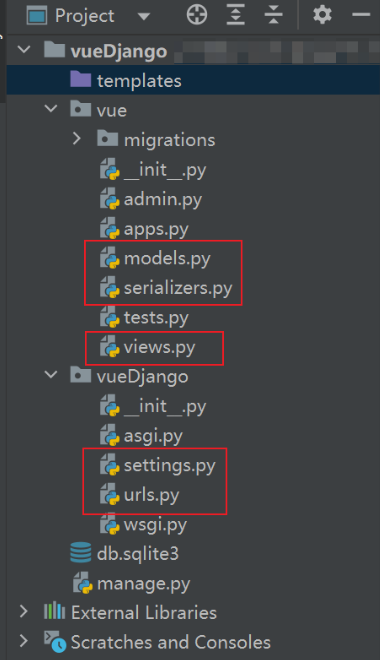
2、settings.py
"""

Django settings for vueDjango project.

Generated by 'django-admin startproject' using Django 3.2.

For more information on this file, see

https://docs.djangoproject.com/en/3.2/topics/settings/

For the full list of settings and their values, see

https://docs.djangoproject.com/en/3.2/ref/settings/

"""

import os

from pathlib import Path

# Build paths inside the project like this: BASE_DIR / 'subdir'.

BASE_DIR = Path(__file__).resolve().parent.parent

# Quick-start development settings - unsuitable for production

# See https://docs.djangoproject.com/en/3.2/howto/deployment/checklist/

# SECURITY WARNING: keep the secret key used in production secret!

SECRET_KEY = 'django-insecure-q!0%lzaj1csl*(6olo+!h=7de5&*@tf_@r@2+=br_nvmzsump='

# SECURITY WARNING: don't run with debug turned on in production!

DEBUG = True

ALLOWED_HOSTS = []

# Application definition

INSTALLED_APPS = [

    'django.contrib.admin',

    'django.contrib.auth',

    'django.contrib.contenttypes',

    'django.contrib.sessions',

    'django.contrib.messages',

    'django.contrib.staticfiles',

    'rest_framework',

    'corsheaders',

    'vue.apps.VueConfig',

]

MIDDLEWARE = [

    'django.middleware.security.SecurityMiddleware',

    'django.contrib.sessions.middleware.SessionMiddleware',

    'corsheaders.middleware.CorsMiddleware',

    'django.middleware.common.CommonMiddleware',

    # 'django.middleware.csrf.CsrfViewMiddleware',

    'django.contrib.auth.middleware.AuthenticationMiddleware',

    'django.contrib.messages.middleware.MessageMiddleware',

    'django.middleware.clickjacking.XFrameOptionsMiddleware',

]

ROOT_URLCONF = 'vueDjango.urls'

CORS_ORIGIN_ALLOW_ALL = True

TEMPLATES = [

    {

        'BACKEND': 'django.template.backends.django.DjangoTemplates',

        'DIRS': [BASE_DIR / 'templates']

        ,

        'APP_DIRS': True,

        'OPTIONS': {

            'context_processors': [

                'django.template.context_processors.debug',

                'django.template.context_processors.request',

                'django.contrib.auth.context_processors.auth',

                'django.contrib.messages.context_processors.messages',

            ],

        },

    },

]

WSGI_APPLICATION = 'vueDjango.wsgi.application'

# Database

# https://docs.djangoproject.com/en/3.2/ref/settings/#databases

DATABASES = {

    'default': {

        'ENGINE': 'django.db.backends.sqlite3',

        'NAME': BASE_DIR / 'db.sqlite3',

    }

}

# Password validation

# https://docs.djangoproject.com/en/3.2/ref/settings/#auth-password-validators

AUTH_PASSWORD_VALIDATORS = [

    {

        'NAME': 'django.contrib.auth.password_validation.UserAttributeSimilarityValidator',

    },

    {

        'NAME': 'django.contrib.auth.password_validation.MinimumLengthValidator',

    },

    {

        'NAME': 'django.contrib.auth.password_validation.CommonPasswordValidator',

    },

    {

        'NAME': 'django.contrib.auth.password_validation.NumericPasswordValidator',

    },

]

# Internationalization

# https://docs.djangoproject.com/en/3.2/topics/i18n/

LANGUAGE_CODE = 'en-us'

TIME_ZONE = 'UTC'

USE_I18N = True

USE_L10N = True

USE_TZ = True

# Static files (CSS, JavaScript, Images)

# https://docs.djangoproject.com/en/3.2/howto/static-files/

STATIC_URL = '/static/'

# Default primary key field type

# https://docs.djangoproject.com/en/3.2/ref/settings/#default-auto-field

DEFAULT_AUTO_FIELD = 'django.db.models.BigAutoField'
3、urls.py
from django.urls import path

from vue import views

urlpatterns = [

    path('vue/', views.VueViews.as_view()),

]
4、models.py
from django.db import models

# Create your models here.

class User(models.Model):

    """学生信息"""

    username = models.CharField(max_length=32, verbose_name="用户名")

    passwd = models.CharField(max_length=32, verbose_name="密码")

    class Meta:

        db_table = "tb_user"

    def __str__(self):

        return str(self.username)
5、serializers.py
from rest_framework import serializers

from vue.models import User

class UserModelSerializer(serializers.ModelSerializer):

    class Meta:

        model = User

        fields = "__all__"
6、views.py
from django.shortcuts import render, HttpResponse, redirect

# Create your views here.

from rest_framework import status

from rest_framework.views import APIView

from .serializers import UserModelSerializer, User

from rest_framework.response import Response

import json

class VueViews(APIView):

    # def get(self, request):

    #     """获取所有用户信息"""

    #     # 1. 从数据库中读取用户列表信息

    #     instance_list = User.objects.all()

    #     # 2. 实例化序列化器,获取序列化对象

    #     serializer = UserModelSerializer(instance_list, many=True)

    #     # 3. 使用serializer.data实现对数据进行序列化成字典

    #     print(request.data)

    #     return Response(serializer.data)

    def post(self, request):

        """添加用户信息"""

        # 1. 获取客户端提交的数据,实例化序列化器,获取序列化对象

        serializer = UserModelSerializer(data=request.data)

        # 2. 反序列化[验证数据、保存数据到数据库]

        serializer.is_valid(raise_exception=True)

        username = request.data['username']

        passwd = request.data['passwd']

        if request.data.get('passwd2', ''):

            userinfo = User.objects.filter(username=username)

            if userinfo.exists():

                # print('用户已存在')

                info = {"state": "fail1", "tip": '用户已存在'}

                return HttpResponse(json.dumps(info))

            else:

                passwd2 = request.data['passwd2']

                if passwd2 != passwd:

                    # print('两次密码输入不同,请重新输入')

                    info = {"state": "fail2", "tip": '两次密码输入不同,请重新输入'}

                    return HttpResponse(json.dumps(info))

                else:

                    serializer.save()

                    # print('注册成功')

                # print(username, passwd, passwd2)

        else:

            userinfo = User.objects.filter(username=username)

            if userinfo.exists():

                if User.objects.get(username=username).passwd == passwd:

                    # print('登录成功')

                    pass

                else:

                    # print('密码错误,请重新输入')

                    info = {"state": "fail3", "tip": '密码错误,请重新输入'}

                    return HttpResponse(json.dumps(info))

            else:

                # print('用户名不存在,请重新输入')

                info = {"state": "fail4", "tip": '用户名不存在,请重新输入'}

                return HttpResponse(json.dumps(info))

            # print(username, passwd)

        # 3. 返回新增的模型数据经过序列化提供给客户端

        return Response(serializer.data, status=status.HTTP_201_CREATED)
前后端分离实现注册+登录(Vue3.0 + Django3.2)的更多相关文章
- Spring Security OAuth2.0认证授权六:前后端分离下的登录授权
历史文章 Spring Security OAuth2.0认证授权一:框架搭建和认证测试 Spring Security OAuth2.0认证授权二:搭建资源服务 Spring Security OA ...
- [转].NET Core前后端分离快速开发框架(Core.3.0+AntdVue)
[转].NET Core前后端分离快速开发框架(Core.3.0+AntdVue) 目录 引言 简介 环境搭建 开发环境要求 基础数据库构建 数据库设计规范 运行 使用教程 全局配置 快速开发 管理员 ...
- vue+springboot前后端分离实现单点登录跨域问题处理
最近在做一个后台管理系统,前端是用时下火热的vue.js,后台是基于springboot的.因为后台系统没有登录功能,但是公司要求统一登录,登录认证统一使用.net项目组的认证系统.那就意味着做单点登 ...
- 前后端分离使用 Token 登录解决方案
前后端分离使用 Token 登录解决方案:https://juejin.im/post/5b7ea1366fb9a01a0b319612
- 前后端分离后台管理系统 Gfast v3.0 全新发布
GFast V3.0 平台简介 基于全新Go Frame 2.0+Vue3+Element Plus开发的全栈前后端分离的管理系统 前端采用vue-next-admin .Vue.Element UI ...
- shiro,基于springboot,基于前后端分离,从登录认证到鉴权,从入门到放弃
这个demo是基于springboot项目的. 名词介绍: ShiroShiro 主要分为 安全认证 和 接口授权 两个部分,其中的核心组件为 Subject. SecurityManager. Re ...
- .NET Core前后端分离快速开发框架(Core.3.0+AntdVue)
.NET Core前后端分离快速开发框架(Core.3.0+AntdVue) 目录 引言 简介 环境搭建 开发环境要求 基础数据库构建 数据库设计规范 运行 使用教程 全局配置 快速开发 管理员登录 ...
- Session与Token认证机制 前后端分离下如何登录
字号 1 Web登录涉及到知识点 1.1 HTTP无状态性 HTTP是无状态的,一次请求结束,连接断开,下次服务器再收到请求,它就不知道这个请求是哪个用户发过来的.当然它知道是哪个客户端地址发过来的 ...
- 如何使用Spring Securiry实现前后端分离项目的登录功能
如果不是前后端分离项目,使用SpringSecurity做登录功能会很省心,只要简单的几项配置,便可以轻松完成登录成功失败的处理,当访问需要认证的页面时,可以自动重定向到登录页面.但是前后端分离的项目 ...
- 实战!spring Boot security+JWT 前后端分离架构认证登录!
大家好,我是不才陈某~ 认证.授权是实战项目中必不可少的部分,而Spring Security则将作为首选安全组件,因此陈某新开了 <Spring Security 进阶> 这个专栏,写一 ...
随机推荐
- python利用pyinstaller打包简明教程
转自:https://www.jianshu.com/p/48f6dea265eb pyinstaller简明教程 安装pyinstaller pip install pyinstaller是最简单的 ...
- 2021年蓝桥杯python组真题-直线(细节+分析+代码)
题目 : 代码: #直线 M=[[x,y] for x in range(20) for y in range(21)] #创建二维列表:代表xy坐标系 d=set() #创建集合属性的容器:因为集合 ...
- 自学C#,要懂得善用MSDN
很多初学者学习编程,都会通过看别人写的教程.或者录制的视频,来学习. 这是一个非常好的途径,因为这个是非常高效的. 但是这样,存在两个问题: 1.教程不够全面:任何再好的教程,都无法囊括所有的知识点, ...
- chrome Dev Tools 性能分析 performance
chrome 的performance用来分析性能优化性能非常好用,下面以一个页面来举例 性能分析 性能分析最好使用隐私无痕模式,以保证干净的环境下,避免chrome插件对性能分析结果的影响 Perf ...
- Amazon S3 对象存储Java API操作记录(Minio与S3 SDK两种实现)
缘起 今年(2023年) 2月的时候做了个适配Amazon S3对象存储接口的需求,由于4月份自学考试临近,一直在备考就拖着没总结记录下,开发联调过程中也出现过一些奇葩的问题,最近人刚从考试缓过来顺手 ...
- C# 禁用窗口激活
如果界面点击时,不想让窗口激活,可以按如下操作: 1 public MainWindow() 2 { 3 InitializeComponent(); 4 SourceInitialized += O ...
- 【asp.net core】自定义模型绑定及其验证
引言 水此篇博客,依旧是来自群里的讨论,最后说到了,在方法参数自定义了一个特性,用来绑定模型,优先从Form取,如果为空,或者不存在,在从QueryString中获取并且绑定,然后闲着无聊,就水一篇博 ...
- 微擎删除分类无法删除解决-select in效率低解决办法
今天朋友微擎后台微网站里的分类要删除,可是怎么删除也不能删除,同样的系统另一套却可以迅速删除. 后来查询到是查询语句的问题,朋友的平台用户量太大,数据太大,用了以下语句,造成效率太低: SELECT ...
- 2022-11-24:小团在地图上放了3个定位装置,想依赖他们进行定位! 地图是一个n*n的棋盘, 有3个定位装置(x1,y1),(x2,y2),(x3,y3),每个值均在[1,n]内。 小团在(a,
2022-11-24:小团在地图上放了3个定位装置,想依赖他们进行定位! 地图是一个n*n的棋盘, 有3个定位装置(x1,y1),(x2,y2),(x3,y3),每个值均在[1,n]内. 小团在(a, ...
- 2020-10-21:go中channel的send流程是什么?
福哥答案2020-10-21: ***[评论](https://user.qzone.qq.com/3182319461/blog/1603234689)